UPDATE: An electronics designer, Shamus Husheer, from the UK contacted me. He found another, cheaper, solution to fix the Lumea battery Charging issue. You can find the post here.
A little DIY post that I like to share with you guys. My wife bought a Philips Lumea a couple of years ago. She didn’t use it for almost two years and it doesn’t charge anymore. If you don’t charge the batteries every 3 months, then the batteries are dead (as mentioned in the manual somewhere… ).
The problem with the Philips Lumea is that you can’t replace the batteries, the product is fully closed and you can’t buy a replacement battery pack. With a retail price of around € 350, I thought it was worth seeing if I can repair it. So I opened it up to see if I could replace the battery pack. And yes it’s possible.
Below is a small guide on how to open the Philips Lumea (use it at your own risk, if you don’t know what you’re doing, ask a specialist), creating the battery pack, and replace it. You will need to following items to create the battery pack:
- 2 Rechargeable Li-ion Battery UR18650W 3.7 1500mAh batteries with C type Tabs
- On Amazon: Samsung 18650
- On Ebay : Panasonic NCR18650B Rechargeable 18650

- Soldering Iron
- Soldering Tin
Opening the Philips Lumea
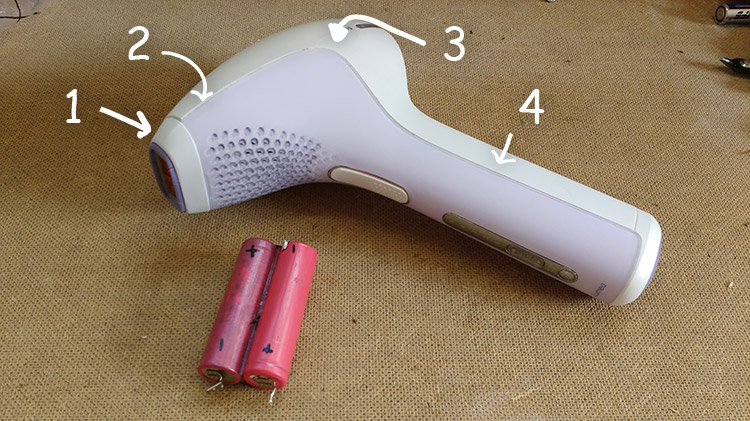
The Lumea is closed pretty tied, first you will have to take off the lens cover (1). This way you can wedge something small between the seal, starting at 2, and work your way down to 4. Take your time for this, because there are some thin wires right beneath the cover, between number 3 and 4, on this side of the Lumea.
Disconnecting the battery pack
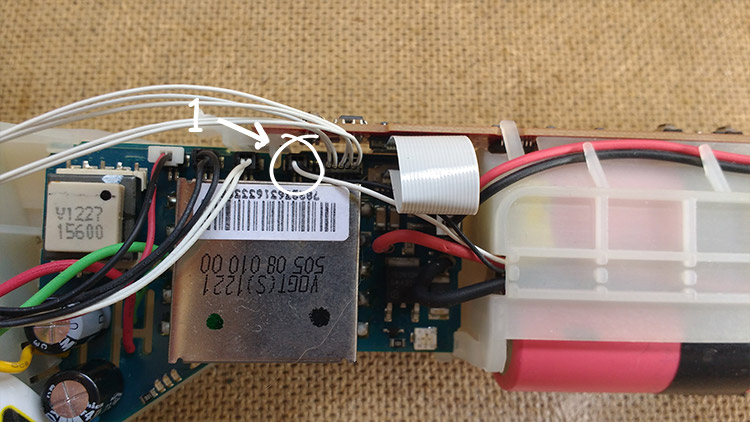
Once you opened the Lumea you can’t take out the battery pack yet, first, you will have to disconnect to PCM (protection circuit module) wire from the circuit board. You can just pull out the tiny connector shown in the image below. When done, you can disconnect the black and red wire on the battery pack itself and slide out the batteries.
Creating the new battery pack
As mentioned at the beginning, you will need 2 UR18650W batteries with C-type battery taps and a good soldering iron. The batteries may come pre-charged, so keep the covers on the positive side tabs until you are going to solder it.
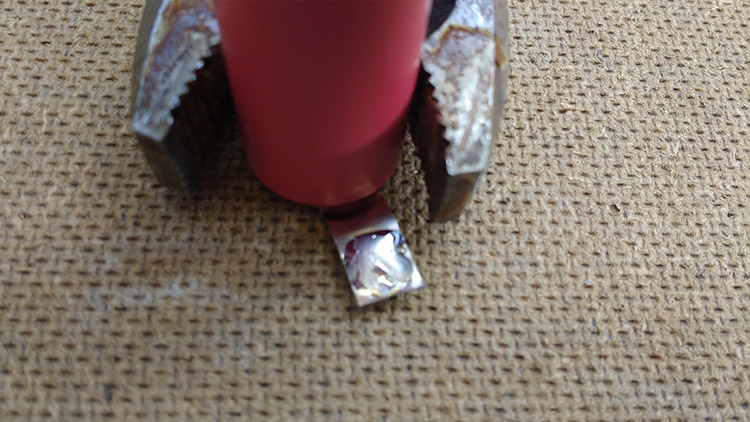
We need the PCM wire for the new battery pack, so first, you need to desolder the wire from the old battery pack. The wire is also glued in the center, use a small knife to cut it loose.
New battery pack creation in steps
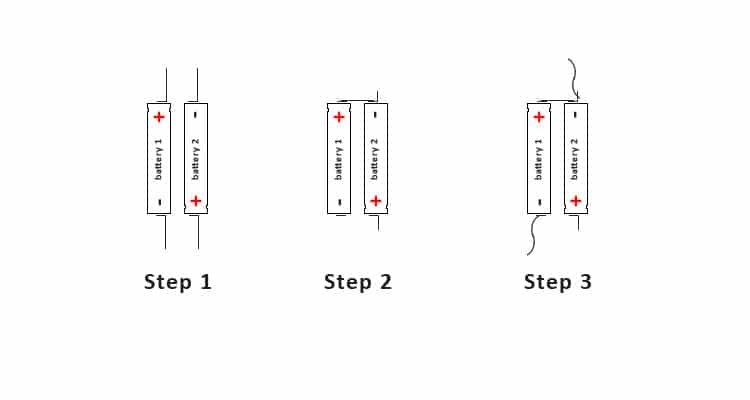
- Align the batteries
- Trip the long soldering tips to which you will connect the main wires and fold the other 2 tabs.
- Solder the tabs and connect to PCM wires as described below
For the new battery pack, we need to solder the positive and negative sides to each other. Trim the taps a little so they can overlap each other when the batteries are taped together. Then apply some tin to each tap where they make contact. Place the 2 together and apply some heat to it to solder the two taps.

Next, we need to reconnect the PCM wire, just simply solder the white and black where to the negative side of the batteries. When done you will have a similar result as below. As of last we need to adjust the taps for the main wires from the Lumea. I have chosen to cut them to the right size so I could reconnect the original connectors, but I have to say, they sit a bit loose, so you might want to solder them also.
When the battery pack is done, al is left the reassemble the Lumea. First, reconnect the black and white PCM wire, then the red wire, and last the black one. You might see a small spark when connecting the last wire, this is caused by the capacitor that will recharge.
Reassemble the cover, starting at 4, and work your way up to number 1.
If this article helped you to fix your Lumea, please donate a small fee to keep this site running so I can write and help others too. Thnx!
Disclaimer: The information in the post is provided as-is. Use it at your own risk. I assume no responsibility for any loss of life, property, equipment, bodily injury, money, time or other incurred directly or indirectly by using information on this website.


Hallo Rudy,
Bedankt voor dit artikel. Ik vroeg mij af of de volgende batterijen passend zijn voor de Philips Lumea? https://www.123accu.nl/UltraFire-18650-batterij-met-soldeerlippen-2-stuks-3-7-V-3000-mAh-i11094.html?gad_source=1&gclid=EAIaIQobChMIsqXEiOiHhQMVGAMGAB39PQtDEAQYAiABEgL3GPD_BwE
Daarnaast heb ik een vraag over de ‘step 3’ afbeelding uit de ‘new battery pack creaction’ tekening: Battery1 moet toch, net als battery2, ook een soldeerlip aan de onderzijde hebben om de stekkers aan te bevestigen?
Bedankt
Dat zijn inderdaad de juiste batterijen. En je hebt gelijk wat betreft de soldeerlip.
Bedankt!
Hi!
My Lumea is SC2003 model.
Symptoms: It starts, flashes 6 to 8 times…battery led blinks orange and automatically turns off. I started it again, 2 more flashes,and goes off again. And so on a few more times.
DC adapter nominal output is 8.5V 1.2 AH…but measured out voltage is 13V…that seems to be wrong…I will open the Lumea to check batteries, but I think I should not change them until getting a proper charger…or 13V is not so bad?
The internal charging circuit monitors the minimum voltage of 1 battery, if too low the charging process will not start. I brought the original batteries back to life by disconnecting the batteries from the internal charging circuit and reconnecting them to a pulse intelligent battery charger. The batteries then very slowly come back to life. It can take 24 hours or more for them to charge to 4.5 volts. After charging the batteries to over 4 volts (2 volts per battery) I reconnected them to the internal charging circuit and the normal charging process started immediately. So you don’t have to solder, just disconnect two connectors and connect them back to the batteries after the batteries have been revived.
Great!!
Thanks for saving me £400!!
This tiny connector is damage
I have replaced the batteries, they do charge correctly using the original power adapter but we can only use the device 8-9 times and it shuts itself off. I noticed a couple more people in this post who experienced the same issue.
Did anyone manage to fix that problem?
Note: I measured the charge of the batteries, which is ~8V.
I tried tried the connect a functioning regular battery to the batteries inside for 30 sec and it jumped into life. Suck a easy fix. Thanks for the suggestion! Look inthe comments for guide.
Did anyone try to replace the complete Battery by a permanent cabled power supply?
Can you put new links for batteries, I beg you! All of the sellers I’ve asked on Amazon, Aliexpress and eBay said they don’t have these batteries. I am so miserable…..
The Amazon link should work, it points to Tenergy batteries which will work. Can’t find them on ebay either at the moment.
You can also search on “18650 battery with tabs”
Hi Rudy,
I also replaced the batteries, however unfortunately I forgot to tape the end of the batteries At 1 end (+ side) at the bottom, so when I closed the Lumea it gave a shortage between the + of the battery and the – of the power entry point at the bottom of the machine, when I tried to charge it.
The machine still works however it won’t charge anymore. Or at least the green charging indicator won’t led up.
Does anybody has an idea what to do about it? Is it the adapter which is broken or perhaps a fuse in the machine itself which I can replace?
Thanks in advance for your reply!
Gr. Rutger
Hello Everyone,
You really don’t need to replace the batteries !!! The problem can be fixed in less than 1 minute (after opening the device and accessing the batteries).
The machine is programmed to NOT charge if it stays too long without being recharged. I watched this guy (link below) on how to simply create a voltage in an “apparently dead battery” and have the charger recognize it again and got my Lumia back.
When you open the device and can access the batteries, without disconnecting or desoldering anything, just connect a “good” normal AA battery to ONE of the 2 Lumia batteries: POSITIVE to POSITIVE and NEGATIVE to NEGATIVE. Hold it for 30 seconds (yes seconds). That creates around 1.5V on the “dead” battery which is then recognized by the device and as soon as you reconnect the charger, it starts charging the device as before. Be careful not to touch the Capacitor connections on the top where a warning sticker is. You could get an electric chock.
All the best,
Tony
Did you also see this article?
Yes I saw your article while I was looking for a solution. That’s why I thought it useful to add my experience. It is crazy how simple the solution is, but no on knows it.
How exactly do you connect the AA to the Lumia battery please? In the most basic of terms
Apparaat open gemaakt en met een AA batterij 1,6V de Lithium batterij opgeladen. Alvorens de batterij parallel te koppelen eerst het zwarte schuifschoentje losgemaakt en zoals omschreven eerst de ene positief op positief. Negatief op negatief en daarna de andere opgeladen. Tot mijn verbazing knippert nu weer het batterij symbool van opladen. Ben wel benieuwd naar het resultaat na een dag opladen. Proberen waard.
Hi Ruud
I finally managed to replace the batteries and now my machine is working. As a girl fixing this and having never soldered before it was tricky and some trial and error but all worthwhile in the end.
Thanks so much for your tutorial.
Helen
Thanks for the guide – I was able to fix my wife’s Lumea.
For those of you who are reporting that the device charges and switches on, but does not fire – I had this as well. Turned out I had not pushed the PCM wire connector back on firmly enough and it was loose. Once I shoved it down properly, it now fires.
Hi Ruud / Harry,
I also replaced the batteries, however unfortunately I forgot to tape the end of the batteries At 1 end (+ side) at the bottom, so when I closed the Lumea it gave a shortage between the + of the battery and the – of the power entry point at the bottom of the machine, when I tried to charge it.
The machine still works however it won’t charge anymore. The green charging indicator won’t led up.
Does anybody has an idea what to do about it? Is it the adapter which is broken or perhaps a fuse in the machine itself which I can replace?
Thanks in advance for your reply!
Gr. Rutger
Hi Ruud,
Thanks for the quidance on this problem.
With the update of Shamus, I managed to fix our old Lumea without buying anything.
Despite the good step-by-step and pictures, I also found the help of “MalaysianInUK” on youtube very helpfull with his video on how to open this device.
https://www.youtube.com/watch?v=t5rzynqzcMw
Many thanks!
Hye my lumea make the same problem if you have any ideas plzz let me know
Hi, rudy plzz help my lumea have this problem can you help me
I changed the batteries as described above but although heaving the batteries fully charged, after few triggers(~8-9) the device just shuts down. It can be immediately powered on again but after another 2-3 triggers it shuts down again. And the so on.
Any idea why it is behaving like this? Did anybody had this issue?
Hye change the batterie put
ICR 18650-26JM
SAMSUNG. SDIEM
THS2
I PUT THIS BATTERIE AND MY LUMEA WORKING WITHOUT SHUTDOWN
Hi Bach,
My battery is exactly the same you described. However, that problem is ongoing. There is something wrong there but I could not understand so far.
Hi,
I changed the batteries as described above but although heaving the batteries fully charged, after few triggers(~8-9) the device just shuts down. It can be immediately powered on again but after another 2-3 triggers it shuts down again. And the so on.
Any idea why it is behaving like this? Did anybody had this issue?
Hi,
Mine has the same issue and unfortunately, I couldn’ t find any solution. I guess the device is getting warmer and a circuit stops the device to save it. If you wait for enough time to cool it, the device runs again for few trigger (as you said, 8-9 times) again after powering on.
Anybody who solve this issue? Thanks a lot.
Thanks for this, very helpful.
One quick question.
I had a small spring fall out when I separated the unit.
Can you tell me where it goes please?
Thanks
Nigel
The battery replace did work! thanks for your DIY Manual.
The spring is to push back the trigger button (that fires the flashlight) in the original position. At the inside of this button you do see a small plastic stick. Simply put the spring around this small stick and assemble the device.
Hi Helen,
Sorry, but by now I have discarded the pictures.
Regards,
Serge.
Zelfde probleem hier accu’s zijn rond de 3,4 volt en met de weerstand truck krijg ik ze naar +/- 5 volt maar zodra ik dan de adapter weer via de normale wijze aansluit helaas geen groene of rode led dat ie aan het laden is. Tips? PS ik gebruik geen 2w weerstand maar 1/4 die word ook niet warm.
Zou je hiervoor ook een weerstand van 180 ohm met 3 watt ipv 2 watt kunnen gebruiken? Of is het dan niet meer veilig/werkt het niet meer?
Ik zou het echt niet weten, denk dat je dit het best even kan navragen bij een eletronica zaak.
Geen probleem.. wattage van een weerstand is puur om een wat hogere stroom te verwerken..
Hello, I bought Panasonic Ncr18650b, 3.7v-3400ma. I did everything as you described. At the end device is working but not charging with its original charger (output:8.5v-1.2a) 🙁 I also tried several types of charging equipment for ex. (Outputs) 5v 2A, 9v 200mA, 12v 1A.
What is your suggestion?
By the way, this device only used inside house. We don’t need to run it with battery power. Is there a solution to use it with only charging equipment? (I can remove batteries and can make easy electronic circuit developments.)
Thank you & Regards
Hi Rudy,
Is it really possible to open it in a clean way?
Didn’t manage to do it without leaving marks every time I used something to separate both parts…
Hello Everybody
Thanks to Rudy and all the shared experience I fixed my wife`s lumea
The first problem I had was the non charging problem, that I fixed whith the recharging batery tutorial using the 2 w resistor during 20 minutes.
After having a small but enough minimum charge, the lumea began to charge whith its own charger, the normal way, and i let it until the green light stop flashing. But then I was having the same problem than Robert ando others: when I press the on button it flickers the led from 1 power setting just for a fraction of second.
I noticed that if I let the lumea disconected from the charger for 5 minutes and plugging again, it began a new charge cicle. It took me 4 complete cicles and charger disconections to get the Lumea working properly. Now it´s everithing OK.
Thank to all of yours!
Thanks! Just saved €350,-
I like to share 2 additions, maybe you can add it to you tutorial.
1. The black wire on the protection circuit is equipped with a 10kohm NTC resistance. This is a resistor that will get less resistance the higher the temperature. Very likely that is used as overheating protection of the batteries. I have read in the comments that a 10k resistor is used by some. This can be dangerous since the thermal safety is gone! Might be good to mention this.
2. Under the device (at the charging connector) you can remove the small cover and you will find 2 screws. This makes it more easy to take the device apart.
does anyone know where to find replacement springs for the button? I seem to have lost mine in the disassembly.
Amazed that it works, thank you for all the advice on here!
Hi Ruud,
Many thanks for this article. I bought my Lumea years back and had this issue with it before. I actually found someone online to fix it for me because I did not know how to do it at the time. In the mean time, I learned a bit more about fixing stuff and I want to give it a go myself. This would be the second time the machine is fixed…I think the first time, the person who helped me simply “jump-started” it, just like your friend, in the other article. I opened the machine and the batteries are not replaced. However, this time they seem to have leaked. I can’t seem to find the same batteries you suggest with tabs on them. I found the same type on ebay, but with higher amperage: Sanyo 18650 FM / ZY 2600mAh 3.7v Li-Ion Rechargeable Battery Tabs Tags Tagged. From what I read, if the voltage is the same, the device will draw only as much amperage as needed and the battery will last longer. Did I get this right or is it a mistake to replace the old ones with these 2600mAh ones? If you do have time to answer me, I would like to say I really appreciate your advice. Many thanks again!
Ana
Hi Ana,
2600mAh will work just fine.
Hi, I tried the other method but this didn’t work for me, so will now try to replace the batteries. Do you have a UK link to compatible ones please?
Hi Nathalie,
These on Ebay will do fine
Hi Rudy, I have the same problem with my Lumea SC2003, can you send me a UK link for the batteries please? Many thanks.
These on Ebay will do fine.
If you replace the battery please be carefull with the 10K ohm ntc that is glued on the old battery between the thin black pcm wire. If you connect the thin black wire direct to the negative side battery, without the ntc, the charging light wil flash but it is not charging. The battery charcher is than in protecting mode and thinks that the battery is overheated. Just check with a voltmeter over the battery if it is charging or not.
Hello, I also destroyed this resistor component which was hardly glued on the battery and connexion very fragile. Is it a simple resistor 10K Ohm ? Thanks
Yes, I think it indeed is a simple 10K Ohm resistor.
Hi Rudd,
Thanks for your follow-up.
In the comments one said it is a 10K Ohm with 3380 NTC ?
Do you know what it means ?
Thanks
Claude
Rudy,
It did work well with changing the batteries and putting a 10K Ohms 3380 NTC Thermistor.
Thanks a lot for your blog and your explanations.
Cheers
Claude
Hello! I bought the battery and tried to make the switch, but it did not work. It does not load and when I click the button it only blinks green where Level 1 is. Do you have any idea what it might be?
Hi Juliane ,
How are you , did you find the reason ?
Did you repair your Lumea ,
i have the same Issue , charging but wont start , Just singl short blink on level 1 evry time i press the power button .
https://uploads.disquscdn.com/images/2efb358e05ebad8d620c8ccf50762a54d7757078bc90b679a02dde34ca7a3741.jpg https://uploads.disquscdn.com/images/3af17e421f7f11cbefab49e325ccba17b389cc4d381336e5580597f809120136.jpg Hi,
Previosly I had SE US18650VT batteries and I had changed it to INR18650-25R. I’m using original charger 8,5V 1,2A – but true is 14V 1,96A. Problem is that won’t charging them, led is flashing but after 24h still fliashing and voltage on battery is 7,3V like before charginrg.
I re-assembled battery pack on old ones (were working before) and the same problem – no charging at all.
Hello, and thanks for sharing this information.
I wanted to ask you, why is it important to remove the PCM first, does it matter the order?
You can’t pullout the batteries when the PCM wire is connected to the circuitboard.
Hi Rudy, I’ve tried the first option without replacing the batteries, but it didn’t work 🙁 So I will try replacing them. Can you send me a UK link for the batteries please. Many thanks.
These should work: http://amzn.to/2ImysA6
Ordered. Thank you.
Ruud
Will it be good working if I put 3.000mah batterys?
Hi Maya,
It should work.
Hello Rudy
Please help me with this.
My wife bought a Lumea Precision Plus down to eBay. It was in used condition but unfortunately there was no power at all.
We put it on charge and it seems that charging led it is flashing. After pulling the unit apart, I have checked the battery and it looks like they are charging around 0.01 v per second or even faster currently I can read on multimeter around 4.50 v. However the green light is flashing and we really don’t know if this is normal or it should stay on.
When press the on button while charging nothing happens. If I unconnect the charger and press the button the led from the power setting 1 it flickers for a fraction of a second.
It looks like it will start but something wrong.
What would you advice to do?
I have checked the wires and they looks good.
Should we get some replacement battery even so this ones looks good?
Thanks
Hi,
unfortunately I destroyd the smal black fuse ;–( .
Can you please tell me which fuse (exakt details) I should take as replacement of the destroyd ohne. Do I need also a resistor (180 Ohm)?
Thanks
Dari
Hi Rudy, I have the same problem with my Lumea SC2006/11, can you send me a UK link for the batteries please? Many thanks.
Here on Amazon http://amzn.to/2EocHlt or these on Ebay https://tinyurl.com/yahwle6j
Lovely, thanks 🙂
Neither of those pages currently exist.
HI, here is another link: https://amzn.to/39mrP0L
Hi guys, I too had a defect battery and I bought 2 new once at Ali expres. there is a wide variety of batteries available. I got mine from https://nl.aliexpress.com/item/1x-18650-3-7V-2-2AH-Li-ion-Rechargeable-Battery-w-tabs-For-Loudspeaker-Flashligt/32611000976.html
I soldered the 2 batts together (one side only) and installed the new batteries today and it is all working fine 🙂
I have one comment to your explanation. in your step 2 and 3 you draw the bottom side of the batteries together, this is to my opinion wrong only the top of the batteries (+ of 1 and – from 2) should be joint together. in your drawing it looks like you connected the bottom together….
You are right, one side should only be connected. I will fix the image later today.
Hello,
Thank you for the tutorial, i’ll keep it for later.
However, my wife’s lumea sc2001/00 is starting but the ready led never turn on green and no flash is emmited when i press the trigger 🙁
Do you have a possible solution for that issue ?
Image is updated!
Rudy,
Thanks a lot for your guide!. I managed even to use 18650 batteries with an integrated protection chip, which are like 4mm longer. Was pretty tight though, when closing it again. So hopefully this should intrinsically protect the batteries from discharging too much. I also made a lot of pictures during the process of opening of the device. These also show where the various locking lips/ hooks are located (and which need to be bent open gently when opening the device). I could share these with you if you like, so you can put the ones to your liking to the site.
Hi Serge
Please can you share your pictures. I am trying to fix my machine and a little nervous☺️
Hey Rudy, do you think the lumea could run directly on the adapter? Or would the PCM interfere?
I don’t think it would run with the adapter.
Thanks for your help Rudy, could you tell me where this piece is from? https://uploads.disquscdn.com/images/b07b3267235d9ac419405ec0abfe88b4ba4fccf0451bc81d661e50cc35e715c5.jpg
did you ever find out where it came from, i have the same issue trying to find where the spring goes
In case anyone else is having this issue: the little spring is part of the white ‘zap’ button. Goes onto a white pin sticking out on the inside. (Replaced the battery pack in mine today and wouldn’t have noticed the spring had come off if this question hadn’t been posted, so thanks 😀 )
Hi Rudy, thanks for the great article!
We also found our lumea dead after leaving it too long, and found it unresponsive. I assumed dead batteries so i ordered some nitecore NL1832 2300mah 18650 cells. 3.7v like the old ones, and 8.5Wh. The nitecores have an overprotection circuit of their own. Button tops, which got me into a little trouble fitting them. But when i did, the lumea came back to life and was superfast! However, when i tried to charge it the green charging light blinked but the batteries wouldnt charge. However long i kept it plugged in. After that i kept it lying around again for half a year before i got around to trying again. Thats when i found your article online. I took the lumea apart, checked the wiring and found a break in the white pcm wire. Hurrah! Fixed that and tried charging again but still no dice. Also tried another (new) charger at 9v and 2A, but same thing. Maybe dead batteries again after 6 months? So i tried the slow recharge trick with a resistor, got the nitecores back to 3,4v but still the lumea wouldnt start charging. Still the blinking charging light though. For good measure i ordered some Panasonic UR18650AA 2050Mah’s which got the lumea running again. But still same problem. Maybe you can think of anything else i overlooked?
Sincerely Job
Hi Job,
My first response was the two overprotection modules are the problem here. One on the batteries and one build in the Lume, but after reading your post again, you used other batteries the second time (without build-in pcm).
Are you sure you connected the black and white wires the correct way? If you read the other comments you will noticed that it’s one of the most common mistakes.
Hi Ruud,
Thank you for your reply.
Yes i read all the comments, which were very helpfull. I am pretty sure i did connect the wires right. Also i always take pictures when i take things apart. I have added some before and after pics. Evenso i will check again. Do you think the Lumea could run wired? Without the batteries?
Thanks again.
Greets Job
https://uploads.disquscdn.com/images/f3fbf1c5fd9f08ddd0b21a61ce854f8b395803e65de0d5e74706f646e42fb7bd.jpg https://uploads.disquscdn.com/images/9b28997af5ad0660b4017c7ffea1641d5f356f78fcd31b77e4038e016a7c96c7.jpg
Excuse me intrudeta but apparently their batteries are not connected in series
Hi Cachito, i wish it were that simple, but they are. The connection between the plus and minus is at the other end. Which is not seen on the pictures. The pictures are made before and after i changed the battery pack. From the top end of the old and new battery pack. Not the top and bottom of the same pack. Thanks for taking the time to help nonetheless.
I have tested my charger and it is putting out almost 13v (against a listed 8.5V) and almost 2 amps (against a listed 1.2A. Cleary chargers do vary around a number, but is this so far off that it would stop the batteries being charged. I pulled the unit apart and did the direct battery charge with the resistor put it all back together – and it worked for a while – now it still seems to be not working. I quickly press the on button repeatedly and get a flicker against the “1” setting – but that is about all. If I plug the lead in it occasionally shows the charging light for a while – but even that seems to have stopped now? Ideas? Please.
I have exactly the same problem.
I pulled the unit apart and checked the battery. It looks that they are charging fine. However when I press the on button it flickers the led from 1 power setting just for a fraction of second. Did you find out what the problem was? Or does anybody know what can I do ?
Thanks
Robert, have not found out what the problem is. It just sits on the desk in front of me – not doing a lot. What I do find is that I have it plugged into the (apple) computer and often when the computer is warmed up from a sleep the Lumea starts showing its charging light. It goes on for a while but when either the charge light says full – or it is no longer charging, I pull the cable out, try to use it – and the 1st power setting just flickers – much as yours does. I bought a cable for charging it from a computer thinking perhaps it was the plug charger that was faulty – but it has made no difference. I thought perhaps only one of the batteries was trying to charge – but from what you have said it is not that. It does seem that it wants to go, but I suspect something internally / electronic. I pulled it apart a few times, charged the battery for a while according to the description here and it worked (for a short period), so then thought to try and charge it the normal way – but nada. Sat here patiently, much like yourself – waiting for someone to come along with some bright ideas. Where’s the kettle…………
I have fixed mine.
I had in on original charger until the battery was around 6 volts.
Than I have used an usb iPhone charger cable which I have cut it.
I have used the red and white cables and connect the to the charging port at the lumea. Red in the middle and white on the earth.
The charger I have used it was 5v and 2 amp.
I have left it for around 1 hour. After that I have connected the original charger and it was all good.
Now is running good.
Home it will help you
Thanks
Can you eleborate it more. How to connect to the charging port at lumea?
I lost the original charger and bought a replacement charger with 8.5V output voltage. First I solved the battery problem. I disassembled the device, took out the batteries and charged one by one with a 18650 Li-Ion charger, and then put all together. After first use, when the batteries were discharged, it was no longer possible to charge them. Led did not blink, just lighted, as if the batteries was full.
After reading your post, I realized that the voltage of 8.5V is too low. I plugged a 12V adapter and charging works. 🙂
I looked at the printed board and found that the charge was controlled by the LT3650-8.4
Integrated circuit. According to datasheet, IC required 11.5V minimum start-up voltage.
So these 8.5V written on the original charger are nonsence.
Just confused me when trying to find a fault, and I also bought a 8.5V charger that is now useless to me.
Obviously, this almost 13V on your charger is a normal voltage.
.
LT3650-8.4 integrated circuit datasheet: https://www.analog.com/media/en/technical-documentation/data-sheets/36508284fd.pdf
I have a model SC2001 with freshly replaced and charged batteries but not charging with original charger. Did not find the LT3650-8.4 ! Which is your model number?
Does anybody know about the battery management system / charging controler of the SC2001?
Hello, excuse my English since I use a translator.
Maybe you can help me.
I was able to fix my wife’s machine, with your battery tutorial.
It worked for a while, but now I have 2 new problems:
1- It does not charge, so I remove the batteries and charge them with a separate charger.
2- The laser is not activated, this model has a protection that when you support it on the skin a light is turned on so you can use it and now it does not work, the machine turns on, but it does not do its function.
Batteries that are not charging could be a faulty adapter. Check this youtube video to test your adapter: https://www.youtube.com/watch?v=LnTxs0o5CJA
The laser: I have no idea, sorry. Could be a faulty sensor or maybe a wire / connection that got loose after you opened the Lumea. That where I should start looking.
It is rare what happens to the machine. The fan turns on and I can select the level with the selector but it does not turn on the backlight so the laser can fire.
Discard the charger and the charging pin as well, remove the batteries again to charge it with an external charger and then try again.
Query: the black and white cable is indistinct in which negative pole of each battery when placing?
Is does matter how you connect the black and white cable: http://disq.us/p/1m6rxg9
https://uploads.disquscdn.com/images/1e76870ccc769f2f01d7a9b3bac34b22fa38236e68c8bf293d13f66b7bd90277.jpg
Perfect, can you tell me where this spring is from?
https://uploads.disquscdn.com/images/ce3d4708b628ccdda2777ec85880d80bc90acc876e5b599468d0d1ce411c9419.jpg
The protection was made with 4 microswitches, very simple. If one of them is not turned on, no green light is illuminated and the IPL is not working. The switch can be obstructed.
Here is the picture of the top two switches.
Thank you for your help.
Apparently when the battery is not at its maximum load the machine does not turn on the light of shooting but it turns on the fan.
This I could check leaving the 4 microswitches tight with tape.
Now I have the problem with a very small spring that can not find its place in the machine, publish a photo above.
I think the spring is from main shooting switch.
Hey Rudy, Thx for the coaching! I’m ready to begin with but the batteries I have are BRC 18650 4000mAh 3.7V li-ion. Do you think that it will work? Thank you!
It could work. The 4000mAh will probably result in a longer usage without charging. You can also check this post https://lazyadmin.nl/diy/fixing-your-lumea-battery-charging-issue-for-less-than-11e1/ to see if you can revive the old batteries
Thank You!!!! it worked!
All the Best!
Hi All,
Just read Shamus Husheer’s method and I’m a little confused. He says ‘Hold the outer ring of the charger barrel against the black (negative) terminal’. Being a bit dumb, can anyone tell me what that means? A picture would be great. Thanks in advance, Clever People.
Hi,
can anyone tell me what kind of PCM is in pack? Mine was damaged and it is not possible to measure resistance.
hello i use notebook battery b18650ca x2 3.7v 1650mha but the light of chargue never stops any solution? thanks a lot
Hi Rudy, just tried this. I installed the new batteries and tested it – everything was working fine. But my soldering on the batteries wasn’t the best, so I took the contacts off and re-soldered them. The only problem was that I got the + and – mixed up. When I connected the black wire, there was a little spark (as described above) but the device didn’t work. I swapped the contacts over when I realised what I’d done – but there’s still nothing. Could I have blown a fuse or something? If so, where is it so that I can replace it? Thanks!
I did exactly that! there was a minor spark. I don’t think the device is damaged. Just check your adapter that it is the correct voltage. The charger that lumea comes with won’t work with these batteries.
Hi Ali, the charger that came with it seemed to be working fine when I connected it the right way round – just not anymore.
Thanks for the “How To” I bought a device with the battery already dead and replaced it.
I was a little confused with attaching the new battery’s pictures and ended up connecting both side + and – to each other resulting in a burning experience (should have known this though).
Also I couldn’t get the soldering tin to stick to the wires/connectors of the new battery tabs, tried sanding the tabs but it wouldn’t stick to it, was using a 120watt soldering station.
In the end i gave up because the battery’s where getting too hot from the soldering attempt, just taped the contact’s to the battery.
Now the device does work with the new battery, and I hope it will for some time.
Because I bought the device with a dead battery and never used it, I found it strange that as soon as you turn on the device the fan immediately starts.
Is that normal?
Yes, that is normal
Ti les vre mpougatsokefalo ork.
Hi Rudd, im struggling to get hold the batteries online on. Do you have any other links or reccomendations. I am based in the uk and i have no clue with the battery type. I am so grateful for your post as i was close to giving up on the lumea.
Thank you
Dil
Hi Dil,
I see that they Ebay item is gone. The batteries with soldering tapes are hard to find indeed. I found them here at Amazon : http://amzn.to/2xlsdKO, but they are quite expensive though.
These here on Ebay should work also : https://goo.gl/b4DDVE or https://goo.gl/oeSRjs
The mAH are higher, but that should not be a problem I think.
Hi Ana,
I thought that I already replied to you last question, but it seems that something gone wrong. Sorry about that.
I am not 100% sure about this, but I would keep the resistor and fuse. The fuse is there to protected the Lumea in case of a surge spike, so that won’t do any harm. The resistor reduces current flow or adjust signal level so keep it there and give it a go. Please lets us know how it worked out for you.
Hi,
unfortunately I destroyd the smal black fuse ;–( .
Can you please tell me which fuse (exakt details) I should take as replacement of the destroyd ohne. Do I need also a resistor (180 Ohm)?
Thanks
Dari
Hi Dari,
I am not an electronics expert, so I have no idea which fuse we are talking about and with what you need to replace it. I suggest you take the fuse to the local electronics shop to find an exact replacement.
Hi,
thank You first for answering my email.
I mean the smal black piece whitch ist glued between the Batteries and is solded on the Black thin wire whitch connect the negative pole of the battery to the PCM.
What kind of part is this? I thought this is a fuse!
Best regards
sounds more like an resistor. Something just like this: https://lazyadmin.nl/diy/replacing-battery-in-a-philips-lumea/#comment-3348059975
I mean this smal black part!
It was damaged during dismantling the old Batteries!
https://uploads.disquscdn.com/images/08a5335a5f1c0c19f1159ffd178f2b6a527bed59d4814e83b5837a43778eb390.jpg
https://uploads.disquscdn.com/images/69439830c2c2bab0f67e5687ece045bfbc176e043cfff20c7ad2d7f6a77b7e1a.jpg
https://uploads.disquscdn.com/images/aa092986667f24601bf4bb28a73262c37f4e7824ce38c80c85e352cf587ab4d3.jpg
hmm I have no idea what that is.. 🙁
Could it be a heat Sensor, to protect the batteries?
It could also be a heat sensor for monitoring the temperature of the batteries!
It is 10kΩ B = 3380 NTC thermistor.
Sorry but I didn’t see your answer either… I kept the fuse and resistor and everything went OK. It’s working smoothly. Just a reminder… While we are unmounting the Lumea everything is safe to touch because there is no power, but when the batteries are connected back, be careful. I got zapped hovering my hand over the ⚠️ sign. I was simply not paying much attention.
Good reminder to charge mine as it has been off for a couple of months.
Thanks for your help!!
Hi Rudy, found your remedy on first search, think I can do this. And well done Ana. most I can understand until you get to making the battery pack, any chance on some pics or drawings to do it step by step , taking into account 60+ female ie what is the resistor and where is it. In my manual it says to remove batteries open the bottom at the charger entry ? is it worth a try doing that way.
Hi Karen,
Not all the models have the resistor, but I marked it red in the picture of Ana:
https://uploads.disquscdn.com/images/ec62ed8cf1cc52ad31029a8fb3518ca31afa84df9f9bf68765c650d0cb801e6c.jpg
What model Lumea do you have? If you can remove the battery pack through the bottom, then yes try it that way first.
I will see if I can enlighten the battery pack creation 😉
Hi Karen,
I added a small schema for creating the battery pack. Hope that this will help you getting started.
Rudd,
I am not going to change the batteries because I have had some news from Philips after I gave them my thoughts on their manual.
Can not say what but all good news for me.
I have mentioned you on Mumsnet so I think more will trying your fix. Well done.
Regards Karen
Hi Karen,
Good to here Philips came up with a solution that worked for you.
Regards, Ruud
hello , when u contact the support of philips they will say that if you change batteries that will not work, but in reality it will , i change the sanyo batterie inside 3.7 v 1500 mah to 3.7 3800 and it wors fine and great !
Hi Rudy, https://uploads.disquscdn.com/images/0c8810d4185e44d5fa62effebe13b4435b7c8a6ab20ba4f73895bfb450730d2e.jpg
First woman trying to fix her lumea by herself. I’ve found that mine has a little resistor in it. Should I keep it for the new battery pack? Or should I just cut the black and white wires and solder it to + and -?
Thanks so much for your help, Philips technical service simply doesn’t take care of it.
Thanks again!!
Ana.
If you got the same batteries as you have now, then you should keep the resistor. But the Sony you got, US18650VT is hard to find. These on Ebay come close to it: goo.gl/wqTidO.
Hi Rudy – thanks for the post. I did not connect the thin PCM wires. Is it really required? Lumea is working now. But the LED is blinking in Orange color. The battery light flashes green when connected to the charger. Can it be ignored? Thanks – Binu
Hi Binu, the PCM wires are really required and you should connect them. The PCM or PCB will prevent the batteries from catching on fire, exploding or receiving damage in any other way. It protects the batteries from overcharging or over draining. So yes, really connect the wires, using the Lumea without it is not save.
Hi Rudy, Thanks a lot for sharing. Your DIY post was real help for people like me.
Thanks – Binu
Hi Rudy – thanks for the post. I changed the batteries as discussed and my wife’s Lumea sprang to life. Unfortunately it won’t now take a charge (i.e. when i plug it in to either of two (tested) chargers, the battery light doesn’t flash (which it should) and the lumea still works (which it shouldn’t when charging)). Do you know what I may have done wrong or what I should try? Thanks
James
When you take out the inner part of the Lumea, there is a small power jack for the adapter at the bottom. Maybe you accidently disconnected it. That could be the only reason why the Lumea is not recognizing the adapter.
That was it – the little white internal connector. Thanks.
Clad I could help.
Hi Rudy,
thank you so for these instructions first of all. I’m having the same problem as clapham_boy but can’t see anything disconnected. Do either of you have any advice please? Thank you!
https://uploads.disquscdn.com/images/a74c94948ccc92857adf4491ebfe257afc0ae0c0d65c0763c7ef1c33d6dc242f.jpg
Hi Irene,
So far I can tell from here every seems to be fine. did you check if the adapter is working? https://www.google.nl/search?q=how+to+test+adapter+with+multimeter&rlz=1C1GGRV_enNL748NL748&oq=howto+test+adapter&aqs=chrome.2.69i57j0l5.4127j0j7&sourceid=chrome&ie=UTF-8
Hi Rudy, thanks for replying so quickly! 🙂
The charger is fine – someone tested it and it’s ok.
However, I found a video in youtube of someone who’s also changed the batteries to their Lumea and he says he needed to change the charger to a 5v 2A one…not sure why, someone already asked him the question a few days ago but he hasn’t replied yet (https://www.youtube.com/watch?v=jso6978eI1c) I can’t see why that would work but I’m waiting to see if and what he replies. Thanks again for all your help! Best wishes
He is using a different type of batteries then original, that’s why he needs another type of charger.
What type of batteries did you replace them with?
Hi again,
Well, he says the original ones were 4.2 and were replaced by 3.7v – which he is now charging with a 5v 2A charger. The original batteries in my machine were 3.7v and so are the new ones. The original charger is 8.5v (1.2A)…sorry, I must sound so dumb! I really don’t know anything about these things to understand why, or even if, replacing the charger for a 5v would work too…I guess I should just get one and try…and if it doesn’t work, sit in a corner and sulk! – and maybe later consider getting a new machine :/
Once again, thank you so much for all your help and taking time out of your day to reply to these posts. Thank you!
Looking at your picture of your batteries: did you connect the the PCM wires correct? I noticed in the comments that there are different type of batteries packs, but with the one with I had the black and white wires were connected in opposite way. (both to the negative side of the batteries).
If you PCM wires are connected the wrong way, the batteries won’t charge. The PCM will protect your batteries from overcharging.
I think you might have solved my problem! Mine was also on the opposite side from the other two. I didn’t repair this myself but took it to an electronics repair shop. I did notice the white wire was now soldered on the same side as the red and black wires, but didn’t think much of it – they are the experts, so didn’t question it! I’ll take it back to the shop next week and ask them to re-position it…hopefully that will do it! I’ll let you know the outcome! THANK YOU SO MUCH! 🙂
Glad I could help and please let me known the outcome!
Hi Rudy! sorry for taking this long to give an update. I took the machine to the electronics repair shop and they repositioned the white wire….still nothing 🙁 the guy tested the charger again – it was fine, an even tried a new one from the shop…no luck either. I think when the batteries died they must have caused some damage to the other components as one of them had leaked a fair bit. So, reluctantly i have bought myself a new machine…this one, I’ll remember to charge once a month!!! – already have a reminder on my phone!
I any case, thank you so much for all your help. You are a star! Thank you!!! Best wishes, Irene
Hi Irene, that is my video. The model of Lumea my wife had was a different model to the one in this article. The batteries in my wife lumea were 4.2 Volts, which are no where to be found! Were your original batteries 3.7 volts? Can you also post a picture of the adapter that came with your lumea? It will also say on it what voltage and amps it produces. It is important to know that information. based on that information you can try a different charger with perhaps more voltage. Lastly, I am not sure how much the electrician is charging you for the repair but I hope he tested the batteries independently to ensure they were working in isolation. You can try buying these batteries as well (if its not too costly) http://www.ebay.com/itm/2PCS-Sanyo-Rechargeable-Li-ion-Battery-Cell-UR18650AA-3-6V-3-7-2200mAh/322270518352?_trkparms=aid%3D555018%26algo%3DPL.SIM%26ao%3D2%26asc%3D41375%26meid%3D8ca6a1eed91d413f9aaed9f1ae69b761%26pid%3D100012%26rk%3D2%26rkt%3D9%26sd%3D320883669285&_trksid=p2047675.c100012.m1985
Hi Rudy, thank you so much for these instructions first of all. I’m having the same problem as clapham_boy but can’t see anything disconnected. Do either of you have any advice please? Thank you!
https://uploads.disquscdn.com/images/a74c94948ccc92857adf4491ebfe257afc0ae0c0d65c0763c7ef1c33d6dc242f.jpg