The Unifi Camera is a really good choice. They are priced really nice and deliver high-quality video recordings. But you need a device to record the videos on, an NVR. Now you could buy the Unifi NVR, but they are pretty expensive if you only want to record a couple of cameras at home or at the office. If you have a Synology NAS, then you can connect your Unifi Camera to the Synology Surveillance Station.
Note
This article is about the older Unifi Camera’s. Not all Unifi Protect camera’s can be used on Synology Surveillance Station. Read more about Unifi Protect in this article.
With the Surveillance Station, you can record videos based on motion or time, send alerts when motion is detected, and save the recording for a given amount of time. In this article, I will help you add the Unifi Camera to the Synology Surveillance Station.
Installing Synology Surveillance Station
We are going to install the Surveillance Station first on the Synology.
- Login to your Synology and open the Package Center.
- Search for Surveillance and install the Surveillance Station

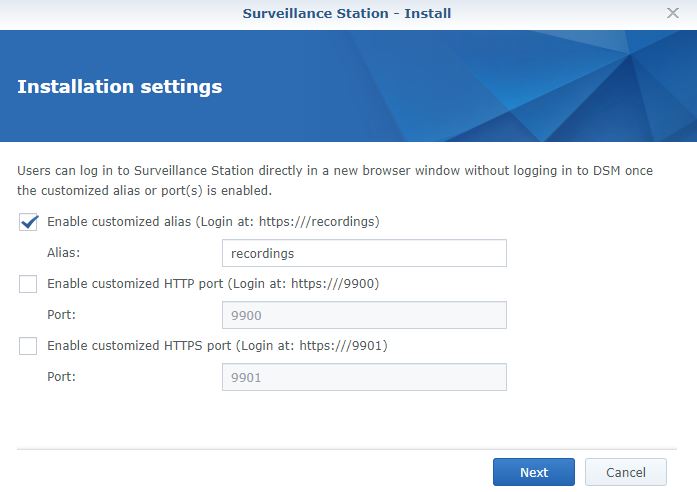
You can access the Surveillance Station directly without first logging into your NAS. During the installation, you can set up an alias of a different port so you can access the Surveillance Station directly from your browser.
The installation may take a couple of minutes. So we leave the browser open and continue with preparing the Unifi Camera.
Preparing the Unifi Camera
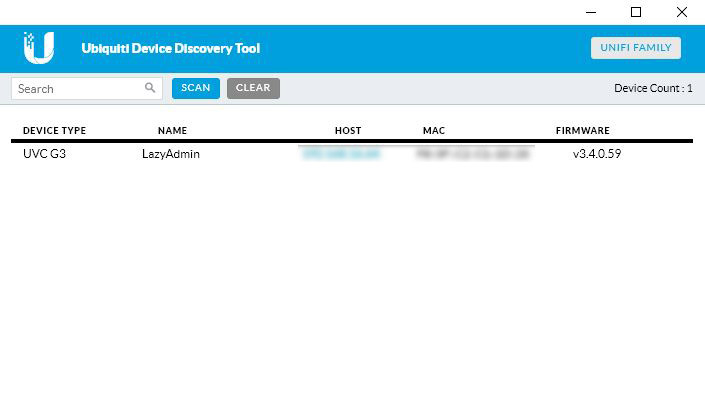
We are going to set a static Ip Address for the camera, change the default login, and lookup the RTSP URL. If you have connected your Unifi Camera to your network, but you don’t know its IP Address, then you can use the UBNT discovery tool to find it. Download the discovery tool from the Chrome Webstore. It will find your camera in seconds.
Setting a Static Ip Address
If you have found the camera with the Discovery Tool, then click on the Host address to open the browser. If you know its IP address, then open your browser and navigate to the IP address of the camera. The default login of the Unifi Camera is username ubnt and password ubnt.

By default, the camera is set on DHCP mode. This way the camera gets a random IP Address from your router every time it reboots. If we leave it at DHCP, then the connection with the Surveillance Station will be lost after a reboot.
- Click on the Network tab
On the right side, you will see the current network information - Select Static
- Enter an IP Address, for example, 192.168.1.210. (the first 3 parts of the IP Address should stay the same as it was before)
- Enter the same gateway as you see on the right side
- Same for DNS
- Click on Save Changes
Your camera will now be available on the new IP Address. So navigate to the new address to open the camera settings.
Change the default camera login
While we are logged into the camera, is it also a good moment to change the default login. Just like any other piece of network equipment is it important to change the default credentials. This will reduce the possibility that some gain access to your network.
- Open the System tab
- Enter the old password (ubnt)
- Enter a new strong password
- It’s also a good practice to change the default username. This will make it even harder to gain access.
Get the RTSP URL
The last part is to get the RTSP URL. We need this URL to add the camera to the Surveillance Station. You will find the URL on the Configure Tab of the Unifi Camera.
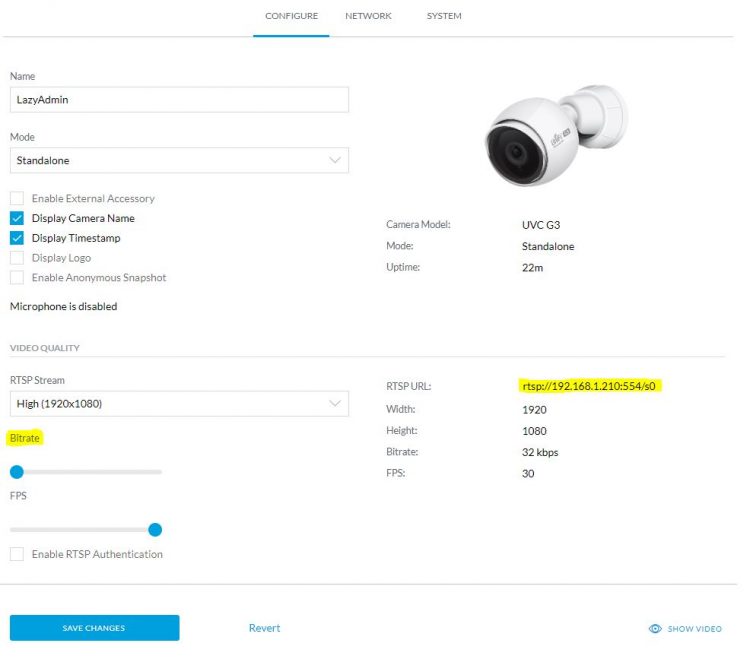
Some have trouble adding the camera to the Surveillance Station. The camera won’t connect or doesn’t show the video stream. To solve this you will have to lower the Bitrate to below 1000 (default is 6000). So if you have trouble adding the camera in the next steps, just go back to the Configure page of the camera and lower the bitrate. You can turn it back up to 6000 if the camera is connected.
Adding the Unifi Camera to the Surveillance Station
The installation of the Surveillance Station should be done by now. Open it and click on Add Camera to get started. The Add Camera Wizard will show:
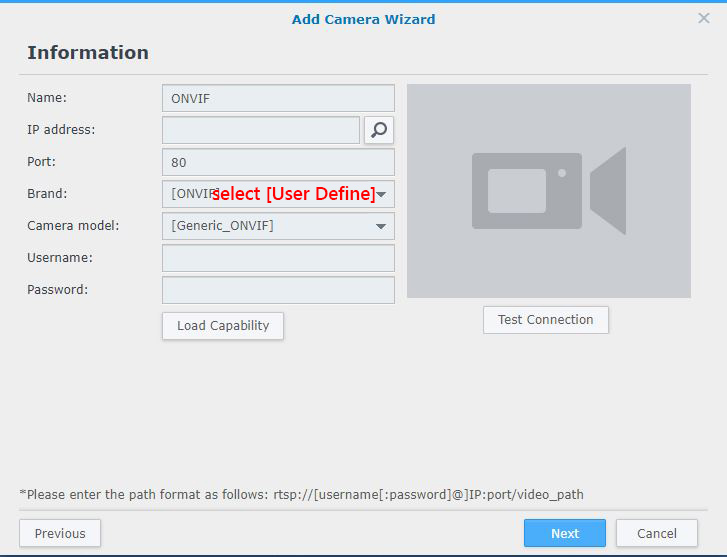
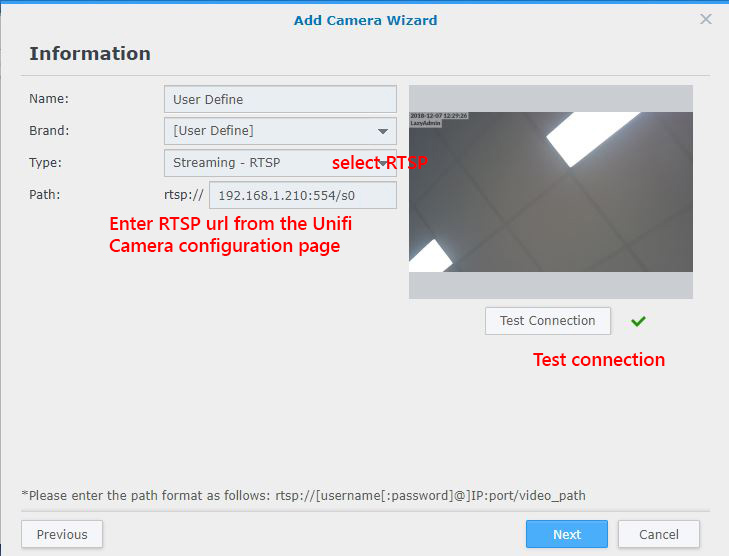
- First, you need to change the Brand to [User Define]
The information page will change:
- Set Type to Streaming – RTSP
- Enter the path, here you will copy / paste the RTSP stream URL.
- Click on Test Connection. You should see the camera feed.
- Click on Next
- Leave everything on default on the Video page and click on Next
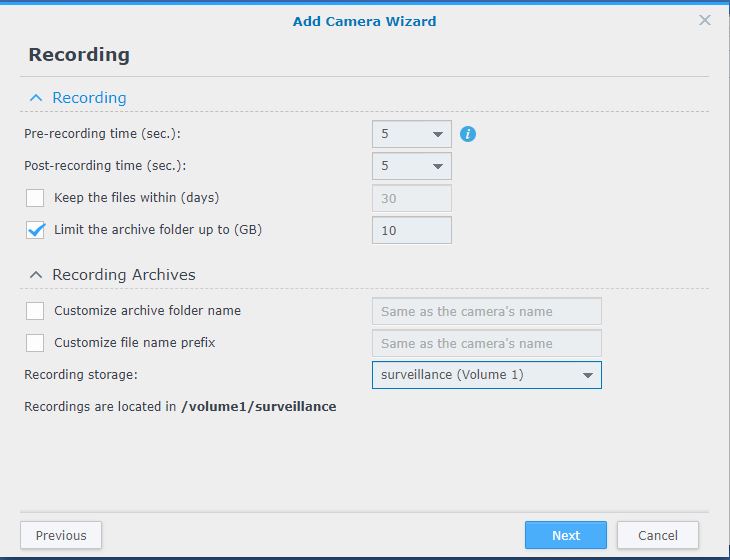
- On the Recording page you can change some settings if you like:

- The Pre-recording time is the amount of seconds before an event will be stored. Keep 3 seconds as a minimum.
- Post-recording is the time after an event.
- You can choose to delete the files after x days. If you live in the EU and you use this in a business environment then you need to delete it after 30 days because of the GDPR Law
- Limit the amount of data. Make sure that the recording can’t take up all the space on your NAS.
- On the last page, you can schedule when the camera needs to start recording. I have set it to record on motion only.


The camera is now added to the Synology Surveillance Station. You can now watch the live stream, or if you set it to motion only, you can set up the Motion Detection Area.
Set Motion Detection Area
You may only want to start recording when a specific door is opened or when someone is walking up to your driveway. To do this we can define a motion detection area. Select the camera and click on Edit.
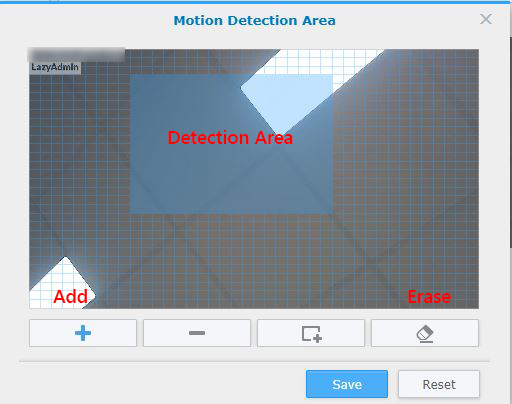
- Go to Event Detection
- Click Edit Detection Area
- First area all
- Click on the plus icon
- Drag over an area that you would like to detect.
Conclusion
If you want to record multiple cameras and you have the budget for it, I really recommend going for the Unifi NVR. The NVR allows you to keep your camera up-to-date and the motion detection area tool in the Unifi NVR is more advanced. Nevertheless, if you have a Synology and only need to record a couple of cameras, then the surveillance station is a really good option.
Looking up recording in the timeline tool is really easy, the event notification is working perfect,ly and adding a camera is done in a couple of minutes.
Hope you found this guide useful, if you have any questions, just drop a comment below.


So, I took a gamble buying a G3 Instant, based on the following:
> “But you need a device to record the videos on, an NVR. Now you could buy the Unifi NVR, [but] you can connect your Unifi Camera to the Synology Surveillance Station.”
Turns out that at least with the G3 Instant that really doesn’t fly. You have no way of setting it up, to connect to your Wifi without using the Protect app. And the app requires that you have a Unifi NVR or product running the Protect service.
Thanks for pointing it out. This article was written in 2018 about the Unifi Video platform. This platform is no longer supported by Unifi. I have added a note about it at the beginning of the article.
Thanks for the setup tips. I was having a bit of trouble getting Surveillance Station to pick up my Unifi camera.. this worked right away
I had no issues with my G3 domes and DS418 play… had not read the bitrate issue / challenge and tested the stream immediately with 6000 bitrate, no issue at all. Just FYI, Kris.
Hi Ruud. Yet another great video. I started migration from Unifi video to Surveillance camera, however…. I ve got lot of wall mounted dome camera’s and the stream seems to be upside down. I looked through the manual and community but there doesn’t seem to be no option to flip the video stream upside down unless you have Synology’s NVR 🙁 I hope I am wrong here ?
Hi I followed the directions exactly and when I enter the RTSP url from the unifi page and test connection it says “camera test failed”.
Thank you so much for your help.
UniFi cameras have a hard time providing full resolution / framerate to Synology Surveillance station. A workaround is to lower the bitrate / framerate on the UniFi camera interface (I’ve had success around 2500 kbps), or using a lower-resolution stream (i.e. /s2 instead of /s0)
See these threads for more detail:
https://community.ui.com/questions/Problem-UVC-G3-Flex-with-Synology-Surveillance-Station/bc5d356b-dcde-4f3b-8f87-f6e28c74d9ba
https://community.ui.com/questions/Unifi-Camera-on-Synology/2bb7240c-5e7f-43d5-9af2-884c7d4bc644?page=1
Hi Ruud! Thanks for this good instruction! I had updated new firmware on my G3 camera and connection to Synology NAS was lost! Problem was RTSP setting on camera was reset!
I still have problem with high bitrate… strange. My network should not be a limiting factor (1000Mbit, routers/switches) Could it be NAS performance? (416-play)
Hav a nice Sunday
BR Per
Try a lower bit rate combined with a lower quality stream (S1 or S2 on the end of the url)