My Smart Home is mainly controlled by my smart home controller, Homey. I really like Homey, but one thing that I missed is a good smart home dashboard. Home Assistant, on the other hand, is a really versatile platform, which also allows you to create beautiful dashboards that interact with your smart home. To run Home Assistant I have used my favorite piece of hardware, a Raspberry Pi.
We are not only going to install Home Assistant on the Raspberry Pi. To interact with other smart home controllers, we are going to use MQTT. This is a messaging protocol that is used for IoT (Internet of Things) devices.

In this article, I am going to help you install Home Assistant on the Raspberry Pi step-by-step. To get you started, we are also going to install some of the most used add-ons:
- HACS – Home Assistant Community Store
- MQTT – Message protocol for smart home devices
- File Editor – Only for Home Assistant OS
Interested in how I mounted my Amazon Fire HD tablet to the wall? Find out in this article!
What do we need for Home Assistant and the Raspberry Pi?
Before we can start with installing Home Assistant on the Raspberry Pi, we first need to get some parts and download the software that we need. Home Assistant doesn’t really require a powerful pi to run, so if you have a model 3 lying around, then you can use that perfectly.
But when you need to buy Raspberry Pi, then go for a Pi 4 Model B with at least 4GB of memory. Home Assistant doesn’t require much memory (2 / 3GB is enough).
For the SD Card, you really need to get a good Application Class 2 micro sd card. Home Assistant reads and writes a lot to the SD card, so don’t save money on this.

The Raspberry Pi 4 can get really warm, up to 70 degrees, so to have some cooling for the Pi is really important. The Geekworm case is a heatsink and case in one that also looks really nice. It uses passive cooling for your Pi, so no noisy fans are needed.
Installation options for Home Assistant on the Raspberry Pi
We have two (recommended) options when it comes to installing Home Assistant on your Raspberry Pi:
- Home Assistant Operating System
- Home Assistant Container (using docker)
If you are not really technical and want to use the Pi only for HA, then I recommend installing the Home Assistant Operating System. This way you can fully manage your installation (updates, add-ons) through the Home Assistant interface.
The Docker method is recommended when you want to use the Pi also for other purposes. But keep in mind that you don’t have the “supervised” option then in Home Assistant. Meaning that you can’t update Home Assistant from the interface or install add-ons, like node-red, automatically (you can still install add-ons manually though).
I have gone for the docker method, because I am planning to use Home Assistant only as a dashboard, and want to use the Pi for other purposes as well. But in this article, I will describe both methods.
Installing Home Assistant OS
Installing Home Assistant OS on the Raspberry Pi is the preferred way to run Home Assistant. It allows you to keep HA easily up-to-date, add different add-ons, like node-red, straight from the HA interface, and connecting ZigBee adapters, etc is a lot easier.
Step 1 – Install Home Assistant OS on the SDCard
Just like with Raspbian we are going to write the Home Assistant OS straight to the SD card. For this, we are going to use a free tool Balena Etcher. Make sure you download and install the tool before you continue.
Make sure that you have inserted your SD Card into your computer.
- Open Ether and click Flash from URL
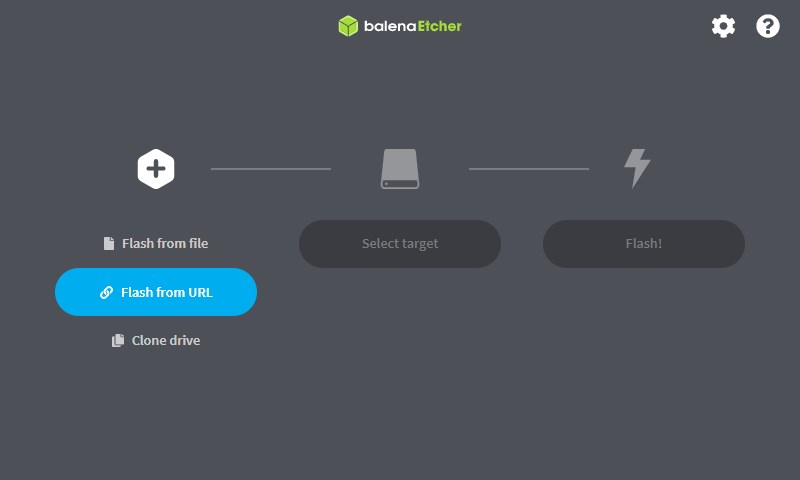
- Enter the URL for your Pi
For the Pi 4:https://github.com/home-assistant/operating-system/releases/download/6.5/haos_rpi4-64-6.5.img.xz
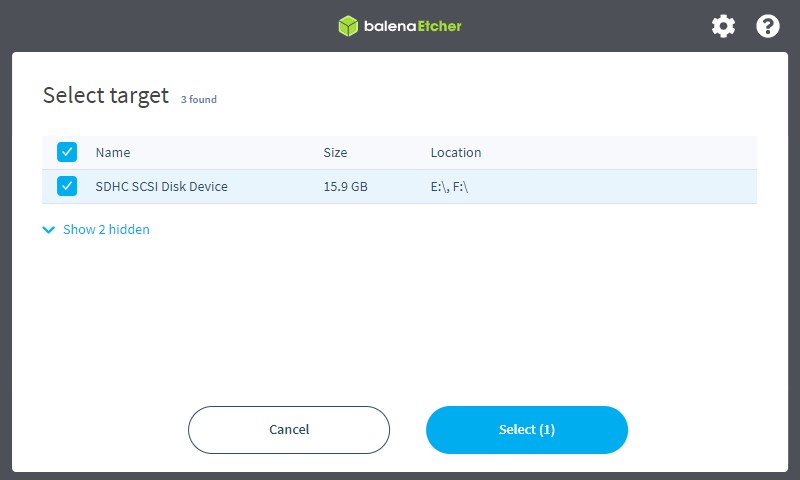
For the Pi 3:https://github.com/home-assistant/operating-system/releases/download/6.5/haos_rpi3-64-6.5.img.xz - Select the target
Select your SD Card, keep in mind that everything on it will be overwritten
- Click Flash to start the process
You might get a warning for User Account Control. Just click yes.
- Wait for the process to finish

- Optional – Adding WiFi or static IP Address
After you have started your Raspberry Pi, you should be able to open the Home Assistant installation onhttp://homeassistant.local:8123/. Unfortunately, it didn’t work during my tests. The Pi didn’t make any network connection, so I was unable to connect to it.
You can preconfigure your network by creating a network config file on the SD Card. Read more about it here - Start your Raspberry Pi
You can now plug the SD card back into the Pi, connect the network and power cable to start your Raspberry Pi.
It can take a couple of minutes until Home Assistant OS is fully started. So give it some time!
Open Home Assistant onhttp://homeassistant.local:8123/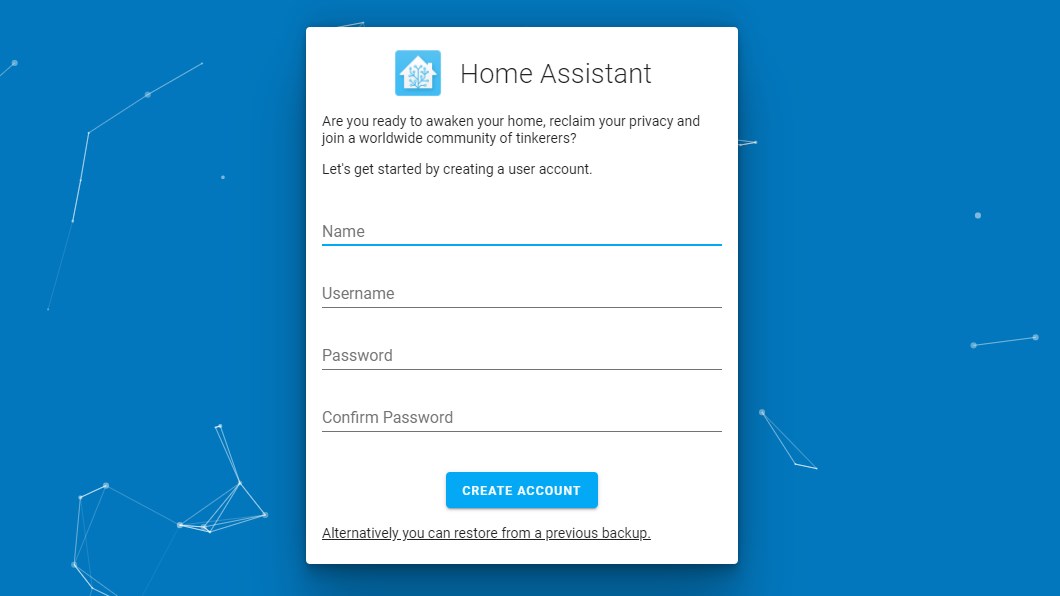


Home Assistant is now installed. It’s a good idea to install MQTT as well, to communicate with other smart home devices and controllers.
Optional – Home Assistant Network Config
After you start Home Assistant OS for the first time you can connect to it using the local URL: http://homeassistant.local:8123/. But that doesn’t always work. In my case, the whole ethernet interface was down (no activity lights on the network port)
I fixed it by configuring the network details in a config file on the SD Card:
- Open the SD Card
- Create a folder CONFIG
- Inside the config folder, create another folder network
- Inside the network folder, create a file my-network without any extensions
- Add the following code in the file
[connection]
id=my-network
uuid=e95afc7a-0e11-4bce-bfe2-984c2401ab26  # Use https://www.guidgenerator.com/ to generate an UUID
type=802-11-wireless

[802-11-wireless]
mode=infrastructure
ssid=<SSID>  # Add your SSID if you want to use your Wireless network (not recommended)
# Uncomment below if your SSID is not broadcasted
#hidden=true

[802-11-wireless-security]
auth-alg=open
key-mgmt=wpa-psk
psk=<WIFI-PASSWORD>  # Enter your WIFI Password here

[ipv4]
method=manual
address=192.168.5.220/24,192.168.5.1  # <static-ip-addres>/24,<ip-address-router>
dns=192.168.5.1;1.1.1.1; #<ip-address-router>;<ip-address-public-dns-server>

[ipv6]
addr-gen-mode=stable-privacy
method=auto
Save the file, and start your Raspberry Pi.
Step 2 – Install Home Assistant Add-ons
To get the most out of our Home Assistant installation we need to add some add-ons. There are a lot of add-ons available for HA, but a couple of them a commonly used and make working with HA a lot easier.
First, we need to enable Advanced mode, this way we can install more add-ons:
- Click on your profile name (last option in the sidebar)
- Scroll a bit down and enable Advanced Mode
We can now install all add-ons that we need:
- Open Supervisor in Home Assistant
- Click on the Add-on store tab
- Install the following add-ons:
- File Editor
- Mosquitto broker
- Terminal & SSH

You are going to need the file editor to modify configuration files in Home Assistant. This way you can do that easily from within your browser. Another option is to install the Samba add-on, which allows you to open the file from your Windows Explorer.
Mosquitto broker is used when you want to connect Home Assistant with other Smart Home platforms (like Homey) or connect Zigbee devices to HA.
The Terminal add-on allows you to log in to your Home Assistant installation with SSH. This is needed to install the Home Assistant Community Store in the next step.
Make sure that you start all the add-ons after you have installed them. Also enable, Show in sidebar, for each add-on.
Step 3 – Install HACS
Home Assistant is really community-driven, so there are a lot of add-ons available made by the community. To install them we need to install the Home Assistant Community Store (HACS).
With the Terminal-SSH Add-on installed we can open the terminal from the sidebar.
- Open Terminal
- Enter the following command to install HACS:
wget -O - https://get.hacs.xyz | bash -

- Restart Home Assistant : Configuration > Server Controls > Restart
- Open Integrations : Configuration > Integrations
- Click Add Integration
- Select HACS
Follow the steps described here to configure HACS
You should now have a good base to start with.
Installing Home Assistant Container (Docker method)
Install Home Assistant in a Docker container allows you to use the Pi for other purposes as well. It’s a bit more work to install, but with the steps below it’s not really difficult.
Step 1 – Install Raspbian
The first step is to install Raspbian on the microSD card. We are going to use the Raspberry Pi Imager tool for this, which makes installing Raspbian really easy:
Place the MicroSD card in your computer and open Raspberry Pi Imager:
- Click Choose OS
- Select Raspberry Pi OS (other)
- Choose Raspberry Pi OS Lite (32bit)

- Click on Choose Storage
- Select your MicroSD card (check the size and drive letter!)
- Optional: Click on the gear icon and enable SSH, WiFi and set username and password.
- Click on Write
- You will get a warning that all data will be removed, click Ok and get a coffee 😉
- Wait until the process is finished

Step 2 – Optional – Enable SSH and WiFi on Raspian
If you haven’t used the advanced options from the Raspberry Pi Imager, you can also enable SSH and WiFi with the following steps.
You can connect a keyboard and monitor to the Pi, but I prefer to use SSH to connect remotely to the Pi. This way we can easily copy-paste commands to our Raspberry Pi. I am using Windows Terminal as an SSH Client, but you can also use PowerShell or Putty for example.
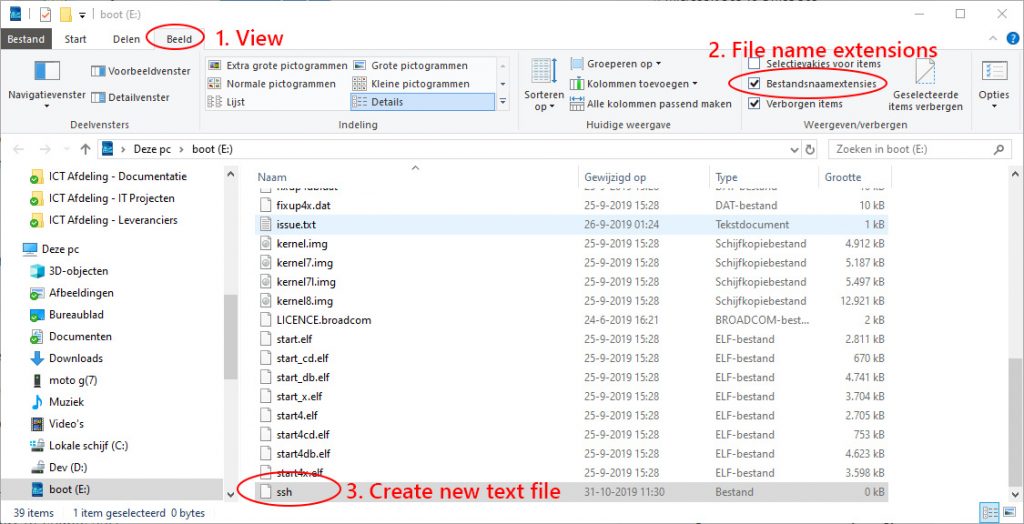
- Open the SDCard in your Explorer
- Create a new text file and name it SSH
- Remove the file extension from the new file.
You can also pre-configure your wifi network on the Raspberry Pi. This way the Pi will automatically enable wifi and connect to your wireless network.
- Create another new text file and name it wpa_supplicant.conf
- Paste the following into the file
country=US
ctrl_interface=DIR=/var/run/wpa_supplicant GROUP=netdev
update_config=1

network={
    ssid="NETWORK-NAME"
    psk="NETWORK-PASSWORD"
}
- Change the county code to match your country
- Enter the SSID and PSK (password) of your wireless network
- Save the file
For Home Assistant it’s best to use an ethernet cable.
Step 3 – Start up and connect to the Raspberry Pi
Plug the SDcard into the Raspberry Pi, and connect an ethernet cable (if you don’t haven configured WiFi) and USB-C power cable. The Raspberry Pi will now automatically start.
Give it a couple of minutes to boot and connect to the Pi with SSH:
- Open Windows PowerShell (Press Windows key + X) (or the SSH client that you want to use)
- Type:
ssh pi@raspberrypi.local
- Type yes to continue connecting
- Enter the default password: raspberry
Step 4 – Configuring the Raspberry Pi
There are a few final steps that we need to do before we can start with installing Docker and Home Assistant. We want to give our Pi a static IP Address, this way we can easily access it in the feature. Also, we want to change the default password and make sure that the latest updates are installed.
- Open the network config file by typing the following cmd
sudo nano /etc/dhcpcd.conf
- Scroll a bit down and enable the following lines by removing the # from it:
# Example static IP configuration:
interface eth0
static ip_address=192.168.1.213/24    # < change this to IP Address that want to use
#static ip6_address=fd51:42f8:caae:d92e::ff/64
static routers=192.168.1.1   # < change this to your routers IP Address
static domain_name_servers=192.168.1.1 1.1.1.1  # < change this to your routers IP Address and DNS
- Give you Pi a static IP Address in the .200 range. Also make sure you configure the router’s IP Address correctly.
When done save and close the file by pressing ctrl + x and choose Y to save it.
- Change the default password by entering the cmd passwd
pi@raspberrypi:~ $ passwd
Changing password for pi.
(current) UNIX password:raspberry
Enter new UNIX password:
Retype new UNIX password:
passwd: password updated successfully
- Update the Raspberry Pi with the latest firmware and updates:
sudo apt-get update && sudo apt-get upgrade -y && sudo apt-get autoremove && sudo apt-get autoclean
6. Reboot the Pi and connect to the new IP Address that we have configured
sudo reboot
Step 5 – Install Docker on Raspberry Pi
With our Raspberry Pi fully up-to-date we can start with installing Docker on the Raspberry Pi. We are going to use a script from Docker for this which will install Docker for us.
- Download the Convenience Script to install Docker on the Raspberry Pi
curl -fsSL https://get.docker.com -o get-docker.sh
- Run the script with the following command:
sudo sh get-docker.sh

Add Pi user to Docker Group
Next, we need to add the default Pi user to the Docker group. This way we don’t have to use Sudo every time when we want to start or stop a Docker container.
sudo usermod -aG docker pi

# optional
sudo chmod 666 /var/run/docker.sock
Step 6 – Install Home Assistant Docker Container
The last step is to install the Home Assistant Docker Container. By default, the config of Home Assistant will be saved in /home/pi/ha. You can change that on line 6.
If you are using a Raspberry Pi 3, then change pi4 to pi3 on the last line.
docker run -d \
  --name homeassistant \
  --privileged \
  --restart=unless-stopped \
  -e TZ=MY_TIME_ZONE \
  -v /home/pi/ha:/config \
  --network=host \
  ghcr.io/home-assistant/raspberrypi4-homeassistant:stable
You can access Home Assistant on <ip-address-of-pi4>:8123 once the docker container is running:

Just follow the setup wizard (onboarding process) of Home Assistant.
Step 7 – Install HACS for Home Assistant Container (docker)
When using Home Assistant inside a docker container you won’t have the add-on store that you get with Home Assistant OS (the supervised option). This means that we will need to install add-ons manually.
But you can use the Community Store, which also contains a lot of integrations and frontend components that you will need later to create stunning dashboards.
Installing HACS
- Open your SSH client and connect to your Pi
- Navigate to your Home Assistant configuration folder (/home/pi/ha)
cd /home/pi/ha
- Run the following command to download HACS
wget -O - https://get.hacs.xyz | bash -
- Follow these steps to configure HACS further
Step 8 – Install MQTT on Raspberry Pi
MQTT is a messaging protocol that is used for communication between different smart home devices (and controllers). To use MQTT, you will need an MQTT Broker (server) and MQTT Clients.
Because we are running Home Assistant in a container, we can install MQTT beside it in its own container.
The MQTT Client can be added from the Home Assistant Community Store (HACS)
- Open your SSH Client and connect to your Pi
- Enter the following commands:
# Install MQTT
sudo apt install mosquitto mosquitto-clients

# Enable MQTT Broker service
sudo systemctl enable mosquitto
The MQTT Broker should now be running. You can test MQTT the following way:
- In your SSH session create a MQTT Subscriber. The subscriber connect to the MQTT Broker on the localhost (the Pi itself) and listen for a message on the test/message topic.
mosquitto_sub -h localhost -t "test/message"
- Open a new SSH session (open another instance of your SSH client) and connect to the Pi again.
- Send (publish) a message to the test/message topic:
mosquitto_pub -h localhost -t "test/message" -m "Hello, world"
If you now look in the first SSH window you will see Hello, world
Secure your MQTT Broker
Keeping your smart home secure is important. To protect unauthorized access to the MQTT broker we can create an MQTT user and password
# Create a mqtt user and password
sudo mosquitto_passwd -c /etc/mosquitto/passwd <mqtt-username>

# Enter an password
<enter password>
To use the newly created user and password we need to change the default configuration file:
# Open the configuration file
sudo nano /etc/mosquitto/conf.d/default.conf

# Enter the following
allow_anonymous false
password_file /etc/mosquitto/passwd
The last step is to restart the MQTT Broker:
# Restart MQTT Broker
sudo systemctl restart mosquitto
Step 9 – Install MQTT Client in Home Assistant
The last step is to install the MQTT Client in Home Assistant.
- Click Configuration > Integrations
- Add Integration
- Search for MQTT
- Enter the IP address of your Raspberry Pi
- Enter the username and password that we just created for the MQTT Broker
- Click Submit

If you are using a Homey as your Smart Home controller, then you will need to install the MQTT Hub and MQTT Client app. The hub will publish all your devices to the MQTT Broker (allowing HA to pick them up) and the client trigger flows based on MQTT topics.
You should now have a good starting point for your Home Assistant installation.
Wrapping Up
Getting started with Home Assistant is the easiest with the use of the Home Assistant Operating System. This works great out of the box with the add-on store. If you want to use your Pi for other purposes as well, then the container (docker) method is a really good option.
Interessted in how I mounted my Smart Home Dashboard? Then make sure you read this article as well.
In the next article, I will explain more about how you can create a custom dashboard and share the details of how I build my dashboard.
If you have any questions, just drop a comment below.


This is still not helping. Wish you would make a video. Got interested in making a smarthome dashboard on a tablet but not finding the 1st step to the end
Thanks Rudy for this great how-to.
I followed every step of the docker installation and everything worked seamlessly until the very last step at the integration of MQTT (client) in Homeassistant.
5-6 seconds after completing the form, I received a ‘connection failed’ message.
Any clue to help me ? Any log I can take a look at ?
Regards
Check if mosquitto is running with
sudo systemctl status mosquittoHi Ruud,
many thanks for your blog!
I successfully installed Home Assistant OS on the SDCard, it works fine.
Now appears an obsticle I am not able to overcome. When try to install the new integration, I need to run the command “[sudo] pip3 install pymultimatic”, but HA console rises an error pip3 command not found.
Could you advice me?
Regards,
František
Make sure that Python 3 is installed with:
sudo apt install python3-pipwhen I put the command in HA Terminal I get:
bash: sudo: command not found
Sorry, missed that you are using Home Assistant OS. Make sure that you SSH into the Home Assistant docker container. And keep in mind that Python etc will be gone once you update HA. This topic might help you : https://community.home-assistant.io/t/accessing-pip-or-python-on-home-assistant-os/331651
Thanks for the tip, I will try to follow it.
F.
Hi Rudy,
Could you avoid using a Raspberry Pi and use a NAS drive instead? I’ve seen suggestion that Docker could be used to do that?
Thanks, great thread
You can indeed use Docker on a Synology NAS for example.
Thank you for this detailed instruction!
I am trying to install Home Assistant Operating System, but have a problem reaching the RPI in my LAN. When I use the instruction with a CONFIG table, nothing happens. The folders and files are available after creation (when I unplug the sd card from my pc and then plug it in again), but after the first boot of the RPI, everything is deleted and settings have not been used.
I tried configuring the network with the HA command line, although I don’t get any error, settings are not altered. Therefore my RPI remains unreachable… Any ideas on what I am doing wrong?
Hi,
thanks for the detailed setup. I have installed this on 25.9.2022 with the latest available raspbian and packages. I had two issue:
1) Step 6 caused “Cannot write to ‘hacs.zip’ (Permission denied)” and “sudo” didn’t help. Instead I did all the subfolders manually => “custom_components” and “hacs” manually and then downloaded latest release of hacs from Git using wget and unpacked it inside hacs folder. I’m leaving it here just in case.
2) Regarding the MQTT it didn’t work for me because of the IP address. Are you sure it has to be 192.168.x.x? For me worked 127.0.0.1
Error writing to hacs.zip.
Changed permissions on the custom_components folder
Downloaded hacs.zip to the custom_components folder
re-ran the install
I’ve recently got this to work, and I just want to ask : I’ve got Nest/Alexa installed and integrated together prior to installing Home Assistant. Now that I do have Home Assistant working, do I still need to keep the nest app and the Alexa app and the ring app on my phone? Do I need to disconnect from any of them? It seems like a lot of this was to put the control back into my hand, but the nest integration seems to suggest I still need everything connecting to Nest still.
Let me know if I misunderstood/did something wrong.
Thanks!
It depends on how you have set up HA. If you have connected each device individually to HA (through zwave, wifi or zigbee for example) then you can control each device directly from HA. But if you have connected HA to the Nest hub for example, then you will need the Nest app to add or manage your devices.
I’m not very big on command line so asking a probably stupid question: at step 7, the wget command, i’m getting errors. What can i do to get this working:
Cannot write to ‘hacs.zip’ (Permission denied).
Try it with Sudo in front:
sudo wget -O - https://get.hacs.xyz | bash -I receive the following error when I try to reboot MQTT
pi@raspberrypi:~ $ sudo systemctl restart mosquitto
Job for mosquitto.service failed because the control process exited with error code.
See “systemctl status mosquitto.service” and “journalctl -xe” for details.
I am unable to add MQTT to my HA integration.
Any suggestions?
The first step is to check the actual error and log files. Run both suggested commands, this will give you more information.
Hi !
How do i update Homeassistant in docker container
We have mapped the config to a local folder, so we should be able to just remove the docker container and reinstall the latest version:
docker stop homeassistant

docker rm homeassistant

docker run -d \

--name homeassistant \

--privileged \

--restart=unless-stopped \

-e TZ=MY_TIME_ZONE \

-v /home/pi/ha:/config \

--network=host \

ghcr.io/home-assistant/raspberrypi4-homeassistant:stable
Looks like I’m getting an error when trying to run the HACS wget line. It’s giving me a 503 service temporarily unavailable error.
Hello,
Very nice and clear How To, thank you.
I want to try out installing Home Assistant before I buy any new hardware. I have an old Rpi B lying around. Would I be able to install Home Assistant on that following this guide?
Greeting, Marcel
I have only tested it on a Model 3 and Model 4B. But you can always try it with this guide. In theory, it should work, but maybe a bit slower.
That is awesome,
Thanks Rudy
Nice post!
However, the Amazon links don’t seem to be able to deliver a Pi 4 model B to Benelux 🙂
I’ll find it somewhere else, ofcourse, but also the Fire HD doesn’t seem to be available for customers in Benelux… So I’m looking for an alternative to that as well… 🙂
Keep up the great work!
Greetings,
EV
Hi,
I updated the links. The Fire HD isn’t available in the Netherlands. But you can use https://www.mailboxde.com for this, works great 😉
Hi Rudy,
Really enjoyed your blog. I have the same issue as you where I have Homey and there is no decent dashboard out there for Homey. I also have issues with my TUYA lights, plugs and switches as there is not much out there in Homey world, there are two apps that are half baked and require further developments.
I would like to use MQTT between Homey and HA (what you have achieved) but would like the lights, plugs and switches to be driven from HA and other devices from Homey.
As a request are you able to write another blog with your integration configuration, please?
I will be really grateful.
Thank you,
Regards,
Brin
Yes, it’s on my list. Expected it to be finished in jan 2022.
Why not running mosquitto as a docker container too?