Installing and configuring a router can sometimes be a bit challenging. How do you connect the cables, how do you configure the router, and what are the best settings?
The router is the most important device in your network. It secures the network with a built-in firewall, provides access to the internet and sometimes even the wireless network.
In this article, I will guide you through how to configure a router so you get a secure and fast home network.
Each router is slightly different, but the basics are pretty much the same. If you have a question, just drop a comment below.
Step 1 – Connecting the Router
The first set is to connect the router. Your ISP (Internet Service Provider) supplied you with either a modem or a modem/router combination. A modem/router is capable of connecting to the internet self and typically has a DSL port.
Some ISP’s supply only a modem, in that case, you won’t need the DSL port, but you will use the WAN port to connect the ISP’s modem too (typically used when you have cable or fiber internet connection)

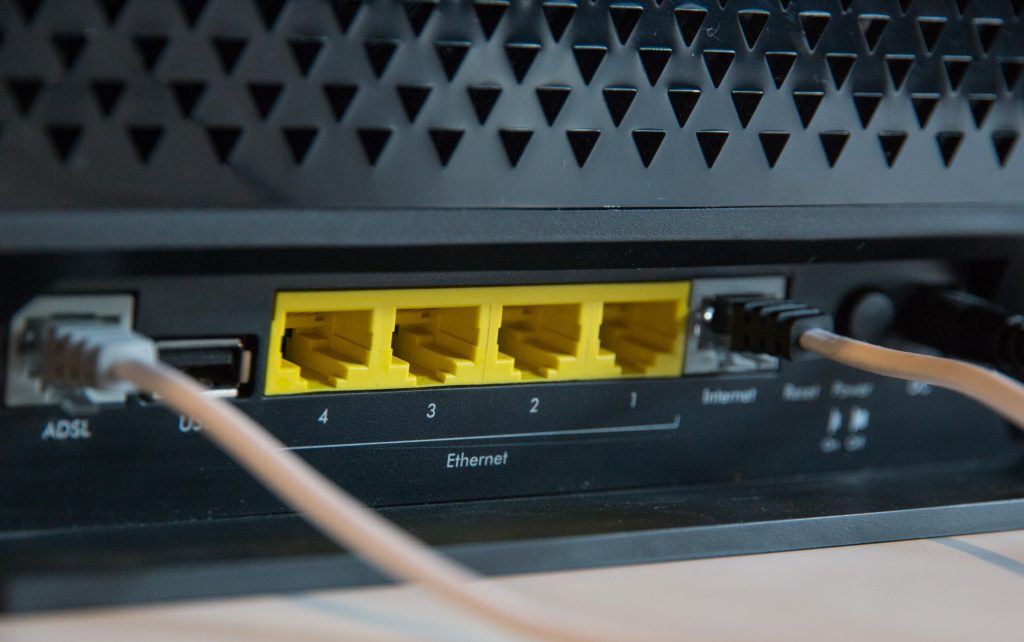
What all routers have in common is that they have one or more LAN (Local Area Network) ports. On most consumer routers they are marked yellow. These ports can be used to connect your network devices (computer, network printer, NAS).
DSL Port
The DSL ports are smaller network ports, also known as RJ11 or RJ12. Here you connect your telephone line in to connect your router to the internet.
Ethernet / LAN ports
LAN ports, also known as Ethernet (eth) ports, are used to connect your network devices too. You can use a normal network cable for this with the standard RJ45 connector. It doesn’t matter which port you use, all the ports are the same.
If you have more network devices than available ports on the router, then you can connect a network switch to one of these ports.
WAN or Internet Port
The WAN port is used to connect your router to the modem (or router) from the ISP. You can’t use this port to connect your network devices too. This port is also a standard RJ45 port.
USB Port
Some routers have a USB port next to the network ports. Now it really depends on your router model where this port can be used for. With some routers, you can connect an external hard drive to it and make it visible in the network.
Wherewith other routers you can only use this port to connect the router to your computer for the initial setup.
Connecting the cables
Now depending on your situation, you need to connect either the telephone line to the DSL port or the modem to the WAN port. In case of a telephone line, make sure you use a DSL Filter or Splitter. This filters and/or splits the telephone signal into a signal for your router and a signal for your telephone.
You can use an ethernet cable between your computer and the router to set up the router or make use of the default wireless network of the router)
Connecting to the default wireless network
If you can’t use a network cable between your router and computer, you can also connect to the default wireless network that most consumer routers have.
On the back or bottom of a router, you will find the default wireless network details. The Wifi Name (or SSID) and the Password. You will need those to connect your computer to the wireless network of the router.

- Turn the router on an wait a couple of minutes so it can start.
- Open your wireless network on your computer
- Find the new wireless network and connect to it with the default password on your router.
Step 2 – Login to the Router
Now we have connected the router we need to open the web interface of the router. These days each router can be configured through your web browser. All we need to do is find the correct webpage.
You can simply open your browser (Chrome, Edge, or Firefox) and navigate to the IP address of the router. Commonly used addresses are:
If none of these addresses work, then we will have to look it up. With your computer connected to the router, open a command prompt to find the network details.
- Press Windows Key + R
- In the Run dialog type cmd and press enter
- Type Ipconfig and press enter

In the results, you will find a table similar to the images above. Note the Ip Address of your router, which you will find after the Default Gateway label.
Enter this address in the address bar of your web browser (Chrome, Safari, or Edge) to open the router setup page.
Router setup page login
You need to log in to your router. Now the default username and password can be found in the manual of your router or sometimes on the back of the router.
The most common combinations are:
| Brand | Ip Address | Username | Password |
|---|---|---|---|
| Asus default router password | 192.168.1.1 | admin | admin |
| Belkin default router password | 192.168.2.1 | admin | admin |
| Dlink default router password | 192.168.0.1 | admin | blank |
| Linksys default router password | 192.168.1.1 | admin | admin |
| Netgear default router password | 192.168.0.1 | admin | password |
| Synology default router password | 192.168.1.1 | admin | admin |
| TP Link default router password | 192.168.1.1 | admin | admin |
Once logged in we can start to configure the router.
Step 3 – Configure the router
So we have the most important part covered, we connected the router and are logged in to it. Now we need to configure the router.
We need to configure several things for our router setup:
- Connecting the internet
- Setting up the wireless network
- Optimize DNS servers
- Change router password
- Create a backup of the configuration
- Update Firmware
Connecting the internet
In case you have a router/modem combo (and you connected the DSL connection to the WAN port) you will need to set up the internet connection.
Your ISP supplied you with the username and password for the PPPoE connection. Make sure you have these at hand.
Just open the router page and look for a tab labeled Internet or WAN. Fill in the details as provided by your ISP.
Setting up the wireless network
If your router also comes with a wireless network, we will need to change the default SSID (Wireless Network Name) and password. Default usernames and passwords are always a security risk, so to keep your network safe, make sure you change it!
Find the wireless network settings tab in your router. Make sure that you change the following settings:
- Wireless SSID (that is your wireless network name) – to something you can recognize
- Security – WPA2 only
- WPS – Disabled, (Leaving WPS on is a huge security risk, the 6 digit code is easy to crack)
- Wireless key – A new strong, but easy to remember the password for your wireless network
Note
If you are connected to your router over the default wireless network, then you will lose the connecting if you apply the settings!
I always recommend to use a dedicated access point and leaving the built-in access point in the router off. Routers are always placed in a cabinet, basement, or hallway. Stuck a way where you don’t see them. But that is also the place where nobody comes and where the wireless network is the strongest.
So what you want to do is bring the wireless network to the place where you use it, your living room. An access point can be placed on the ceiling or wall to give you the best wireless network cover in your house. Read more about it here.
Optimizing the DNS servers
The default DNS servers that are supplied by your ISP are typically really slow. The DNS servers are important, because they translate a domain name, like google.com, to the correct IP Address of the servers from Google.
So the faster the DNS server, the faster your internet connection will be. I always recommend using DNS Server from Cloudflare. These DNS servers are fast, secure, and respect your privacy (they don’t sell your data)
- Primary DNS server: 1.1.1.1
- Secondary DNS server: 1.1.0.0
If you want to know more about optimizing your DNS servers, make sure you read this article about finding the fastest DNS server for you.
Changing the default admin password
The default logins for a router a listed on the internet, so to secure your router you will need to change this password. Some routers will prompt you when you login the first time to change it, but otherwise you will find it in one of the following locations:
- Settings -> admin password
- Advanced
- Administration
- Security
Change the default password to something strong. Make sure you store the password in a password manager because you won’t log in to your router often and might forget it easily.
Create a backup of the configuration
If you have the option, always make a backup of your router configuration. Router configurations can get lost after a power outage or are lost when you have to reset your router (because you might forget the admin password).
Look for a backup function in the advanced or administration pages.
Update the firmware
One of the last steps is to update the firmware of your router. Most new firmware versions contain security fixes, performance improvements, and bug fixes. So it’s really important that you keep your router up to date!
Updating the firmware can most of the time be done in the advanced, administration, or settings page.
If something goes wrong with the firmware update, you can always reset the router and restore the configuration with your backup file 😉
Set up a Router Conclusion
I hope this article helped you with how to set up a router. Make sure you change the default passwords, used a good DNS server, and keep your network equipment up-to-date!
If you have any questions, just drop a comment below!
You may also like the following articles:


Thanks for the awesome review of the best routers. I really find the resources you provide very nice.
Thanks for sharing this with us.
I know I am really naive concerning networking (good at writing application software but not trained with hardware and networking).
But in trying to do as you describe without a broadband/fibre/telephone connection yet (and therefore no ISP) am I correct in thinking that if I plug a spare computer into the ISP side ethernet port and give it appropriate information and even go so far as to put an apache webserver on it then it simulates the outside of my house (ie world of the fully connected internet). Then I can set up my LAN using the other internet ports and when in due course I replace my simulated internet with an ISP supplied modem then everthing will work with the real internet. On another related point if I have a NAS (yet to be purchased) on my LAN and plug a WAP into a second ethernet port then will all my android phones etc be able to wifi to the NAS. If the answers are ‘yes’ then I can work out the rest. But on a final point if I eventually get another router for its modem that included wifi then I believe I can connect the wired router into it and in which case is it better to have wireless connectivity through a WAP on the LAN side or have wifi passed from the upline router/modem avoiding a WAP then channel it through the wired router to the NAS – or does it make no difference. The reason I want to go through all of this is that I have two houses on either side of the world and I am in one or the other for months at a time and I want to connect to a NAS from both locations to backup and retrieve large photographic files. Sorry for needing such basic advice but we all need to make a beginning.