In this article, we are going to setup our D-Link router. Now we are not only focussing on connecting to the internet, but also on some other important settings. Think of securing your WiFi, using the right DNS servers to speed up your internet connection and creating a guest WiFi network.
Getting started
Before we can connect our D-Link router to the internet we need to figure out how we can connect it. The D-Link router is a router and modem, so it can make the connection to your ISP itself, but we need to know how the internet is provided by your ISP.
- DSL users without modem – If you have a DSL connection and your ISP hasn’t provided a modem, then we need to use PPPoE to connect the D-Link router. Check if your ISP has provided you with the PPPoE credentials, you will need this to connect the router to the internet.
- DSL users with modem/router combo – It’s best to use PPPoE, so check if your ISP has provided you with the PPPoE credentials or request them. If they don’t support a custom router (like here in The Netherlands), then we are going to place the D-Link router behind the modem/router from the ISP. We need to set the router in Bridge or DMZ mode.
- Cable/Fiber users – If you have only a modem, then we can connect the D-LINK router behind it. You might have to reboot the modem after you connected the D-Link router. If you have a modem/router combo then you will need to set in the Bridge or DMZ mode.
Difference between modem and modem/router combo
The difference between a modem and a modem/router is that a modem only makes the connection to the internet. Where a router connects all the device together so you can print on your network printers, share files between computers and use the internet connection. Most consumer routers also provide WiFi and they have multiple ethernet ports (RJ45). A modem only has one ethernet port that you use to connect a router behind it.
Setting your router in bridge or DMZ mode
If your ISP doesn’t provide you with the PPPoE credentials, then we need to set your current router in bridge mode. In bridge mode, your router won’t route anymore, but it will essentially be a dumb switch. It passes on the internet connection through to a LAN port.
How you set your router in bridge mode is different for each router. So the best thing is to look up the user manual. But in general, you can follow these steps:
- Find your routers IP address
- Click on Start and type CMD <enter>
- In the black dos box, type ipconfig <enter>
- Note your default gateway address
- Visit the router’s ip address in a new browser tab. (http://192.168.1.1) in my case
- Look for the internet settings page
- Find the Enable Bridge mode or Enable DMZ mode
Setting up a D-Link Router
We have done all the prerequisites, so we can now start with actually setting up the D-Link router. I assume your connected the router and put the internet connection in the WAN port and connected your computer with one of the LAN ports.
1. Open the router in a new browser tab
Open your browser and navigate to http://192.168.0.1, the default IP address of the D-Link router.
2. Enter the D-Link router password
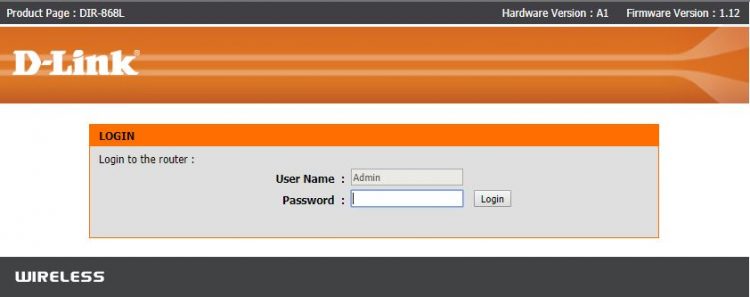
The default router password of a D-Link router is nothing (blank). The default username is Admin. After you are logged in the Internet Connection Wizard will show. The wizard will only open the first time your login. If you don’t get the setup wizard, then click on Internet Connection Setup Wizard in the centre of the page
3. Setup a strong password
First, we are going to change the default password. Enter a strong password (at least 8 characters) to secure your router. Click on next when done
4. Select your Timezone
A pretty simple one, select your time zone. Nothing to explain here…
5. Configure your internet connection
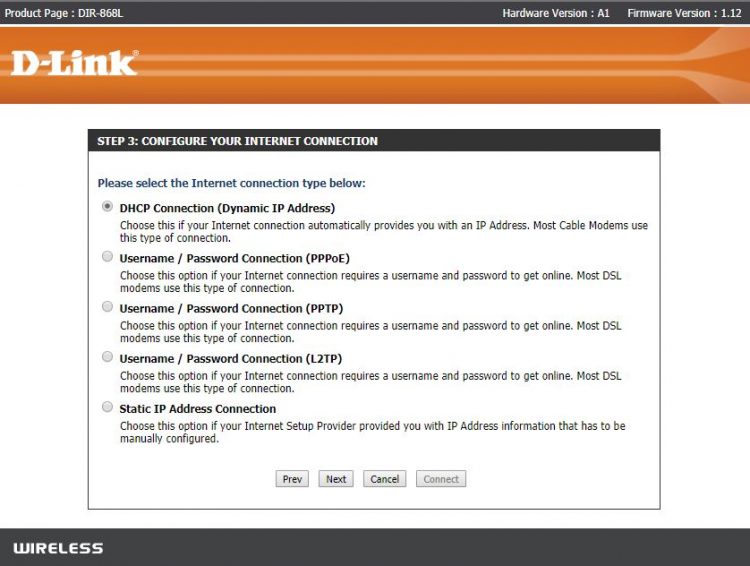
The most important step, we are going to configure the internet connection. Now, it depends on how you can connect to the internet what you are going to select here. The two most options are:
- DHCP Connection. Use this when you have a modem from your ISP. Just select DHCP and click next.
You don’t need to enter the MAC Address or enter a hostname. We will configure the DNS later, just click next. - Username / Password Connection (PPPoE)
If you have the PPPoE credentials from your ISP then select this option.
Enter the credentials and click on next.
When done click on Connect. It may take a few seconds to connect, but you should now have an internet connection.
WiFi setup on D-Link Router
Our D-Link router is now connected to the internet, but we also want to set up our wireless network. By default, your router will have a wireless network that you can connect to. You will find these details on the bottom of the router.
But leaving things default is never a good idea, so we a going to change our wireless network name, pick a new password, optimize our wifi signal and disable the Wifi protected setup (because these are to easy to hack).
1. Open the Wireless network setup
We won’t be using the wizard, so on the setup page of your D-Link router, select Wireless settings on the left side and then Manual Wireless Connection Setup.
2. Configuring the 2.4Ghz band
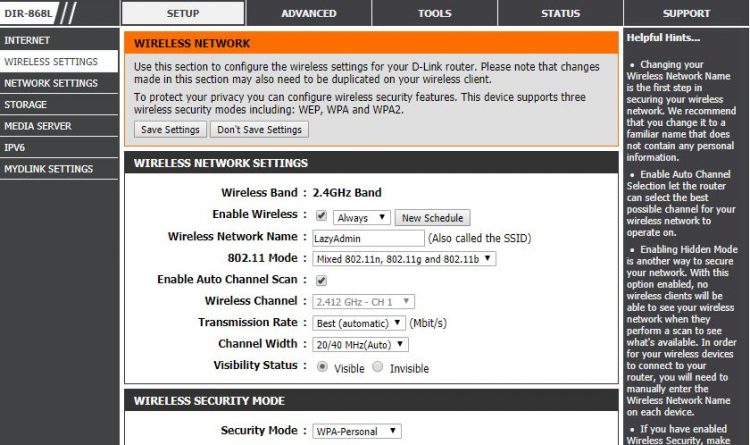
- Change the Wireless Network Name to something you like
- Keep the mode on Mixed 802.11n, 802.11g and 802.11b. This way all wireless devices can connect to the router
- Enable auto scan, this way the router will find the least crowded wifi channel
- Channel width, an important one. If you live in an area with a lot of wireless devices around you (like an apartment building), then you need to changes the channel width to 20Mhz. Narrowing down the bandwidth will give your less interference and resulting in a better and faster wifi connection.
If you live in a not so crowded area, then leave it on 20/40Mhz. This will give you to most speed and maximum distance. - Scroll down to Pre-Shared key, fill in a new password for your wifi. Use the same password of both wifi networks (2.4ghz and 5ghz)

3. Configure the 5Ghz band
Use the same settings as for the 2.4Ghz band. Only add 5Ghz to the wireless network name.
For the channel width, again if you live in a crowded area, lower the channel width. For 5Ghz, you should lower it to 20/40Mhz.
When done save the settings, if you were connected wirelessly to your router then you will have to reconnect to the new Wifi network.
4. Disable WPS (Wifi Protected Setup)
WPS is an easy way to connect a device to your wireless network. You can connect/pair a device by pressing a button on the router or enter a pin code. Now the pin code is where the vulnerability is. A pin code is really easy to crack, so it’s really recommended to disable WPS at all for your router.
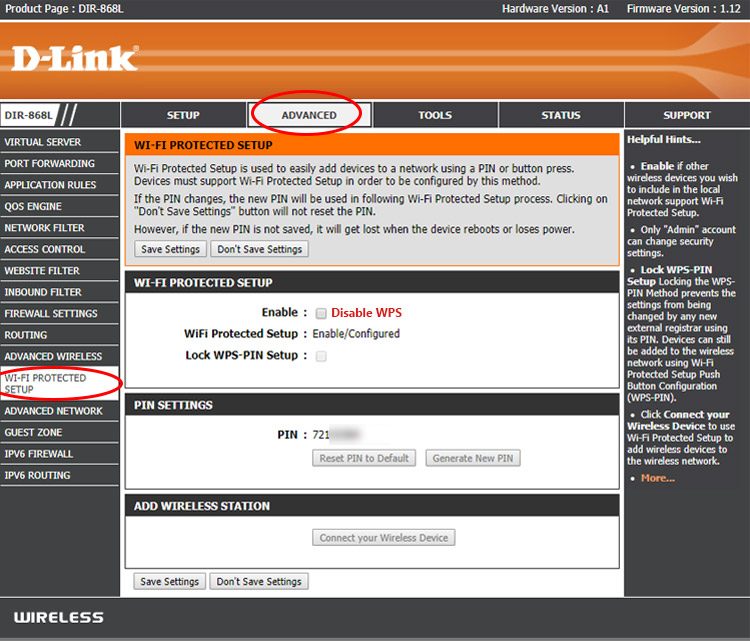
- Click on Advanced
- Select WI-FI Protected Setup on the left side
- Disable it
Creating a Guest Wifi Network
The D-Link router supports a guest wifi network. This way you can give your guests internet access without letting them on your private home network. The guest network is a separate Wifi network with its own wireless network name and password. Enabling it on a D-Link router is pretty easy.
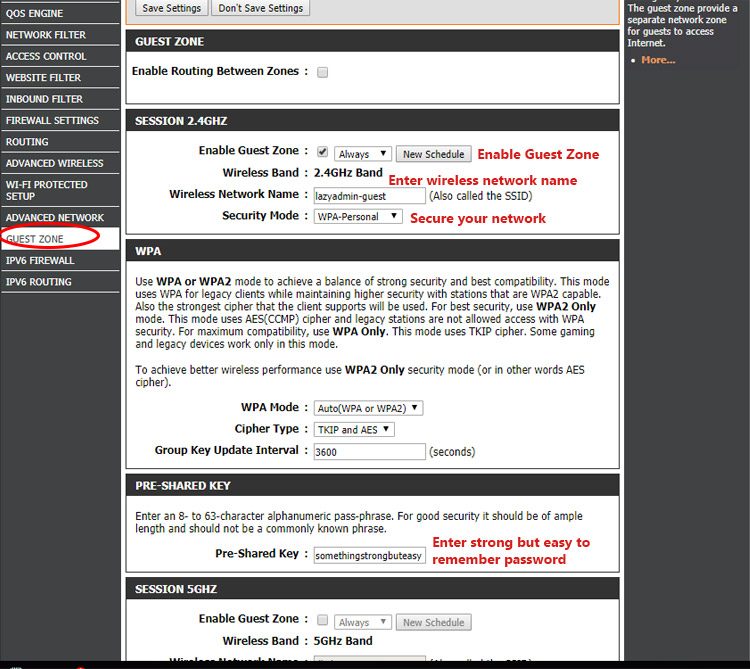
- Go to the Advanced page
- Select Guest zone on the left side
- Enable Guest Zone for the Session 2.4Ghz
- Enter a Wireless Network Name for your guests
- Set the security mode to WPA-Personal. Never leave your guest wifi on-secured, otherwise, everybody can use your internet connection.
- Scroll down to Pre-Shared key and make a strong but easy to remember password for your guest.
- Click on Save Settings
You will now see an extra wifi network in your house. you can also create a 5Ghz guest wifi network, but that isn’t really necessary in most cases.
Speeding up your internet with the fastest DNS Server
During the internet connection setup, we skipped the DNS part. A DNS server is the dictionary of the internet. Almost everything we do with the internet requires a DNS server to translate a domain like amazon.com to an IP address. And because nearly everything you do requires a DNS server, selecting the fastest one will accelerate pretty much everything you do online. Your ISP also has a DNS server and those are in most of the case, not the fastest servers. So using another one can speed up your internet with more than 30% easily.
Now there is also another important reason to pick a different DNS server. The company the runs the DNS server can see every site you visite. Some company even sell this data to advertisers.
The fastest DNS server available today is 1.1.1.1. You don’t have to take my word for it, but the independent DNS monitor DNSPerf ranks 1.1.1.1 as the fastest server in the world.
Changing the DNS server
To change the DNS server on your D-Link router is pretty simple.
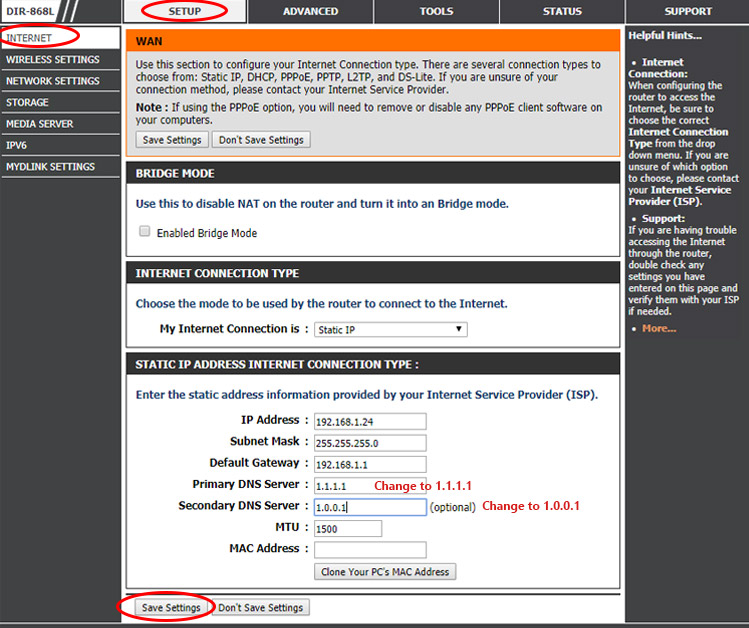
- Go to the Setup page and select Internet on the left side
- Choose Manual Internet Connection Setup
- Change the Primary DNS Server to 1.1.1.1
- Change the Secondary DNS Server to 1.0.0.1
- Click on Save Settings
You will need to restart your computer to apply the changes to your computer too. Or a little bit faster is to reconnect the Wifi network or the unplug and replug the network cable in your computer.
Prioritize Network Traffic with QoS
To speed up your internet connection we can also prioritize important network traffic. In a household your share your connection with all the members in your household. If somebody is watching Netflix while another is downloading the latest game on Steam you might notice that Netflix will need to buffer or lower the video quality. This happens because the download is consuming almost all the bandwidth that is available.
By prioritizing the network traffic we can tell the router to handle the video stream or gaming traffic first. This way you won’t suffer from any lag during your online gameplay or while watching a movie.
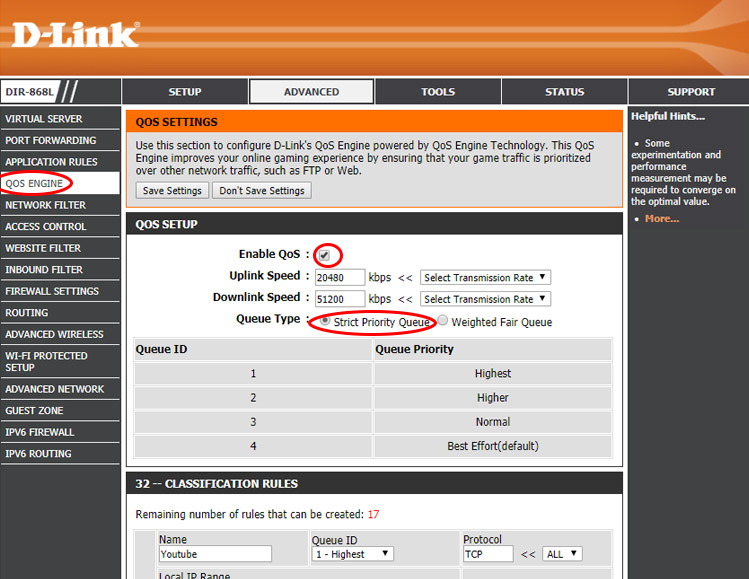
You can enable QoS as followed:
- Go to Advanced
- Select QoS Engine on the left side
- Enable QoS
- Set your Uplink and Download speed
This must be the speed of your internet connection. - Select Strict Priority Queue
- By default, there are already some rule created
The default rules are in basic fine, but if you have a game console and you play online then you might want to prioritize all the traffic from the console. You can do this by creating a new rule.

- Name the rule PS4 for example
- Queue ID is 1 – Highest
- Protocol is ALL
- Local IP Range is the IP address of your console. (Look it up at the status page of the D-Link router or in your console under network settings)
Last Tips
We have set up our D-Link router and it’s ready to be used. There a few last tips / commenly asked questions that I would like to mention
Back a backup of the configuration
After you configured your router is it always a good habit to make a backup of the configuration. With a backup, you can easily restore your router if you have to reset the router or when it lost the configuration due to a power outage.
- Go to Tools and select System on the left side
- Click Save Configuration
- Store the config.bin file somewhere save
Update the firmware
Something you should actually start with, but the most convenient way to update the firmware requires an internet connection. New firmware version contains bug fixes, security updates and may even have performance updates for your router. Before you update the firmware, always make a backup of the configuration.
- Go to Tools and select Firmware on the left side
- Click on Check now
- Update the firmware.
Reset D-Link Router Password
If you lost your password of the D-Link router the only option is to factory reset your router.
- Power on the D-Link router
- Hold the reset button for atleast 10 seconds with a paperclip
- Wait 15 second until the router is restarted
- The default login is Admin with no (blank) password
Other articles you may like:


If I reset my modem with a paperclip does this reset alter the password my isp has given me ( pppoe)
No, the PPoE password remains the same.
Hi a dinosaur Dlink-34A3 never been plugged in to change anything.. can I update firmware via a phone? If not … best option..
Having issues with wifi camera assume I need to upgrade/update
Still works after 4 yrs would like to get the most out of unit.
I have no idea, can’t find any firmware for it online.
hi,
just a very simple question:
my d-link router has 5 holes to put in the internet cable. The first four are numbered 1, 2, 3, 4 and the last is yellow and says internet below.
What is the difference between those 5 holes? if I put the internet cable in the one which says internet, the internet does not work on my lap-top, so I tryed to put the internet cable in no. 4 and now it works. Why?
Kind regards
Jesper
Port 5 is used to connect your modem. The other 4 are used for your local network.
Please I need wireless configuration
Obrigado por compartilhar informações úteis, muito bom
Thanks, mate, this information was very helpful. Thanks for posting the article..keep posting articles. Being a newbie in d-link, I was finding it difficult to change the password. Thanks to you I can finally change the password.
Mate. I just can’t get my dlink DSL-2740M To connect to the internet. Sooo frustrating
I tried setting my DNS settings to two different adult blocking sites (ex. 208.67.222.222) and none of them work. This is very frustrating. I must be missing something because this works perfectly fine on my netgear router.
Did you try restarting the clients after you have changed the DNS servers? You can check the configuration on Windows the following way:
press windows key + x
choose cmd or powershell
type : ipconfig /all
This shows you the assigned IP Address and DNS servers.
Today it just started working.. i have no idea why because i didn’t change anything or restart anything. It wasn’t working on all my devices. Iphones, androids and PC’s. It’s working now though so I’m happy about that. Thanks for the tips!!
Thanks!
Again Thanks
Thanks for posting article..keep posting always.
Thanks for posting article…keep posting article
Thanks for posting article..keep posting article.
Thanks for sharing useful information, it’s really amazing.
Thanks mate, this information was quite helpful. Being a newbie in dlink, I was finding it difficult to change the password. Thanks to you I can finally change the password.