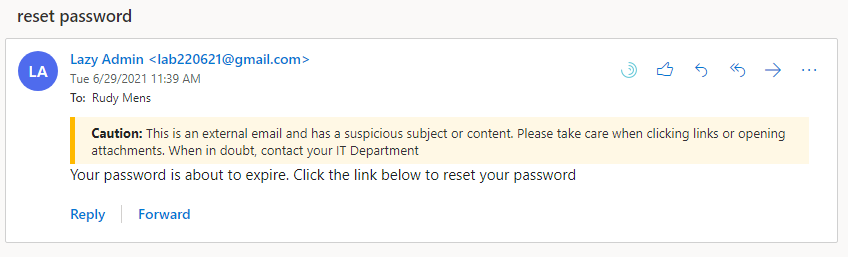
Phishing emails are one the biggest security threads at the moment. The phishing emails are getting better every year making it hard to block them up front. Typically users find them also hard to recognize and click too often on the links in the emails. We can prevent that by adding an external email warning or tag external emails.
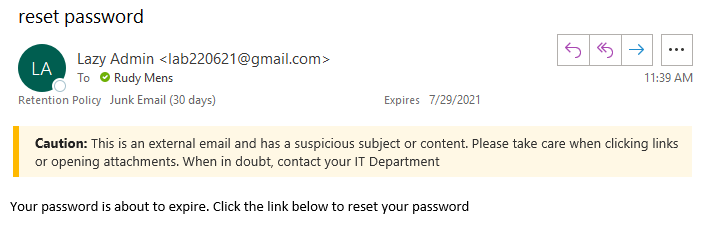
There are basically two options, which you should both implement. The first one is enabling the external email tag in Exchange Online. This will enable a built-in warning between the subject and body of the email when the email is sent from outside your organization.
The second option is to add a custom warning banner at the top of the email. We can show the custom warning based on words in the subject or body, making it really versatile. It allows us to show a warning for phrases like, “keep your password”, or “update your password”
In this article, I will explain how you can enable the Exchange Online External Tag and create custom external email warnings in Office 365 and Outlook.
Enable External Email Tag
External email tagging is an extra security layer to help protect you against phishing emails. Features like SPF, DKIM, and DMARC already do a great job in preventing most phishing emails, but we all know that it’s still not enough.
Especially spoofed emails, which seem to have been sent from a trusted source in your organization, are a great security risk.
Microsoft recently launched a new feature in Exchange Online to help increase the user’s awareness by automatically tagging external emails. The external tag is supported in the following versions of Outlook:
- Outlook Online
- Outlook for Window – rollout started may 2021
- Outlook for Mac – Version 16.47 and higher
- Outlook Mobile App – iOS and Android – version 4.2111.0 and higher
How to Enable External Email Tagging
At the moment we can only enable external email tagging through PowerShell. Make sure you have the Exchange Online module installed before you start.
Note
It can take up to 48 hours before the external tag will show up in Outlook. Only new emails will get tagged after you enabled the feature, existing emails won’t.
Step 1 – Connect to Exchange Online
The first step is to connect to Exchange Online.
Connect-ExchangeOnline -userPrincipalName john@contoso.com
Step 2 – Enable external tagging
The next step is to enable the external tagging in Exchange Online.
Set-ExternalInOutlook -Enabled $true
You can verify the settings with the following cmdlet:
Get-ExternalInOutlook

# Result:
RunspaceId : 4b07eecc-34c5-4add-8ee4-80d25aa4aff4
Identity   : 11e55098-68ad-4992-aaf8-c5fdceb3b6da
Enabled    : True   # < External tagging enabled
AllowList  : {}
Step 3 – Add domains to allow list (optional)
It’s possible to exclude domains from the external tag. This can be useful if your organization has different tenants or work closely with specific partners.
By using the @{add=""} syntax we make sure that any existing domain in the list is preserved. Without it, all existing domains in the AllowList would be removed.
Set-ExternalInOutlook -AllowList @{Add="lazyadmin.nl", "lazydev.nl"}
To remove a single, or multiple, domains from the list you can use the following syntax
Set-ExternalInOutlook -AllowList @{Remove="lazyadmin.nl", "lazydev.nl"}
We can verify the settings with the following cmdlet
Get-ExternalInOutlook

# Result
RunspaceId : 6468fcef-1cb9-4d6c-9cae-6b8dbc999971
Identity   : 11e55098-68ad-4992-aaf8-c5fdceb3b6da
Enabled    : True
AllowList  : {lazyadmin.nl, lazydev.nl} # domains added to allow list
Tagging external emails in Outlook is a new feature in Microsoft Office 365. New features are always first rolled out to the insiders and targeted release tenants. If it’s doesn’t work after 48 hours or you want new features faster for your tenant, then make sure you change the Release Preferences in the Microsoft Office 365 Admin Center.
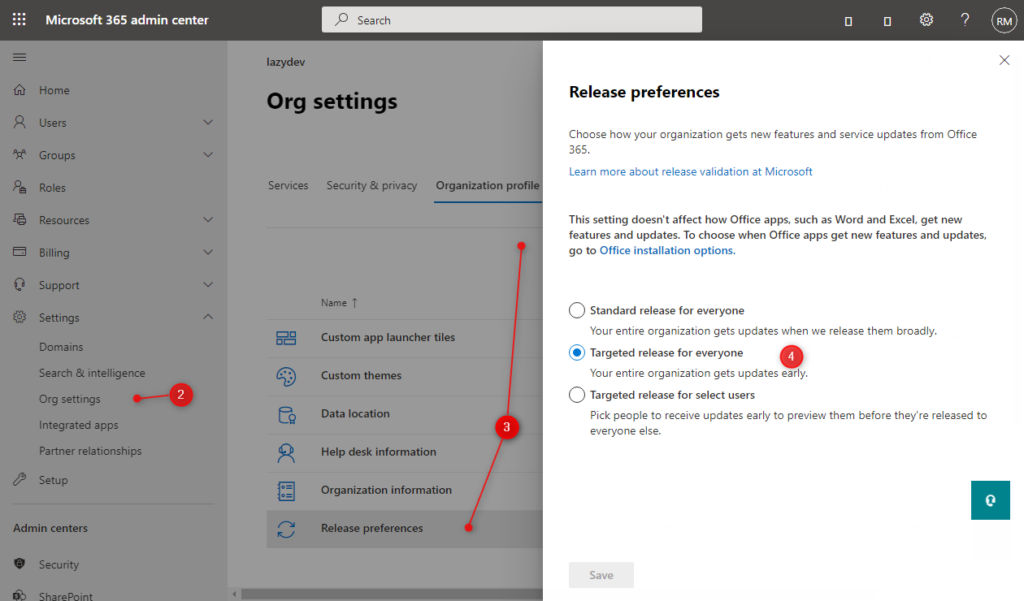
- Open the admin center
- Go to Settings > Org Settings
- Click on Organization profile and select Release Preferences
- Make sure that Targeted release for everyone is selected.
Create External Email Warning
External email warnings are custom messages that you can add to the top of the email. It’s still a good idea to warn your users of malicious emails, even though we can now tag external emails in Exchange Online. The custom warning allows us to warn users based on the content or subject of the email.
So we are not going to warn users for every single external email with this, only if the content or subject contains specific words or phrases.
To create the external email warning we are going to use Exchange Transport Rules. You can use this method both in Exchange Online and Exchange On-Premise.
Note
I have also created a script that will show a warning then users receive an external email with the same display name as a user of your organization (Impersonation). Read more about it in this article.
We are first going to use the Office 365 Exchange Online Admin Center to configure the external email warning. At the end of the article, I also have a PowerShell script that you can use.
Configure External Email Warning in Exchange Online
If you want to configure the external email warning for only a single-tenant, then it’s more convenient to use the Exchange Admin Center for this.
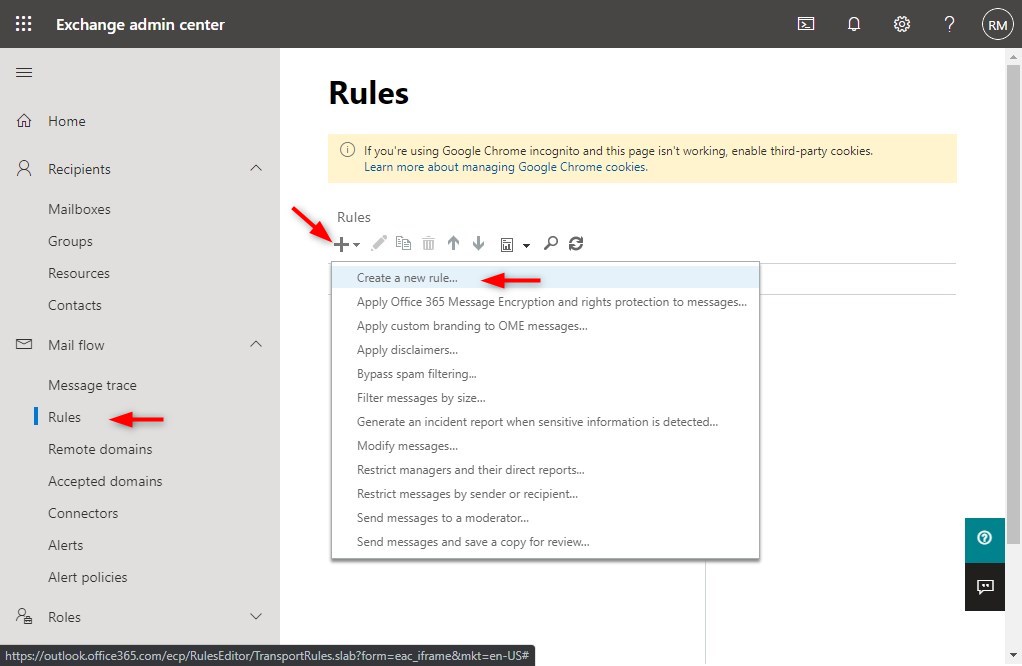
Step 1 – Create a new Mail Flow Rule in the Exchange Admin Center
– Login to the Exchange Admin Center
– Expand Mail flow
– Select Rules
– Click on the plus and select Create a new Rule
Step 2 – Give the rule a name
Enter a name for the rule so you can easily recognize it later, for example, “external email warning”
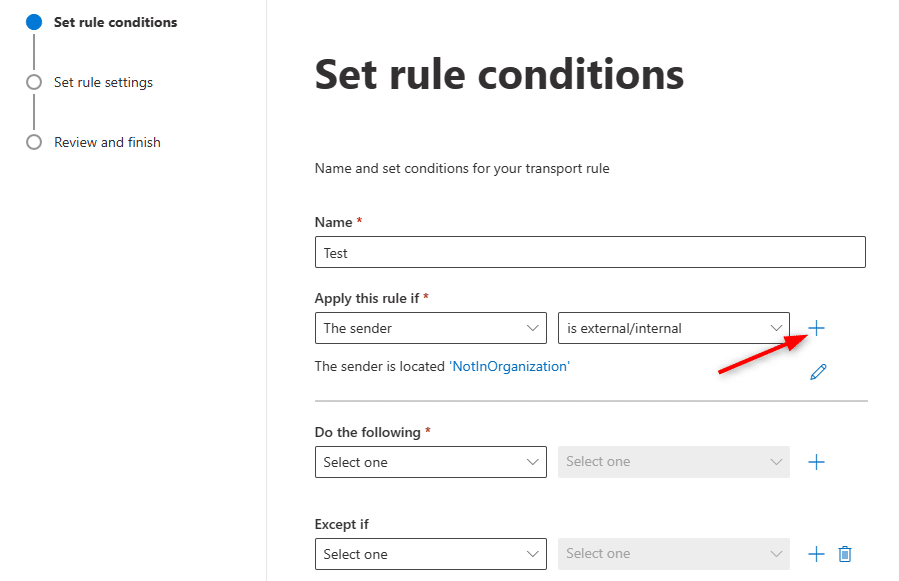
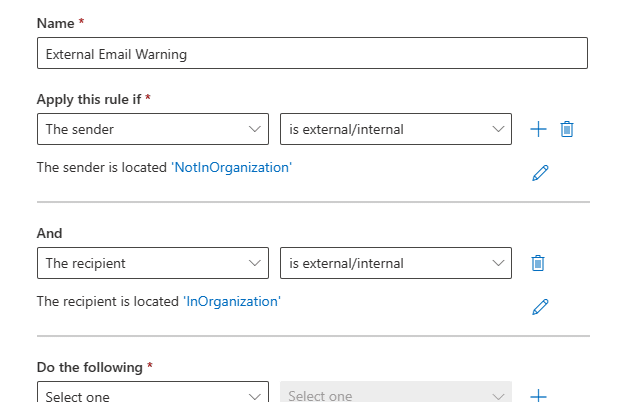
Step 3 – Configure Apply this rule if
We only want to apply the rule when the email comes from an external source. And we also want to add a filter to match the subject or body against a list of words.
- Click on Apply this rule if
- Choose The sender… is external/internal
- Select Outside the organization
We need to add extra conditions, to do this you will need to click on + Icon behind the rule.
You can add as many rules as needed by using the + icon. In the new rule select the following options
- Choose The recipient is … external/internal
- Select Inside this organization
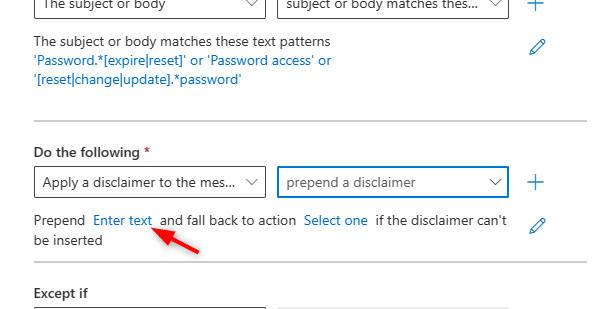
We are going to add one more condition so we only show the warning when the subject or body matches specific words or phrases:
- Click on Add Condition (plus icon) behind the Apply this rule if
- Choose The subject or body matches…
- Select Subject or body matches these text patterns
Now you can add all words and phrases manually or use PowerShell for this. Just add one or two phrases for now and we will update the list later with PowerShell.

The list below is based on the Regex list from SwiftOnSecurity that you can find here on GitHub.
Password.*[expire|reset]
Password access
[reset|change|update].*password
Change.*password
\.odt
E-Notification
EMERGENCY
Retrieve*.document
Download*.document
confirm ownership for
word must be installed
prevent further unauthorized
prevent further unauthorised
informations has been
fallow our process
confirm your informations
failed to validate
unable to verify
delayed payment
activate your account
Update your payment
submit your payment
via Paypal
has been compromised
FRAUD NOTICE
your account will be closed
your apple id was used to sign in to
was blocked for violation
urged to download
that you validate your account
multiple login attempt
trying to access your account
suspend your account
restricted if you fail to update
informations on your account
update your account information
update in our security
Unusual sign-in activity
Account Was Limited
verify and reactivate
has.*been.*limited
have.*locked
has.*been.*suspended
unusual.*activity
notifications.*pending
your\ (customer\ )?account\ has
your\ (customer\ )?account\ was
new.*voice(\ )?mail
Periodic.*Maintenance
refund.*not.*approved
account.*(is\ )?on.*hold
wire.*transfer
secure.*update
secure.*document
temporar(il)?y.*deactivated
verification.*required
blocked\ your?\ online
suspicious\ activit
securely*.onedrive
securely*.dropbox
securely*.google drive
view message
view attachment
Step 4 – Adding the external email warning
With the conditions in place, is the next step to add the warning that we want to display. We are going to add the external email warning example below. But you can customize it to your needs of course.
At the end of the article, I have added a couple of other examples for the warning message.
We can use some basic HTML to format the warning message:
<!-- Yellow caution banner -->
<table border=0 cellspacing=0 cellpadding=0 align="left" width="100%">
<tr>
<!-- Remove the next line if you don't want the Yellow bar on the left side -->
<td style="background:#ffb900;padding:5pt 2pt 5pt 2pt"></td>
<td width="100%" cellpadding="7px 6px 7px 15px" style="background:#fff8e5;padding:5pt 4pt 5pt 12pt;word-wrap:break-word">
<div style="color:#222222;">
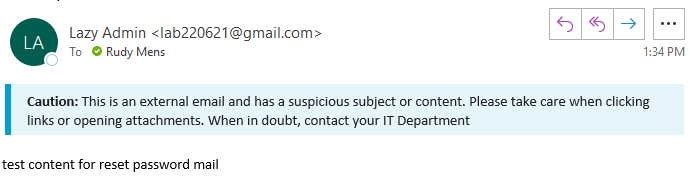
<span style="color:#222; font-weight:bold;">Caution:</span>
This is an external email and has a suspicious subject or content. Please take care when clicking links or opening attachments. When in doubt, contact your IT Department
</div>
</td>
</tr>
</table>
<br />
- Click on Do the following
- Choose Apply a disclaimer to the message
- Select Prepend the disclaimer…
- Click on Enter text…
- Paste the HTML code from above into the text box
- Click on Select one.. and set the fallback action to Wrap
Step 5 – Add Exceptions
You might want to add some exceptions to the rule. You may have for example an application that sends emails with a password reset link. We can add multiple exceptions under Except if.
The exception can be based on domains, specific sender, words, IP Addresses, etc.
Step 6 – Save the rule
With the rule completed, you can save it to enable it. If you want to test the rule first you can change the Apply this rule if condition This Recipient is located to is this person and enter your own email address.
This way the rule will only be applied to your mailbox, allowing you to safely test it before rolling it out to the organization.
The complete rule should look similar to this:
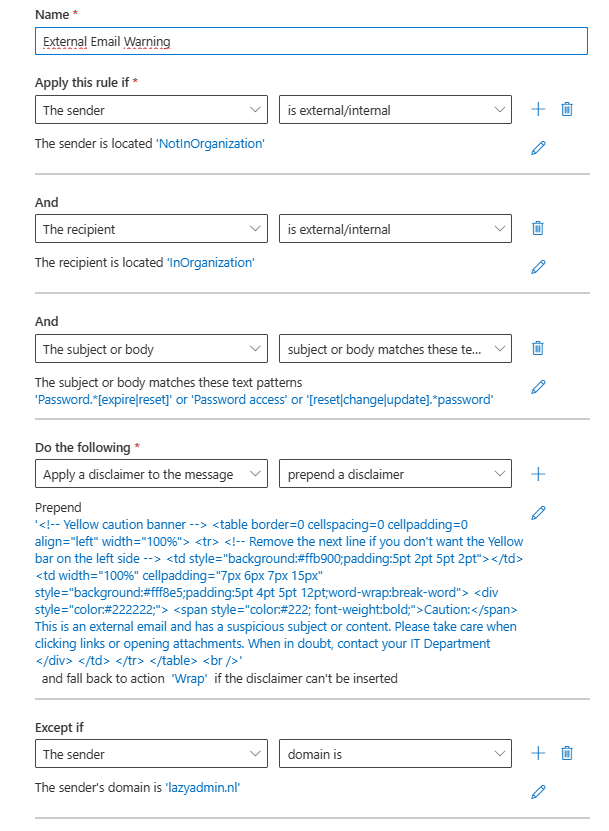
Step 7 – Add all the words and phrases with PowerShell
The list of words and phrases is pretty long, so instead of adding them all manually, we are going to update the transport rule with PowerShell.
First, we need to get the transport rule based on its name. This is the same name we entered in step 2. If you are unsure, you can also list all the transport rules with Get-TransportRule
I always do a Get first to be sure that I have the correct rule before making any changes to the configuration of the rule.
# Connect to Exchange Online
# Enter your userprincipalname to use SSON
Connect-ExchangeOnline -userprincipalname john@contoso.com

# Get the transport rule
Get-TransportRule -Identity "External Email Warning" | select -ExpandProperty SubjectOrBodyMatchesPatterns
This should return the rule that we have just created with the words or phrases that you entered manually in Step 3.
I have saved the patterns in a text file in my temp folder. This way we can easily import it with PowerShell:
# Update the transport rule with all the patterns
Set-TransportRule -Identity "External Email Warning" -SubjectOrBodyMatchesPatterns (Get-Content C:\temp\patterns.txt)

# Check if the import was successful:
Get-TransportRule -Identity "External Email Warning" | select -ExpandProperty SubjectOrBodyMatchesPatterns
Using PowerShell to create the External Warning
If you want to add the external email warning to multiple tenants, then it’s easier to use PowerShell. The script below creates an Exchange Online transport rule with all the settings as described earlier.
Make sure you have the patterns.txt in the same folder as the script.
# Connect to Exchange Online
Write-Host "Connect to Exchange Online" -ForegroundColor Cyan
Connect-ExchangeOnline

$HTMLDisclaimer = '<table border=0 cellspacing=0 cellpadding=0 align="left" width="100%">
	<tr>
		<td style="background:#ffb900;padding:5pt 2pt 5pt 2pt"></td>
		<td width="100%" cellpadding="7px 6px 7px 15px" style="background:#fff8e5;padding:5pt 4pt 5pt 12pt;word-wrap:break-word">
			<div style="color:#222222;">
				<span style="color:#222; font-weight:bold;">Caution:</span>
				This is an external email and has a suspicious subject or content. Please take care when clicking links or opening attachments. When in doubt, contact your IT Department
			</div>
		</td>
	</tr>
</table>
<br/>'


Write-Host "Creating Transport Rule" -ForegroundColor Cyan

# Create new Transport Rule
New-TransportRule -Name "External Email Warning" `
									-FromScope NotInOrganization `
									-SentToScope InOrganization `
									-SubjectOrBodyMatchesPatterns (Get-Content $PSScriptRoot\PhishingPatterns.txt) `
									-ApplyHtmlDisclaimerLocation Prepend `
									-ApplyHtmlDisclaimerText $HTMLDisclaimer `
									-ApplyHtmlDisclaimerFallbackAction Wrap

Write-Host "Transport rule created" -ForegroundColor Green
You can also find the complete script, external email warning HTML code, and pattern list here in my GitHub Repository.
External Email Warning Examples
I have created a couple of external email warning examples that you can use. Some organizations may want a more prominent banner than others. These examples can be used directly or can help you with creating your own warning.
Make sure you leave the <br/> at the end of the warning banners because this will add an enter (white line) between the warning and the actual mail content.
Example 1 – Yellow warning banner
If you don’t like the dark yellow bar on the left side, then you can remove line 5 from the HTML code.
<!-- Yellow caution banner -->
<table border=0 cellspacing=0 cellpadding=0 align="left" width="100%">
  <tr>
    <!-- Remove the next line if you don't want the Yellow bar on the left side -->
    <td style="background:#ffb900;padding:5pt 2pt 5pt 2pt"></td>

    <td width="100%" cellpadding="7px 6px 7px 15px" style="background:#fff8e5;padding:5pt 4pt 5pt 12pt;word-wrap:break-word">
      <div style="color:#222222;">
        <span style="color:#222; font-weight:bold;">Caution:</span>
        This is an external email and has a suspicious subject or content. Please take care when clicking links or opening attachments. When in doubt, contact your IT Department
      </div>
    </td>
  </tr>
</table>
<br />
Example 2 – Blue information bar
The HTML code for this warning banner is:
<table border=0 cellspacing=0 cellpadding=0 align="left" width="100%">
  <tr>
    <td style="background:#00A0d2;padding:5pt 2pt 5pt 2pt"></td>
    <td width="100%" cellpadding="7px 6px 7px 15px" style="background:#e5f5fa;padding:5pt 4pt 5pt 12pt;word-wrap:break-word">
      <div style="color:#222222;">
        <span style="color:#222; font-weight:bold;">Caution:</span>
        This is an external email and has a suspicious subject or content. Please take care when clicking links or opening attachments. When in doubt, contact your IT Department
      </div>
    </td>
  </tr>
</table>
<br/>
Example 3 – White background warning
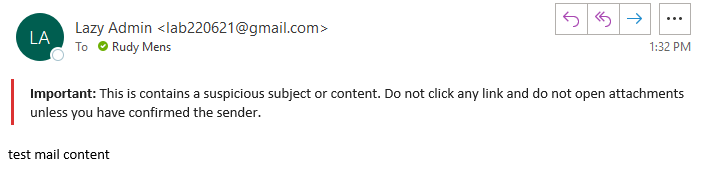
You can also use only a small red or dark yellow line in front of the warning.
<table border=0 cellspacing=0 cellpadding=0 align="left" width="100%">
  <tr>
    <td style="background:#dc3232;padding:3pt 1pt 3pt 1pt"></td>
    <td width="100%" cellpadding="3px 6px 3px 15px" style="background:#ffffff;padding:3pt 4pt 3pt 12pt;word-wrap:break-word">
      <div style="color:#222222;">
        <span style="color:#222; font-weight:bold;">Important:</span>
        This is contains a suspicious subject or content. Do not click any link and do not open attachments unless you have confirmed the sender.
      </div>
    </td>
  </tr>
</table>
<br />
Wrapping Up
I hope this article helped you with setting up your own external email warning. Make sure you enable the external email tag because this can really help you, users, with recognizing spoofed phishing mail earlier.
The custom external email warning that you can add to Office 365 and Outlook is really versatile. I don’t like to show the banner on every external email, because users will get too familiar with it, and it will lose its effect.
So by adding the extra conditions, we make sure that only the mail with a high risk is flagged.
Make sure you also read this list with more than 18 security tips to protect your Office 365 tenant and check out this script for impersonation warning in Outlook. If you have any questions, just drop a comment below.


Rudy – Hello, Is there a way to turn this warning off or incoming replies? As of now, ever email from the external user in an email chain gets the warning. Thanks, Mike
In the Exhange Online rule, add an Except if, and choose “The subject of body” “Subject or body matches any of these phrases”. Here you can add your warning line. This should prevent the double warning.
Hello, is there a way to put a space between the warning and the text in the email? It works that way in classic Outlook, but not in the new Outlook. Thanks!
Are you sure you are using the HTML format? It should work in the new Outlook app as well.
Yes, It works in both classic and new Outlook. But, we want a space between the warning message and body of the email. Is that possible?
ah I think I misunderstood you. Have your tried adding a new line in the warning message? In the example, the HTML code ends with
.
None of this code appears to work to add style in Microsoft 365 Exchange Rule creation process. Regardless of styling, the banner remains plain text without color or style changes.
Check if you have set your message format to HTML. If it’s set to plain text, then the styling will indeed be lost.
Hi, Great article. We have an external email warning set. Is there a way to have a button that allows me to “Report Suspicious” emails? Like the Report Phishing button add-in but without using the add-in. Many of our users don’t think to report phishing using the add-in (if they have it). This way, the report phishing option would be right there when viewing the email.
No, not that I am aware of. I think you really need Microsoft Defender for 365 for this. But then it still will be a button.
Hi Rudy, does the list with Phishing patterns needs updating and if yes, what would be godd/trusted resources for this?
Thank you.
The list with patterns is 6 years old, so yes it needs updating. But I haven’t find any other source for it.
We already have this warning banner implemented in our environment, and some users are still clicking on links embedded in external emails.
So now I’m looking to implement a warning message (“You are trying to open a link from an untrusted source do you want to proceed? Yes or No”) that pops up whenever a user tries to click a link in an external email.
I’ve been struggling with that for months, please does anyone have an idea on how to pull that off on MS Office 365 (Outlook)?
Showing a popup that interacts with the link would require a custom VBScript as far as I know. You won’t be able to pull that off with Exchange rules.
Maybe this works?
OK, I see! Not used to that at all… but thanks for your answer!
Hello
It is not related to this topics though.
I want to colour code subject line(Stand Out) for all users if message is coming from Service desk with Service ALert. Is there any way?
Thank you in Advance
That is not possible. You could add a message banner or warning banner to the beginning of the email.
maybe i’m not reading the question clear, but it is possible to use a different markup for e-mails send from a specific e-mail address (servicedesk) and words in subject (alert).
Yes that is correct. But he wanted to change the color of the subject line. And that is not possible. You can indeed show a custom warning when the email comes from the servicedesk.
External Tag works perfectly only while in office having a local IP.
As soon as I connect to an external network then the Tag disappears.
Is there any way I can have the Tag showing while I am in or out of office?
Thanks in advance.
I haven’t seen before that the network of the client has influence whether or not the external tag is displayed.
Microsoft released their native solution for that: https://techcommunity.microsoft.com/t5/exchange-team-blog/native-external-sender-callouts-on-email-in-outlook/ba-p/2250098
Yes, that feature is described in the first part of this article 😉
Hi ,
How to enable similar warning message when user wants to send an email with attachment to external domain?
Thanks heaps
Mr. Mens,
Thanks so much for the excellent External Email Prepend Notification guide and example. I properly see the prepend warning notice in new, external, inbound email but it’s not formatted per the HTML/CSS you provided. Perhaps I need a higher level O365 Tenant? I literally copy/pasted and it’s exactly the same as your example.
I much appreciate any thoughts you can provide.
Steven
It will only be formatted as HTML if the message that you receive is also in HTML format. If you receive a plain text email, then HTML formating isn’t applied
I’m having an internal battle with my Linux self wondering if maybe those regexps are wrong? The [] construct is a character class, not a () grouping. So wouldn’t something like [reset|change|expire] match on “resangire”?? I think it should be (reset|change|expire). But then you’ll run into issues where the parser doesn’t like (groups) adjacent with “.*”…
Hi Thanks for your article. How can an employee of a company warn ourselves from external emails when we are not the admin to our outlook?
our IT security team will have regular fake phishing emails to trick us.
Those fake emails are part of user training, so it’s important that you learn from them. Talk with your IT team about adding external email tags.
Hi, for my employer I enabled the the External email tagging using PowerShell, and then setup the external email warning in Exchange Online.
I sent an email from my gmail account to test.
I received two emails in my Outlook program:
1. Microsoft Outlook
This email from the “postmaster” had the external email warning banner in yellow
2. The email from my gmail account with no warning banner.
Hi Rudy,
Thanks for the awesome guide and tips on how to create the email banners. Very useful and helpful information you have provided with clear instructions.
I was wondering if there is a way we can include the sender’s email address into the banner? For example: “The sender of this external email is xxx@xxx.com“. This will bring to attention any possible email impersonation by clearly displaying the sender’s email address.
Your help is greatly appreciated!
That is unfortunately not possible.
I’m not sure if this will help or not but I also created this External warning from this guide as well and it works great. But I also created another rule for the Display Name Spoofing / Impersonation and placed it above the priority of the External. So lets say Joe Blow is the Manager and his email is jblow@xyzcorp.com Now lets say someone sends in an email that shows Joe Blow in the From, which lets be honest is what most average employees look at and never pay attention to the actual email, but the email address is a gmail or yahoo address and not xyzcorp.com It will still tag it with the External in the subject but instead of a yellow box with External Email message I have the box Red with a different warning. Below is how it looks…
Is sent to ‘Inside the organization’
and ‘From’ header contains ”Employee1 Name’ or ‘Employee2 Name’ or ‘Employee3 Name’ or ‘Employee4 Name’ (I think you get the point)
and Is received from ‘Outside the organization’
Do the following
Prepend the subject with ‘[EXTERNAL]’
and Prepend the message with the disclaimer ‘
WARNING:
This email is claiming to be from an Employee of XYZCorp but is not using their XYZCorp Email. Please double check the senders email address before replying, clicking any links and/or opening any attachments.
‘. If the disclaimer can’t be applied, attach the message to a new disclaimer message.
and Stop processing more rules
Hi JC,
Thanks for putting forward this suggestion. This sounds useful, and will provide more visibility to any spoofing/impersonation emails that usually target upper management users. We will have a go at testing it out. Thanks mate.
Thanks for the brilliant guide. I’m having problems importing patterns.txt though… Powershell just sits there doing nothing. Is this the correct command:
Set-TransportRule -Identity “External Email Warning” -SubjectOrBodyMatchesPatterns (Get-Content C:\temp\patterns.txt)
Hi, Im also just getting PowerShell just sitting there doing nothing.
Installing Powershell v7 fixed it for me:
https://github.com/PowerShell/PowerShell/releases/download/v7.3.0/PowerShell-7.3.0-win-x64.msi
Hi.
Is it possible, when using the above method, to filter external emails in Outlook using a rule? I want to have a search folder and/or rule to easily allow me to focus on external emails over internal ones.
Yes, but in that case, I would add [external] to the subject line. Then you can create an Outlook rule based on the subject that begins with [external]
That’s what we do at the moment, but that breaks the conversation thread as each subject in each reply is different. I was hoping hat there was a solution that allows for the conversation thread to be kept intact.
OK, and if you add [external] between the brackets in the body of the text. So prepend and then in Outlook rules, search in the body for [external]?
Hi Rudy! Thank you for this.
However, I have the same problem just like Calum.
I tested sending message to my corporate email using my personal gmail and icloud account. The mail I received from my gmail account works perfectly but the mail from my icloud account only gets the disclaimer message in plain text. No background color or bold text. Please help how to solve it. Thank you
It seems that the emails from iCloud are not in HTML format. That is why you don’t see the colors or other styling options.
I only want to prepend coloured text with no banner, but this doesn’t seem to work.
“[EXTERNAL]”
You could just use the following HTML, (start with style=”color:#ff0000; font-weight:bold;”>[EXTERNAL]
Thank you for this article it has really helped me learn some PowerShell. I have used this in the past but at my new company users use the preview pane so we are going to go with the new native rules. Do you have a good write up for that? There’s is a Microsoft document your stuff is so much better.
I’m surprised nobody else brought these up honestly but there are two problems with this. One, if you put it in the subject line the subject line will eventually become and endless string of “EXTERNAL EMAIL WARNING RE: EXTERNAL EMAIL WARNING RE: EXTERNAL EMAIL WARNING….” clouding up the message preview. If you do the body of the email, you cant preview the body of the email in Outlook mobile. This is becoming a major hassle and I don’t know what to do to fix it. I need to get this right.
Message preview will indeed not be possible with this. But honestly, I don’t find it a big deal. I only warn based on keywords or malicious attachments. Haven’t got any complaints yet.
My boss unfortunately wants all external emails that come in to have the warning, so I don’t think this solutions will work for me. For now I have just prepended the body of the email with [EXTERNAL EMAIL] but I don’t think it’s a good long term solution for a couple reasons. Mainly, I think it is going to become noise very quickly and get ignored, so I’ve decided to create several of these rules which will move them around the email and color them differently that I’ll rotate so they remain noticeable, ever changing. I’ve been reading about something else though, have you heard of the native callout? As I understand it this will, at least on mobile, generate an actual pop up that has to be clicked indicating it is an external email. I’m not yet sure what it will do on the desktop application but I think this is a very good solution.
No haven’t heard of it. Only the External tag (mentioned at the beginning of this article) is the built-in method I know of.
You can leave off the External Subject Line if you choose, it’s not mandatory but simply a pre-warning. My users have not yet complained about any issues with the subject line. As for the Message Preview, I had 2 users complain about that. Both of them are knowledgeable and I know that they know how to spot fake messages, so for both of those users I Appended the message at the bottom of the email instead. To do this in my original Prepend Rule I added them as an Exemption (Except If – The Recipient is…) Then created a duplicate Rule where it only applied to them as the recipient (*Apply this rule if… The Recipient is…) I certainly would not do this for all of my users, luckily I have less than 75 and I know who I can trust and who I absolutely cannot.
I also forgot to mention that you can add an Exception to the Subject Line or Sender. Obviously if the Subject line already contains RE: [External] they are replying and it’s a known good email. So you can add an Exception (Except if… The Subject or Body… Subject Matches These Test Patterns “RE: [External]” or whatever your Prepend subject warning is.
Also if there’s a sender that is always causing the warning and they are a known good sender you can add the Sender as a Safe Sender and not to bother with the warning by adding (Except if… Sender is…) and add the email address.
Take a look at the native warning. This is what we are going to go with because of your exact concerns .
https://techcommunity.microsoft.com/t5/exchange-team-blog/native-external-sender-callouts-on-email-in-outlook/ba-p/2250098
This is great!
however when I run this in outlook, there is no spacing below the banner, It’s directly above the introduction of the email. Is there a way to add margin or padding below the banner?
Thanks for the nice and easy to walk-through tutorial. I do have a question about the Expressions list. I went to GitHub and it looks like this list hasn’t been updated since March 2017, do you know if there’s another place that may have a current list of expressions?
No, unfortunately not. If you find one, please let me know!
After poking around I’ve found that the following RegEx will tag everything with an embedded link in it with the EXTERNAL warning whether it has HTTP(s) in front of it or not
[-a-zA-Z0-9@:%._\+~#=]{1,256}\.[a-zA-Z0-9()]{1,6}\b([-a-zA-Z0-9()@:%_\+.~#?&//=]*)
Thanks for sharing!
I have set up the custom warning with the html from above but the banner shows without formatting in Outlook, what am I missing?
Have you set your message format in Outlook to HTML? You can find it under Format Text in a new message.
Hi Rudy,
Thank you very much for the great article, much appreciated!
I have the same problem, the warning only appears as plain text in both Outlook and Mac Mail, and I can’t see the option to change the text format. Can you provide some more detail on how we’re able to force the HTML message? (All other HTML-based mail such as newsletters, etc. seems to come through as expected.)
Thanks again!
Ah sorry, I totally misunderstood the situation here.
But you are saying that the warning isn’t displayed when you are receiving HTML formatted emails?
Thanks for the quick reply, Ruud.
No worries at all.
To clarify, I meant that my corporate account receives other HTML-formatted emails (like newsletters) correctly, so it is capable of showing HTML formatting (with styling, etc.).
I’m saying that when i send mail from any of my personal accounts to my corporate account (to test the ’email from outside the company’ rule), the warning message appears in Outlook as plain text – i.e. black text, except for URLs which are in the usual blue (and do work) but there is no yellow banner or other style applied (as defined by the HTML code in the rule in the Exchange Admin Centre).
I’ve tried sending mail from both my iCloud and Gmail accounts in both Apple Mail on the Mac and Spark on the iPhone. I’ve obviously tried basic text emails stating it’s a test, but i’ve also tried copying and pasting the contents of an HTML file loaded in Safari, but everything leads to the same result: the warning appears as plain text.
Thanks again for your help.
I am sorry, but I am unable to recreate the issue here. Tested the HTML banner in an HTML file, and it just works as expected in Chrome.
How does the banner look like when open the email in Outlook Online?
[Sorry for replying exactly here, Ruud, the reply button only appears on comments up to here and none further down the chain – strange!]
Yep, to clarify, if I copy the banner code, create an html file from it and then load that in Safari, it shows correctly.
Outlook online exhibits the same behaviour; interestingly, it doesn’t even automatically hyperlink URLs and email addresses though, which the Outlook and Mail app at least do
Thanks for your help anyway.. if we can’t find the problem, the plain text will suffice.
Hi Rudy
Thanks for the detailed description.
I have other request if you can help me out. I wanted to setup a rule/policy in the Office365 in which if some internal staff trying to send the email to outside the organization they can receive the pop-up message as soon as they type the external email.
is this possible?
If yes I will be sharing my contacts with this comment will be help full f you can share some of the steps with me.
Thanks
Jitendra
Email: iam_jitendra@hotmail.com
Yes, technically it’s possible. But in practice, it doesn’t really work that well.
The way to do this is to create a custom policy tip in the Compliance Center (Purview), under Data loss prevention > Policies. Here you can create policies based on keywords, recipient domain, or recipient address for example. When the conditions are met, you can show a policy tip (notification) in Outlook. Or even prevent the email from sending at all.
The problem with the policy tip is that it takes some time to show. Sometimes only a minute, but it can also take a couple of minutes or longer. So you can’t fully rely on the notification alone. But you could also forward the message for approval to a manager, or reject the message completely.
Hi Joe,
thanks for helping out. Whenever I am trying to import the patterns list via powershell, i am getting this error. I opened the GitHub link and copied the text from there, pasted it into a notepad and saved it as patterns.txt. Upon importing I am getting this error:
Cannot process argument transformation on parameter ‘SubjectOrBodyMatchesPatterns’. Cannot convert value
“System.Collections.ArrayList” to type “Microsoft.Exchange.MessagingPolicies.Rules.Tasks.Pattern[]”. Error: “Cannot
convert value “” to type “Microsoft.Exchange.MessagingPolicies.Rules.Tasks.Pattern”. Error: “A regular expression
specified for a transport rule must contain at least one non-blank character. A regular expression that consists of
only blank spaces isn’t allowed.””
+ CategoryInfo : InvalidData: (:) [Set-TransportRule], ParameterBindin…mationException
+ FullyQualifiedErrorId : ParameterArgumentTransformationError,Set-TransportRule
+ PSComputerName : outlook.office365.com
I think you will need to remove the empty lines in the list. It’s now trying to import an empty value.
My apologies, I had the name Joe stuck in my head when I wrote the message.
Thanks a lot Rudy for all your help. I tried running it again and this time this is the error I receive although the count of characters in the file is 2391.
================================================
The rule can’t be created because it is too large. It has 10056 characters, and the maximum number of characters is
8192. Reduce the size, either by removing content, such as words or regular expressions, from the rule; or by removing
conditions, exceptions, or actions from the rule.
+ CategoryInfo : InvalidOperation: (:) [Set-TransportRule], InvalidOperationException
+ FullyQualifiedErrorId : [Server=BYAPR12MB2855,RequestId=1cadd94c-df41-4f86-be5c-5afc24a477c6,TimeStamp=5/25/2022
1:45:41 AM] [FailureCategory=Cmdlet-InvalidOperationException] 6B3B1514,Microsoft.Exchange.MessagingPolicies.Rule
s.Tasks.SetTransportRule
+ PSComputerName : outlook.office365.com
================================================
Try using the list from the article, and not from GitHub. The list in the article is based on the GitHub version, which is longer and I thought is had also some issues with the regex in combination with the Exchange Online rules.
The list from the article worked perfectly fine. Thank you very much
As others have mentioned, this is great but it really annoys our users because it screws up the one-line preview. From an accessibility point of view, implementing this seems like a step backwards.
Hi Ruud, great article ! Apart from SPF, DKIM, DMARC, and the email warning, is there any other way to protect us from the email spoofing ? Many thanks for your sharing.
Defender for Office 365 or something like Sophos Email Security are good options.
Will this work for on-prem Exchange?
Yes, it should work on-prem as well.
Hi Rudy,
Came across your article while looking for help on an issue we’re having with our banner. Hoping you’ll have some thoughts on how we can accomplish what we’re trying to achieve.
We have a banner similar to your write up, though just for external senders. We’re starting to use Microsoft Defender’s Attack Simulations and find that the external sender banner does not apply to these emails. Any thoughts on how to apply our banner to our 365 Defender Attack simulations as well?
Thanks!
Defender Attack Simulations are sent from within your tenant, that’s why the rule won’t trigger.
Isn’t there anything in the body that you can apply the rule to? Otherwise, you will need to see if you can match the rule on the header of the message.
Is there any way of creating a rule in Outlook that filters out or stops this appearing?
CAUTION: EXTERNAL EMAIL. DO NOT CLICK LINKS OR OPEN ATTACHMENTS UNLESS YOU RECOGNISE THE SENDER AND KNOW THE CONTENT IS SAFE.M
My company has imposed this on us and it’s really annoying!
Thanks
No, you can’t filter it out. Talk to your IT dep and ask if they can fine-tune the rule in Exchange, so it’s only displayed when there are words in it like “reset password” or “login”, etc.
Love the content! But how do you know if someone spoofs your company’s domain? The “Outside the organisation” rule isn’t too descriptive regarding this. I have this question with more detail on a spiceworks post – https://community.spiceworks.com/topic/2354838-o365-apply-external-email-banner-to-all-emails-outside-of-o365-tenancy
Could you please take a look and let me know if you have any suggestions to my concerns?
We’re scared that if we apply this rule and user’s learn to trust it too much, then they could be duped. Can we define the rule to say outside of the office365 tenancy, rather than specified domains?
You could try to check if the sender from address in the header and/or envelope doesn’t match one of your domains. But I haven’t tested it personally.
Hi Ruud, I’m glad you wrote this up, it is really good. I wonder if this could even be taken a step further. Since these warning messages are written in HTML, is there a way to create a link right in the warning message to forward the flagged message to our Information security team? It seems like putting an email link in there would probably work, but I’m not sure if a Outlook Fowarding link could be embedded so our employees can easily forward these suspicious emails directly on to our IS team with just a click on this header link. Any thoughts?
You will need to add the exact subject and body to the mailto link. But I don’t see an option to add these in the disclaimer through a variable or something like that.
Hey Rudy, why do we need to set up a condition for “the recipients inside the organization?”
Isn’t that excessive? They are already.
When using an SMTP Relay the sending device or application can also be marked as “outside the organization”. When you use the SMTP relay to send directly to external you probably don’t want to apply to rule. So this is a bit of best practice to ensure that only emails to your users are targeted.
Hi, Thank you for the great guide. Appreciated the bundled code for the HTML based header.
Ah yes, it seems I don’t have “prepend” as an option (append is the last value in the drop-down).
Is there something I need to do elsewhere?
Thanks
Just checked it, you will first need to select “more options”, which is a bit at the bottom of screen, written in blue. Without more options, you indeed only see append.
Perfect, thanks for your help. Much appreciated.
Hi thanks for this, really useful. Needed a shortcut to achieve and this was perfect.
One quick question though, I used the html suggested but for some reason my warning message sits at the bottom of the email message rather than before!
Any ideas why?
Thanks
Make sure that you select prepend (Step 4) instead of append
I see you use Retention Policies for emails classified as Junk. Could you show me how you did that, but, of course, keep all other emails.
I think you mean mail flow rules?
What I mean is, an email that comes in and it is marked by the system as Junk. How do you force the retention policy to apply, as you have, to be 30 days and then delete?
Ah that policy. Right-click on your junk folder in outlook, select properties > policy. There you can set a policy for a folder
What a fantastic guide, HULDE!
do you have any tips/tricks on how to make these banners multilingual?
You can create separate rules and add the condition: The Recipient > Is a member of this group. Then make groups based on the language that your internal user needs to get.
Hi, do you have the disclaimer text to enter via O365 gui instead of powershell? I have the message working but it does not highlight it in yellow.
You can just enter the HTML code from step 4 in the GUI
Hi,
We have recently implemented this and it works like a charm. However we have some complaints from some users that in Outlook it now always shows the Caution: this is an external mail in the preview windows from Outlook and/or OWA.
They would like to see the first line of the mail again. I’m guessing there is no solution for this but thought it won’t hurt to ask 🙂
To only would be to append the warning (so add it below the content). Don’t see any other option to leave the original content in the pre-header.
You could also exclude some of the regular external domains.
Hello,
After sharing your article with our Exchange administrator, he stated that the Native Microsoft External tag cannot be customized. He cited the article at the link below to support his statement. I’m confused. Help.
The native tag can’t be edited indeed, but we can add our own warning. So we enable the tag, that is one part. And the next step is that we added a custom warning for potential phishing mails (based on the content)
Dear Team,
Some great suggestions I can see. What if I want to make alert and differentiate external mail without opening the actual mail. I mean it should be visible and marked market in Inbox so that user knows it is from external source. Can I do that?
The warning is displayed in the inbox below the subject line
That worked great, thanks for your help!
Thanks Rudy,
Great tutorial, is there a way to only put the warning on the initial email that was received and not the correspondence back and forth?
Thanks,
What you can do is add an exception:
Except If:
– The subject or body > Subject or body includes any of these words
– Add a phrases of the warning
Hello Rudy, Nice post. Could you please tell whether this rule can slow down sending/receiving of mails ?
The rule will have minimal impact
Thanks,
The code is amazing and the instructions are accurate.
Is it possible to forward the alert to the end of the email that arrives?
You could add an action to the “Do the following” part, and then select “Generate incident report and send it to”
Hello, Rudy.
How can I change the size of the text so that the warning is smaller than the actual email content text?
Thank you.
Yes, you should be able to change the font size by adding font-size:12px; in the style part:
Caution:

This is an external email and has a suspicious subject or content. Please take care when clicking links or opening attachments. When in doubt, contact your IT Department
Hi Rudy,
Policy worked but there is a notification also sent to sender and how to enable only policy tips without any notification and also without send the notification any dummy email.
Hi one doubt
if I use this: Password.*[expire|reset|access] on my 365 rule every mail contains:
password * show me alert box example:
Specops Password Auditor
the sentence is correct? or maybe is like this: Password*.[expire|reset|access]
flipping .* to *.
I notice the github regex list hasn’t been updated since 2017, is there a newer repository?
Not that I am aware of. But this list is a good starting point.
Hi Rudy,
How to enable warning message or tips when user draft an email with attachment .The warning message/Tips will appear with some custom text like below before sending the email to external domain.
“Please make sure that the attachment does not include any confidential information that is not intended to be shared outside the organization. Where appropriate please ensure that files are sent securely and/or encrypted where possible.”
You will need to use a policy tip for that.
Awesome! Thanks and I look forward to your article
Here you go: Add Impersonation Warning to Outlook Messages
Hi ,
How to enable similar warning message when user draft an email with attachment .The warning message will appear with some custom text before sending the email to external domain.
You can’t show a warning before the user has sent the email.
Hi there, do you have an example where you can warn recipients about an external email address using a Display Name that matches one of our company’s display names? For example, Pat Smith, CEO of Company with an external email address of xxxxxxx@gmail.com, sends an email to accounting@company.com to wire him money while he is out of town, etc. Or, better yet, send the emails directly to trash?
And, thanks for sharing this stuff. I am an accountant who has been coerced into taking on some IT duties. Your help is greatly appreciated!
I have created a script for that, but not an article. I will try to write it up next week.
I followed your examples and everything worked great except for the white space between the warning and the beginning of the message. I even added another and the message is still pressed right up against the warning box. Any thoughts?
Must be in line 7 of the warning template. Double-check the quotes, or mail me your HTML code here of your warning message
Amazing job, thanks for this incredible guide.
Thanks for the great guide, but I’m still having a few issues.
– Tags aren’t working yet, but I’ll give it a few days.
– I can’t figure out how to select different parameters in PowerShell so that I can update HTML there. (ex: select -ExpandProperty SubjectOrBodyMatchesPatterns)
– All of the HTML works for me, except line break code isn’t working for me, any idea why? I’ve tried multiple variations. This is through the web gui.
Tags can indeed take some time. In one of my tenants, it took almost a week.
You can do line brakes with
You can update the HTML through PowerShell with:
Set-TransportRule -Identity "External Email Warning" -ApplyHtmlDisclaimerText "HTML CODE"And if you want to get the current HTML you can use:
Get-TransportRule -Identity Test | Select -ExpandProperty ApplyHtmlDisclaimerTextThank you, and external tags finally kicked in, and I get the powershell now. I think you accidentally left out the line break code you meant to include.
One other issue I am having is with adding the subject/body rules in the web gui. If they contain any special characters, it is giving me an error (that there are blank items or end with blank spaces).
Sending you a tip, thanks for your article and your help.
Thanks for the tip, much appreciated,
Which line break do you mean?