When you have multiple domain controllers in your domain, then there is a single master for each of the 5 FSMO roles that can perform updates in the Active Directory. This is commonly the first domain controller you have installed in your network, but we can transfer FSMO roles to other domain controllers.
There are not a lot of use cases where you need to transfer the FSMO roles manually. The roles are transferred automatically when you demote a domain controller. And splitting the roles is only necessary for global multi-domain forest environments.
In this article
In this article, I will explain how you can transfer all the FSMO roles quickly, both through the GUI and PowerShell. And we will also look at how to split the roles between the domain controllers.
Why Transfer FSMO Roles?
So when do you need to transfer the FSMO role? It’s often thought that you need to transfer them before you demote a domain controller. But that isn’t entirely true. Here are some reasons why Transferring FSMO roles may be required:
- Demoting a domain controller: The FMSO roles are transferred automatically when demoting a domain controller. However, you can’t choose which domain controller during the process. So in some cases, you may want to manually transfer the FSMO role.
- Load balancing: Transferring roles may be necessary to distribute the FSMO role responsibilities evenly across domain controllers.
- Disaster recovery: In the event of a domain controller failure, transferring FSMO roles to another domain controller helps maintain the continuity of Active Directory operations.
- Upgrading hardware or software: During hardware upgrades or operating system migrations, transferring FSMO roles ensures their availability on the new infrastructure.
When you choose to transfer the FSMO role, try to pick a domain controller that is the most resilient. For example, a dc in the data center is often better protected against downtime than a dc that is located on-premise.
Understanding FSMO Role Transfer
Before we start with the transfer of the FSMO roles, it’s important to know the five roles and their function within the Active Directory:
- Schema Master: Manages modifications and additions to the AD schema.
- Domain Naming Master: Controls the addition or removal of domains in a forest.
- RID Master: Allocates unique security identifiers (SIDs) to objects within a domain.
- PDC Emulator: Emulates the behavior of a primary domain controller for backward compatibility.
- Infrastructure Master: Ensures the consistency of object references between domains.
If you need to split the FSMO roles (which in 99% of the situations isn’t needed), then it’s important to keep the Schema Master and Domain Naming Master roles together, and the RID Master and PDC Emulator roles. The Infrastructure Master role isn’t really used anymore, but still assign it to dc.
Check FSMO roles
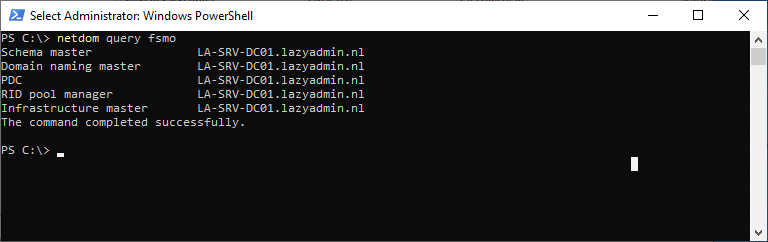
Before we transfer the FSMO roles, it’s a good idea to check how the FSMO roles are assigned now. There are two methods to view the current roles, we can use the netdom query tool and PowerShell. The first only requires a single command, for the latter we will need to get the Forest and Domain roles separately.
Netdom Query Tool
Open a command prompt or PowerShell window on a domain controller and type the following command:
netdom query fsmo
Using PowerShell
As mentioned, for PowerShell we will need to run two commands to get all the roles. The first one will get the roles for the domain and the second command checks the roles for the forest:
# Get Domain roles
Get-ADDomain lazyadmin.nl | Select PDCEmulator, RIDMaster,InfrastructureMaster

# Result
pdcemulator              ridmaster                infrastructuremaster
-----------              ---------                --------------------
LA-SRV-DC01.lazyadmin.nl LA-SRV-DC01.lazyadmin.nl LA-SRV-DC01.lazyadmin.nl

# Get Forest roles
Get-ADForest lazyadmin.nl | Select SchemaMaster,DomainNamingMaster

# Result
SchemaMaster             DomainNamingMaster
------------             ------------------
LA-SRV-DC01.lazyadmin.nl LA-SRV-DC01.lazyadmin.nl
Method 1 – Use PowerShell to Transfer FSMO roles
The easiest way to transfer FSMO roles is with the help of PowerShell. We can transfer all the roles with one command, or transfer each role individually to another server.
Before you can transfer roles, you will need to make sure that you are a member of the schema admin group in the Active Directory. By default, the administrator account isn’t a member of this group. You can find the Schema Admin group in the Active Directory under Users.
We will be using the Move-ADDirectoryServerOperationMasterRole cmdlet to transfer the roles. You can specify which role you want to move, or specify all of them in a single command:
Move-ADDirectoryServerOperationMasterRole "LA-SRV-DC02" -OperationMasterRole PDCEmulator,RIDMaster,InfrastructureMaster,SchemaMaster,DomainNamingMaster
If you want to split the roles between multiple domain controllers, then you only have to specify the roles that you want to move:
# Transfer the roles PDCEmulator,RIDMaster,InfrastructureMaster to DC02
Move-ADDirectoryServerOperationMasterRole "LA-SRV-DC02" -OperationMasterRole PDCEmulator,RIDMaster,InfrastructureMaster

# Transfer the roles PSchemaMaster,DomainNamingMaster to DC03
Move-ADDirectoryServerOperationMasterRole "LA-SRV-DC03" -OperationMasterRole SchemaMaster,DomainNamingMaster
Method 2 – Using the GUI to Transfer FSMO role
If you don’t like or want to use PowerShell, then it’s also possible to transfer the FSMO roles using the GUI. There are three different consoles that we will need to transfer all the roles:
- RID master, PDC Emulator, and Infrastructure master roles are done in the Active Directory Users and Computer console.
- Domain naming role can be transferred in the Active Directory Domains and Trusts.
- The Schema Admin role requires loading the Active Directory Schema MMC snap-in.
Tip
Perform the steps below on the domain controller where you want to transfer the roles too.
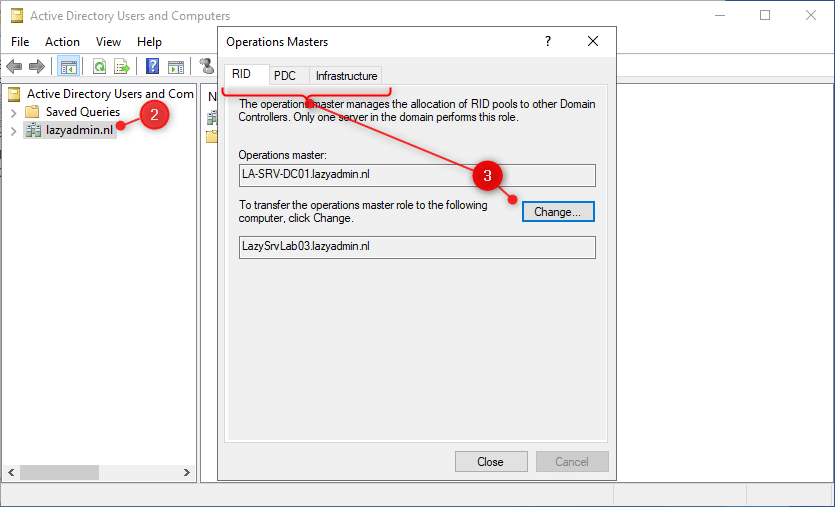
RID master, PDC Emulator, and Infrastructure master roles
- Open the Active Directory Users and Computer console
- Right-Click on your domain and choose Operations Masters
- Transfer each role to the new domain controller (check each tab).
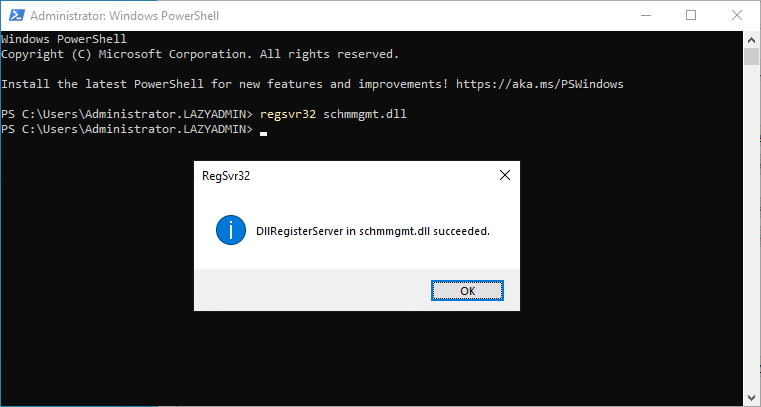
Schema Admin Role
We will need to manually load the Active Directory Schema add-in in an MMC console to transfer the Schema Master role. But before we can do that, we will need to register a DLL file on the domain controller.
- Open a terminal (command prompt or PowerShell) as Admin
- Type regsvr32 schmmgmt.dll and press enter
- Wait for the success message and click Ok.
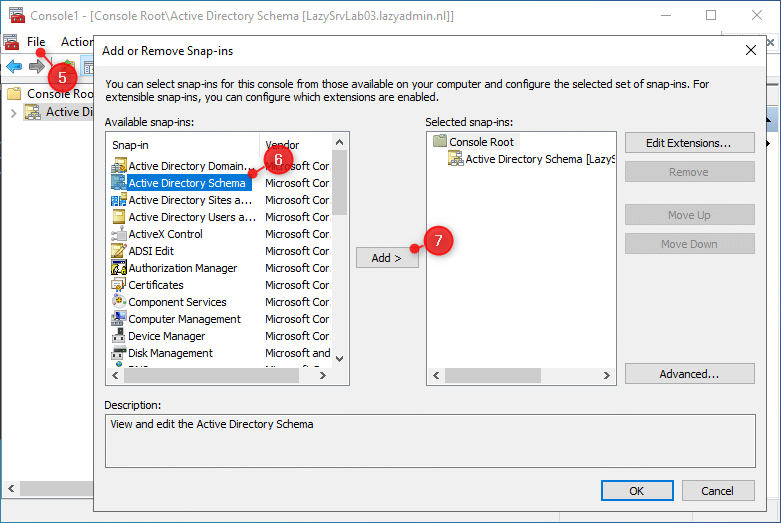
- Type MMC in the console (or open the run dialog (Windows key + R) and type MMC)
- Click on File and select Add or Remove Snap-Ins
- Select Active Directory Schema
- Click on Add and click Ok
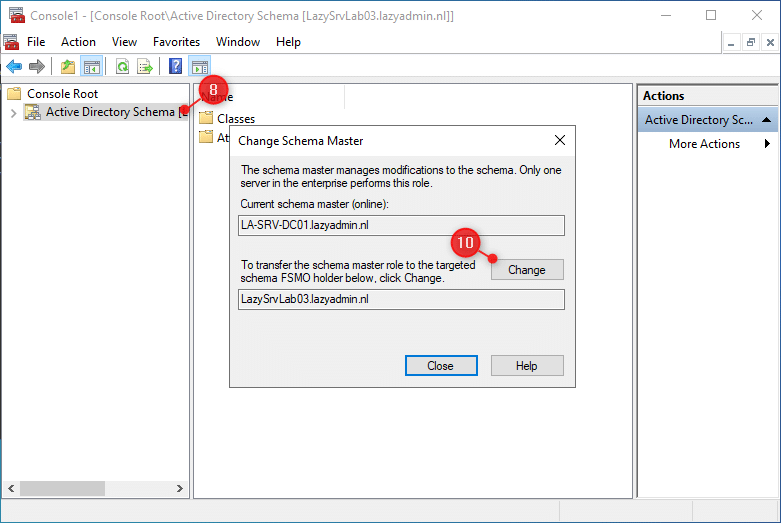
- Right-Click on Active Directory Schema
- Choose Operations Master
- Click on Change to transfer the role
Operations Master Role
The last role that we need to transfer is the Operations Master Role. We can do this in the Active Directory Domains and Trusts console. Again, perform the steps below on the domain controller where you want to transfer the roles too.
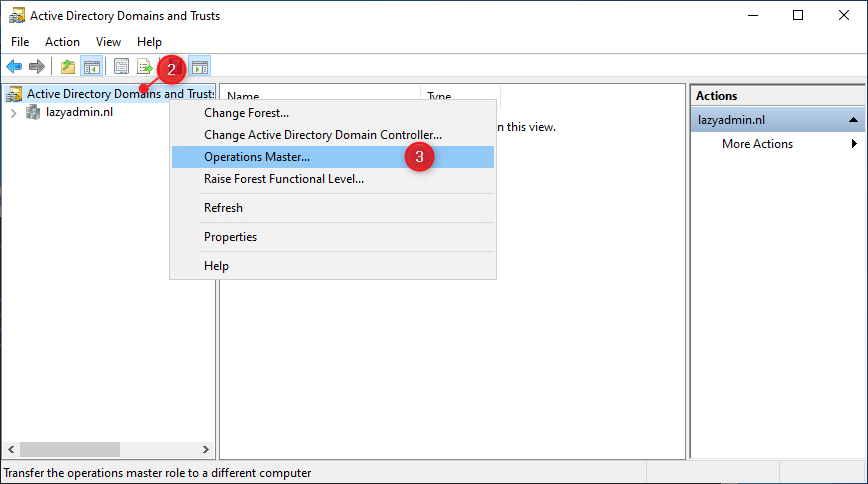
- Open Active Directory Domains and Trusts
- Right-click on Active Directory Domains and Trusts
- Choose Operations Master
- Click Change to transfer the role
Wrapping Up
Transferring the FSMO roles is rarely necessary. The roles are automatically transferred when you demote a domain controller. And splitting the roles between multiple domain controllers may only be needed in really large environments.
The easiest way to transfer FSMO roles is to use PowerShell. Using the GUI is also possible, but it request a bit more work.
I hope you found this article useful. If you have any questions, just drop a comment below.


Nice job!