Windows system files sometimes get corrupted, which can result in errors, problems with updating Windows, or even preventing Windows from booting at all. In these cases, we can often repair Windows using the built-in DISM command.
When system files are corrupt or missing Windows might not start at all anymore. You will get a blue screen of death (BSOD), with an error indicating what the issue is. It could be a driver error, but also broken system files can prevent Windows from starting.
In this article, I am going to explain how to use the DISM Command and the restorehealth function. Also, I will explain briefly how to boot from the installation media.
How to use the DISM Command
DISM stands for Deployment Image Service and Management and is a built-in command-line tool that can be used to create Windows system images. But today we are going to use the tool to repair Windows.
To use the tool we will need to have access to the command line interface of Windows. This can be done through Command Prompt, PowerShell, or Windows Terminal. But more importantly, we need to be able to start Windows.
If your computer doesn’t boot at all, then you can’t access the command-line interface. To solve this you can use a Windows Installation medium that you can easily create with an 8GB thumb drive. Follow this guide for more information on how to boot into safe mode.
The DISM command will by default use your Windows Updates files to repair any corrupt files. If your Windows updates files are also corrupted or when DISM is unable to repair the files with it, then you can use a Windows installation media as a source. Follow the steps described in this article to create a Windows installation USB drive.
DISM Online Cleanup Image Restorehealth
To restore the health of your Windows installation we first need to check for any corrupted files. For this, we are going to use the command CheckHealth and ScanHealth first.
If you are able to login to Windows, then open a command-line interface in elevated mode:
- Right-click on Start (or press Windows key + X)
- Choose Command Prompt (admin) (or Windows PowerShell (admin), or Windows Terminal (admin)
Otherwise, follow the steps described here to boot Windows from USB and open the command prompt.
Follow the steps below to restore the health of your Windows installation. Some commands can take a couple of minutes, just give it some time:
- Check the Health of Windows System files
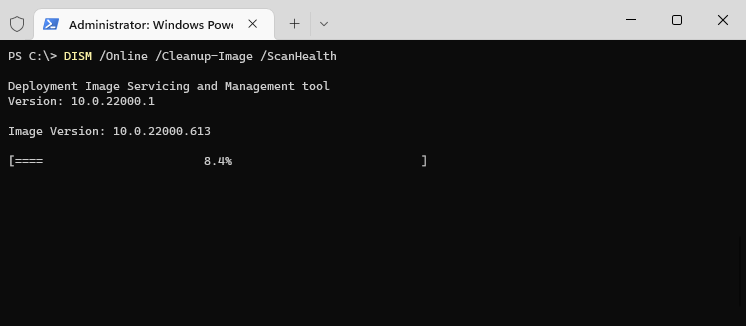
We are first going to do a quick scan of the Windows system:DISM /Online /Cleanup-Image /CheckHealth - Advanced system scan
The next step is to do a more advanced system. ScanHealth will check the component store and report any corruption in the log file: C:\Windows\Logs\CBS\CBS.logDISM /Online /Cleanup-Image /ScanHealth
- Repair Windows with DISM Online Cleanup Image Restorehealth
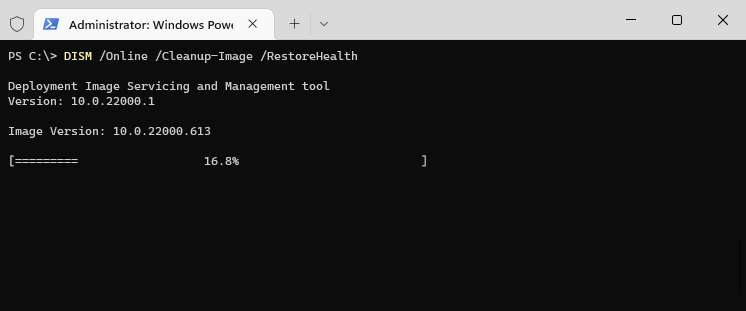
When the ScanHealth or CheckHealth commands found any corruption then we can repair it with the RestoreHealth command:DISM /Online /Cleanup-Image /RestoreHealth
- Reboot
It can take some time for the DISM tool to restore your Windows Image. Make sure that you let it run. The progress bar sometimes stops for a couple of minutes, just give it some time.
Once completed, reboot your computer.
Use an Installation Media to Restore System Files
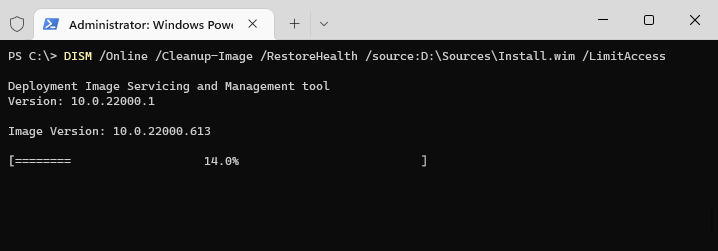
Sometimes DISM is unable to repair your Windows installation with the files that are on your hard disk. In these cases, we can specify an installation source that can be used to repair your Windows files. Make sure that you have created a recovery USB for this.
If you can still access Windows you can also download the Windows ISO file and mount it by double-clicking on the file. You can then refer to the ISO file instead of the USB drive.
With the ISO file or USB drive connected enter the following command to repair Windows:
# Replace the D:\ in the source path with the correct drive letter of your ISO file or USB Drive
DISM /Online /Cleanup-Image /RestoreHealth /source:D:\Sources\Install.wim /LimitAccess
Repair the current Windows Installation
The steps above repair the Windows image that is stored on your computer. But the actual Windows installation isn’t repaired yet. So you might get errors in Windows or are unable to boot Windows at all.
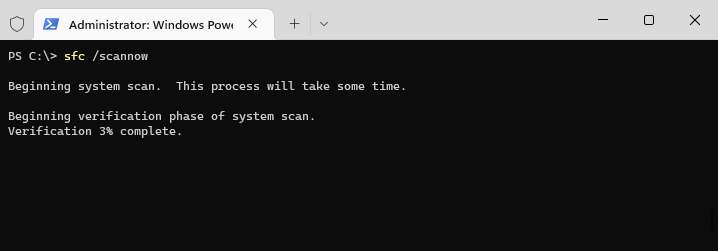
So to repair the Windows installation we need to run the SFC command tool. Use the methods described earlier to open a command prompt or PowerShell window with elevated permissions (run as Administrator).
Run the command below to repair the files:
sfc /scannow
This command will take some time, let it complete and reboot your computer once done. Sometimes you will need to repeat the command to fully repair all the corrupted files.
Free up disk space with DISM
Besides repairing your Windows installation can DISM also be used to free up disk space. Windows will keep a copy of all Windows updates that it ever installed on your computer. This is needed so you can uninstall updates in case of a problem.
But all those updates can take up quite a lot of disk space. With the DISM Command, we can remove the old updates. Keep in mind, that you can’t uninstall Windows Updates anymore after removing the update files!
Analyze the Component Store
The first step is to analyze the Windows Update component store. The command below will go through all the update files to see what can be removed.
- Right-click on start (or press Windows key + X)
- Choose Windows PowerShell (admin) or Windows Terminal (admin)
- Enter the command below:
Dism /Online /Cleanup-Image /AnalyzeComponentStore
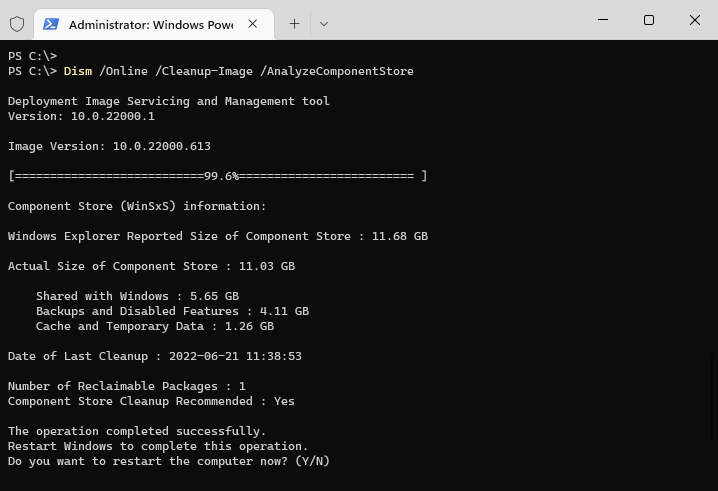
Press Y to reboot your computer to start the cleanup process.
Cleanup old files manually
On Windows 10 you might not get the option to restart your computer. In this case, we will need t start the clean-up manually with the command below:
Dism /Online /Cleanup-Image /StartComponentCleanup
Once completed use the command below to reduce the size even further:
Dism /Online /Cleanup-Image /StartComponentCleanup /ResetBase
The ResetBase command can take some time, just let it complete.
Wrapping Up
The DISM command is a great tool to repair your Windows installation or to clean up your old Windows updates. Make sure that you run the SFC /Scannow command once completed to repair also the corrupted Windows installation.
I hope you found this article helpful, if you have any questions, just drop a comment below.


thank you for this simplified version of dism i recently learned off the existence of dism and wanted to learn more before diving into things i had no idea on , got corrupoted ram drivers i think.
got kernel mode heap corruption so now i learning new tools, that always is a good thing.
Excellent write up on DISM – very helpful