Microsoft LAPS can be used to manage local administrator passwords on your domain-joined devices. LAPS (Local Administrator Password Solution), creates a unique and random password for each device client in your network and stored the password in the Active Directory.
The advantage of Microsoft LAPS is that only users with the correct permissions can access the passwords and the local administrator account. And more importantly, attackers won’t be able to access and infect other computers when one account is compromised.
In this article
In this article, we are going to deploy and configure Microsoft LAPS. Keep in mind that this is the legacy version of Microsoft LAPS. The new version, Windows LAPS, will be available in public preview around Q2 2023.
Note
Windows LAPS has now been released to public preview. I recommend to rollout Windows LAPS instead of the old Microsoft LAPS solution. You can find the complete guide here.
What is Microsoft LAPS?
Administrators often use the same password for each device when deploying Windows on a new machine. This local administrator account can be used as an alternative way to log in when troubleshooting problems on the machine. But having the same password on each device is a huge security risk, this is where LAPS (Local Administrator Password Solution) from Microsoft comes in.
When attackers gain access to one local admin account, they can use the same credentials to access all other devices in the network. So using a unique password for each device is recommended. But we need a way to manage those passwords. With LAPS, the password for each device is randomly generated and stored in the Active Directory. Only users with the appropriate permission can read the password from the Active Directory and use the local administrator account.
To look up the LAPS password we can use either PowerShell, the LAPS Client UI, or find it in the Active Directory.
Requirements
There are a couple of requirements when it comes to installing and using Microsoft LAPS:
- It only works on Domain Joined devices
- Protects only one local admin account (recommend disabling any other accounts)
- We need to extend the Active Directory scheme
- Configuration is done with a Group Policy
- LAPS Client needs to be installed on all client devices
Installing LAPS
Installing LAPS is done in 3 parts. We are first going to configure the Active Directory and policies on the Domain Controller. Next, we will install the management tools on our own machine and the last step is to roll out the LAPS client to all the client devices.
Step 1 – Configuring the Domain Controller
We are first going to perform all the necessary steps on the domain controller. This means that we will extend the Active Directory schema, create a security group with users that are allowed to read the LAPS passwords, set up the correct permissions, and configure the Group Policy.
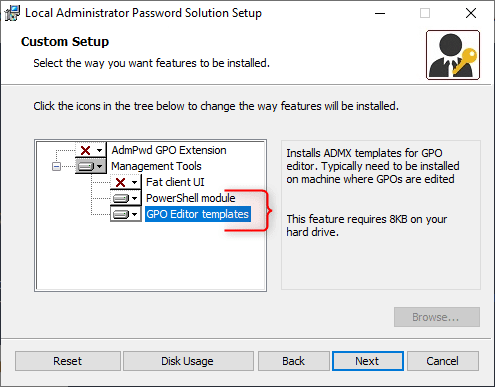
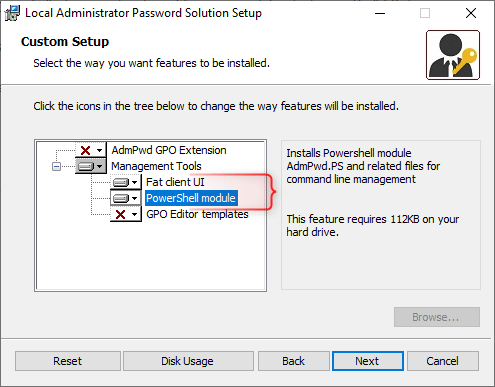
The first step is to download the Local Administrator Password Solution. Select and download the LAPS.x64.msi file and open the setup once it’s downloaded. On the domain controller, we only need to install the following components:
- PowerShell module
- GPO Editor templates
Extend the Active Directory Schema
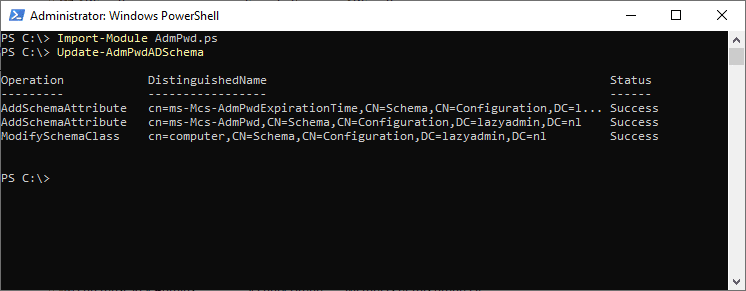
We will need to extend the Active Directory Schema to add the new attribute fields for the LAPS password. Now to extend the AD Schema, you will need to be a member of the Security Group Schema Admins which you can find in the Active Directory. If you are not a member of the schema admins, then you will get an error user has insufficient access rights.
- Open PowerShell on the Domain Controller
- Type the following commands to extend the AD Schema:
Import-Module AdmPwd.ps
Update-AdmPwdADSchema
Set permissions in the Active Directory
With the PowerShell window still open (otherwise, Import the AdmPwd.ps again), we are going to set the permissions that are required for LAPS. We will need to give the SELF built-in account on the computer’s write access so it can update the password in the Active Directory. And we will need to give the administrators read (and maybe write) permissions to read the stored LAPS password.
For the computer, we are going to target them using the OU. The setting will apply to all nested OUs as well. You can repeat the steps below for any OU with computers that you have. In PowerShell type the following command to set the permissions on the Computers OU:
Note
To target the OU you can use the OU name (if it’s unique) or the distinguished name.
Set-AdmPwdComputerSelfPermission -OrgUnit Computers
If the OU name isn’t unique, then all matching OUs are displayed and an error will be thrown that more than one object is found. Using the DistinguishedName to target the correct OU:

Set-AdmPwdComputerSelfPermission -OrgUnit "OU=Computers,OU=Amsterdam,OU=Sites,DC=lazyadmin,DC=nl"
The next step is to create a new security group that contains the users that are allowed to read the LAPS password. I like to create two groups, one with read/write permissions (these users can force a password reset of the LAPS password) and one group with only read access. You can create the groups in the Active Directory or use PowerShell:
# AD Security Group for LAPS read/write access
New-ADGroup -name 'LAPS Admins' -GroupCategory Security -GroupScope Global

# AD Security Group for LAPS readonly  access
New-ADGroup -name 'LAPS ReadOnly' -GroupCategory Security -GroupScope Global
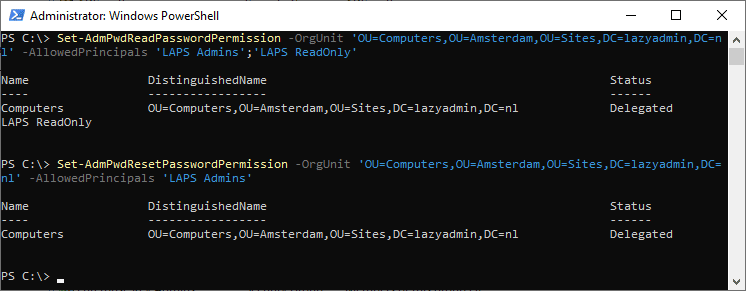
We can now give the new security groups the appropriate permissions. First, we will give both groups read permission to the LAPS password (the ms-Mcs-AdmPwd attribute):
Set-AdmPwdReadPasswordPermission -OrgUnit Computers -AllowedPrincipals 'LAPS Admins','LAPS ReadOnly'
Administrators should also be able to reset the password, so we will give the LAPS Admins group also reset permission:
Set-AdmPwdResetPasswordPermission -OrgUnit Computers -AllowedPrincipals 'LAPS Admins'
Setting up the LAPS GPO
With the permission all sorted we gain configure the LAPS GPO (Group Policy Object). First, we will need to copy the LAPS Admx file to the Active Directory Central Store.
- On the domain controller, navigate to C:\Windows\PolicyDefinitions
- Copy the AdmPwd.admx to \\contoso.local\SysVol\contoso.local\Policies\PolicyDefinitions
Do the same for the Adml file which you can find in the language folder:
- On the domain controller, navigate to C:\Windows\PolicyDefinitions\en-US
- Copy the AdmPwd.adml to \\contoso.local\SysVol\contoso.local\Policies\PolicyDefinitions\en-US
We can now create a new GPO for LAPS:
- Open the Group Policy Management Console
- Create a new Group Policy in your Computers OU
- Right-Click the new Policy and select Edit
- Navigate to : Computer Configuration > Polices > Administrative Templates > LAPS
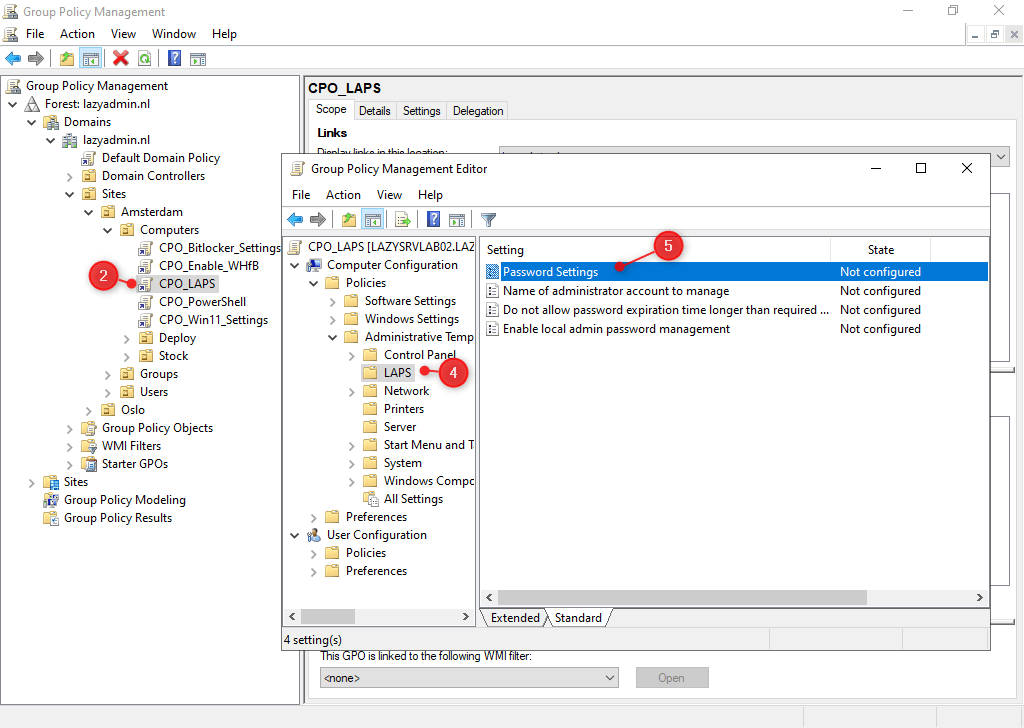
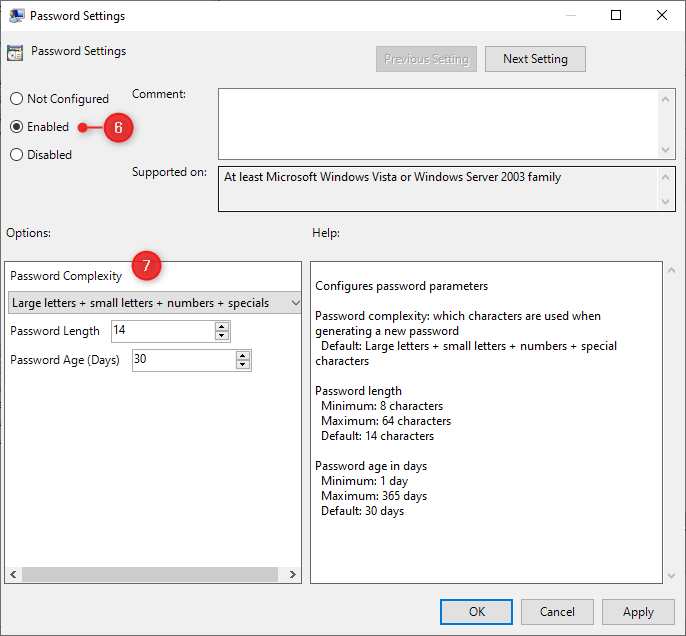
- Open the Password Settings
- Enable the setting
- Configure the password complexity (the default settings are in most cases fine)
- Click Ok when done
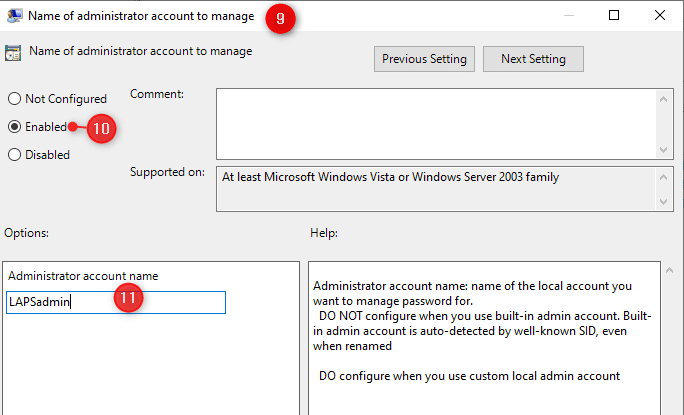
- Next, open the setting Name of the administrator account to manage
- Enable the setting
- Under Administrator account name enter LAPSAdmin
Note
LAPS can only protect one local admin account. Using a distinct local admin account name allows us to easily verify if the computer is protected with LAPS. Plus the built-in Administrator account is often disabled by default.
- Open the setting Enable local admin password management
- Click Enable and close the window
Optional GPO Settings
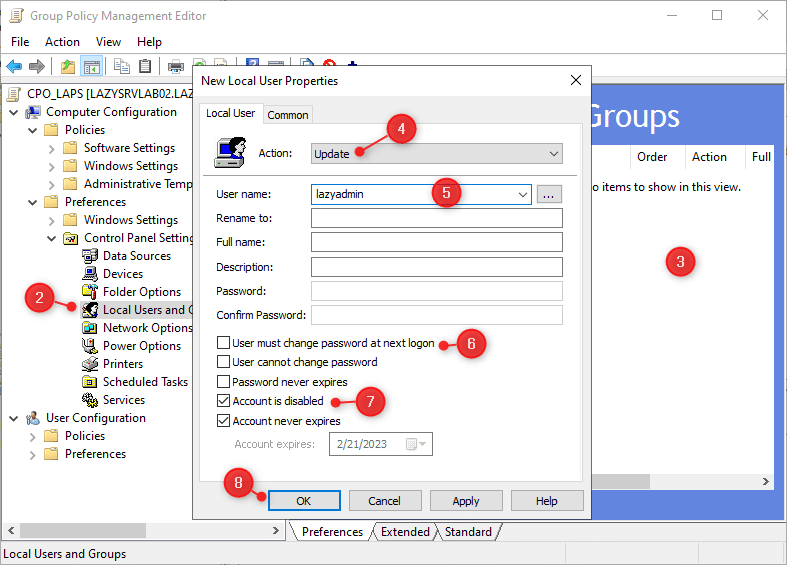
The following settings are optional. If already have a local admin account, name lazyadmin, for example. Then you probably want to disable this account when deploying LAPS. We can do this in the same policy that we just created:
- Edit the CPO_LAPS policy
- Navigate to: Computer Configuration > Preferences > Control Panel Settings > Local Users and Groups
- Right-Click in the white area and choose New > Local User
- Set Action to Update
- Enter the name of the current local admin account
- Uncheck User must change password at next logon
- Check Account is disabled
- Click OK
We have now successfully configured the Active Directory and Group Policy for Microsoft LAPS. Make sure that you apply the newly created policy to all OUs that contain computers where you want to use LAPS on.
Step 2 – Install the LAPS Client on the Computers
We will need to install the LAPS Client component on all Windows computers. Now the best way to install software on multiple clients is to use a deployment tool like PDQ Deploy or Action1.
In PDQ Deploy you can create a new package and use the LAPS.x64.msi file that we downloaded earlier. Make sure that you add the parameter CUSTOMADMINNAME=LAPSAdmin in your package. It’s also a good idea to add a PowerShell or Command step with the gpupdate command.
Note
The CUSTOMADMINNAME parameter will create a local admin account on the computer with the username LAPSAdmin.
If you don’t have a deployment tool that you can use, then could also use a group policy to deploy the client. The only problem is that you can’t easily add the required parameter CUSTOMADMINNAME to the MSI file. You would need to modify the MSI file using a tool called ORCA, but that is out of the scope of this article.
Deployment through GPO is also possible when you can re-use the existing local admin account:
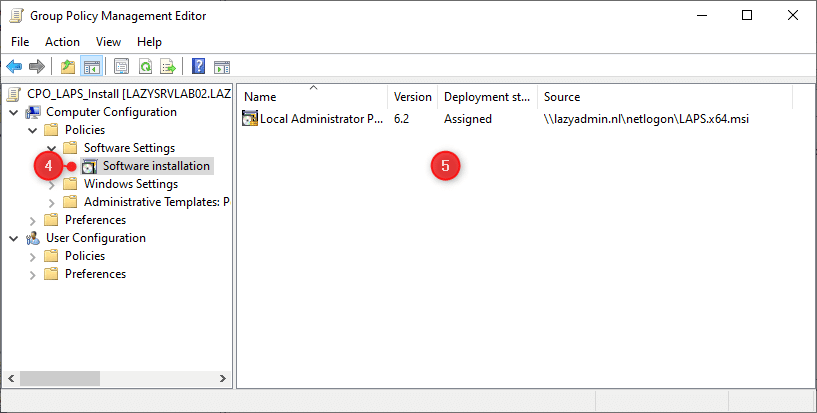
First, copy the LAPS.x64.msi file to your Netlogon folder (\\contoso.local\netlogon)
- Open the Group Policy Management console
- Create a new GPO in your Computers OU (same location as the LAPS GPO) and name it CPO_LAPS_Install
- Edit the new policy
- Navigate to: Computer Configuration > Policies > Software Settings > Software Installation
- Right-Click on the white space and select New > Package…
- Navigate to your Netlogon folder and select the LAPS.x64.msi file
- Select Assigned
Another option is to install the MSI manually or use a PowerShell script:
if (-not(Get-Package -name "local administrator password solution" -ErrorAction Ignore)) {
    Start-Process msiexec.exe -Wait -ArgumentList "/i '\\contoso.local\netlogon\LAPS.x64.msi /qn /norestart /l*v 'c:\temp\laps-install.log' CUSTOMADMINNAME=LAPSAdmin"
}
You can easily verify if the LAPS client is successfully installed by checking if the LAPS Admin account is created on the client:
- Press Windows Key + R
- Type lusrmgr.msc to view the local users accounts
- LAPSAdmin should be listed
Step 3 – Installed the LAPS Management UI
To look up the LAPS Password of a client we will need to use either the LAPS Client UI or the PowerShell module. You can install the management parts on as many machines as you like. Only to view or reset the password, the user will need to be a member of one of the security groups that we created earlier (LAPS Admin or LAPS ReadOnly).
Download the Local Administrator Password Solution again from Microsoft. Select and download the LAPS.x64.msi file and open the setup once it’s downloaded. We are going to install the Fat client UI and the PowerShell module:
Retrieving Microsoft LAPS Password
After the installation is completed you will find the Microsoft LAPS client in the start menu. If you open LAPS UI you can enter the computer name and click on Search to lookup the LAPS password:
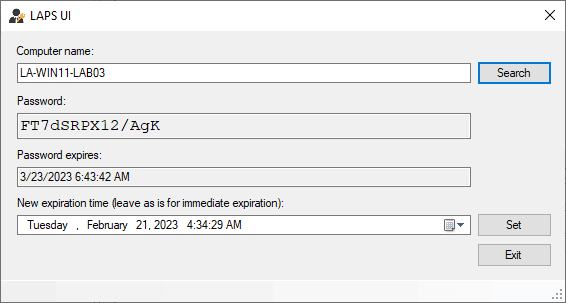
If you have reset permissions then you can also reset the password by clicking on Set. This will reset the password immediately. Another option is the set the expiration date of the LAPS Password.
Get LAPS Password with PowerShell
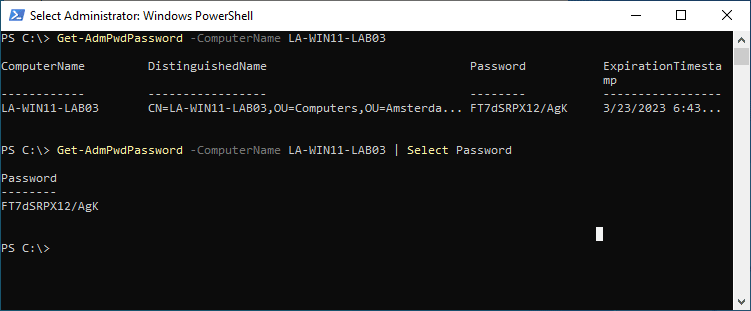
We can also use PowerShell to find and reset the LAPS Password. Make sure that you have installed the PowerShell module from the Local Administrator Password Solution setup. We can use the cmdlet Get-AdmPwdPassword to get the password from the specific computer:
Get-AdmPwdPassword -ComputerName LA-WIN11-LAB03

# Or to return only the password:
Get-AdmPwdPassword -ComputerName LA-WIN11-LAB03 | Select Password

# Result
Password
--------
FT7dSRPX12/AgK
As you can see in the screenshot below, the cmdlet doesn’t only return the password, but also the computer name, distinguished name, and expiration timestamp. With a simple select we can make sure that only the password is returned.
We can also copy the password automatically to our clipboard by piping the Set-Clipboard cmdlet behind it. For that we will need to expand the password property first, so that only the value is copied, instead of the complete object:
Get-AdmPwdPassword -ComputerName LA-WIN11-LAB03 | Select -ExpandProperty Password | Set-Clipboard
Using the Active Directory
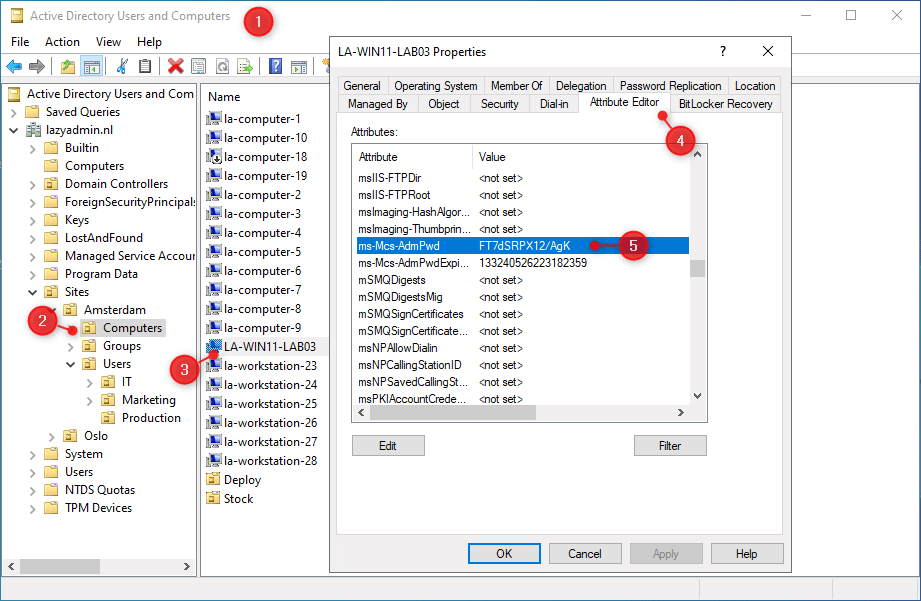
We can also look up the Microsoft LAPS password in the Active Directory. The password is stored in the ms-MCS-AdmPwd attribute. So to retrieve it we will need to open the Attribute editor of the computer object:
- Open the Active Directory Users and Computers
- Navigate to the computers OU
- Double-click on the computer object
- Open the Attribute Editor tab
- Scroll down to the ms-MCS-Adm-Pwd attribute to view the password
Wrapping Up
Microsoft LAPS is a great solution to manage your local administration password. Keep in mind that a new version of LAPS, named Windows LAPS, will be released in the second half of 2023. This version can also store the password in Azure Active Directory, among with other benefits.
I hope this article helped you with configuring the local administrator password solution. If you have any questions, just drop a comment below.


Hi, Having issue with getting AD to see the new ms-Mcs-adminpwd and ms-Mcs-AdmPwdExpirationTime. When run cmd to add, comes back with already exists. When I check and AD pc, attribute it is not there. I see a single post about adding / checking MMC (https://serverfault.com/questions/1117494/laps-update-admpwdadschema-doesnt-add-the-attributes ) but not sure what they are doing / how. Thoughts?
Open a new MMC (management console) (Start > Run > type MMC)
Click on File > Add/Remove add-in
Add the Active Directory Schema
Expand classes
Select Computer > Properties
There you can check it in the attribute tab.
Hi Rudy,
thanks for the blog. LAPS should no be integrated in the the last windows update of April, so step 2 should’t be needed anymore, right?
I have written a new guide on how to deploy Windows LAPS.
Hi Rudy,
Thank you for the detailed info.
It has really helped me.
I used the build-in local administrator account instead of the “CUSTOMADMINNAME=LAPSAdmin” on the GPO and it has worked fine.