Robocopy is a great command-line utility that is used to copy, mirror, or move large amounts of data quickly and efficiently from one location to another. The power of Robocopy is that it comes with tons of options/switches that you can use to fine-tune and optimize the copy action.
But all those possible options are also the common problem with Robocopy. You probably don’t use it daily, so which switches (options) do you need to use? How did we copy also the NTFS permissions or skip the empty folders?
In this article
In this article, we are going to take a look at Robocopy with the help of commonly used examples. What are the best practices? And how do you speed up your copy action?
The Basics
Before we deep dive into Robocopy and look into all the options, let’s first start with the basics. The first and most important to know is that you run Robocopy in a test mode with /L. This will list the result without actually copying or removing any files or folders.
Robocopy "D:\test files" "F:\lab" /L
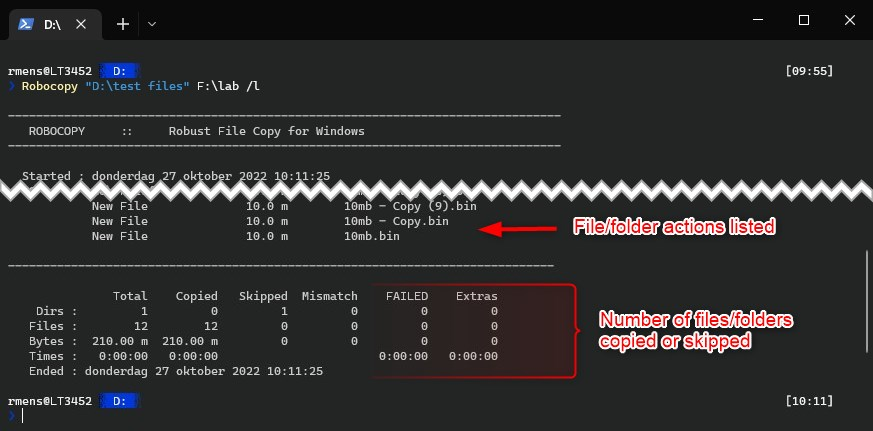
If you look at the results, you will see which files or folders will be copied, removed, or skipped. When you are new to Robocopy, using the /L parameter first is really a good idea to check if the results are as expected.
Copying all Files
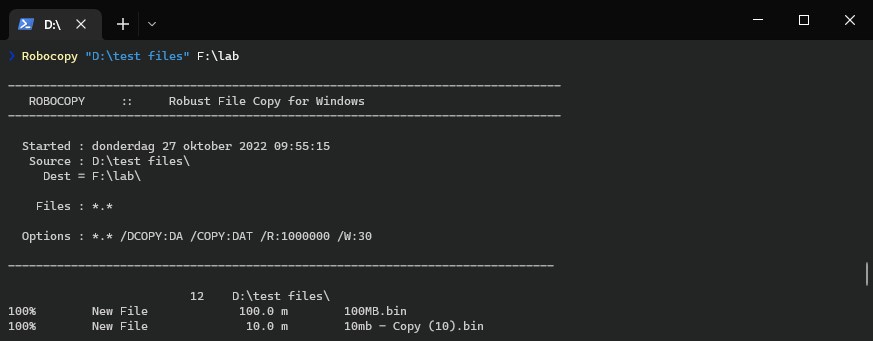
When you use Robocopy without any switches, it will copy only the files from the given location to the destination. It won’t copy any subfolders from the given directory, only the files without NTFS permissions or owner information. All you need to do is specify the source folder and destination folder:
Robocopy "D:\test files" "F:\lab"
Copy all Files and Folders
To copy all files and folders with Robocopy, we will need to specify the parameter /E. This will copy all files and folders from the given directory. If you also want to copy all attributes as well, for example, NTFS permissions or owner attributes, then also add the /COPYALL parameter as well:
Robocopy "D:\test files" "F:\lab" /E /COPYALL

Move Files
When you need to move files from one location to another, then you can use the /mov parameter in Robocopy. This will copy all the files, not the subfolders, to the destination location and once completed delete the files from the source location.
Personally, I am not a big fan of using the /mov or /move parameters. Because if anything goes wrong with the copy action, you also don’t have the source files anymore. So make sure you test the results first with the /L parameter.
Robocopy "D:\testfiles" "c:\temp\testfiles" /mov
When using /mov alone, it won’t copy the file attributes, like NTFS permissions. So you might want to use the /COPYALL parameter as well.
Move Files and Folders
To move also the folders we can use the parameter /move, which should also move the subfolders from the directory. You need to combine this with the /E parameter to go through all the subfolders, otherwise, only the contents of the main folder are moved.
Robocopy "D:\testfiles" "c:\temp\testfiles" /move /e /copyall
The difference with /mov /e is that this will leave the empty folders behind in the source directory, where /move /e also deletes the subfolders once they are copied.
Robocopy Mirror
When you want to mirror a complete directory, then you can use the Robocopy mirror parameter. Mirror will make sure that the destination folder is completely the same as the source.
Good to know is that if you add or remove a file in the destination folder, then this won’t be added to the source. This mirror only from the source to the destination
Note
Don’t use Robocopy mirror as a backup solution. If a file is deleted in the source then it will automatically be delete on the destination as well. So this isn’t a backup solution!
# Mirror files
Robocopy "D:\testfiles\" "c:\temp\testfiles\" /mir
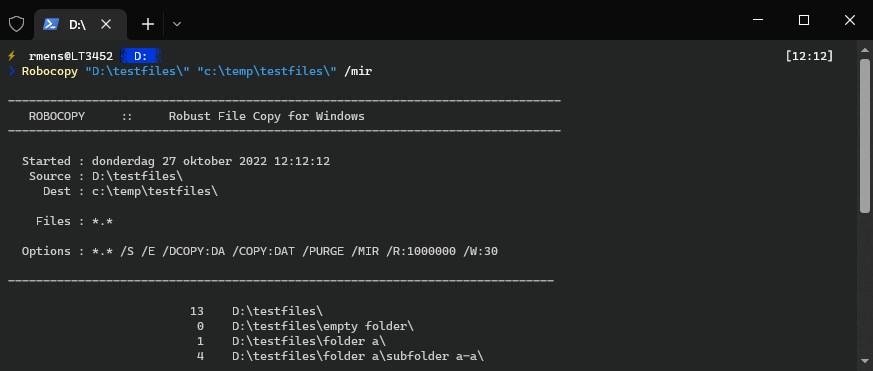
If we look at the results you will see the line Options. This shows which Robocopy switches are used. As you can see /E and /Purge are automatically added. This means that /MIR will also mirror all subdirectories and purge (delete) any files in the destination directory that don’t longer exist in the source.
Robocopy Switches
As mentioned in the beginning, the Robocopy command comes with a lot of switches that you can use. I am not going to fully explain each of them, but below you will find the most commonly used switches that you can use for Robocopy. You can get all information by typing robocopy /?
Copy Options
| Option | Description |
|---|---|
| /S | copy Subdirectories, but not empty ones. |
| /E | copy subdirectories, including Empty ones. |
| /LEV:n | only copy the top n LEVels of the source directory tree. |
| /Z | copy files in restartable mode. |
| /B | copy files in Backup mode. |
| /ZB | use restartable mode; if access denied use Backup mode. |
| /J | copy using unbuffered I/O (recommended for large files). |
| /COPY:copyflag[s] | what to COPY for files (default is /COPY:DAT). (copyflags : D=Data, A=Attributes, T=Timestamps, X=Skip alt data streams). (S=Security=NTFS ACLs, O=Owner info, U=aUditing info). |
| /SEC | copy files with SECurity (equivalent to /COPY:DATS). |
| /COPYALL | COPY ALL file info (equivalent to /COPY:DATSOU). |
| /NOCOPY | COPY NO file info (useful with /PURGE). |
| /SECFIX | FIX file SECurity on all files, even skipped files. |
| /TIMFIX | FIX file TIMes on all files, even skipped files. |
| /PURGE | delete dest files/dirs that no longer exist in source. |
| /MIR | MIRror a directory tree (equivalent to /E plus /PURGE). |
| /MOV | MOVe files (delete from source after copying). |
| /MOVE | MOVE files AND dirs (delete from source after copying). |
| /A+:[RASHCNET] | add the given Attributes to copied files. |
| /A-:[RASHCNET] | remove the given Attributes from copied files. |
| /CREATE | CREATE directory tree and zero-length files only. |
| /MON:n | MONitor source; run again when more than n changes seen. |
| /MOT:m | MOnitor source; run again in m minutes Time, if changed. |
| /RH:hhmm-hhmm | Run Hours – times when new copies may be started. |
| /MT[:n] | Do multi-threaded copies with n threads (default 8). n must be at least 1 and not greater than 128. This option is incompatible with the /IPG and /EFSRAW options. Redirect output using /LOG option for better performance. |
| /DCOPY:copyflag[s] | what to COPY for directories (default is /DCOPY:DA). (copyflags : D=Data, A=Attributes, T=Timestamps, E=EAs, X=Skip alt data streams). |
| /NODCOPY | COPY NO directory info (by default /DCOPY:DA is done). |
| /NOOFFLOAD | copy files without using the Windows Copy Offload mechanism. |
| /COMPRESS | Request network compression during file transfer, if applicable. |
File Selection Options
| Option | Description |
|---|---|
| /A | copy only files with the Archive attribute set. |
| /M | copy only files with the Archive attribute and reset it. |
| /IA:[RASHCNETO] | Include only files with any of the given Attributes set. R – Read only A – Archive S – System H – Hidden C – Compressed N – Not content indexed E – Encrypted T – Temporary |
| /XA:[RASHCNETO] | eXclude files with any of the given Attributes set. |
| /XF file [file]… | eXclude Files matching given names/paths/wildcards. |
| /XD dirs [dirs]… | eXclude Directories matching given names/paths. |
| /XC | eXclude Changed files. |
| /XN | eXclude Newer files. |
| /XO | eXclude Older files. |
| /XX | eXclude eXtra files and directories. |
| /XL | eXclude Lonely files and directories. |
| /MAX:n | MAXimum file size – exclude files bigger than n bytes. |
| /MIN:n | MINimum file size – exclude files smaller than n bytes. |
| /MAXAGE:n | MAXimum file AGE – exclude files older than n days/date. |
| /MINAGE:n | MINimum file AGE – exclude files newer than n days/date. |
| /MAXLAD:n | MAXimum Last Access Date – exclude files unused since n. |
| /MINLAD:n | MINimum Last Access Date – exclude files used since n. (If n < 1900 then n = n days, else n = YYYYMMDD date). |
| /DST | compensate for one-hour DST time differences. |
| /XJ | eXclude symbolic links (for both files and directories) and Junction points. |
| /XJD | eXclude symbolic links for Directories and Junction points. |
| /XJF | eXclude symbolic links for Files. |
| /IM | Include Modified files (differing change times). |
Retry Options
| Option | Description |
|---|---|
| /R:n | number of Retries on failed copies: default 1 million. |
| /W:n | Wait time between retries: default is 30 seconds. |
| /REG | Save /R:n and /W:n in the Registry as default settings. |
| /TBD | Wait for share names To Be Defined (retry error 67). |
| /LFSM | Operate in low free space mode, enabling copy pause and resume (see Remarks). |
| /LFSM:n[KMG] | /LFSM, specifying the floor size in n [K:kilo,M:mega,G:giga] bytes. |
Robocopy Examples
As you can see there are a lot of switches that you can use with Robocopy. The best way to learn and understand the robocopy utility is by examples in my opinion. Below you will find some of the most commonly used robocopy commands.
Robocopy Single File
Even though robocopy is primarily designed to copy large amounts of data in a robust way, it’s possible to copy a single file with robocopy. To do this you will need to specify the file name as a filter:
robocopy d:\testfiles c:\temp\dst "file-name-to-copy.txt"

Copy Files by Type
In Robocopy, we can filter which files to copy using wildcards and filenames. This allows us to also filter the files on file type. For example, to copy only the log files from the given directory, we can filter on the extension .log using the wildcard *:
robocopy d:\testfiles c:\temp\dst *.log
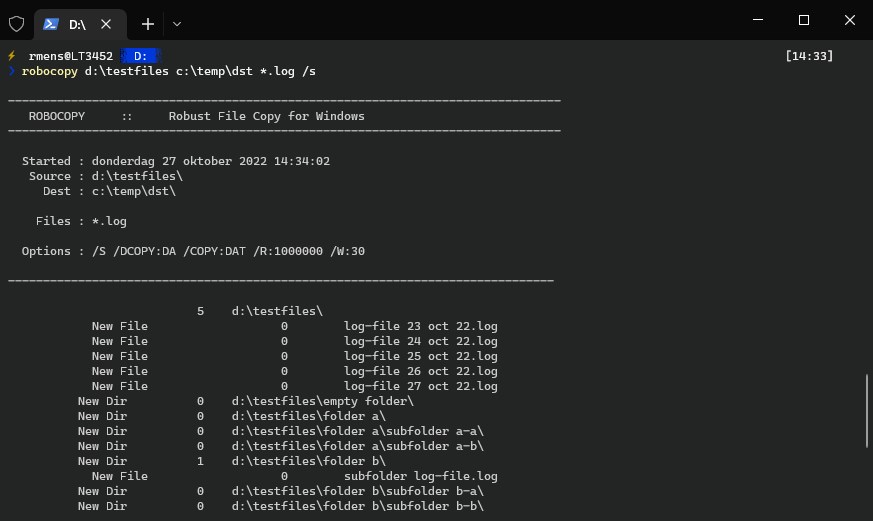
As you can see in the screenshot above, I have added the option /s. This will also copy the .log files from the subdirectories. It won’t copy subdirectories that don’t have a .log file.
You can also specify multiple files types, simply leave a space between the files types:
robocopy d:\testfiles c:\temp\dst *.log *.txt
Exclude File Type
Excluding file types in Robocopy is done with the /xf switch. We can use wildcards (* and ?) to specify the file types that we want to exclude. Separate multiple file types with a space between them.
The example below copies all files, except log and txt files:
robocopy d:\testfiles c:\temp\dst /xf *.log *.txt
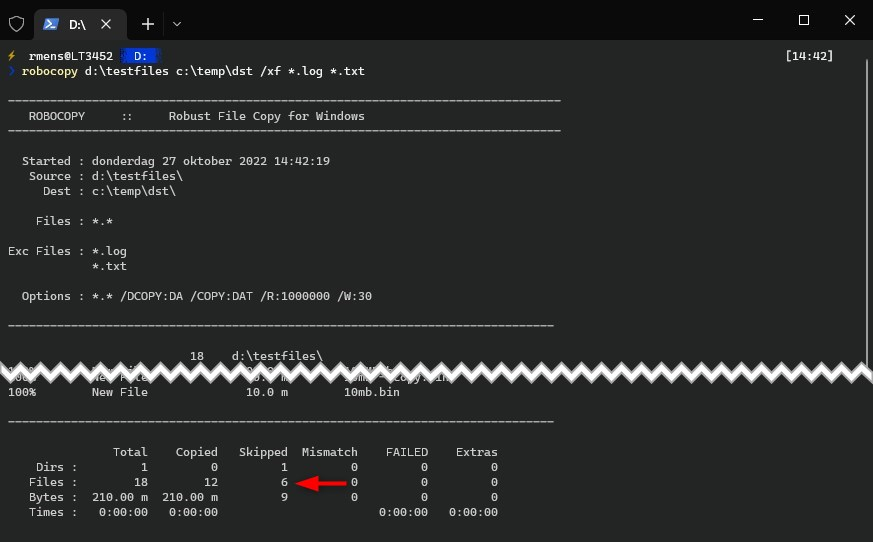
We can see in the results that 6 files were skipped and 12 files copied.
Copy Files with a Filter
Besides file types, we can also filter on file names or file attributes with Robocopy. The principle of filtering in filenames is similar to filtering on file types. We can use wildcards (* and ?) to filter the part of the filenames.
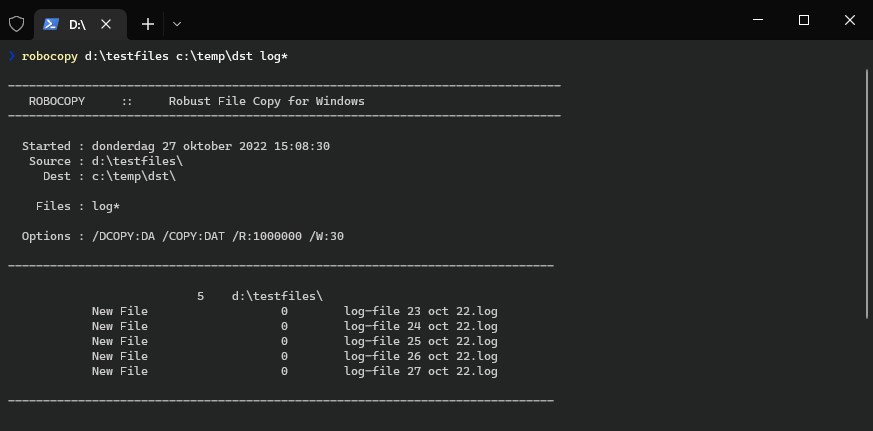
For example, to filter all files where the name starts with log:
robocopy d:\testfiles c:\temp\dst log*
It’s also possible to filter the files that you want to copy based on an attribute. We can use /IA to copy only the files with a certain attribute or /XA to exclude files with a specific attribute.
For example, to include or exclude files that are marked Read-Only:
# Exclude all files that are read-only
robocopy d:\testfiles c:\temp\dst /XA:R

# Copy only the read-only files
robocopy d:\testfiles c:\temp\dst /IA:R
You can combine all the filter options if you want. The example below copies all files that contain the name sep, as the extension .log and isn’t marked read-only.
robocopy d:\testfiles c:\temp\dst *sep* *.log /XA:R
Copy Contents without Empty Directories
Copying empty folders is not always wanted. To exclude the empty folders we can use the switch /s. This way empty folders won’t be copied:
robocopy d:\testfiles c:\temp\dst /s
Robocopy Exclude Folder
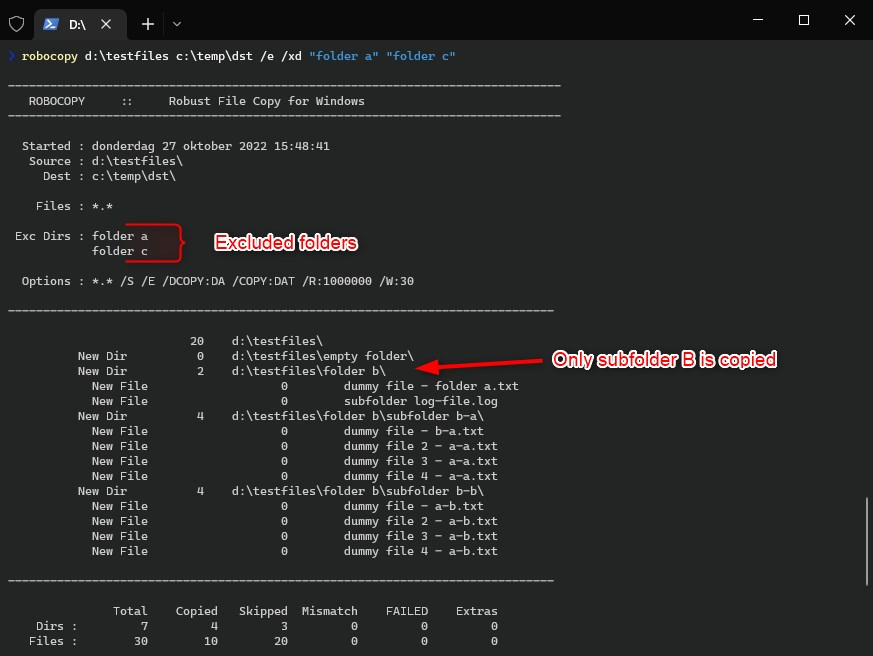
Just like files, we can also exclude folders with Robocopy. For this, we will be using the switch /XD followed by the folder or folders that we want to exclude. We will also be using the /E switch to copy all other subfolders from the directory:
robocopy d:\testfiles c:\temp\dst /e /xd "folder a" "folder c"
Copy based on File Age
Filtering out files based on age is also a common method used with Robocopy. We can use the switches /MINAGE and /MAXAGE for filtering. /MAXAGE is for example useful when you want to copy only the files that are a couple of days old. The age can only be specified in days.
# Copy files that are created last week
robocopy d:\testfiles c:\temp\dst /MAXAGE 7
Or when you want to move all files that are older than a year you can do:
# Move all files that are more then a year old
#
# NOTE - This will DELETE the files from the source!
#
robocopy d:\testfiles c:\temp\dst /MINAGE 365 /MOVE /E
Besides file age, you can also filter the files based on the last access date the file is accessed. For this use the switches /MINLAD and /MAXLAD.
Copy based on File Size
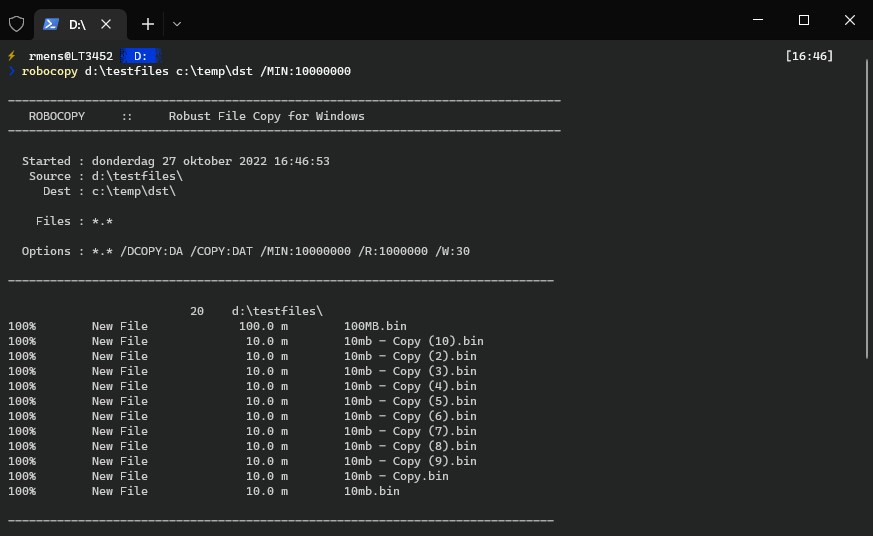
When you want to copy all files large than 10Mb or files only files that a less 1Mb, then you can use the Robocopy switch /max and /min. The file size is specified in bytes.
# Copy only files that are larger then 10Mb
robocopy d:\testfiles c:\temp\dst /MIN:10000000
Include Security (permissions)
When copying files to another NTFS formatted drive, we can also copy the file permissions with /sec. If you use /copyall, then security will also be copied, /sec is the same as /copy:dats (Data, Attributes, Time stamps, NTFS Access control list)
# Copy file including the NTFS permissions
robocopy d:\testfiles c:\temp\dst /SEC
If the destination isn’t an NTFS formatted drive, then the permissions will be lost.
Copy All Files and Folder Information
The /copyall switch in Robocopy only specifies which attributes to copy from the files (everything). By default, only the Data and Attributes of folders are copied. You can also copy the timestamps of the folders, for this you will need to specify /dcopy:dat.
If we combine the two, then we can copy all files and folder information:
# Copy all file and folder information
robocopy d:\testfiles c:\temp\dst /copyall /dcopy:dat
Copy to Network Path
When you need to copy files and folders to another server (network path) then there are a few tips when it comes to using Robocopy. The problem with copying files over the network is that even a short network interruption can cause normal copy actions to start over.
Tip
It’s recommend to use full UNC paths when copying files over the network instead of using mapped drives.
Besides interruption, we also need to keep in mind bandwidth limitations. If you run Robocopy with a multi-threading during business hours on the file server, then there is a chance that your users start complaining. To limit bandwidth usage we can use /ipg:n. Another option is to specify the hours between which Robocopy can run with /RH
So to optimize network transfer with Robocopy we can use the following switches:
| Option | Description |
|---|---|
| /RH:hhmm-hhmm | Specify the time between the job can run |
| /ZB | Copy files in restartable mode, if access is denied, restart the copy action in backup mode. This will override files and folder permissions that might block access. |
| /MT:n | Multi-Threaded will speed up the file transfer, n = default 8 |
| /IPG:n | Limit bandwidth usage by telling Robocopy to wait n milliseconds |
| /R:n | Specify the number of retries |
| /W:n | Specifies how long to wait between the retry |
If you want to run the Robocopy job during business hours, then you might want to limit bandwidth usage with /ipg. Robocopy copies the data in blocks of 64KB, the ipg switch adds a short pause in milliseconds between each block, making room for other data. I won’t go fully in-depth about how it works but /ipg:25 limits the required bandwidth by 50%. And /ipg:9 about 25%.
# Copy all file and folders to network share and limit throughput by 50%
robocopy d:\testfiles \\la-srv-lab02\temp$\dst /copyall /e /ipg:25 /zb /r:3 /w:1
Another good method when transferring data over the network is to schedule it after business hours. With Robocopy we can specify the time between the job can run. For this, we are going to use the /RH switch.
robocopy d:\testfiles \\la-srv-lab02\temp$\dst /copyall /e /rh:1900-0600 /zb /r:3 /w:1
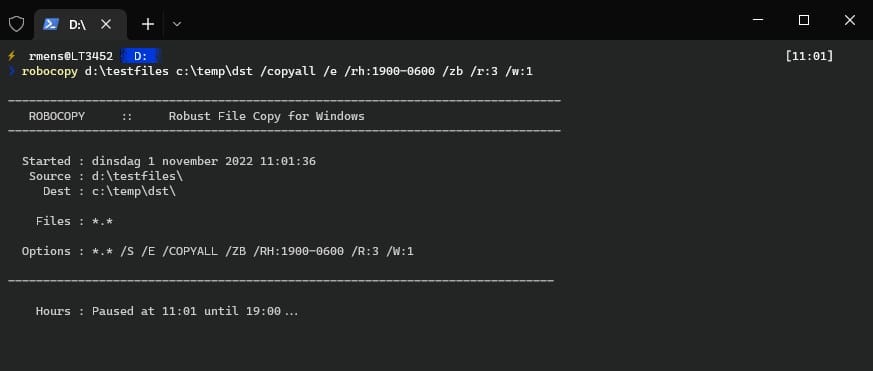
You can see in the screenshot above that the job is paused until 19:00.
Increase Copy Speed with Multi-Threading
Multi-Threading allows you to copy more files simultaneously. By default, it’s set to 8, but you can increase it to 128. So let’s set it as high as possible, right? Well, there is more to it. How high you can set Multi-Threading in Robocopy depends on the source and destination resources. The more disks (and IOPS) you have, the more files the server can simultaneously handle. But also CPU, memory, and bandwidth all need to be taken into account.
In general, we can say, if you have a lot of small files, then it’s worth increasing the multi-threadings. When you have primary large files, then it might be better to lower the number of threads.
I did a quick test with 2500 files, copying them from one SSD disk to another on the same device:
- 8 Threads > 0.72 seconds
- 16 Threads > 0.31 seconds
- 128 Threads > 0.48 seconds
The numbers above are to give you an idea. When you need to copy a large amount of data then it’s a good idea to do some tests on what the optimal number is for your environment.
Robocopy Log
By default, Robocopy outputs the log directly into the console. Great for small copy jobs, but when transferring a large number of files, you might want to save the results to a log. Another benefit of using the log file is that Robocopy will be faster.
| Option | Description |
|---|---|
| /LOG:<path> | Specify the log file to save the information to |
| /LOG+: | Append the result to an existing log file |
| /ts | Include the source file time stamp in the log output |
| /tee | Output to log and console |
| /fp | Include the full path of the files in the log |
| /v | Verbose, output also skipped files |
It’s even possible to determine what to log or not, like don’t log the directories for example. You can find all the options here in the documentation.
Using log files is really recommended when you are running Robocopy unattended. It gives you the ability to check for any errors afterward, even in case the console is closed. It’s also a good idea the use the log files when transferring a lot of data. This way you can easily check for any copy issues that have occurred.
Make sure that you also specify the file name, not only the log file location.
robocopy d:\testfiles \\la-srv-lab02\temp$\dst /copyall /e /log:c:\temp\dst.log /zb /r:3 /w:1
FAQ
When using the parameter /COPYALL or /COPY:U you need to run the command prompt (or Windows Terminal) as administrator.
To speed up to copy process it’s best to redirect the output to the log files. Outputting it to the console will slow down the copy process. Also if you have a stable and reliable network connection, then you can leave out the /z (restartable mode) switch. Increase the threads to 16 with /mt:16, setting it too high might cause latency to occur.
Wrapping Up
When you need to copy large amounts of data, then Robocopy is one of the best tools to use. It comes with a lot of options, as you have seen, to help you with copying data in the most efficient way. When working with large data sets, make sure that you test your commands with the /L switch before running them on production data.
I hope you found this article useful, if you have any questions, just drop a comment below.


Hi, Is there a way to copy only newest files, for Instance I have to copy files from one drive to another for later be processed by staffs, but if the staff delete one of the processed files that no longer needed then my robocopy brings the file over again I am using the robocopy C:\sourcePath E:\TargetPath /XO, so my question would be, can I the robocopy check just for time stamped on file, instead of the date stamped on file.
Thanks
Robocopy can’t do that, xxcopy can or you should use PowerShell for that.
I have a NAS that requires login username/passowrd. (standard windows fileshare on an old windows box). what do i need to do with robocopy to get that working?
Easiest option is probably to map a network drive to the NAS with PSDrive.
Thank toy very much for this article. One more question:
is it possible to limit the copy only on a list of files? I mean, I have a .txt file with many full paths and I want to copy just them to a new directory.
is it possible?
Thank you!
No, not with Robocopy alone. But you could use PowerShell to go through the list and copy each item (with robocopy)
Hello Folks, Thanks for the article. I am trying to use robocopy to create a backup on my NAS but I don’t want to copy the recycle bin. My command
robocopy F:\ \\TrueNAS\dwf_samba\backups\robocopy\Ryzen_7\DriveF /xf Recycle.Bin
seemed to work once but now it copies the recycle bin anyway. Can you give me the correct syntax?
Thanks
Hello support Guys,
Good day,
I need a small help. I am creating one script .bat. my backup and old date deleted file is run smoothly and also each file generate the time but how to set date and time can you help me please
set CUR_YYYY=%date:~10,4%
set CUR_MM=%date:~4,2%
set CUR_DD=%date:~7,2%
set CUR_HH=%time:~0,2%
if %CUR_HH% lss 10 (set CUR_HH=0%time:~1,1%)
set CUR_NN=%time:~3,2%
set CUR_SS=%time:~6,2%
set CUR_MS=%time:~9,2%
set SUBFILENAME=%CUR_DD%-%CUR_MM%-%CUR_YYYY%_%CUR_HH%.%CUR_NN%.%CUR_SS%
robocopy “D:\Test Robo” “E:\Backup Robo” /E /MT[:128] /log:E:\Backup_log\AB%SUBFILENAME%.log
forfiles -p “E:\Backup Robo” -m *.* /S /D -5 /C “cmd /c del @path&echo @path >> E:\Backup_log\Del%SUBFILENAME%.txt”
Log file showing this range
AB02-9–_11.01.41.log
Del02-9–_11.01.41.txt
I need output like this below
AB15-09-2023–_11.01.41.log
Del15-09-2023–_11.01.41.txt
Please reply and help me
Thanks In Advanced
Amol
Hello, this is a great article! It had just what I needed, examples of multiple parameters on a single command line.
Thank you!
A variation of /S /PURGE (/MIR); is there any combinations of switches that would hold on to files at the Destination for a period of time “since they last disappeared from the source” so that you could set that switch to something like ’14’ and give yourself two weeks to determine that something had been accidentally deleted on the Source but yet still not have the Destination fill up forever with tons of old files that you don’t really want— and don’t want to have to go through and manually clean up? (As it would go ahead and delete any files that haven’t been on the Source for 14 days or more.)
Maybe some combination of /MAXAGE /MAXLAD and strategic File Attributes somehow?
Or maybe it isn’t possible.
Anyway, thanks again!
That is not possible with Robocopy. An option would be to write a custom PowerShell script for that.
Hello Rudy! thanks for the comprehensive guide. Last weekend I have copied across millions of files to another file server using robocopy which took 28 hours.
After another week, I am required to copy across the changes (delta) from the source and I am planning to use parameters below:
robocopy (source) (destination) /MIR /ZB /W:5 /MT:32 /R:5 /LOG:C:\robocopy.log
given above command, my question would be – will /MIR overwrite ALL the files or just copy across the updated/new files?
Reason is there is a time constraint for me to do the copy, and I was hoping that /MIR will just transfer the new/updated files and folder.
MIR will only copy the changed and new files to the destination. Keep in mind though that files and folders deleted from the source, wil also be deleted from the destination.
RoboCop should update their ABOUT screen from Windows 8 to Windows 10/11.
Also, have the errors (see https://sourceforge.net/projects/robocoprobocopy/reviews) been corrected?
We need to migrate 2 TB of data from one data drive to another (both the drives are mounted on the same VM) and my question is how can we get an ETA for the copy operation to complete? We would want to know how long will it take so that we can schedule a downtime accordingly. I know that there is a /ETA switch that can be used but that only shows the status of the copy operation for individual files/directories and not for the copy operation as a whole (it wouldn’t show the total amount of data out of the 2 TB that has been transferred over and/or is yet to be transferred). Please suggest.
/ETA will only work when copying files. What I personally would do is a test run. Run the command for 10 min orso and see how much data is processed. You can then calculate how long the 2TB will take. This will give you a good estimate
Seems that /XO doesn’t work when i robocopy files from my desktop to the cloud (ionos) :
it doesn’t exclude files even if they have the same date/hour ?
if i send twice the same robocopy command … it uploads same files twice
robocopy “%cleUSB%\JL_DATA\banque\factures et notices” “Z:\users\jl.gillet\cle_USB\JLG_DATA\banque\factures et notices” /E /R:3 /W:3 /XO /NP /NDL
have any idea?
Thank you
Sorry, I am unfamiliar with Ionos. Might have something to do with the file system they are using or a timezone issue. Best option would be to contact Ionos about it.
This is a great article. So comprehensive.
I am trying to use robocopy where the Source and Destination are in 2 different AD domain (there is vpn tunnel, but no trust). I do not see a way to specify credentials in robocopy!
After DAYLIGHT SAVINGS TIME occurred, my next run of Robocopy seemed to check on and report on every file, unlike its usual checking process. It took over an hour whereas it usually takes a minute or so. How come?
Thanks,
Dan
You can use the switch /DST to compensate for the daylight saving time.
Hi Rudy,
Thanks for your reply.
I’m wondering why “/DST” isn’t the default for ROBOCOPY. After all, what is the benefit of ROBOCOPY rechecking every file just because DST occurred? Or more basic, how did DST cause ROBOCOPY to do all the rechecking in the first place?
Thanks again,
Dan
HI,
How to exclude copying of files without extensions. ?
I Take
/XF *.
do not work
An idea
Thanks
You could use PowerShell to create an exclude list:
$source = c:\files\

robocopy $source "c:\temp\" /xf (Get-ChildItem -File $source -name | ?{$_ -notmatch '\.'})
Love the guide but I find that Robocop Robocopy makes Robocopy almost foolproof.
https://sourceforge.net/projects/robocoprobocopy/ – the program and even a WIKI on the same page. Although after the guide above, I doubt that you need the wiki.