#sponsored
Data protection is more critical than ever. With the increasing frequency and severity of cyberattacks and data breaches, a reliable backup solution to protect your data is essential.
Hornetsecurity has just released their latest version of VM Backup, VM Backup V9, with new and improved features. The feature that stands out the most is the addition of ransomware protection leveraging immutable cloud storage. This gives you an extra layer of security against ransomware attacks.
In this article, we explore the new features and improvements in VM Backup V9 and provide you with a step-by-step guide on how to use it effectively.
VM Backup V9
VM Backup (formerly Altaro VM Backup) is a popular backup solution that provides reliable protection for virtual environments. It is a lightweight yet robust backup solution that can be installed on any physical server or virtual machine (VM), allowing you to back up and restore your VMs quickly and easily.
One of the key features of VM Backup is its support for in-line deduplication. This feature helps reduce the amount of storage space required for backups by identifying and removing any redundant data. With in-line deduplication, VM Backup can optimize storage usage, reduce backup times, and minimize network traffic.
A wide range of virtual environments is supported, including VMware vSphere, ESXi, vCenter, Microsoft Hyper-V, and Azure Stack HCI. It also supports backup and restore for individual files and folders, as well as granular restore options for Exchange and SQL Server.
With VM Backup, you can protect your VMs that are running on Hyper-V (Server 2008 or higher), Azure Stack HCI, and VMware ESXI 5.5 and higher. The free version of ESXi is not supported due to the limitations of VMWare.
New Features in VM Backup
VM Backup V9 comes with a lot of new and improved features that provide better protection against ransomware and enhance the user experience by introducing highly scalable, robust, and optimized features for efficient use of disk space.
The biggest improvement in VM Backup version 9 is the introduction of ransomware protection on offsite cloud storage locations. By leveraging immutable storage policies on Wasabi and Amazon S3, backups can be written in a WORM, or write once read many, state for a set amount of time. This way, backups cannot be deleted or altered by any user, not even administrators or other root accounts.
This tamper-proof data is an extra level of security, protecting against ransomware attacks that target backup files. Immutable policies can be configured only while setting up the offsite cloud location. You can configure any duration that you want for the immutable period. When the backup version exceeds its defined immutable period, it will no longer be protected against ransomware.
Another big improvement can be found in the backup repository. VM Backup v9 introduces a new backup repository for onsite (primary), offsite, and cloud storage accounts. The deduplicated repository has been rebuilt to optimize disk space usage and backup storage robustness.
It includes a new optimized data storage mechanism that allows for unused data blocks to be freed from the storage repository and reclaim storage space whenever possible. Concurrent data cleanup operations (retention) can now run in parallel with any other onsite and offsite backups, as well as restore operations.
How to use VM Backup
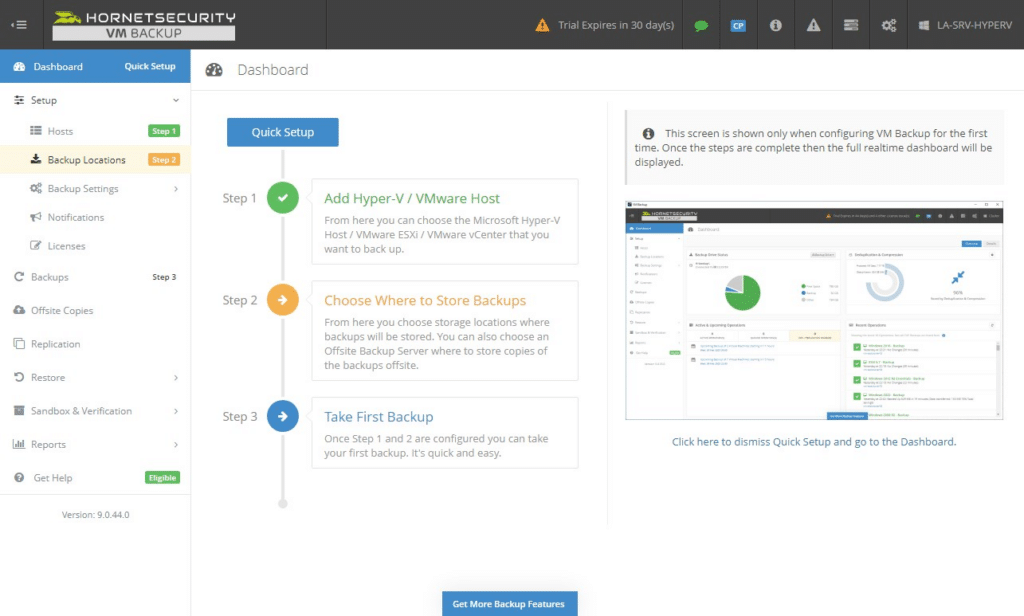
Backing up your first VM with VM Backup only takes a couple of minutes. The console will guide you through the configurations in three simple steps after the installation. If you are upgrading from VM Backup V8, then make sure that you follow this guide.
You can download the latest version, including a 30-day trial, here.
Step 1 – Adding the host(s)
After you have installed VM Backup, the first step is to add the host(s) to your management console. You can add multiple hosts to Hornetsecurity, and you are not limited to one type. This means that you can mix Hyper-V servers with ESXi, for example.
Step 2 – Adding the local Backup Location
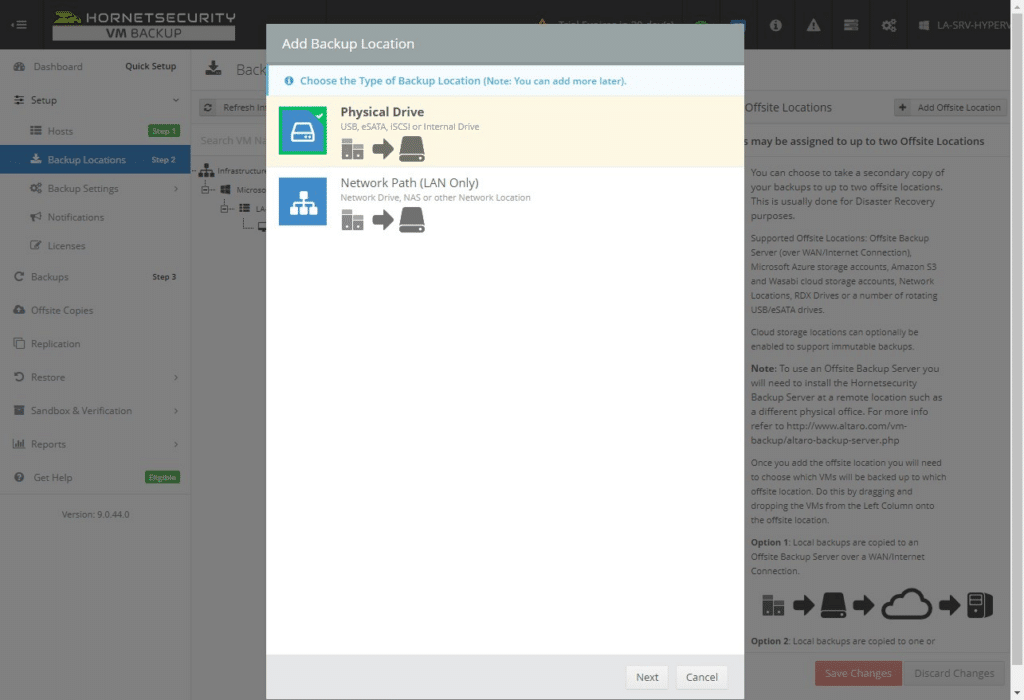
The next step is to add the backup locations. We will need a local backup location for our primary backup. This can be a local disk or a network location. If you want to use the feature Boot from Backup, then you will need to make sure that your local storage disks are fast enough to boot the VMs from. A set of SSDs in a RAID volume will be the best solution.
Besides the local storage, we can also add an offsite location, which can be a remote storage server. Replication jobs will ensure that the data is in sync between the two locations.
Step 3 – Add the Offsite Location
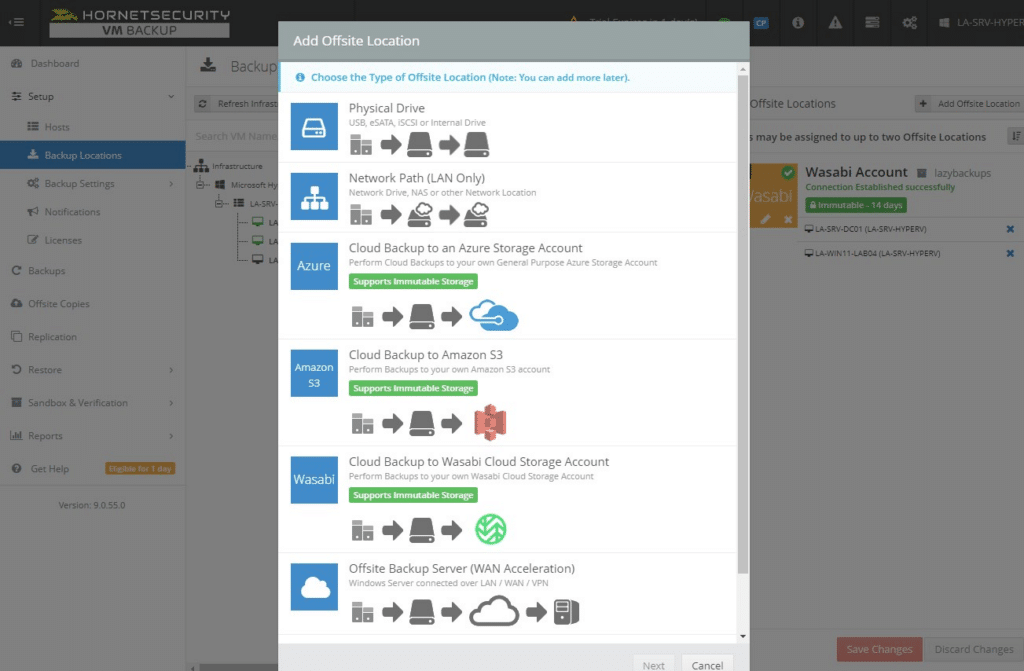
Each backup solution must have an offsite backup location. With VM Backup v9, we can choose from a range of options for the offsite location. We can not only use the common options like a network path, remote backup server, or rotating disks—we can also use cloud storage locations.
At the moment, you can choose between Amazon S3, Wasabi and Azure in combination with immutable storage.
Step 4 – Creating the Backup Schedule
With the hosts and backup location added, we can now create our backup schedules. VM Backups come with two predefined schedules that we can use or change. Of course, you can also create your own schedule.
Before you add VMs to the schedules, we first need to edit the schedule, because the default schedules will only backup to the primary backup location. Click on the pencil (1) to edit the schedule. Make sure that you enable the Offsite copy in the schedule, which is indicated by the cloud icon (2).
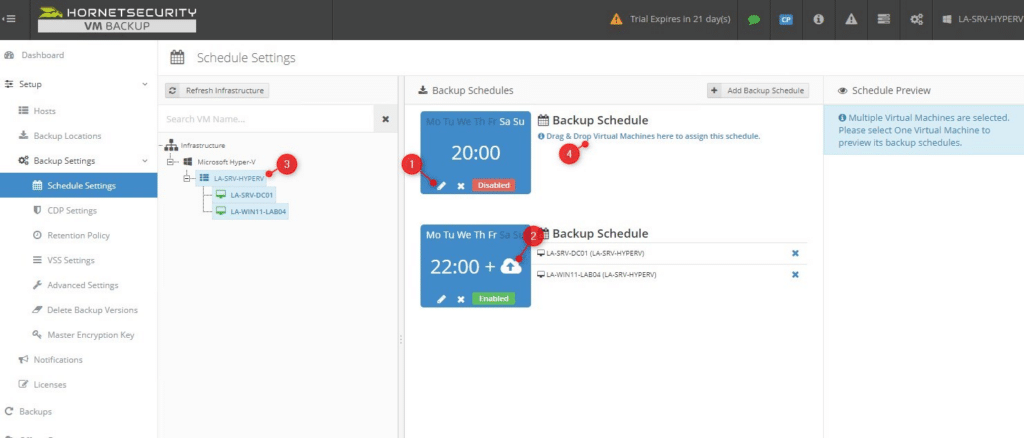
After you have edited the schedule, enable it (by clicking on Disabled) and then drag and drop your VMs (3) to the schedule (4). You can select each individual VM or all VMs by dragging the Hypervisor.
Monitoring the Backups
There are multiple places within VM Backup where you can monitor the backup status. The dashboard is the perfect place for a quick overview of your backups, displaying how much data is backed up, the history of your local backup and offsite copies, and the backup schedule.
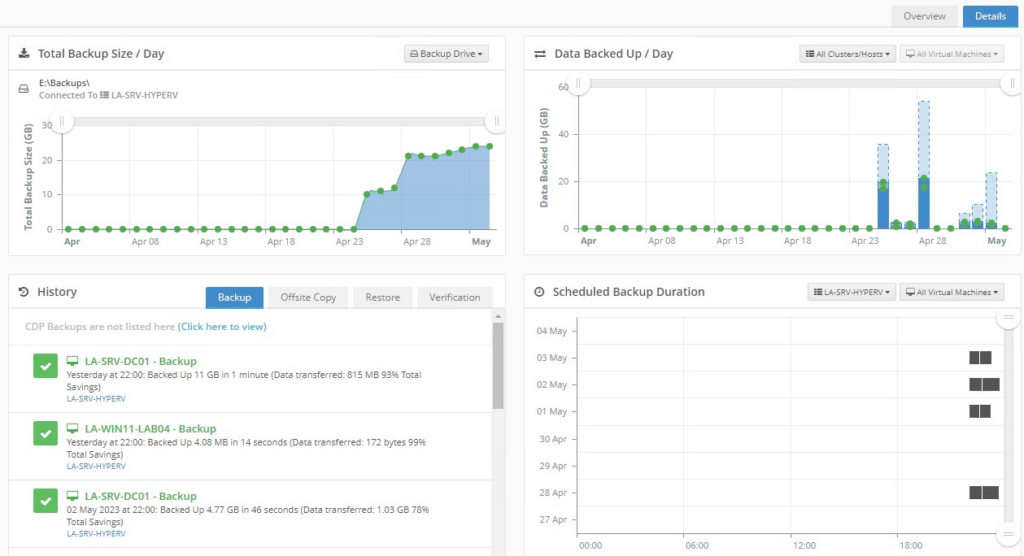
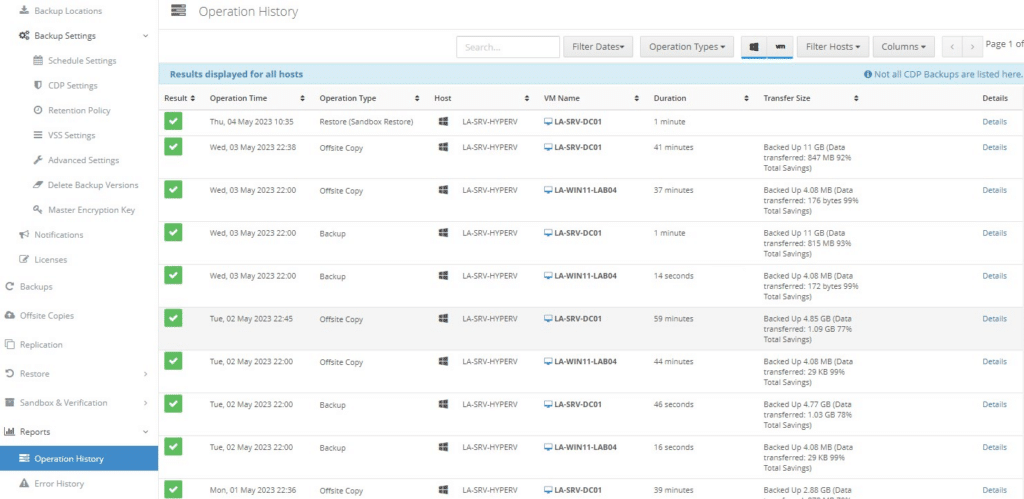
More details about the backup can be found in the Backups menu or in the operation history report. This will give you details about each job per VM and allows you to quickly filter the events.
Testing your Backups
Creating backups is only the first step of a good backup process; regularly testing the backups is just as important. VM Backup comes with a couple of useful tools to monitor and test your backups.
The first step is the Backup Health Monitor. This is enabled by default and will monitor your backups in the background for integrity issues. Integrity issues often occur due to disk issues and can easily be resolved by creating a new backup of the affected data.
To fully test your backups, you can perform a sandbox restore job. This will either verify the backup folders or perform a full system restore in a sandbox environment. The sandbox environment won’t affect your live VMs.

With VM Backup v9 we can create a sandbox restore schedule to automatically perform a full restore of your VM on a regular basis. The restored VM disk will be attached to your hypervisor to ensure that it boots. You run this test on a weekly or monthly basis, making sure that your backups are always working as they should.
Pricing and plans
VM Backup license is available in two license types, subscription and perpetual, as well as in three editions, Standard, Unlimited, and Unlimited Plus. The subscription license allows you to pay per VM and is not tied to a host. With perpetual, you pay a fixed price per host, independent of the number of VMs and CPUs.
If you want to use the immutable cloud storage option, then you will have to go for the Unlimited Plus option. You can find a detailed comparison of the different versions here.
Wrapping Up
VM Backup V9 is a powerful and flexible backup solution that provides reliable protection for virtual environments. With support for multiple hypervisors, inline deduplication, a wide range of backup locations, and now even immutable cloud storage, VM Backup is a great choice for any organization looking for a reliable and easy-to-use backup solution.
