Multi-factor authentication is pretty much the standard these days, but for our Windows devices, most of us still use only a username and password. The problem with strong passwords is that they are sometimes hard to remember and users often reuse them on multiple sites. Windows Hello for Business replaces passwords with two-factor authentication on your Windows devices.
When authenticating with Windows Hello for Business we can use biometrics (fingerprint or facial recognition) or PIN code sign-in. This combined with the built-in TPM chip on your device gives a two-factor login. We can even extend this to multi-factor with the help of trusted signals.
In this article
In this article, we are going to take a look at how Windows Hello for Business works, how to implement it, and how to configure multi-factor unlock (recommended).
Windows Hello for Business – The basis
Windows Hello for Business (WHfB) replaces the need for strong, hard-to-remember passwords, with two-factor authentication on your devices. Authentication is done with either biometrics or PIN and is tied to the device. This means Windows Hello for Business needs to be configured on each device that the user uses.
The two-factor authentication is created by something that the user knows or is (the PIN or Biometric) and something that the user has, the key generated by the TPM chip in the device. The combination of the two is sent to the identity provider, Azure AD, for the authentication token.
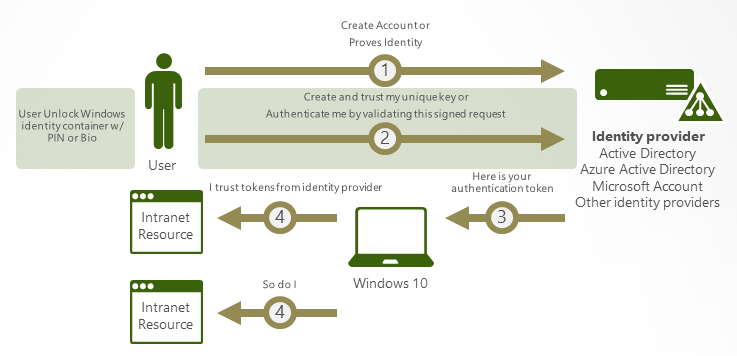
Windows Hello for Business can even be extended to true Multi-Factor Authentication, with the use of dynamic unlock. Dynamic unlock allows you to combine PIN/biometrics with for example trusted signals, like the Bluetooth signal of your phone or network information.
This allows us to create a scenario where a user is able to login with only the fingerprint sensor at work (a trusted location), but needs to have their phone in proximity or enter their PIN as second factor when working at a coffee shop.
PIN vs Password
A question often asked is how is PIN more secure than a password. The PIN that you use for Windows Hello for Business can exist only out of numbers and has a default minimum length of 6 characters. So a strong password sounds more secure, right?
The difference between the two is, that the password can be used on any device or even online in the case of Microsoft 365. The PIN however is tied to a specific device, so when somebody else knows your PIN, they still need to have access to your device to be able to login into your account.
Now the problem with PIN alone is that it can easily be stolen by shoulder surfing. When you leave your computer unattended for a moment, somebody could gain access to your device this way. A good way to mitigate this risk is to use Multi-Factor Unlock. This uses trusted signals, for example, the Bluetooth of your mobile phone, to verify that it’s you that is logging in.
Good to know is that simple PIN numbers are not allowed. Windows Hello for Business uses an algorithm to check for a constant delta between one digit to the next. This prevents the use of repeating, sequential and simple patterns. For example, the PIN patterns below are not allowed:
- 1111
- 1234
- 1357
- 9630
- 1593
Implementing Hybrid Cloud Trust
When you have a hybrid environment, on-premise Active Directory and Azure AD, then Cloud Trust is the recommended way by Microsoft to implement Windows Hello for Business. Implementing Windows Hello for Business is much easier with Cloud Trust, compared to the old methods of Key Trust or Certificate Trust.
To implement Cloud Trust we are going to set up Azure AD Kerberos, using PowerShell. To deploy it on the devices we are going to use Group Policies.
Requirements
To use the new Cloud Trust method you must ensure that you meet the following requirements:
- Multi-factor Authentication enabled
- Atleast Windows 10 21H2 or Windows 11
- Fully patched Windows Server 2016 or later Domain Controller
Creating the Azure AD Kerberos Server object
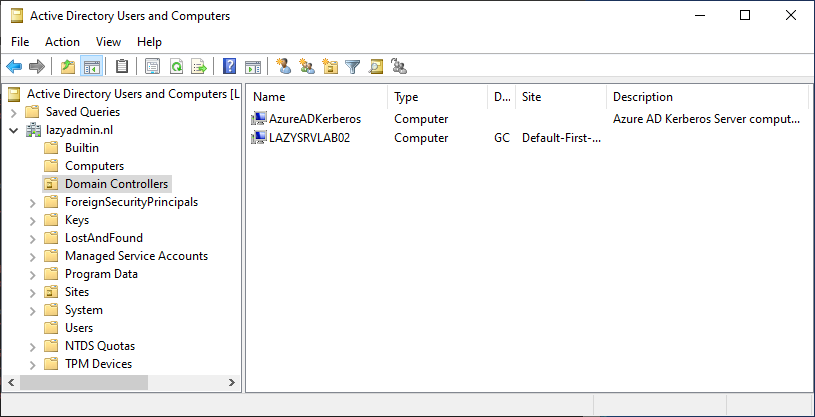
The first step is to enable Azure AD Kerberos in our domain. This will create a Read Only Domain Controller object in your Active Directory and is used to generate TGTs (ticket-granting-tickets) for on-premise authentication. If you want to know more about how this works, then make sure that you read this technical deep dive at Microsoft.
It’s possible that you already have deployed Azure AD Keberos if you are using passwordless SSON in your environment. In that case, you don’t need to redeploy it.
To install Azure AD Kerberos, we are going to use PowerShell. Make sure that you have a Global Administrator account for Azure AD and a Domain Admin account for your on-premise AD.
- On your Domain controller, open Windows PowerShell (Admin)
- Install the Azure AD Keberos PowerShell Module:
# Ensure TLS 1.2 for PowerShell gallery access.
[Net.ServicePointManager]::SecurityProtocol = [Net.ServicePointManager]::SecurityProtocol -bor [Net.SecurityProtocolType]::Tls12

# Install the module
Install-Module -Name AzureADHybridAuthenticationManagement -AllowClobber
Next, we are going to create the Kerberos Server object. For this, we will need to administrator accounts so we create the object in the Active Directory and verify our tenant. If you are running the PowerShell commands on the domain controller, then you don’t need to enter the local Administrator credentials (See Example 2 below).
I assume you are using Modern Authentication for your Azure AD environment, if not make sure that you configure it! With the method below you will be prompted for authentication, allowing you to use your multifactor authentication.
# Get your domain
$domain = $env:USERDNSDOMAIN

# Enter a domain administrator username and password.
$domainCred = Get-Credential

# UserPrincipalName of an Azure AD Global Administrator
$userPrincipalName = "lazyadmin@lazydev.onmicrosoft.com"

# Create the new Azure AD Kerberos Server object in Active Directory
Set-AzureADKerberosServer -Domain $domain -UserPrincipalName $userPrincipalName -DomainCredential $domainCred
Example 2 – Running the script on the domain controller:
# Get your domain
$domain = $env:USERDNSDOMAIN

# UserPrincipalName of an Azure AD Global Administrator
$userPrincipalName = "lazyadmin@lazydev.onmicrosoft.com"

# Create the new Azure AD Kerberos Server object in Active Directory
Set-AzureADKerberosServer -Domain $domain -UserPrincipalName $userPrincipalName
Once completed you will find the AzureADKerberos computer object in your Active Directory in the Domain Controller OU:
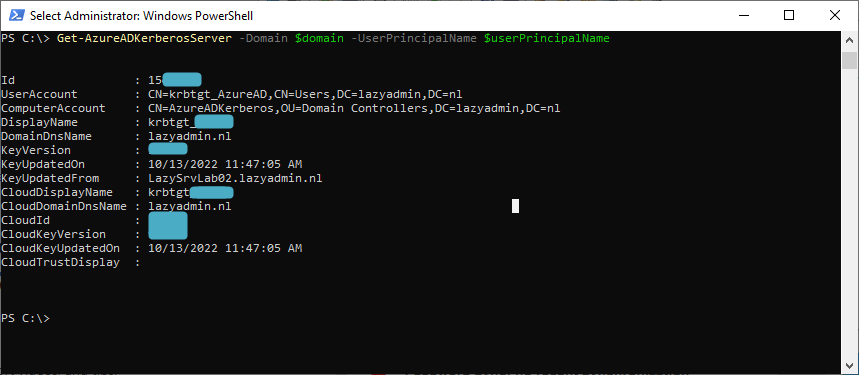
We can also verify the configuration with PowerShell, but you might need to authenticate again to view the details:
Get-AzureADKerberosServer -Domain $domain -UserPrincipalName $userPrincipalName
Configure Windows Hello for Business with Group Policies
In a hybrid environment, we can use Group Policies to configure Windows Hello for Business on the devices. Because we are using the Cloud Trust method, we can only use the computer configuration settings. This means that the policy needs to be assigned to computers and cannot be assigned to users.
- In the Group Policy Management create a new Policy, for example, CPO_Enable_WHfB
- Edit the policy and navigate to:
Policy > Administrative Templates > Windows Components > Windows Hello for Business - Enable the following settings
- Use Windows Hello for Business
- Use Cloud trust for on-premise authentication
- Use a Hardware security device
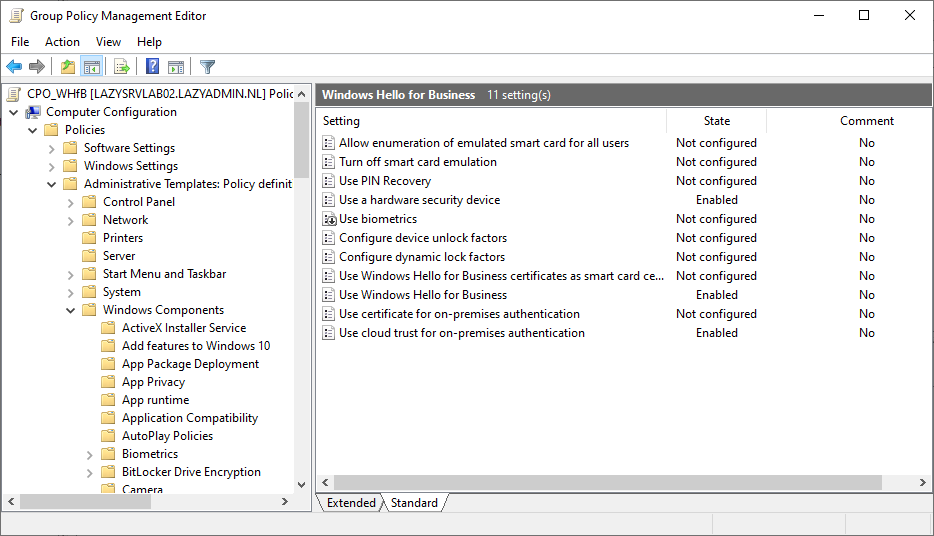
These three settings are the basis that you need to use Windows Hello for Business in a hybrid environment. Make sure that you assign the policy first to an OU with test computers. For the roll-out, you can enable the option “Do not start Windows Hello provisioning after sign-in” under the Use Windows Hello for Business setting. This way users won’t be prompted immediately after sign-in and allows them to configure it when it suits them.
Testing
With the policy configured and assigned to an OU with computers, it’s time to test the Windows Hello for Business implementation. The first step is to make sure that the latest policies are loaded on the client. You can force the update with the GPUpdate command or check the status with RSOP.
Note
Users that are member of the Account, Server, Backup or Print Operators group in the Active Directory won’t be able to use WHfB. These group are protected by the AdminSDHolder and have the attribute adminCount set to 1. By design, some attributes of these accounts won’t sync to Azure AD
If you have left the option “Do not start Windows Hello provisioning after sign-in” off, then the next time you log in on the computer you will be prompted with the Windows Hello setup screen.
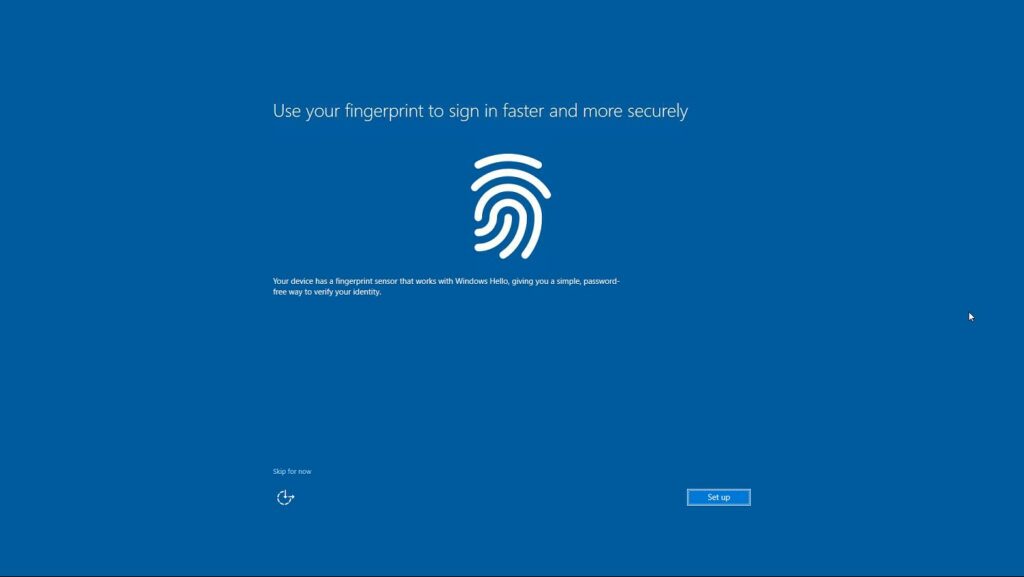
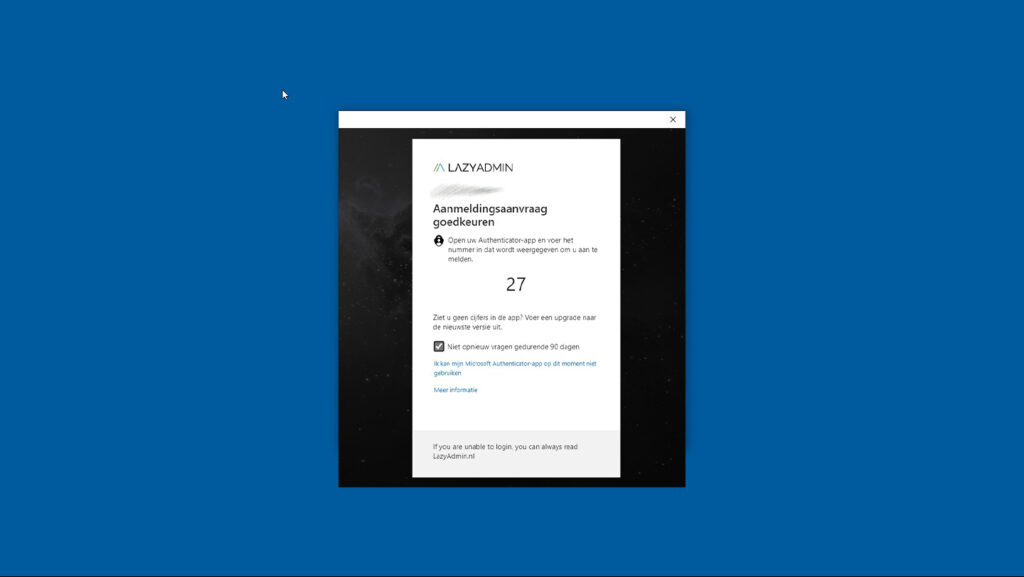
After setting up the fingerprint, you must add a PIN. The PIN is always required, it can be used in case of the fingerprint sensor doesn’t work or as a second authentication factor in the multi-factor unlock scenario.
The user will first need to complete the MFA request, to authenticate the user’s identity. After the MFA request, we can configure the PIN
It can take up to 30 minutes after you have configured the sign-in method for Windows Hello for Business on your device for it to work. The reason for this is that the Azure AD Connect tool first needs to synchronize the necessary attributes. You can force a sync of Azure AD with the following PowerShell command on the server where the Azure AD Connect client is installed:
Start-ADSyncSyncCycle -PolicyType Delta
You can also verify if the key is synced back to your Active Directory by checking the attribute msDS-KeyCredentialLink attribute is in the user’s account.
Dynamic Lock
When rolling out Windows Hello for Business in your tenant I really recommend configuring Dynamic Lock as well. From a security standpoint, user’s really should lock their computers when they walk away from their desk. Leaving a computer unlocked is a security risk, somebody could gain access to confidential or privacy-sensitive information. It also prevents from data being altered by unauthorized persons.
Locking the computer is for most users not the problem, simply press the Windows key + L. But unlocking it, with the long and strong password is the thing that is holding the users back. But it shouldn’t be an issue anymore now we have implemented that users can unlock their computer with a single touch of the fingerprint sensor.
Dynamic lock uses the Bluetooth signal of the user’s mobile phone to determine if the user is near the computer or not. When the signal gets too weak, it will lock the computer if the computer is idle.
Note
Dynamic lock only locks the computer when the bluetooth signal is lost and the computer is idle. This means that if somebody gets access before the systems locks, the computer simply won’t lock. Therefore, the Dynamic Lock feature isn’t a replacement for the user to lock the computer. It only reduce the change when the user forgets to lock it.
Enabling Dynamic Lock with Group Policy
To enable dynamic lock, we first need to change the policy that we created earlier:
- In the Group Policy Management edit the Windows Hello for Business policy
- Navigate to:
Policy > Administrative Templates > Windows Components > Windows Hello for Business - Enable the setting: Configure dynamic lock factors
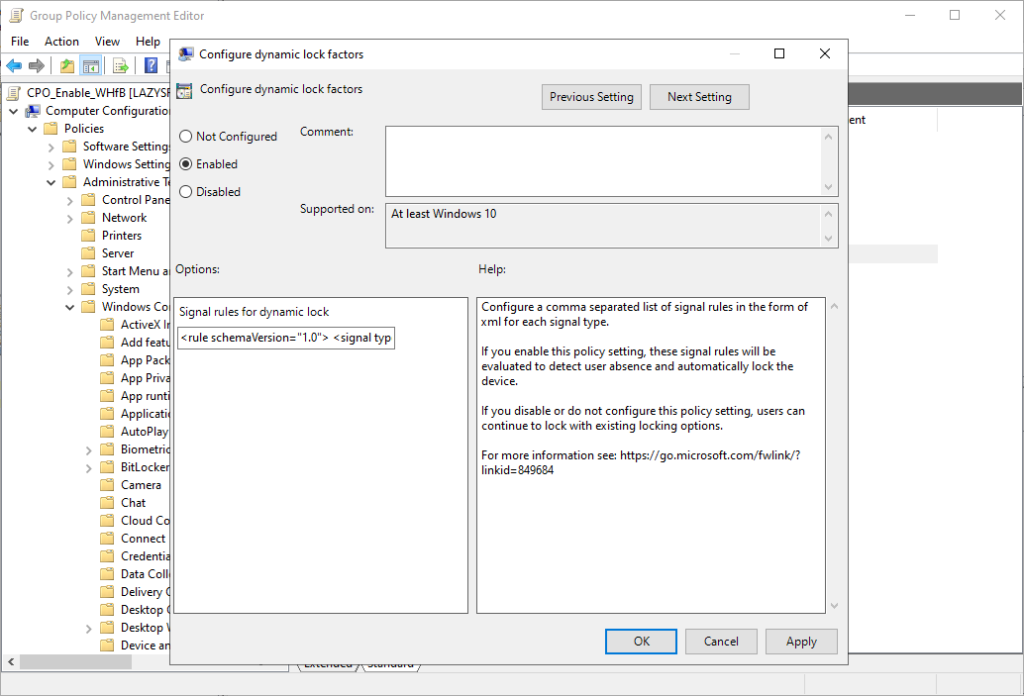
In the policy setting, you will see the signal rule for dynamic lock. It contains the following default value:
<rule schemaVersion="1.0"> <signal type="bluetooth" scenario="Dynamic Lock" classOfDevice="512" rssiMin="-10" rssiMaxDelta="-10"/> </rule>
The default rule is recommended to use, but it’s also good to know how it works and what options you have. So let’s take a closer look at the XML rule. For the dynamic lock functionality, we need to use a Bluetooth device, which is set by the Type attribute and the scenario is Dynamic Lock. These two can’t be changed.
By default, Windows will watch the Bluetooth signal of your phone, which is indicated by the classOfDevice attribute value 512. For the device classes are also other options available. Basically, you can use any Bluetooth device that you can pair with Windows, but the most common ones to use are:
| Description | Value |
|---|---|
| Phone | 512 |
| Peripheral | 1280 |
| Wearable | 1792 |
| Uncategorized | 7936 |
The last two attributes, rssiMin and rssiMaxDelta, tell something about the signal strength. rssiMin indicates the signal strength needed for the device to be considered in range. The default value of -10 allows a user to move around in an average size office without locking the device. rssiMaxDelta determines how that Windows should lock once the signal strength is lost by more than -10.
Pairing your phone to Windows
Do dynamic lock to work, the users will need to pair their phone with Windows. Bluetooth pairing isn’t really difficult, simply open Start and type Bluetooth. This will show the option Bluetooth and other devices where you can add a Bluetooth device. Pair your phone for dynamic lock to work.
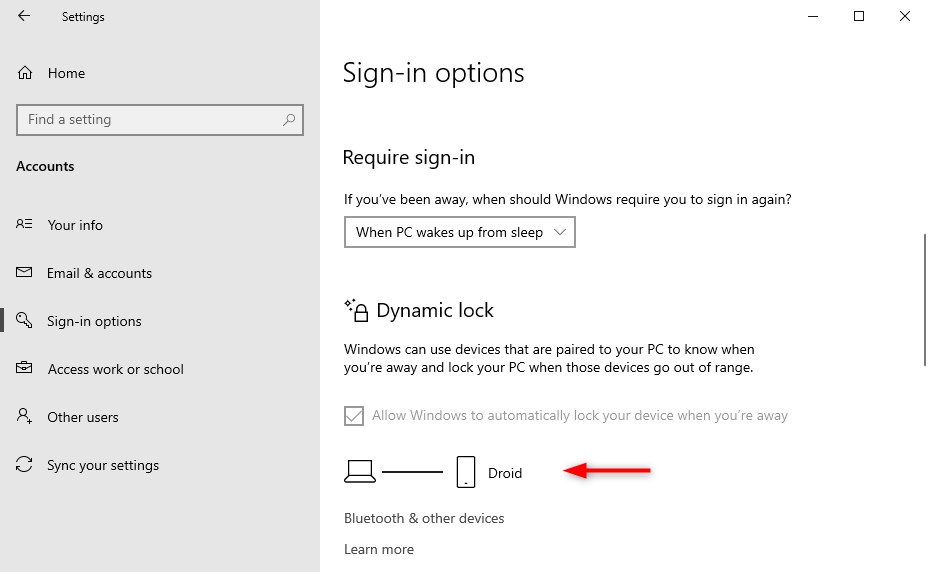
You can verify dynamic lock on the client device by opening Settings > Accounts > Sign-in Options. Scroll bit down and you will see that Dynamic lock is enabled and paired to your phone.
Multi-Factor Unlock
When logging in to Windows we normally use a single-factor login, password, PIN, or fingerprint. As mentioned in the beginning, especially PIN is easy to get compromised with shoulder surfing. But also passwords can get compromised. An attacker could gain access to your system with these stolen credentials.
With Windows Hello for Business, we can add an additional factor to unlocking Windows. For the second factor, you will need to use a different credential provider, then the first unlock. An extra option that we use is the trusted signal (more about trusted signals later). By default, PIN and Trusted Signals are used for the second unlock factor.
To configure multi-factor unlock, we are going to use group policies. We can determine which credential providers (PIN, fingerprint, facial recognition, trusted signal) we want to use as the first and second unlock factors. These credential providers are indicated with GUIDs:
| Credential Provider | GUID | First unlock factor | Second unlock factor |
|---|---|---|---|
| PIN | {D6886603-9D2F-4EB2-B667-1971041FA96B} | X | X |
| Fingerprint | {BEC09223-B018-416D-A0AC-523971B639F5} | X | X |
| Facial Recognition | {8AF662BF-65A0-4D0A-A540-A338A999D36F} | X | X |
| Trusted Signal (Phone proximity, Network location) | {27FBDB57-B613-4AF2-9D7E-4FA7A66C21AD} | X |
Enable Multi-factor Unlock
To enable Multi-factor unlock in Windows Hello for Business we will have to edit the group policy once again.
- In the Group Policy Management edit the Windows Hello for Business policy
- Navigate to:
Policy > Administrative Templates > Windows Components > Windows Hello for Business - Enable the setting: Configure dynamic unlock factors
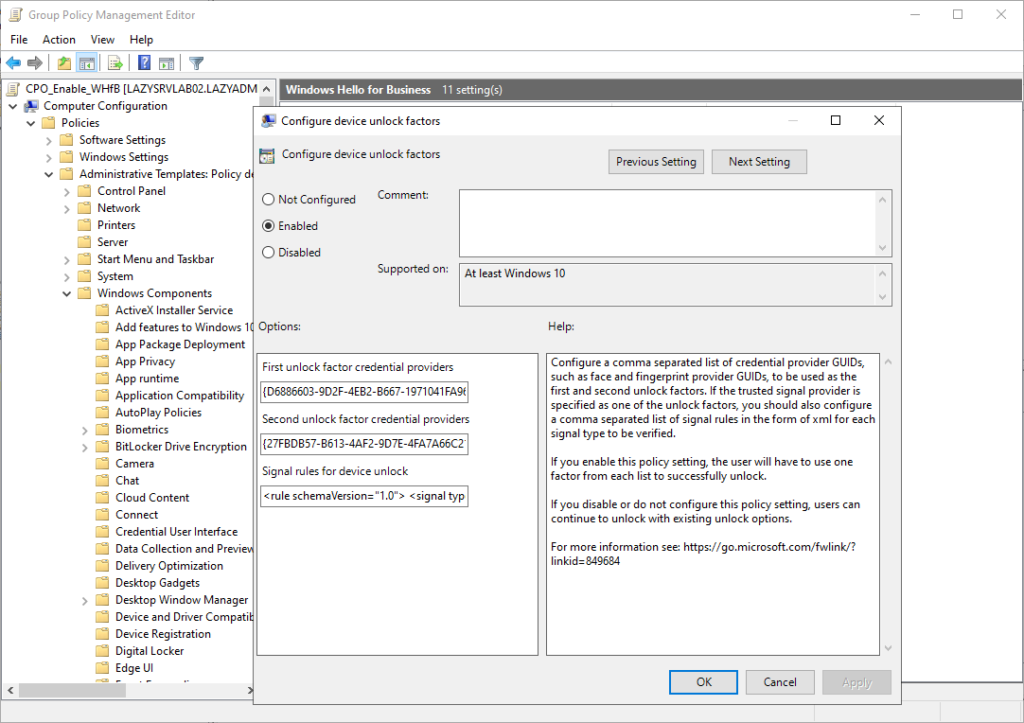
The default configuration for dynamic unlock (multi-factor unlock), is as followed. For the first unlock, you can use the following credential providers:
- PIN – {D6886603-9D2F-4EB2-B667-1971041FA96B}
- Fingerprint – {BEC09223-B018-416D-A0AC-523971B639F5}
- Facial Recognition – {8AF662BF-65A0-4D0A-A540-A338A999D36F}
And for the second unlock factor you can by default use either the:
- Trusted Signal – {27FBDB57-B613-4AF2-9D7E-4FA7A66C21AD}
- PIN – {D6886603-9D2F-4EB2-B667-1971041FA96B}
Both are configured in the policy settings using the GUIDs which are separated by commas:
# First unlock
{D6886603-9D2F-4EB2-B667-1971041FA96B},{8AF662BF-65A0-4D0A-A540-A338A999D36F},{BEC09223-B018-416D-A0AC-523971B639F5}

# Second unlock
{27FBDB57-B613-4AF2-9D7E-4FA7A66C21AD},{D6886603-9D2F-4EB2-B667-1971041FA96B}
If you want to add facial recognition as a second unlock factor as well, then you can simply add the GUID to the list:
# Trusted signal, PIN, Facial recognition
{27FBDB57-B613-4AF2-9D7E-4FA7A66C21AD},{D6886603-9D2F-4EB2-B667-1971041FA96B},{8AF662BF-65A0-4D0A-A540-A338A999D36F}
Trusted Signals
The most common option for the second unlock factor is the Trusted Signal. The idea behind this is that you either measure if the user is near the Windows device, based on the Bluetooth signal of the phone or wearables. Or you check if the Windows device is in a trusted network.
The Bluetooth signal of the phone is the default option. Just like with Dynamic Lock, we have a single-line XML file where we can configure the signal type and device class.
<rule schemaVersion="1.0"> <signal type="bluetooth" scenario="Authentication" classOfDevice="512" rssiMin="-10" rssiMaxDelta="-10"/> </rule>
Now Bluetooth works in most use cases great, especially in combination with the dynamic lock feature. But Bluetooth isn’t always an option. Desktop computers often don’t have a Bluetooth adapter, or users don’t want to pair their (private) mobile to the company device. Another option for the trusted signal is to check the network environment of the device.
For example, when the device is at the office or connected to a known wireless network, then we can satisfy the trusted signal based on the network or wireless network details. We can, for example, check the Ip range, wireless network name (SSID), the mac address of the access point, or the DNS suffix. Check the documentation for all the possible options.
Good to know is that you can use multiple rules together, so you can check for either the Bluetooth signal or the network details. And when it comes to verifying the network, you can use multiple conditions.
Trusted Signal Examples
Now I am not going to explain all the possible options that there are for the ipConfig and Wifi signal, but I will give you some commonly used examples for the trusted signal.
Note
The XML configuration needs to be a single-line xml. Use an XML minifier to compact your XML into a single line. Make sure that you only have 1 line!
In the first example, we are going to verify the trusted signal by either the dnsSuffix of the IP configuration or the Bluetooth signal. Note that the two rules are separated with a comma. Now the code below isn’t minified, so before you can use it you will need to minify it.
<rule schemaVersion="1.0">
  <signal type="ipConfig">
    <dnsSuffix>lazyadmin.nl</dnsSuffix>
  </signal>
</rule>,
<rule schemaVersion="1.0">
  <signal type="bluetooth" scenario="Authentication" classOfDevice="512" rssiMin="-10" rssiMaxDelta="-10"/>
</rule>
Copy and paste the code in the XML Beautifier and press Minify XML. Note that in the result, we still have 2 lines, not one! Place your cursor behind the comma on line 1 and press the delete key. This will place the XLM on a single line.
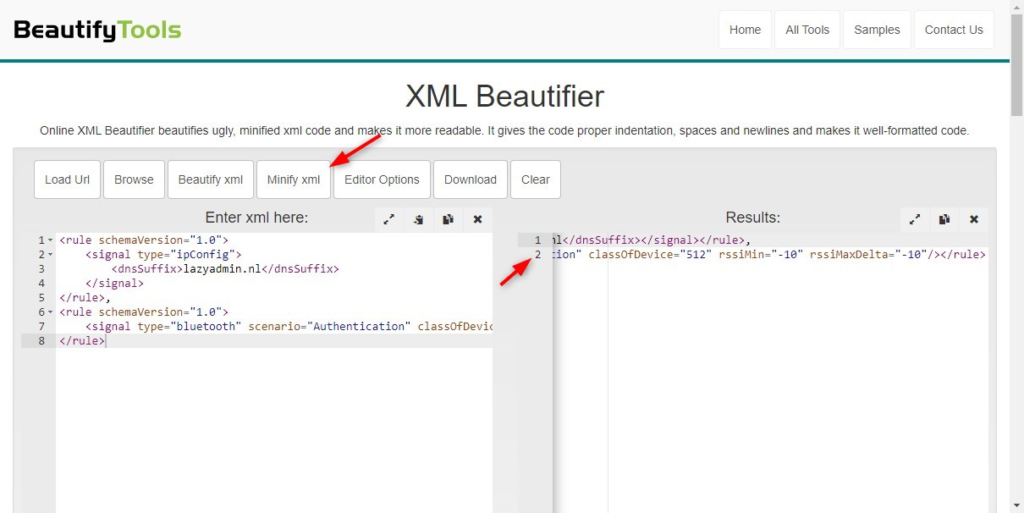
The XML result should look like below before you add in the policy setting:
<rule schemaVersion="1.0"><signal type="ipConfig"><dnsSuffix>lazyadmin.nl</dnsSuffix></signal></rule>,<rule schemaVersion="1.0"><signal type="bluetooth" scenario="Authentication" classOfDevice="512" rssiMin="-10" rssiMaxDelta="-10"/></rule>
You can also check for two or more rules, using the AND element. For example, we want to check the wireless network name (SSID) and IP range. Note the AND element below the rule element. In this case, the device needs to be connected to a wireless network lazywifi and have an IP address assigned in the range 192.168.0.x
<rule schemaVersion="1.0">
<and>
  <signal type="ipConfig">
    <ipv4Prefix>192.168.0.0/24</ipv4Prefix>
  </signal>
  <signal type="wifi">
    <ssid>lazywifi</ssid>
  </signal>
</and>
</rule>
If you have multiple offices then you probably want to check for different network settings. In these cases, make sure you create a rule for each network environment, for example:
<rule schemaVersion="1.0">
  <signal type="ipConfig">
    <ipv4Prefix>172.16.10.0/24</ipv4Prefix>
  </signal>
</rule>,
<rule schemaVersion="1.0">
  <signal type="ipConfig">
    <ipv4Prefix>172.16.30.0/24</ipv4Prefix>
  </signal>
</rule>,
<rule schemaVersion="1.0">
  <signal type="bluetooth" scenario="Authentication" classOfDevice="512" rssiMin="-10" rssiMaxDelta="-10"/>
</rule>
Troubleshooting
The trusted signal configuration may take a bit of trial and error to get it working perfectly. Keep in mind that policy changes can take some time to reflect on the client. So make sure that you check if the latest setting is applied by using the RSOP utility. During my own tests, I noticed that the wireless network signals didn’t work reliably. Some clients were unable to satisfy the additional factor even though they were connected to the correct wireless network.
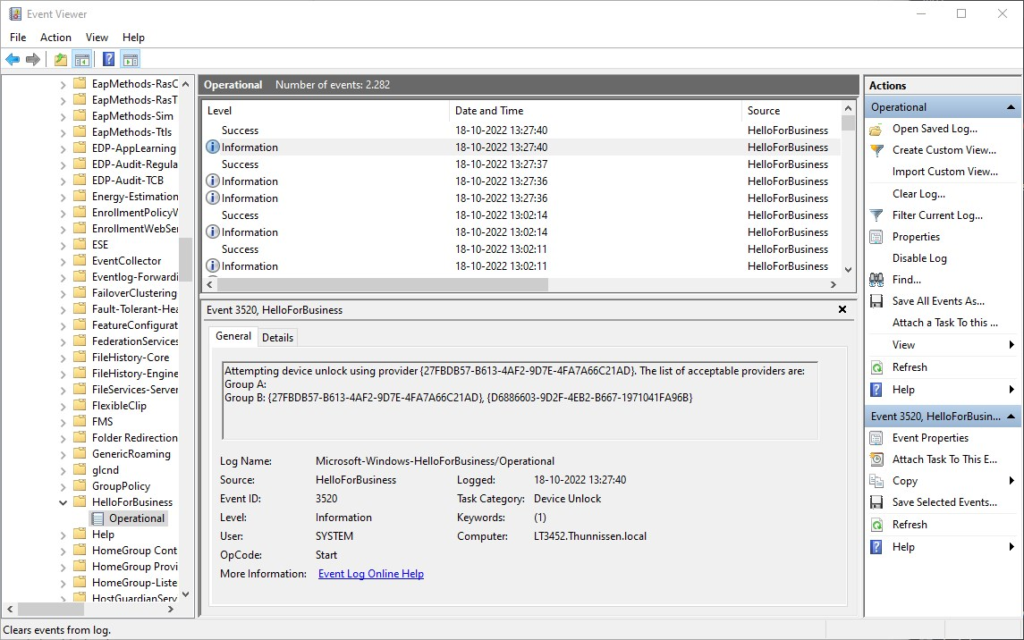
When troubleshooting Windows Hello for Business on a client, make sure that you use the event viewer. It gives a perfect insight into which credential providers WHfB is using and if there were any issues. You will find the events in the event viewer under:
Applications and Services Logs > Microsoft > Windows > HelloForBusiness > Operational
When using Multi-factor Unlock or also known as Dynamic Unlock, then you will find two events in the event viewer. The first event is the unlock of the first factor. In the example below, we see that I have used Fingerprint – {BEC09223-B018-416D-A0AC-523971B639F5} as credentials. The GUID is listed in Group A, so we can successfully use it.
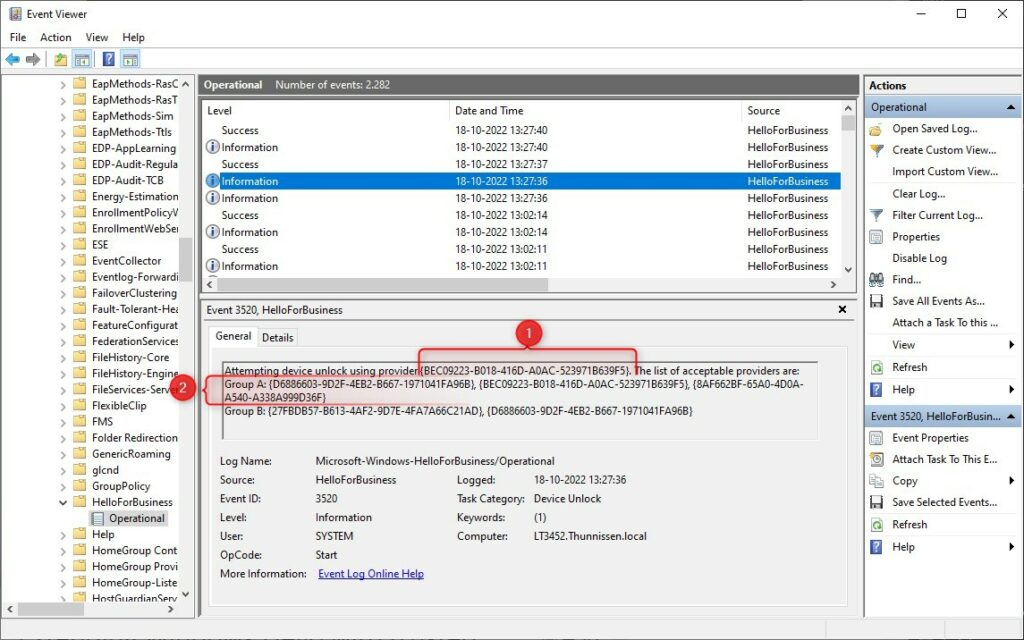
A few seconds later we see the second unlock factor event. Here we have used a Trusted signal {27FBDB57-B613-4AF2-9D7E-4FA7A66C21AD}, which is listed as a provider in Group B.
Wrapping Up
Deploying Windows Hello for Business with Cloud Trust is pretty easy compared to the older methods. Make sure that you thoroughly test the implementation before you roll it out in your organization. I have seen new Hp notebooks where the fingerprint sensor doesn’t work with Windows Hello for Business out of the box. A driver update fixes it most of the time, but make sure that you test the different devices that you have in your organization.
Windows Hello for Business is not only a good security improvement, but it makes logging in also more convenient for your users. That is something that is really gone help with the adoption in your organization.
If you have any questions, just drop a comment below.


I hope you still reply on this article.
I’m in a hybrid environment, on-prem AD/DC, AAD joined. SCCM Co-managed with device workload enabled on Intune. Testing is being done by enabling the policy via local policy instead of group policy.
If I set up Windows Hello in office or via VPN and logged in once with it (PIN/Fingerprint), everything work like a charm even at home network.
If I set up Windows Hello at home network, it never works and always prompted error of “Your credentials could not be verified”.
Is the prerequisite for it to work is first time must be on-prem to get the ticket then only cloud trust kick in afterwards?
Yes, it would need to be able to connect to the domain controller
Hi Ruud, any particular reason for using GPO for hybridAAD\cloud set-up instead of Intune to enable whfb? I have deployed cloud trust and configured whfb in Intune, working OK on test machines except for some nagging issues with RDP to servers. I managed to find some tweaks like enabling restricted admin on some servers to fix sso for RDP but couldn’t find any documentation on how to negotiate locked remote session as it needs a password to unlock. Any ideas?
I don’t have a lot of experience with Intune (is on my todo list)
Hi, We are looking at setting this up in our Environment, one thing we would like verification on, is when we do configure the Kerberos trust in a Hybrid Setup, what impact does this have on users sign in? Does the sign-in continue to function as they are currently, until we assign a policy to them via Intune, to enable Windows Hello. Or will this enforce all users to start authenticating differently, regardless on them having a policy assigned to them.
The login method only changes after you have assigned the policy.
Thanks for a great read but wondering if you can see through my problem with MFA.
I have a problem it seems with Azure joined machines. it seems when using normal password local ressourses are avaliable. but if you LOCK the pc and login with pin it says an error ocurred when accessing the local share. like the pin isn´t working. All Klist tickets is also wiped when logging in with the pin seems odd. i can safely say this is on 2 computers this is occuring but not the rest……any ideas what to check for
Are devices not joined to the local domain (hybrid environment)? Seems like an issue with the DC not having the proper certs and you need make sure that AD Connect has written back msds-keycredentiallink attribute on user objects, more info:
https://techcommunity.microsoft.com/t5/microsoft-entra-azure-ad-blog/azure-ad-mailbag-windows-hello-for-business/ba-p/445349
https://learn.microsoft.com/en-us/windows/security/identity-protection/hello-for-business/hello-hybrid-aadj-sso
Hi again Rudy.
Guess you missed the info i didn´t write, sorry about that. I have a Cloud trust enviroment. I have a mix of HAAD machines and just AAD joined machines. In this case it is only windows 10-11 clients. This problem is for azure Joined devices only. But it is working for others without a hickup just these 2 machines. Like it doens´t recognise the pin as being valid. I can see that the msds-keycredentiallink attribute on user objects is being updated on the user. I see this as an local problem. When you login with password it works. when you login with pin the error starts to appear. And if i remove the mapped drive the error stops as no kerberos is required. So untill i have moved all our local drives to Onedrive / sharepoint this is giving me a headache
It’s hard to tell from here what the issue might be with those two machines. I found a couple of similar issues online, but not a real solution. Some say just login first time with credentials and use PIN only after locking the device. Another workaround might be to use certificates provisioned by Intune. This should bypass normal auth and use cert for smartcard type auth against AD.
Sorry can’t really help you any further with this one.
Hi
loging in with passwords works and you have the kerberos tickets. when locked and pin is used the Kerberos tickets is Wiped from the machine. really weird. so the solution with passwords and then pin isn´t working. The certificate could be nice but for something that is “short lived” onprem it might be a overkill. Well back to reinstalling the device and see if the SSPR is the one thing that is triggering this. thanks for your suggestions 😉
I have GPO setup for WHfB with Kerberos enabled on Hybrid Azure Joined devices. Testing on few devices and apart from 1 all the devices can only use pin to unlock but not bio/facial.
Tried everything including restarting the services, removing ngc folder, deleting files from winbio folder with no luck. Event Viewer Event 1401
The Windows Fingerprint Credential Provider failed to enumerate its tile.
The operation failed with error: 0x80098030.
Need to get this working so it can be deployed to all users.
Any help will be highly appreciated.
The error code indicates the following:
0x80098030 – System policy settings have disabled the biometric credential provider.
So something must be wrong with the policy. Keep in mind that policies can take some time to get applied. Use the rsop utility on the client to verify the policy.
Thanks Rudy but with same GPO 2 machines are working fine (Face/Bio/Pin) same location and rest 3 (1 on the same location and other 2 different location) only Pin.
I have 2 machines assigned to me. 1 is working fine and other just pin.
I know that not all webcams are supported for WhFB, so that could be an issue for the facial recognition. Are you also sure that the fingerprint sensor is working? I have seens some HP notebooks that have the placeholder for the fingerprint reader, but don’t come with actual reader.
If you are sure that either is working, then double check the policies using the RSOP client. I don’t have any other idea what it could be.
I have been stuck on this for 2 weeks now and cant find the fix any where 🙁
Thanks for your help. Much appreciated.
will this work in a child domain? we get an error when we try to run the poaershell in the child domain.
Great article by the way
I have no idea, to be honest. Can’t find any documentation about child domains and WHfB. What is the error that you get?
Set-AzureADKerberosServer : The Azure AD Kerberos Server object in Active Directory is missing required properties. Property: ComputerAccount Value:
At line:5 char:1
+ Set-AzureADKerberosServer -Domain $domain -UserPrincipalName $userPri …
+ ~~~~~~~~~~~~~~~~~~~~~~~~~~~~~~~~~~~~~~~~~~~~~~~~~~~~~~~~~~~~~~~~~~~~~
+ CategoryInfo : NotSpecified: (:) [Set-AzureADKerberosServer], DirectoryObjectValidationException
+ FullyQualifiedErrorId : Microsoft.AzureAD.Kdc.Service.DirectoryObjectValidationException,Microsoft.AzureAD.Kdc.Management.SetAzureADKerberosServer
Check if the AzureADkerberos computer object exists in the Domain Controller OU. Otherwise, check the Deleted Objects in the Active Directory Administrative Center.
I think the problem is that we have done it for the root domain and the RODC exists in Domain Controllers on that domain but we get an error when configuring whfb on the child domain it works for like 8 houres and then stops working but only in the child domain.
Does the AD domain name have to be one that O365 knows about? Annoyingly I inherited an AD domain for which we don’t own the public dns domain so whilst we sync the users to AzureAD their UPN is at our public DNS domain. So when you run the powershell command it is referring to a domain name AzureAD knows nothing about.
I assume that you have a hybrid environment already, so your AD is already synced with AzureAD, right? Then it should work as described.
Hi hope you still respond to this article. Regarding the Azure AD Kerberos that’s created in the domain controller OU. I have OU filtering enabled AD Connect and domain controller is not one I’m syncing…. should it be for this to work?
Is not necessary to sync the domain controllers
So an domain joined machine can benefit from this or just Azure AD Joined machines?
You will need to have a hybrid azure ad environment. So the machines are locally joined to a domain and synced with Azure AD.
So this wouldn’t apply to machines that are AAJ? I’m just trying to determine the best course of action for new computers. Contemplating on just Azure AD Joining them since I’ve already tested one machine and can access on-prem file shares (but still keep DC’s onsite). I’ve just read some people mentioning it’s not worth doing HAAJ.
AAJ? Do you mean Azure AD (AAD)? For AAD devices you should follow this guide. Cloud Trust indeed won’t work for Azure AD only devices.
I should clarify that we have an Hybrid Azure AD setup. My machine is the only one that is AAJ (Azure AD Joined). I swear I read that you need Cloud Trust setup because my local account continues to get locked and think it is related to Windows Hello.
Fantastic article, thank you.
Excellent article. One thing that springs to mind is the additional costs of the RO DC and I presume the requirement of at least Business Premium O365 CALs?
Do you have any information on the additional costs? Can’t find anything about costs for the RO DC. You will need to have Office 365 licenses indeed for your users
Thanks for the great article