SharePoint Online is a great tool to store and share files, collaborate on projects, and communicate with team members. However, as the amount of data stored in SharePoint Online grows, you will probably run out of storage space.
You can buy additional storage in SharePoint Online, which can become quite expensive. The other option would be to archive old SharePoint sites, but what options do you have for that?
In this article
In this article, we are going to take a look at the different options to archive SharePoint. Including transferring data to a local storage solution (NAS for example), Azure blob storage and we will look at the upcoming new features of Microsoft Sentex.
Archiving SharePoint
Even though SharePoint online comes with a lot of storage space, over the years you will see that most organizations run out of storage as the company grows. One reason for that is the versioning that is done by default in SharePoint Online. SharePoint will retain up to 500 copies (versions) of a file. Depending on the file type and size this can eat up a lot of storage.
Note
Read more about SharePoint Online storage in this article.
It’s possible to buy additional storage, but with a price of $0.20 per GB per month, the bill can get high pretty quickly. So that is why a lot of companies are looking into options to archive SharePoint Online.
Microsoft has released Microsoft 365 Archive, it’s still in Preview, but you can already test it out. Other options to archive your SharePoint sites are:
- Download data to a local storage option
- Move data to Azure blob
- Use a third-party backup solution
There are two other options that are often named when searching for archiving solutions for SharePoint. Setting up retention policies is one of them, but that is not archiving in my opinion. The retention policy will simply delete files that are not used for more than a year for example.
The other option is to move the data to a OneDrive account of a dedicated user. OneDrive gives you 5TB of storage, so that might be an option for some. But keep in mind that OneDrive isn’t designed to be easily accessed by many users and it might also be against the Microsoft Service Agreement.
Archive SharePoint to local storage (NAS)
Moving the data to a local storage option, for example, a NAS is often a good and affordable solution to archive SharePoint. The advantage of local storage is that it only requires a one-time investment every 5 to 7 years and it’s to expand.
But there is also a downside to it, which is often forgotten. If you place a NAS in your office with your archived SharePoint data, then make sure that you also have a backup of that storage. You won’t be the first one where the NAS crashes and you lose all the data.
Tip
I personally use a Synology RS822+ as the main NAS and use a smaller DS220+ as a backup of the RS822+.
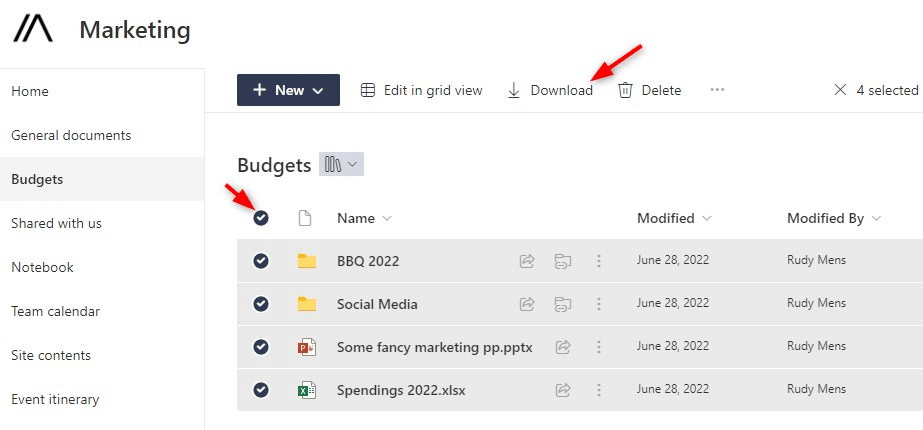
In modern SharePoint libraries, you can simply select all the files in the document library and hit the download button to download all the files. You will have to do this per document library though, but this is the easiest way to archive the files to another storage solution.
If you need to archive a lot of files and document libraries, then a better solution is to use a PowerShell script for this. The below will download all document libraries from the given SharePoint site and download the files to the given path. It’s based on a script from SharePointDairy.com, but I have extended the script with exclusions and added logging to it.
The exclusion list, defined in the Get-DocLibraries function, filters out the Site pages, assets, preservation-hold libraries, and others that we don’t need. You can get the latest version of the script here from my GitHub repository.
Article continues below the script
<#
.Synopsis
  Download all libaries, folders and files from SPO.

.DESCRIPTION
  Script is based on https://www.sharepointdiary.com/2017/07/download-all-files-from-sharepoint-site.html from Salaudeen.

  Script copies all document libraries including all content from SharePoint Online (SPO) to a local folder. Logging is
  done through a log file, path for log file can be set.

  You can re-run the script, it will check if local files exists. If the file on SPO is newer, then it will update the local file.

  Scripts counts the number of files copied and skipped.

.NOTES
  Name: Copy-SpSiteToNAS.ps1
  Author: R. Mens - LazyAdmin.nl
          S. Rajack - SharePointDiary.com
  Version: 1.1
  DateCreated:  2022
  Purpose/Change: init

.LINK
  https://lazyadmin.nl
  How to Download All Files from a SharePoint Site?
#>

[CmdletBinding(DefaultParameterSetName="Default")]
param(
  [Parameter(
    Mandatory = $true,
    HelpMessage = "SharePoint Site Url"
    )]
  [string]$siteUrl,

  [Parameter(
    Mandatory = $true,
    HelpMessage = "Enter path where to download files to"
    )]
  [string]$downloadPath,

  [Parameter(
    Mandatory = $false,
    HelpMessage = "Enter path for log file location"
    )]
  [string]$logFilePath = "c:\temp\sp-archive.txt",

  [Parameter(
    Mandatory = $false,
    HelpMessage = "Set log level"
  )]
  [ValidateSet("error", "warn", "info", "full")]
  [string]$logLevel = "full"
)
# Init Log file
$Global:logFile = [string]""
$Global:filesCopied = [int] 0
$Global:filesSkipped = [int] 0

Function Write-Log {
  <#
    .SYNOPSIS
    Save output in log file
  #>
  param(
      [Parameter(Mandatory = $true)][string] $message,
      [Parameter(Mandatory = $false)]
      [ValidateSet("FULL","INFO","WARN","ERROR")]
      [string] $level = "INFO"
  )

  # Create timestamp
  $timestamp = (Get-Date).toString("yyyy/MM/dd HH:mm:ss")

  if ($logLevel -eq 'warn') {
    $allowedLevels = @(
      'warn',
      'error'
    )
  }elseif ($loglevel -eq 'info') {
    $allowedLevels = @(
      'info',
      'warn',
      'error'
    )
  }elseif ($loglevel -eq 'full') {
    $allowedLevels = @(
      'full',
      'info',
      'warn',
      'error'
    )
  }
  # Output errors also to console
  if ($allowedLevels -contains $level) {
    # Append content to log file
    Add-Content -Path $Global:logFile -Value "$timestamp [$level] - $message"
  }

  # Output errors also to console
  if ($level -eq 'ERROR') {
    Write-host $message -ForegroundColor red
  }
}

Function Get-DocLibraries {
  <#
    .SYNOPSIS
    Get all document libraries from the SharePoint site, except excluded ones
  #>

  #Excluded libraries
  $ExcludedLists = @(
    "FormServerTemplates",
    "Images",
    "Pages",
    "PreservationHoldlibrary",
    "SiteAssets",
    "SitePages",
    "Style_x0020_library"
  )

  Get-PnPList -Includes RootFolder | Where-Object {$_.BaseType -eq "Documentlibrary" -and $_.EntityTypeName -notin $ExcludedLists -and $_.Hidden -eq $False}
}

Function Get-SPOFiles {
  <#
  .SYNOPSIS
    List all folders and files from the given library
  #>
  param(
    [Parameter(Mandatory = $true)] $List
  )
  process{
    Try {
      # Get all Items from the library - with progress bar
      $global:itemCounter = 0

      Get-PnPListItem -List $List -PageSize 1000 -Fields ID -ScriptBlock {
        Param($items)
        $global:itemCounter += $items.Count;

        # Create progress bar
        $getItemsProgress = @{
          Activity         = "Get items from $($List.Title)"
          Status           = "Progress->"
          PercentComplete  = ($global:itemCounter/$list.itemCount) * 100
          CurrentOperation = "$($items.Count) of $($list.itemCount)"
        }
        Write-Progress @getItemsProgress
      }

      Write-Progress -Activity "Completed gettings items from library $($List.Title)" -Completed
    }Catch{
      Write-Log -Message "Error Downloading library $($List.Title) : $($_.Exception.Message)" -level ERROR
    }
  }
}

Function Copy-SPOFiles(){
  <#
  .SYNOPSIS
    Download all folders and files from the given library
  #>
  param(
    [Parameter(Mandatory = $true)] $ListItems,
    [Parameter(Mandatory = $true)] $List,
    [Parameter(Mandatory = $true)] $localFolder
  )
  process{
    Try {
      # Create a Local Folder for the Document library, if it doesn't exist
      $libraryFolder = $localFolder +"\" +$List.RootFolder.Name

      If (!(Test-Path -Path $libraryFolder)) {
        New-Item -ItemType Directory -Path $libraryFolder | Out-Null
      }

      # Get all Subfolders of the library
      $SubFolders = $ListItems | Where {$_.FileSystemObjectType -eq "Folder" -and $_.FieldValues.FileLeafRef -ne "Forms"}
      $SubFolders | ForEach-Object {
          # Create local path for the sub folder
          $LocalFolderPath = $localFolder + ($_.FieldValues.FileRef.Substring($Web.ServerRelativeUrl.Length)) -replace "/","\"

          # Create Local Folder, if it doesn't exist
          If (!(Test-Path -Path $LocalFolderPath)) {
                  New-Item -ItemType Directory -Path $LocalFolderPath | Out-Null
          }
          Write-Log -Message "Created subfolder $LocalFolderPath" -level FULL
      }

      # Get all Files from the folder
      $FilesColl =  $ListItems | Where {$_.FileSystemObjectType -eq "File"}
      $FileCounter = 0

      # Iterate through each file and download
      $FilesColl | ForEach-Object {

          # Frame the Parameters to download file
          $FileDownloadPath = ($localFolder + ($_.FieldValues.FileRef.Substring($Web.ServerRelativeUrl.Length)) -replace "/","\").Replace($_.FieldValues.FileLeafRef,'')

          $FileName = $_.FieldValues.FileLeafRef
          $SourceURL = $_.FieldValues.FileRef
          $FileModifiedDate = $_.FieldValues.Modified

          # Creating progressbar
          $FileCounter += 1;

          $downloadItemsProgress = @{
            Activity         = "Downloading items from $($List.Title)"
            Status           = "Progress->"
            PercentComplete  = ($FileCounter/$FilesColl.Count) * 100
            CurrentOperation = $FileName
          }
          Write-Progress @downloadItemsProgress

          #Check File Exists
          $FilePath = Join-Path -Path $FileDownloadPath -ChildPath $_.FieldValues.FileLeafRef

          If (-not(Test-Path -Path $FilePath -PathType Leaf)) {
            # Download the File
            Get-PnPFile -ServerRelativeUrl $SourceURL -Path $FileDownloadPath -FileName $FileName -AsFile -force
            Write-Log -Message "Downloaded $FileName from $SourceUrl " -level FULL
            $Global:filesCopied++
          }else{
            # Compare local and SPO file date
            if ($FileModifiedDate -gt ( Get-ChildItem -Path $FilePath | Select -ExpandProperty LastWriteTime)) {
              # SPO file is newer than local file, overwrite local file
              Get-PnPFile -ServerRelativeUrl $SourceURL -Path $FileDownloadPath -FileName $FileName -AsFile -force
              Write-Log -Message "Downloaded newer version of $FileName from $SourceUrl " -level FULL
              $Global:filesCopied++
            }else{
              Write-Log -Message "Skipped $FileName from $SourceUrl - Already exists" -level FULL
              $Global:filesSkipped++
            }
          }
      }
      Write-Progress -CurrentOperation "downloadItems" -Activity "Completed downloading items from library $($List.Title)" -Completed
    }
    Catch {
      Write-Log -Message "Error Downloading library $($List.Title) : $($_.Exception.Message)" -level ERROR
    }
  }
}

Function Get-NrOfDownloadedFiles() {
  <#
  .SYNOPSIS
    Download all folders and files from the given library
  #>
  param(
    [Parameter(Mandatory = $true)] $localFolder,
    [Parameter(Mandatory = $true)] $List
  )
  Process {
    $libraryFolder = $localFolder +"\" +$List.RootFolder.Name

    If (Test-Path -Path $libraryFolder) {
      (Get-ChildItem -Path $libraryFolder -File -Recurse).count
    }
  }
}

Function New-SPSiteArchiveFolder() {
  <#
  .SYNOPSIS
    Download all folders and files from the given library
  #>
  param(
    [Parameter(Mandatory = $true)] $title,
    [Parameter(Mandatory = $true)] $downloadPath
  )
  process {
    If (!(Test-Path -Path ($downloadPath +"\" +$title))) {
      New-Item -Path $downloadPath -Name $title -ItemType 'directory'
    }Else{
      $downloadPath +"\" +$title
    }
  }
}

# Connect to SharePoint Online
Connect-PnPOnline $SiteURL -Interactive
$Web = Get-PnPWeb

# Create Log file
$Global:logFile = $logFilePath + "\" + $Web.title + ".txt"
New-Item -Path $Global:logFile -Force | Out-Null

# Create folder for SharePoint site in Archive folder
$localFolder = New-SPSiteArchiveFolder -DownloadPath $downloadPath -title $web.title

# Get all the libraries
$documentLibraries = Get-DocLibraries
Write-Log -Message  "$(($documentLibraries).count) Document Libraries found" -level INFO

# Download all the files from each library if they contain items
ForEach($library in $documentLibraries)
{
  if ($library.itemCount -ne 0) {
    Write-Log -Message "Process document library : $($library.title)" -level INFO

    # Count nr of files in the doc library
    $SPOItems = Get-SPOFiles -List $library
    Write-Log -Message "$($SPOItems.count) files and folders found in $($library.title)" -level INFO

    # Download the files
    Copy-SPOFiles -List $library -ListItems $SPOItems -localFolder $localFolder

    # Count files in the local folder
    $CountLocalItems = Get-NrOfDownloadedFiles -List $library -localFolder $localFolder
    Write-Log -Message "$CountLocalItems files downloaded to the local folder" -level INFO
  }else{
    Write-Log -Message "Skipping document library : $($library.title) - No files found" -level WARN
  }
}

Write-Log -Message "---------------------------------------------" -level INFO
Write-Log -Message "Download completed" -level INFO
Write-Log -Message "---------------------------------------------" -level INFO
Write-Log -Message "Number of files copied $($Global:filesCopied)" -level INFO
Write-Log -Message "Number of files skipped $($Global:filesSkipped)" -level INFO
Write-Log -Message "---------------------------------------------" -level INFO
Archive SharePoint to Azure Blob
Azure Blob storage comes in different access tiers, each with its own price, performance, and availability. With cloud storage, you are not only paying for the actual storage space that you use, but you will also need to pay for each write and read transaction.
There are four tiers to choose from when creating a new Azure Storage Account. The premium tier is pretty much the same as SharePoint Online, only it costs a few cents less ($0.15 per Gb) than SharePoint storage. So for archiving we actually have three tiers to choose from:
| Hot tier | Cool tier | Archive tier | |
|---|---|---|---|
| Availability | 99.9% | 99% | Offline |
| Recommended data retention period | None | 30 Days | 180 days |
| Access Latency | Milliseconds | Milliseconds | Hours |
| Usage charges | Higher storage costs, but lower access and transaction costs | Lower storage costs, but higher access and transaction costs | Lowest storage costs, but highest access, and transaction costs |
| Price per Gb (first 50TB) | $0.018 per GB | $0.01 per GB | $0.00099 per GB |
The Hot tier and Cool tier are in my opinion the best option for archiving. The archive tier looks more suitable to me for backup purposes.
Setting up Azure Storage Account
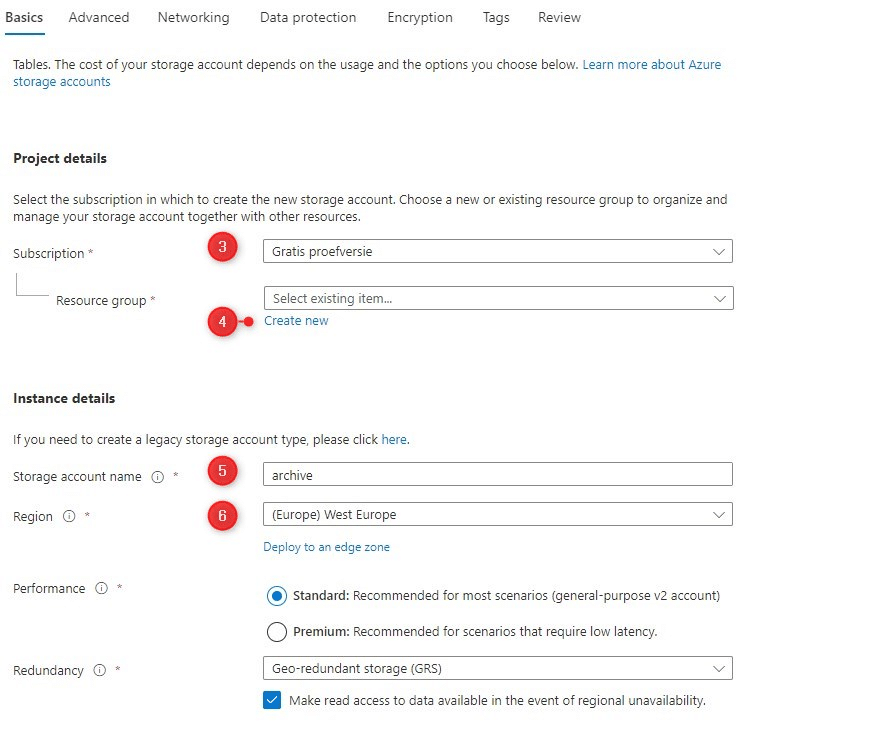
The first step is to set up the Azure Storage Account. You can register for a free account first, which gives you up to $200 worth of Azure resources. After that, you can always decide if you want to continue or not.
- Open the Azure Portal and click or search for Storage Accounts
- Create a new Storage Account
- Select the subscription that you want to use
- Create a new resource group, name it Archive
- Enter a unique storage account name (must be unique in Azure!)
- Select the region where to store the data
- Click Next : Advanced
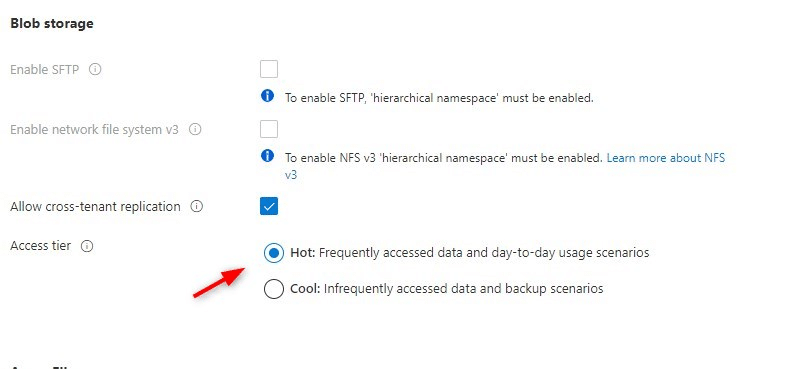
On the advanced page, you can select the Access tier that you want to use. You will need to scroll a bit down to Blob storage. By default, the Hot tier is selected:
It’s also a good idea to check out the Data protection tab. Here you can configure how long you want to retain files and containers in Azure after they are deleted.
When done, click the Review tab. If there are no errors, click on Create.
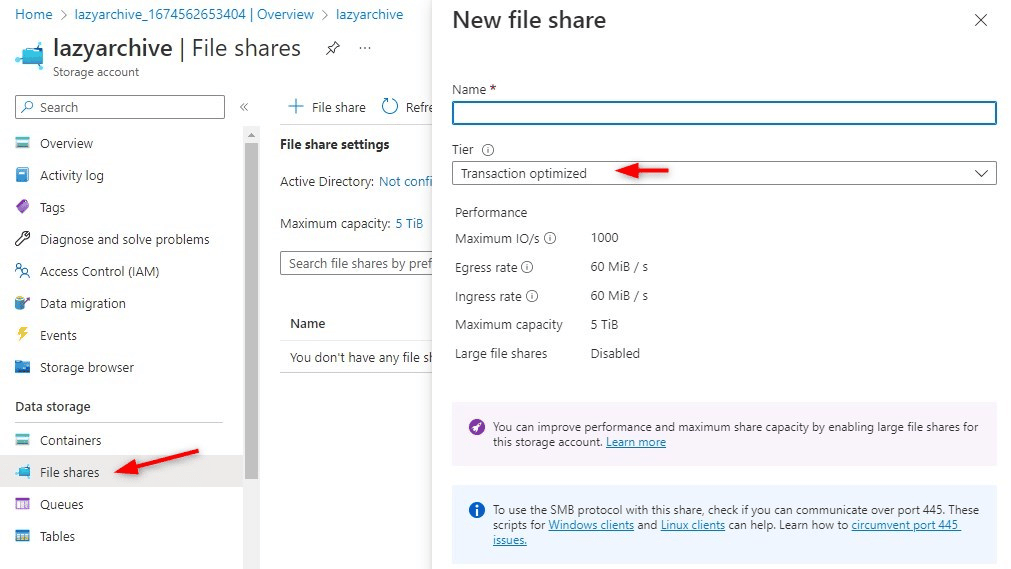
Create a File Share
We will need to be able to access the files from within our PowerShell script. To do this we are going to create a new File share. This allows us to open and mount the Azure blob storage in our explorer and use it as a download path for our script.
When creating a file share you will need to select the Tier. This tier determines the performance and also the cost of uploading and downloading files from the share. It’s best to start with the Transaction optimized tier and change this to the Cool tier once all files have been archived.
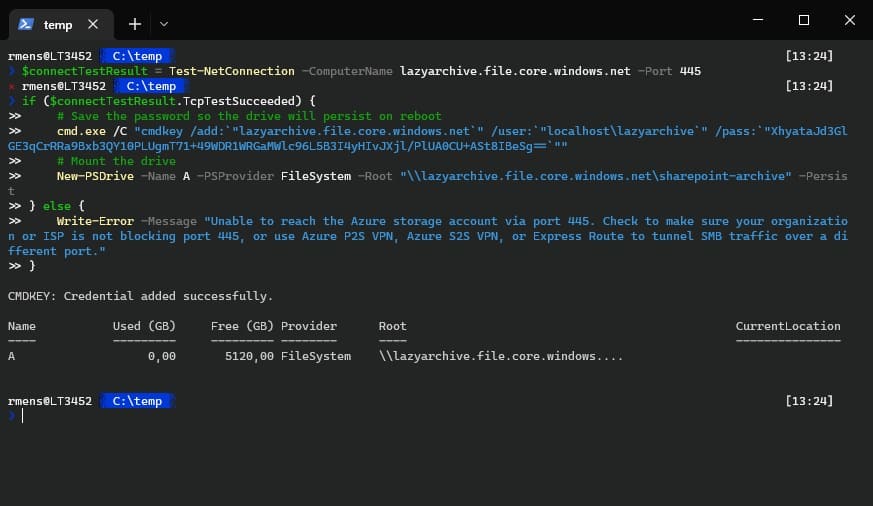
Connecting the file share in Windows
After you have created the file share, open it and click on Connect. Here we can select the drive letter that we want to use and the authentication method. By default, the storage account is used.
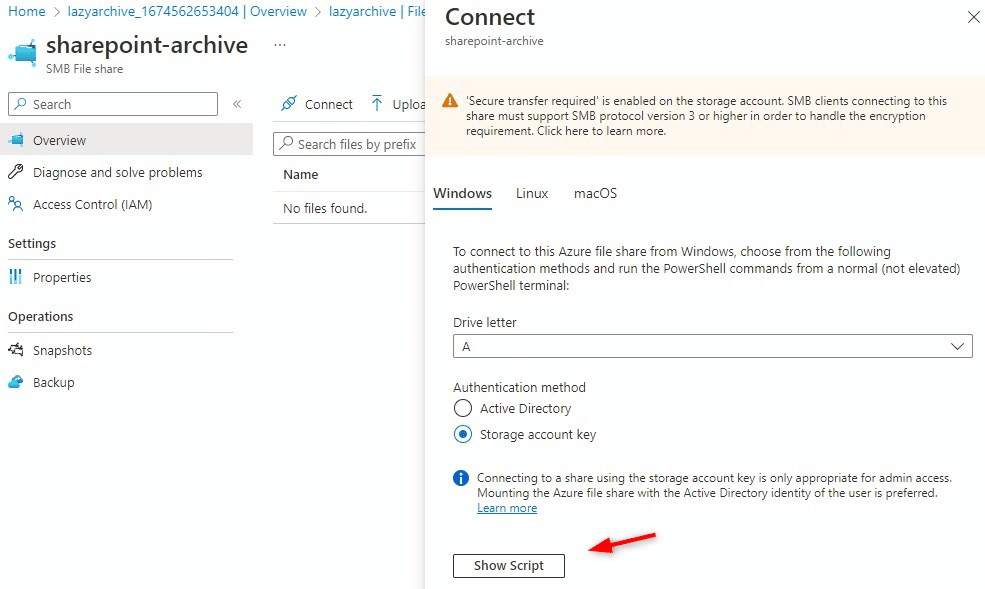
After you have selected the drive letter, click on Show script. This will give you a PowerShell script that you can run to mount the Azure file share in your Explorer:
Archiving SharePoint to Azure Blob
With the Azure Blob storage created and mounted, we can now use the PowerShell script, from the beginning of this article, to move the files from SharePoint to Azure. Keep in mind though that this method will download and upload all the files over your internet connection.
.\Copy-SpSiteToNAS.ps1 -siteUrl https://lazydev.sharepoint.com/sites/lab28 -downloadPath a:\

The script takes some time, but all the files are eventually uploaded to the Azure Blob storage. After you have verified that all the files are copied you can delete the data from SharePoint.
Note
I think it should also be possible to run the PowerShell script inside an Azure Runbook. But that is something I will workout later.
Third-Party Backup Solution
Using a third-party backup solution is also a way to archive SharePoint. A lot of backup providers come with unlimited retention and some even with unlimited storage. So depending on the amount of data and the number of users, this can sometimes be a viable solution.
Using a third-party backup solution for archiving comes with another advantage, you also have an active backup solution for your Microsoft 365 data. SharePoint only retains your data for 93 days, after which you can’t restore them anymore.
But there is also a downside to this. If you have removed the data from SharePoint, which is kind of the purpose here with archiving, then switching from the backup provider will be a hideous task. It means that you will need to restore all the archived data from the backup provider and then archive/back up it again to another provider.
This is something you really need to keep in mind. You might now think that you won’t switch that soon, but if the provider increases the prices then the solution might get even more expensive than buying additional SharePoint storage.
Microsoft Syntex
During the Microsoft Ignite event of October 2022, Microsoft announced that it’s going to introduce Syntex archiving for SharePoint and Microsoft Teams. Syntex Archiving will add tiered storage to SharePoint and allow us to move less critical (or old content) to lower-cost storage.
Note
Microsoft has released Microsoft 365 Archive which is part of Syntex. You can read more about this new feature in this article.
Microsoft Syntex doesn’t only offer archiving features, but it helps you to enhance your content, understand and structure your information, and simplify workflows. You can read more about Syntex in this article from Microsoft.
At the moment Syntex costs $5 per user per month. I don’t think storage is included in this price, so that probably be additional costs as well, similar to the Azure Storage tiers.
Now $5 per user might seem like a bit much, but if you have read the article then you will also see that it comes with a backup and restore feature later this year. This means that you don’t need a third-party backup solution anymore.
Wrapping Up
Archiving SharePoint is something we all need to do sooner or later. As our data grows it will be harder to manage and the storage cost will only increase. I prefer to archive SharePoint to Azure Blob because this way you still have all your data in de cloud and not the burden of protecting locally stored data.
Microsoft Syntex may become a really interesting option for archiving and backup. Make sure that you subscribe to the newsletter below to stay up-to-date.
I hope this article helped you with archiving SharePoint, if you have any questions, just drop a comment below.


Hello Rudy,
I’ve always found your site a valuable resource and this article is great, as usual.
Although archiving to a NAS has been mentioned, I’d like to take that further and suggest something our team has put in place and found to work quite well. We installed Cloud Sync from Synology’s Package Centre and set it up to sync a SharePoint site, downloading remote changes only and not deleting files in the destination when deleted from the source. It’s a work in progress so the currently active operation is not quite as I’ll describe below, but the workflow is being refined now as we prepare to do this for another client who is exceeding the SharePoint quota:
1. Create a new site in SharePoint, for the purpose of archiving. As projects or any grouped set of data becomes stale, one or more key individuals in the organisation can move data from site XYZ to the Archive site (with a name that makes sense, at your discretion).
2. Cloud Sync on the Synology will download the contents of that site, keeping the same folder structure.
3. Once confirmed to be fully downloaded, the same key individuals or admins can delete the data from the archive site created in step 1 and empty the recycle bin if needed.
Following these three steps, old data is moved out of SharePoint to a NAS and space is released for new data online. The shared folder in the NAS should be read-only to users who might need to access it for reference. If more work is to be done on that data, an admin can upload it back to the original SharePoint site and follow the same three-step process later.
As you pointed out, a backup is crucial. Our recommendations to our clients include a cloud-based backup of Microsoft 365 as a baseline standard anyway, and depending on the product chosen it can include infinite retention and unlimited storage for backup data. Otherwise, a backup from the first NAS to another NAS would suffice, as the NAS would otherwise hold the only copy of data archived from SharePoint.
Of course Synology also have Active Backup for Microsoft 365 in the Package Centre and although the interface leaves a lot to be desired it does work. (Many alerts are generated because the Microsoft servers respond too slowly and Active Backup’s threshold is too short – minus 10 points for Synology here…) But using Active Backup and Cloud Sync would put all your eggs in one basket. If the NAS fails, you’d still lose your backup plus the archive.
Happy days to all.
Thanks for sharing your method! Have you also looked at the new Microsoft 365 Archive feature?
Will you update article with new SP Archive feature?
I am indeed currently working on an acticle about Microsoft 365 Archive. Should be online tomorrow.
The new article is online: https://lazyadmin.nl/office-365/microsoft-365-archive
Hi Rudy,
Excellent work. I have tested the script and it is working as intended. However, I would like to download the data that is older than 6 months and then delete the data from the sharepoint site. I have tried modifying the script by adding the 6 months conditions, but it doesnt seems to work.
That would require some rewritting, because you will need to check the file date first of the files, before you can create the parent folders. Otherwise you will end up with a lot of empty folders.
Hi Rudy, thanks for the write-up.
Let’s say I move the contents to an Azure Blob Storage.
How can people who currently have access to this teams site still access the files?
Can the search function with Teams still be used?
You will need to give them read permission on the file share that you can create in Azure. Access through Teams isn’t possible.
If you want a better integration, you will need to take a look at Syntex.
Thank you for this helpful article.
Hi Ruud,
this is an excellent post and exactly what I was looking for. Thanks a lot.
A question I have, or maybe only a confirmation.
When I would be archiving SPO content to Azure Storage it would probably be an advantage to run the script, mount the storate and download the content to a VM in Azure.
That woud prevent the local download to my site, wouldn’t it?
thanks,
Franck
Yes, that should work.