Shared mailboxes in Microsoft 365 can be converted (back) to a user mailbox. This can be necessary when you need to access the mailbox directly (from an application or specific device) or accidentally convert the wrong user mailbox to a shared mailbox.
Keep in mind that a user mailbox requires a license at all times. This can be a Microsoft 365 plan which includes Exchange Online, or an Exchange Online only plan. Without the license, you won’t be able to access the mailbox.
In this article, I will explain how you can convert the shared mailbox to a user mailbox, using the admin center or with PowerShell.
Convert Shared Mailbox to User Mailbox
There are two ways to convert the shared mailbox, we can use the Exchange Admin Center or PowerShell. Let’s start with the Exchange Admin Center.
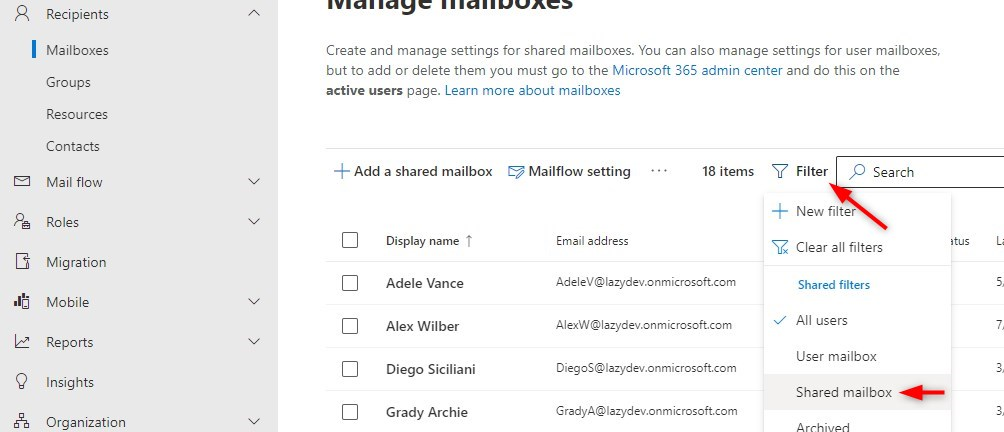
The shared mailboxes are listed in the Exchange Admin Center between the normal mailboxes. You can either search for the name of the shared mailbox in the list or use the filter to show only the shared mailboxes:
With the shared mailboxes listed, let’s change the mailbox back to a user mailbox:
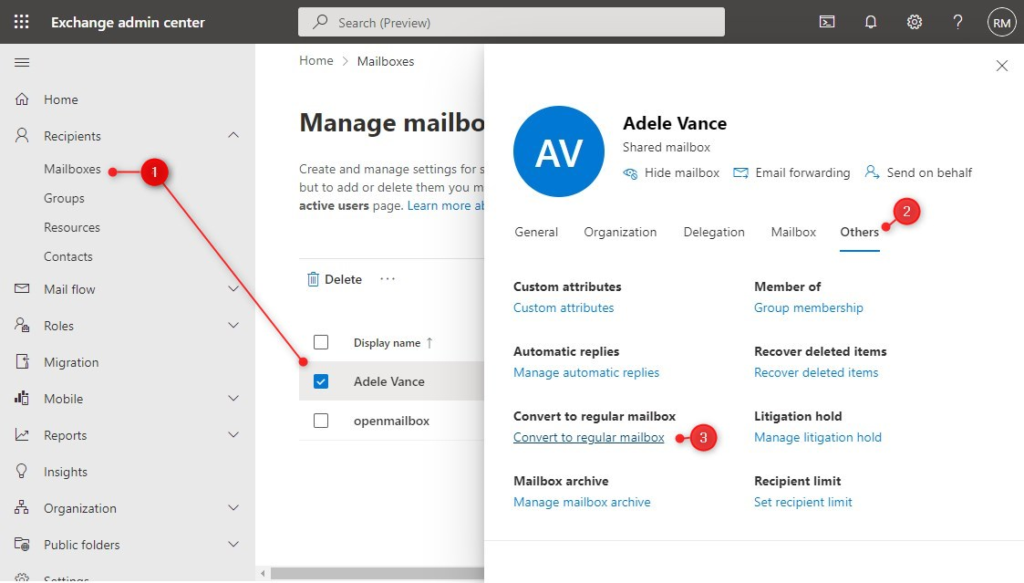
- In the Exchange Admin Center, open the shared mailbox
- Click on the tab Others
- Select Convert to regular mailbox
- Click Confirm on the prompt
The mailbox should now be listed as a UserMailbox in the mailboxes list. Make sure that you assign an appropriate license to the user, otherwise, you won’t be able to access the mailbox!
Use PowerShell to Convert Shared Mailbox to User
We can also use PowerShell to convert the shared mailbox back to a user mailbox. For this, you will need to have the Exchange Online module installed in PowerShell.
To convert the mailbox back we are going to use the Set-Mailbox cmdlet. For identity, we are using the email address of the mailbox. It’s also possible to use the mailbox name, but email address is unique making it a better choice.
Note
Note that the type is set to Regular and not User.
# Connect to Exchange Online
Connect-ExchangeOnline -UserPrincipalName lazyadmin@lazydev.onmicrosoft.com

# Convert Shared mailbox back to user
Set-Mailbox -Identity adelev@lazydev.onmicrosoft.com -Type Regular
The cmdlet won’t give any output or confirmation that the operation is succeeded. Only in case of an error, you will be notified. So to verify if the mailbox is converted to a regular mailbox, we can use the Get-Mailbox cmdlet:
Get-Mailbox -Identity adelev@lazydev.onmicrosoft.com | Select Name, RecipientTypeDetails

# Result
Name        RecipientTypeDetails
----        --------------------
Adelev-test UserMailbox
As you can see the mailbox type is now set to usermailbox. Again, make sure that you assign an appropriate license to the user account, so you can access the mailbox.
Wrapping Up
Converting a shared mailbox to a user mailbox is just as easy the other way around. Make sure that you assign a license to the user mailbox.
I hope you found this article helpful, if you have any questions, just drop a comment below!


I converted a shared mailbox to a regular user mailbox, using the Exchange Admin Centre. The new user mailbox works perfectly fine, but the shared mailbox still shows up in Outlook for the users that was assigned to use the shared mailbox before. This kind of interferes with the (new) regular user mailbox which I have also added to the Outlook accounts. Have you experienced anything similar?
No, but have you checked the mailbox delegation permissions?