Meetings can either be effective and to-the-point or a long and slow process that barely addresses what needs to be discussed. With Decisions for Microsoft Teams, you can bring structure and efficiency to your meetings, whether they are online, in-person, or a hybrid of the two. Decisions helps your team organize the meeting, ensure participants are prepared and engaged—and it lets you easily capture tasks, decisions, and meeting minutes.
Decisions reached out to ask if I wanted to test and review their award-winning Microsoft Teams app and give my unbiased opinion about it.
In this article, we will take a look at Decisions, demonstrate how it integrates seamlessly into your Office 365 environment, and go over how to set up a structured meeting in Teams with Decisions.
Decisions for Microsoft Teams
The advantage of Teams, and Office 365 in general, is that you have everything in one place. From within Teams, you can access your files, your agenda, notes, etc. All the tools you need are in Teams, which makes it such a great tool for holding meetings.
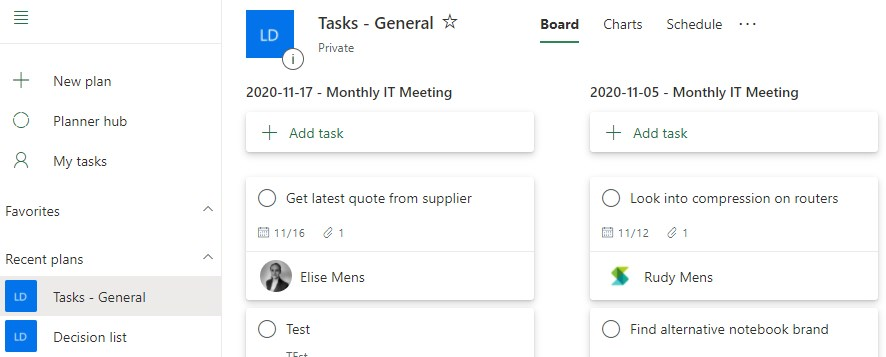
Decisions offers complete meeting management through Microsoft Teams. It extends Teams further with powerful tools to structure your meeting agenda, capture tasks, decisions, and voting results. The best part of Decisions is that it integrates with the tools you use every day in Office 365. For example, tasks that you create while using Decisions will be listed in the Planner of the corresponding Team and can also be exported to Excel.
Minutes that you take are stored in OneNote or Word and files that you add to the meeting agenda are safely stored in the SharePoint site of the Team.
Decisions also has add-ins for Outlook and Word, with further integration into OneNote, Planner, SharePoint, Excel, and more.
Creating your first Decisions Meeting
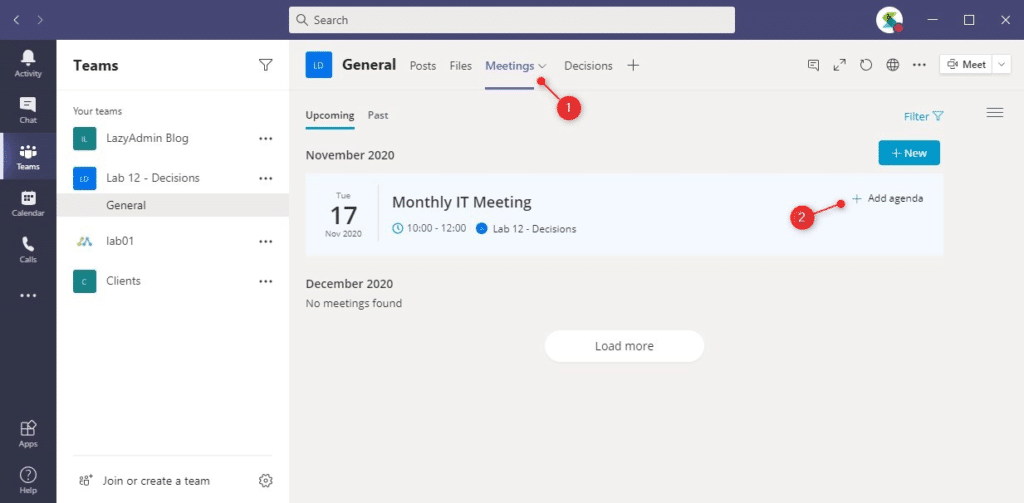
To create a meeting agenda with Decisions, you first need to create a normal meeting in either Outlook or Teams. You will then find the meetings that are linked to a Team listed in the meetings tab under Upcoming meetings. Simply click on Add agenda to start creating the agenda for the meeting.
Other meetings (that are not linked to a Team yet), can be added by clicking on New. You can then select any meeting of which you are the organizer or that you are a participant in.
Everything for the meeting will be stored on the SharePoint site of your Team. You can select a channel for the meeting or make it available for the whole Team.
Creating agenda items in Teams
Effective meetings start with a clear agenda of the items you’d like to discuss. This is something Decisions is really good at: creating the agenda (with the help of templates, if you like), assigning owners to the agenda items, and adding tags, links, files, etc.— everything you need to fully prepare and execute a successful meeting.
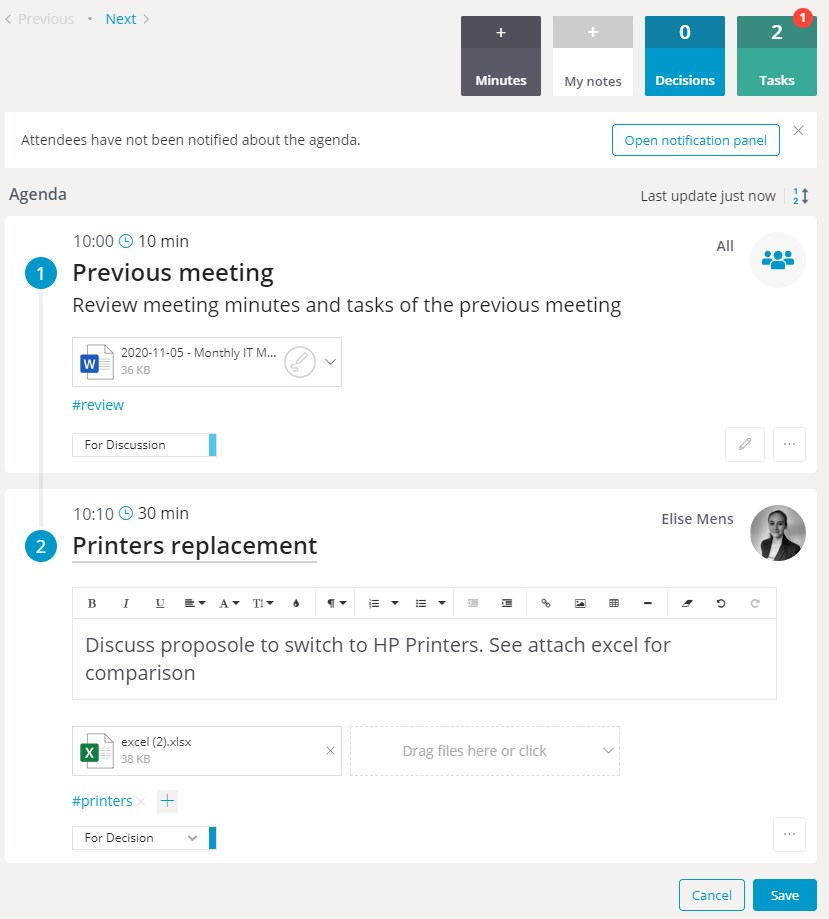
With the meeting upgraded to a Decisions meeting, we can begin creating the agenda items. Only organizers can create the meeting items at first, though other attendees can suggest new items after you have published the agenda.
For each item, you can specify the presenter(s), label the item to let participants know whether the item is up for discussion, decision, or purely informational, and add the amount of time you want to spend on the topic.
Outlook Meeting Secretary
Once you have created an agenda, you can notify the attendees so they can start preparing.
Creating Templates
You’ll probably want to use a relatively standard agenda for your monthly departmental meetings. Decisions allows you to save the agenda that you have just created as a template. That way, next time you have your monthly department meeting, you can simply select the template. Additionally, templates can be used and modified exclusively by anyone on your team, but not those from other teams.
Decisions Add-In for Outlook
If your team uses Outlook more than Teams, you can also use Decisions Meeting Secretary for Outlook to create meeting agendas right from Outlook, allowing you to send the agenda items along with the invitation to all the attendees in one neat package.
To add an agenda to a meeting in Outlook, you first need to select a storage location for the meeting. This can be any Group or Team in your Office 365 Tenant. Once you have selected the place to store the meeting, you can begin creating the agenda items.
When you are done creating the agenda, you simply click publish to create the agenda. Keep in mind that you will still need to send the meeting invitation in Outlook like you normally would.
Preparing for the meeting
The organizer of the meeting sets up the agenda, but the real power of Decisions is the ability for participants to collaborate on the agenda.
If you take a look at how participants currently prepare for meetings in your organization, you’ll probably notice that everybody is creating their own notes, with lists of things they want to discuss. They may even print documents to hand out to supplement discussion. (And that is if they prepare at all.)
Decisions for Teams make collaborating upfront easier and more robust—so everybody knows which topics will be discussed, documents can be reviewed in advance, and comments can be made. This all makes for a more effective meeting structure.
Sharing the agenda
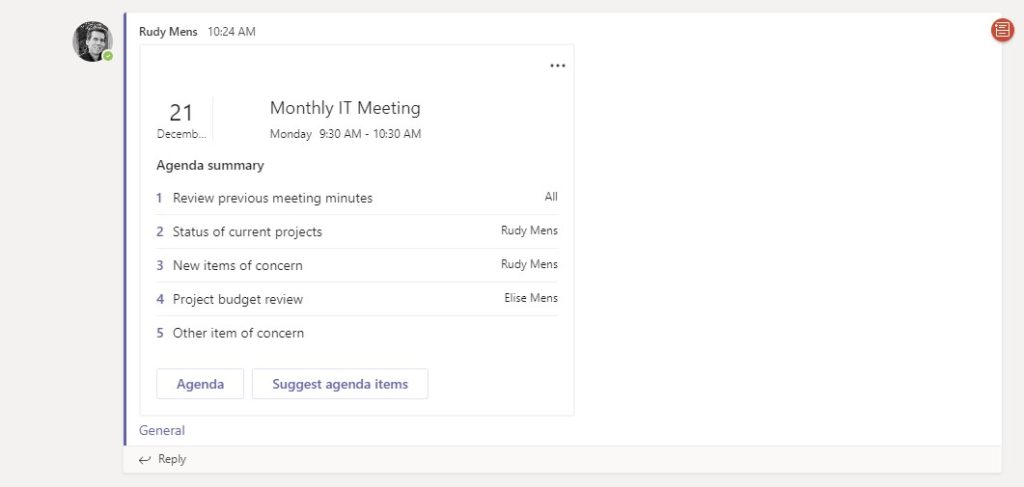
When you are done creating the agenda, you can notify the attendees, either by sharing the agenda through email or by publishing the meeting agenda in the Team’s channel. When you publish the meeting, you can choose to include the agenda items in the email or channel body.
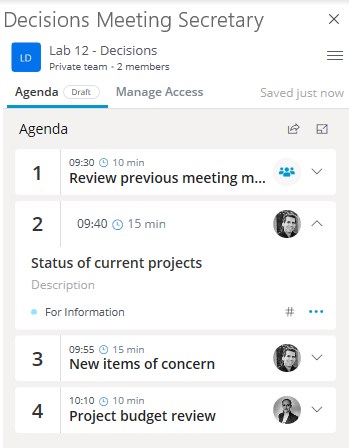
After you have published the agenda, comes the real power of Decisions. Your participants can now collaborate on the agenda items:
- With the “Suggest agenda items” button they can add new items to the agenda that they would like to bring up for discussion.
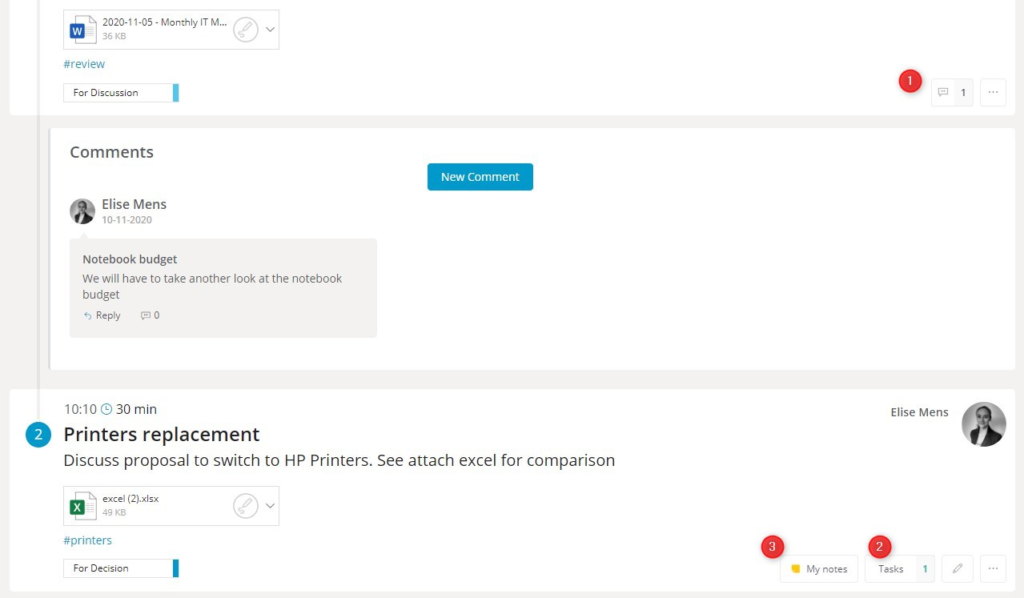
- Attendees can comment (1) on agenda items, allowing them to share their thoughts upfront
- Attach items to their topics, like files, links, or notes
- Add tasks (2) and decisions to agenda items
- Make personal notes (3) for each agenda item
Running the Meeting
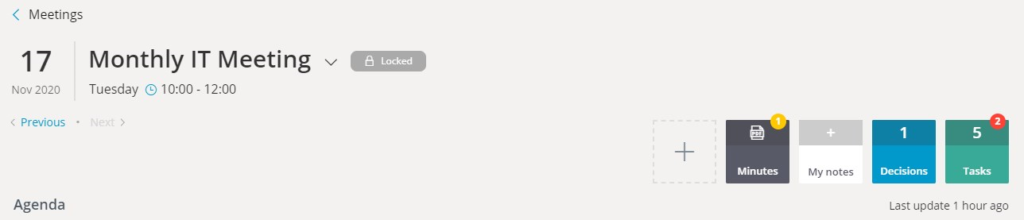
When the meeting starts, you can view the agenda in the Meetings tab of your Team. From here you can create the meeting minutes, view the notes, open the linked files, and add tasks and decisions to the agenda items.
A new feature Decisions recently launched is the in-meeting extension for Teams. With this extension, you can now see the meeting agenda, with all the files, notes, time tracker, voting, etc. in the sidebar of the meeting window.

This allows all the participants to keep track of the agenda and review the notes without leaving the meeting window.
Secure voting for Microsoft Teams
Sometimes, during a meeting, there are important topics people need to vote on. Decisions offers an easy and secure way to hold a vote in Teams with Vote Now.
With this feature, you can add a decision to an agenda item just like you can add tasks to it. You can start the vote in the meeting chat or Team channel. Another perk is that you have the option to make the vote anonymous, partially anonymous, or completely transparent.
The responses can be set to “yes” or “no”, allow custom options, or even allow the participants to give an alternative answer.
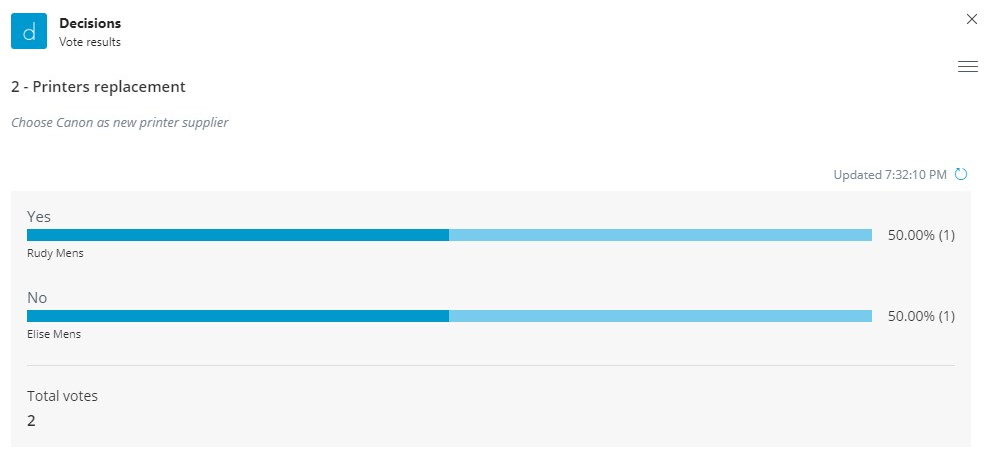
You can view the results of the vote in the agenda item and after you have voted in the chat or channel.
Speak Now
In virtual meetings with a lot of participants, people often speak over each other or even don’t get the chance to speak at all. Teams already comes with the raise hand feature but Speak Now from Decisions goes much further.
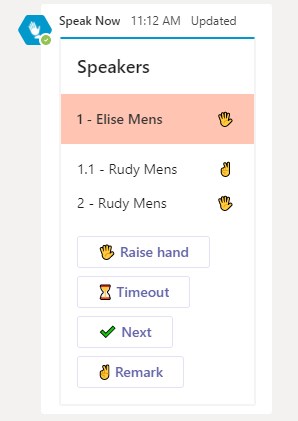
It gives the participants the ability to request speaking time, ask for a brief recess, or respond on the current speaker. You can access the Speak Now feature from the meeting chat, just like the secure voting.
Meeting Minutes
During the meeting, you can easily merge the agenda into meeting minutes for Word or OneNote.
For Word, you will need to install the Decisions Meeting Documents Manager add-in; OneNote minutes are available without an additional add-in. Both OneNote and Word allow you to merge tasks and decisions that you write while taking meeting minutes, back into the meeting agenda. When choosing which platform to use for meeting minutes, it generally depends on personal or organizational preference.

To create tasks and decisions from within Word or OneNote, you can simply use the following format while writing:
Task: Task Description @Rudy Mens 16-11-2020
The task will be synced to Planner after you have clicked on the “sync” button in the top right corner of the add-in.
You can also create decisions in the same way:
Decision: decision
When the meeting is over you can send a review of the minutes to the attendees before you finalize it and create a PDF. All the tasks and decisions will be listed in the meeting overview in Teams so every attendee can easily see the listed tasks and decisions or open the meeting minutes for more context.
Where is meeting data stored?
Decisions is fully integrated into Microsoft Office 365. That means that all the data is stored in your own Office 365 Tenant. All the files, comments, and descriptions that you add to an agenda item are stored in SharePoint.
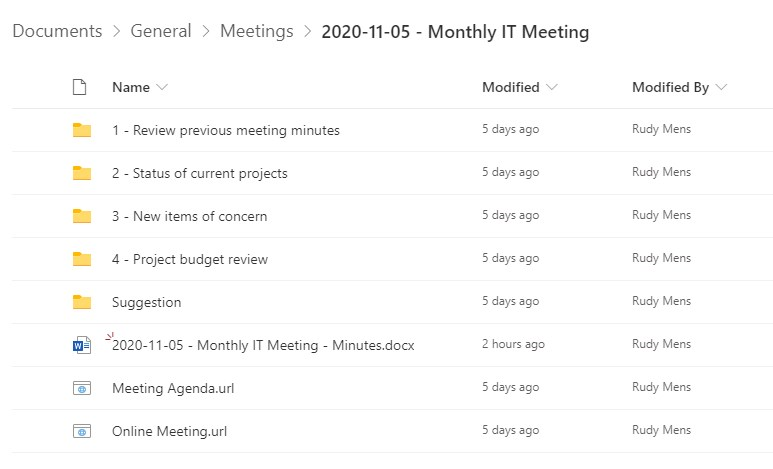
You can find the files in the SharePoint site of the Team, under Documents > General > Meetings.
Tasks and decisions that you create are stored in Planner. The tasks are listed in buckets per meeting, and there is a private Planner where the decisions are stored.
All the Decisions-specific services are hosted on Azure and only contain the references to the data in your Tenant. This ensures that all your data stays within your Tenant, preserving your existing security and compliance features.
License requirements
It is important to know that your users need to have at least Microsoft 365 Business Premium or Enterprise E3 to use Decisions. Though these are the official requirements, I also tested it with a Business Standard license, and it worked—just keep in mind that you can’t use the Word or Outlook add-ins in this situation.
Get Decisions for Your Team
If you, too, think Decisions would be a useful addition to your workflow, follow these installation steps.
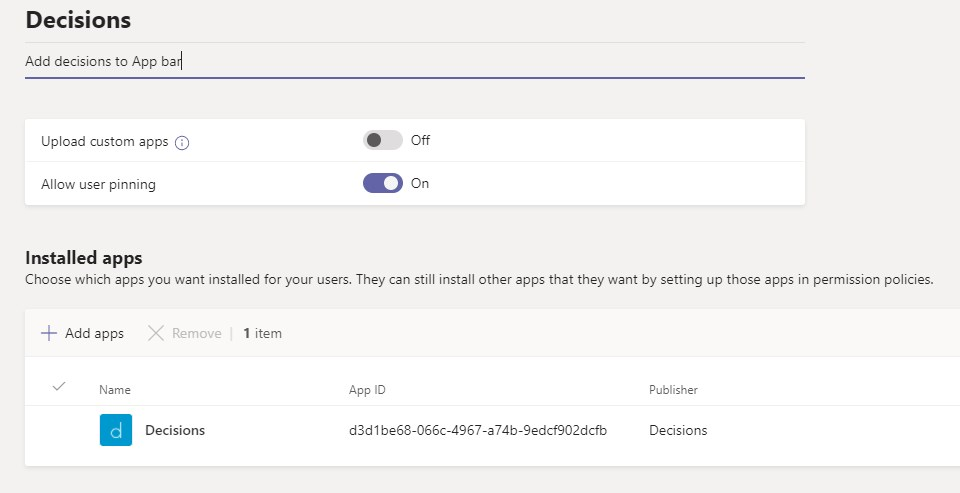
Decisions is composed of three add-ins. The basis is the Teams app, which the user can install themselves or you can roll out for your organization. Just make sure you allow third-party apps in the Teams Admin center under Teams Apps > Permissions Policies > Global.
As an admin, you can easily roll out the Decisions for Teams app in your Tenant. You can either roll the app out to all the users using the Global Setup Policy or create a custom Setup Policy and assign it to specific users.
The add-ins for Outlook and Word can be deployed through the Microsoft 365 Admin Center. Open Settings > Integrated Apps and click on Get Apps to add the Decisions apps.
With the add-ins, you can also specify if you want to deploy it to a specific group of users or to the entire organization.
Wrapping up
Decisions really helps you structure your meetings, from the planning stage to the meeting itself. What I found to be a big advantage is that you have all the documents, notes, and tasks in one place. You don’t have to search in OneNote for the notes you’ve made, or in SharePoint for the documents that you have talked about.
The new in-meeting extension is a great addition to Decisions. This way you don’t have to switch between windows—you can access all the information from within the meeting window.
Learn more about how Decisions can improve your meeting collaboration, engagement, and productivity: meetingdecisions.com.


Rudy,
I have been using Decisions and Love it. Your article is really good about showing the functionality. Have you seen a good comprehensive video tutorial or e-book or SOPs on how to use Decisions fully that we can share with staff who are learning at different paces?
Hi Martie,
I had to check with Decisions, they came with the following videos:
• Decisions for Microsoft Teams – short marketing video
• Decisions for Microsoft Teams step-by-step get started tutorial
• Decisions Meeting Secretary for Outlook step-by-step get started tutorial
• Overview video
looks very interesting, thanks!!