Phishing emails are a constant threat to your IT environment. Besides all the security measures that you can take, is the awareness of your users really important. You can help them by warning them of potential phishing emails.
I have written before about how you can add a warning to phishing emails based on suspicious words in the subject or content. But another common tactic from attackers is to use impersonation.
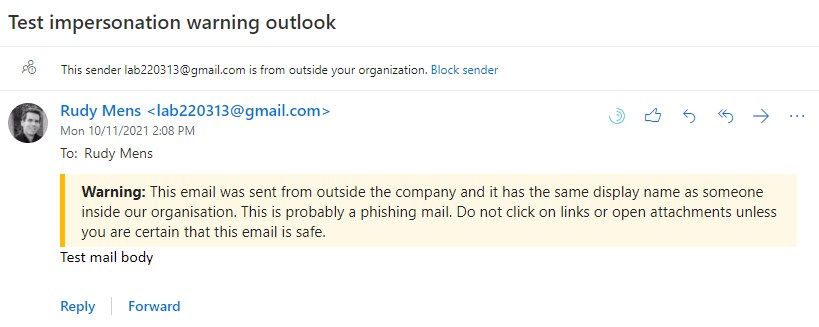
They pretend to send the email as someone from inside your organization, using a display name that matches one of your users’ names.
You can help your users detect these kinds of phishing emails by adding a warning to external emails that have a matching display name.
Creating a Transport Rule to add a warning when display name exists Internally with PowerShell
To add a warning to emails we will need to create a transport rule in Exchange Online. We also need a list with all the display names from our organization. Both can be done with PowerShell.
For the warning message, we are going to use the same layout as we have used for the phishing email warning. If you want to know more about it, or how to change the look, make sure you read this article.
As always, I will first explain how the script is built up and at the end of the article, you can find the complete script.
Get all Display Names with Exchange Online
The first step is to get all the display names from your organization. To keep the script simple, we are going to use Exchange Online for this. You will need to choose if you want to add the names of the shared email boxes as well.
Make sure you are connected to Exchange Online. If you want all mailboxes (inc shared) then remove -RecipientTypeDetails usermailbox from the command below.
# Get all existing users
$displayNames = (Get-EXOMailbox -ResultSize unlimited  -RecipientTypeDetails usermailbox).displayname
Get Existing Transport rule
Users come and go in your organization, so we need to be able to update the list with display names. So we set our transport rule name and then check if the rule already exists later on.
# Set the transport rule name
$transportRuleName = "Impersonation warning"

# Get existing transport rule
$existingTransportRule =  Get-TransportRule | Where-Object {$_.Name -eq $transportRuleName}
Create the Warning Banner
We also need to define the warning banner which we are going to add to the emails:
$HTMLDisclaimer = '<table border=0 cellspacing=0 cellpadding=0 align="left" width="100%">
	<tr>
		<td style="background:#ffb900;padding:5pt 2pt 5pt 2pt"></td>
		<td width="100%" cellpadding="7px 6px 7px 15px" style="background:#fff8e5;padding:5pt 4pt 5pt 12pt;word-wrap:break-word">
			<div style="color:#222222;">
				<span style="color:#222; font-weight:bold;">Warning:</span>
				This email was sent from outside the company and it has the same display name as someone inside our organisation. This is probably a phishing mail. Do not click on links or open attachments
				unless you are certain that this email is safe.
			</div>
		</td>
	</tr>
</table>
<br/>'
Create the Transport Rule with PowerShell
With all the components in place, we can add the transport rule with PowerShell. The rule will be applied to all emails sent from outside the organization, where the From field matches one of the display names.
	Write-Host "Creating Transport Rule" -ForegroundColor Cyan

	# Create new Transport Rule
	New-TransportRule -Name $transportRuleName `
										-FromScope NotInOrganization `
										-SentToScope InOrganization `
										-HeaderMatchesMessageHeader From `
										-HeaderMatchesPatterns $displayNames `
										-ApplyHtmlDisclaimerLocation Prepend `
										-ApplyHtmlDisclaimerText $HTMLDisclaimer `
										-ApplyHtmlDisclaimerFallbackAction Wrap

	Write-Host "Transport rule created" -ForegroundColor Green
The complete script
When we put it all together we get a complete script that will be able to create and update your transport rules. Now in the examples above the script only created a single transport rule. But when you have more than 150/200 users, then a single rule will become too big.
In the final script, which you can find here in my Github repository, I have added also a part that will split the users into multiple rules (thanks to Gerald for the suggestion). The script will detect if you have more than 100 users (set the chunk size in the beginning) and will create one or multiple rules accordingly.
To update the rules, if you have multiple impersonation rules, then we will delete the existing rule. If you have only one rule, then we can update it.
Transport Rule in Exchange Online
You can find the transport rule in Exchange Online after you have executed the script:
- Open the Exchange Admin Center
- Expand Mail flow and select Rules
- Open the rule Impersonation Warning to see the details

Wrapping Up
If you are adding the names of shared mailboxes to the list as well, then you probably want to filter out names like “info” from the list, because info is pretty common 😉
The size of a transport rule is limited, so when you have a large tenant, with more than 200 users, you might need to create multiple transport rules (which the script will now do automatically)
If you have any questions, just drop a comment below.


Thanks for posting this code!
This script works for the most part, but I’m running into the following error:
Write-ErrorMessage : Cannot process argument transformation on parameter ‘HeaderMatchesPatterns’. Cannot convert value “System.String[]” to type
“Microsoft.Exchange.MessagingPolicies.Rules.Tasks.Pattern[]”. Error: “The pattern contains incorrect characters, operators, or constructs.
That must be coming from unsupported characters in the usernames.
That was it! Thank you!
Hey Frank,
Thanks for posting updated code.
I have updated my script but its returning back with the below.
Creating Impersonation Transport Rule 1 …
Write-ErrorMessage : |System.InvalidOperationException|The rule can’t be created because it is too large. It has 10623 characters,
and the maximum number of characters is 8192. Reduce the size, either by removing content, such as words or regular expressions,
I’m running into a similar issue, implying that even with the updated code it’s still trying to put the full display name list into the rule.
It works with just my display name, otherwise I’m having this error in addition:
Write-ErrorMessage : Cannot process argument transformation on parameter ‘HeaderMatchesPatterns’. Cannot convert value “System.String[]” to type “Microsoft.Exchange.MessagingPolicies.Rules.Tasks.Pattern[]”. Error: “”The pattern ‘[
“Display Names”
]’ exceeds the maximum length of 128 characters.””
Seems pretty darn close…
How long are some of the display names then? They seem to exceed the 128 characters somehow..
–Cannot process argument transformation on parameter ‘HeaderMatchesPatterns’ Cannot convert value “System.String[]” to type “Microsoft.Exchange.MessagingPolicies.Rules.Tasks.Pattern[]”
Appears to be referring to the whole $Chunk of $DisplayNames
“”The pattern ‘[
“Display Names”
“More Display Names”
]’ exceeds the maximum length of 128 characters.””
It seems to me that EXO-PS wants to convert this data to another type when we pass it along and it fails, perhaps requiring us to convert it before storing it in the variable? My best guess. I did double check the contents of $DisplayNames and they are all fairly normal names, nothing close to 128 chars!
What am I missing?
None of them are even close, I’ve been trying to understand how this fails, it appears the issue isn’t the length of the display names, but the whole chunk – it appears that an attempt is made to convert the entire list and then it dies on the vine.
Do we need to craft a way to iterate through the conversion, store the results, and then pass them along? We’d really like to use this, schedule it to run regularly and let it be…
Check out this comment, maybe braking it up in chunks will fix the issue : https://lazyadmin.nl/office-365/warn-users-for-email-impersonation-phishing-mail/#comment-5480
foreach ($chunk in $chunks) { …..
-HeaderMatchesPatterns $chunks `
I stripped off the update portion of the script and changed the chunks to chunk in the new-transportrule command:
-HeaderMatchesPatterns $chunk `
I now have transport rules. Looking at the update portion with the same lens I think it needs attention, it appears to be doing the same thing.
I hate to spam this but I’m trying to make it work – and share the joy of success. Thanks for all you and the rest have done to make this happen.
I did get it to work – sort of. The code posted on GitHub isn’t going to be functional in its current state.
There is an issue with the chunks portion. The $chunks inside the loop should be $chunk.
The update portion of the script doesn’t handle the chunking *at all*. Considering the DisplayNames don’t go into the rules in a specific order (could sort them) it would be complicated to enumerate and update the rules with the new list of names.
That code posted on GitHub will not work as it sits. I appreciate your work and will make use of it. Rather than the complication of trying to update the rules I plan to delete and recreate them.
Thanks!
You where correct, seems that I added the Chunk loop part to quick. I have updated the script so it will now better handle creating a single or multiple transport rules and also be able to update them correctly.
Cool! It does the job! I’m buying you a coffee for sure!
Ideally we’d like to schedule this as an Azure script so we’ll remove any need for interaction AFTER we’ve proven that it works as it should in our environment. And I have.
To keep from having to confirm rule deletion: set confirm to false in the removal function. Just do it!
Remove-TransportRule -identity $rule -Confirm:$false
We don’t need to hold a session open once the script finishes, so we go straight for the disconnect without the prompt\logic.
“Disconnect-ExchangeOnline -Confirm:$false | Out-Null”
For the nit picky… When I look at the rules, I get a better sense that everything looks correct when the display names are in order – so I stuck a “| sort” at the end of the “$displaynames” line.
That is all that I can think of. Thank you so much for your effort. You rock!
Thanks for sharing the tips!
The linked GitHub script doesnt increment $c to make the rule so Rule 0 gets overwritten
Thanks, it should be fixed now.
Hello,
I have a question about the warning banner. Will the banner still remain in the mail conversation when I press reply on an external email?
Yes, it’s embedded in the email body.
Thank you for this! I have copied and it is working. However, I have one issue. The background highlight doesn’t work all the time. I have tested sending mail to my company email using my gmail and icloud ID. On gmail, it works perfectly but on my icloud mail it gets the disclaimer message but no backgroud color/highlight. Please advise. Thank you
It seems that the emails from iCloud are not in HTML format. That is why you don’t see the colors or other styling options.
I modified the loop for breaking into multiple transports and tested it.
Replace the section after else.
{
$chunks = [System.Collections.ArrayList]::new()
for ($i = 0; $i -lt $displayNames.Count; $i += 100) {
if (($displayNames.Count – $i) -gt 99 ) {
$chunks.add($displayNames[$i..($i + 99)])
}
else {
$chunks.add($displayNames[$i..($displayNames.Count – 1)])
}
}
$c = 0;
foreach ($chunk in $chunks) {
Write-Host “Creating Transport Rule” -ForegroundColor Cyan
# Create new Transport Rule
New-TransportRule -Name “$transportRuleName-$C” `
-FromScope NotInOrganization `
-SentToScope InOrganization `
-HeaderMatchesMessageHeader From `
-HeaderMatchesPatterns $chunk `
-ApplyHtmlDisclaimerLocation Prepend `
-ApplyHtmlDisclaimerText $HTMLDisclaimer `
-ApplyHtmlDisclaimerFallbackAction Wrap
Write-Host “Transport rule $c created” -ForegroundColor Green
$c = $c + 1
}
}
Hello, Amazing script, thanks.
But there is a little issue with the loop. When i try to restart the script, the update part is not working.
I’m not a Powershell master user but if i’m understand correctly, the script try to find a rule name “Impersonation warning” but in the loop section change the name for “Impersonation warning-0, -1, -2 …) so the update part of the script can’t find them.
So for now i’m deleting the 4 rules created by the script and replay it.
it will be very nice if you can adjust it for a newbie like me 🙂
But still it is a fantastic script, so thank you for that.
Helene, I quickly added this script to do the following:
1. Export all rules (in case things go wrong) to a file name that will include a Date and Time
2. Delete all rules that contain “impersonation” in their name
This is my quick-win script as I couldn’t get the script to update as I’m also not an expert in PowerShell
#export/backup ALL rules
$file = Export-TransportRuleCollection
[System.IO.File]::WriteAllBytes(“I:\temp\Exchange Rules $(((get-date).ToUniversalTime()).ToString(“yyyy-MM-dd_HH-mm”)).xml”, $file.FileData)
#list all “impersonation” only rules and store them in a variable, then delete all
$tRules = Get-TransportRule | Where-Object {$_.Name -match ‘Impersonation’}
$int = 0;
foreach ($tRule in $tRules) {
#Start-Sleep -s 2
Remove-TransportRule -identity “$tRule” -Confirm:$false
Write-host “$tRule not/deleted…” -ForegroundColor Red
$int = $int +1
}
This is awesome. Many thanks for the hard work. One question though. What happens when a display name is changed or a new user is added? I assume you would have to run the script to update the rule. I am just thinking if a member of my Team performs the display name change/add a new user without letting me know so I can perform the follow-up action.
Yes, you will need to re-run the script, or manually add/remove the user.
Hi
Have copied your script only translated it to swedish, but i keep getting error message
The rule can’t be created because it is too large. It has 24183 characters, and the maximum number of characters is 8192. Reduce the
size, either by removing content, such as words or regular expressions, from the rule; or by removing conditions, exceptions, or
actions from the rule.
How do you get it to work?
Whitout it geeting to large
How many users do you have? I have tested it with up to 200 users, and that worked fine.
We have 600 users roughly
I think you will have to break up the list into smaller batches, creating multiple exchange rules.
Something like this:
$chunks = [System.Collections.ArrayList]::new()

for ($i = 0; $i -lt $displayNames.Count; $i += 100) {

if (($displayNames.Count - $i) -gt 99 ) {

$chunks.add($displayNames[$i..($i + 99)])

}

else {

$chunks.add($displayNames[$i..($displayNames.Count - 1)])

}

}
$c = 0;
foreach ($chunk in $chunks) {
Write-Host "Creating Transport Rule" -ForegroundColor Cyan
# Create new Transport Rule
New-TransportRule -Name "$transportRuleName-$C" `
-FromScope NotInOrganization `
-SentToScope InOrganization `
-HeaderMatchesMessageHeader From `
-HeaderMatchesPatterns $chunks `
-ApplyHtmlDisclaimerLocation Prepend `
-ApplyHtmlDisclaimerText $HTMLDisclaimer `
-ApplyHtmlDisclaimerFallbackAction Wrap
Write-Host "Transport rule $c created" -ForegroundColor Green
}
I haven’t tested it
It wasn’t updating correctly, I made some adjustments
# Get all existing users
$displayNames = (Get-EXOMailbox -ResultSize unlimited -RecipientTypeDetails usermailbox).displayname
# Set the transport rule name
$transportRuleName = “Impersonation warning”
$chunks = [System.Collections.ArrayList]::new()
for ($i = 0; $i -lt $displayNames.Count; $i += 100) {
if (($displayNames.Count – $i) -gt 99 ) {
$chunks.add($displayNames[$i..($i + 99)])
}
else {
$chunks.add($displayNames[$i..($displayNames.Count – 1)])
}
}
Write-Host “Started looping displayNames chunks …” -ForegroundColor Cyan
$c = 1;
foreach ($chunk in $chunks) {
# Get existing transport rule
$existingTransportRule = Get-TransportRule | Where-Object {$_.Name -eq “$transportRuleName $c”}
if ($existingTransportRule)
{
Write-Host “Updating Transport Rule $c …” -ForegroundColor Cyan
# Update existing Transport Rule
Set-TransportRule -Identity “$transportRuleName $c” `
-FromScope NotInOrganization `
-SentToScope InOrganization `
-HeaderMatchesMessageHeader From `
-HeaderMatchesPatterns $displayNames `
-ApplyHtmlDisclaimerLocation Prepend `
-ApplyHtmlDisclaimerText $HTMLDisclaimer `
-ApplyHtmlDisclaimerFallbackAction Wrap
Write-Host “Transport rule $c updated.” -ForegroundColor Green
}
else
{
Write-Host “Creating Transport Rule $c …” -ForegroundColor Cyan
# Create new Transport Rule
New-TransportRule -Name “$transportRuleName $c” `
-FromScope NotInOrganization `
-SentToScope InOrganization `
-HeaderMatchesMessageHeader From `
-HeaderMatchesPatterns $displayNames `
-ApplyHtmlDisclaimerLocation Prepend `
-ApplyHtmlDisclaimerText $HTMLDisclaimer `
-ApplyHtmlDisclaimerFallbackAction Wrap
Write-Host “Transport rule $c created.” -ForegroundColor Green
}
$c++
}
Write-Host “Finished looping displayNames chunks.” -ForegroundColor Cyan
Did the extra script work for 200+ users? – thanks
Woo hoo! Thank you so much. This is now working! I’m going to keep following you to see what else I can learn. Thanks again!
Ok, I do have that option! It wasn’t available to me because I had used 2 conditions to apply the rule already – apply the rule if the sender is located outside the organization and the recipient is located inside the organization. If I get rid of that second condition which really isn’t needed, I see where I can choose Header. Thank you!
Unfortunately, I’m lost on this part. I don’t have the option to change the sender’s specified properties to Header. I’m using the rules on the Exchange admin center and only have certain options I can pick from. Under the sender’s specified properties match these text patterns, I can select user properties, and DisplayName is one of them but there’s nothing about header.
I think you’re using a program that perhaps I don’t have?
You don’t have the option > A message header? And then “matches these text patterns”? You can then click on “Enter text..” and type “from”
See this screenshot
Is it possible to create this rule in the exchange admin center, rather than use Power Shell? We often get random email addresses using only certain names as Display Names.
I created a warning within the rules, just like I did for external emails (following one of your articles, and it worked). Apply this rule if the sender is located outside the organization, and the recipient is located inside the organization and the sender’s specified properties includes any of the these words… Display Name XXXX or Display Name XXXX or Display Name XXXX (I listed out about 10). Then, do the following – prepend the disclaimer –
‘ Caution: This email originated from outside the organization AND has the same display name as someone inside our organization. This is probably a phishing email. Do not click on links, open attachments, or follow any instructions in this email. ‘; and fall back to action Wrap if the disclaimer can’t be inserted.
Do you see something that I’m doing wrong? Thanks very much
Change this: the sender’s specified properties include any of these words
To: A Message header matches > specify From > Add the display name
You can also run the script, and change $displayNames = (Get-EXOMailbox -ResultSize unlimited -RecipientTypeDetails usermailbox).displayname to $displayNames = “Place Holder”
This way the rule will be created in Exchange Online, allowing you to change the display names manually later on.
Thanks for posting this article! I really appreciate it!