Sometimes legitimate email ends up in the junk folder after being marked as spam by Exchange Online. This is of course unwanted, so how do you whitelist a domain in Office 365? And how can we do it safely without opening the doors for phishing emails?
Filtering out spam emails is important to prevent malware and phishing emails from ending up in your user’s mailboxes. But when emails from trusted senders are marked as spam we need to find a way to override this and safely deliver the mail into the user’s inbox.
In this article, we are going to take a look at the different options to whitelist a domain in Office 365.
What you need to know
There are multiple ways to whitelist a domain in Office 365, but it’s important that you understand the implication of the different methods. There are various reasons why an email is marked as spam. It can be that it’s sent from an untrusted source, failed the SPF or DMARC check, or even based on the content of the email.
The two most common ways to whitelist a domain on a tenant level are by either using a mail flow rule (recommended) or by adding the domain to the allowed sender list in de anti-spam policy. Other options are to whitelist on IP Address in Office 365 or use the safe sender list in Outlook.
When it comes to excluding a domain from spam filtering, it’s important to be as specific as possible about the source. Because when filtering simply on a domain name alone, you also set the door open for spoofed phishing mails for that domain.
That is why mail flow rules are the recommended way to whitelist a domain.
Whitelist a Domain in Office 365 with Mail flow rules
We are going to start with the recommended way, using mail flow rules. The advantage is mail flow rules is that we can whitelist a domain and also add some additional checks to it. Like part of the subject, DMARC result, or even a specific IP Address.
When you have a web application, that sends an automatically generated email that you want to whitelist. Then you can create a mail flow rule, and filter on sender or domain. And as an extra check, filter on IP Address. Because you probably know from which IP Address the mail is sent.
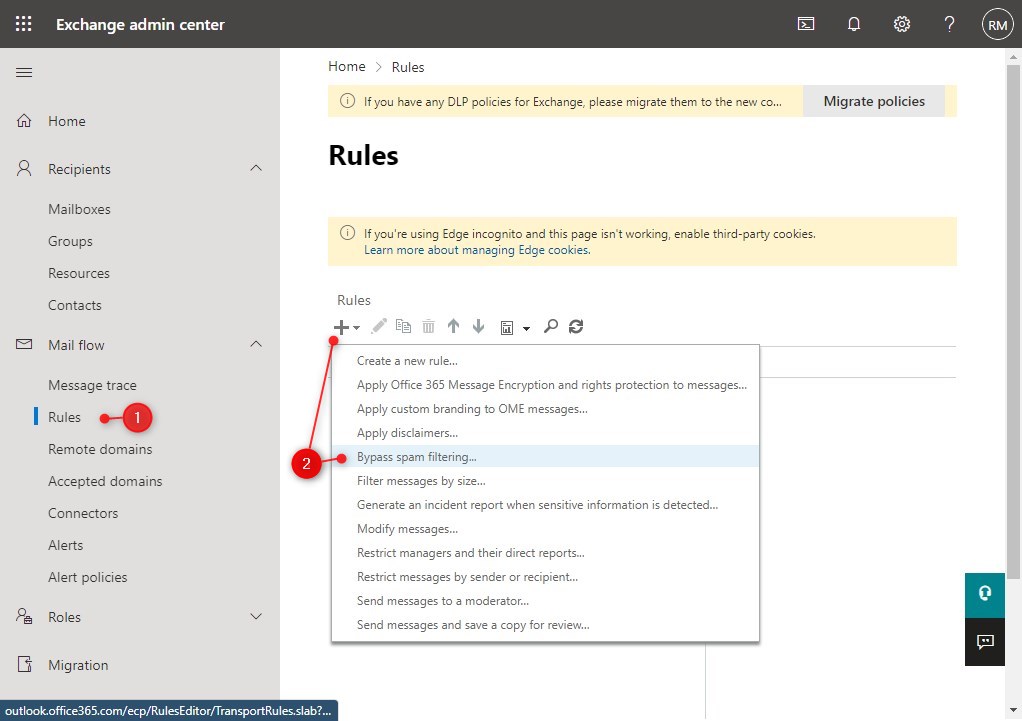
To whitelist a domain with a mail flow rule we first need to open the Exchange Admin Center.
- Expand Mail flow and click on Rules
- Click on the plus icon and select Bypass Spam Filtering
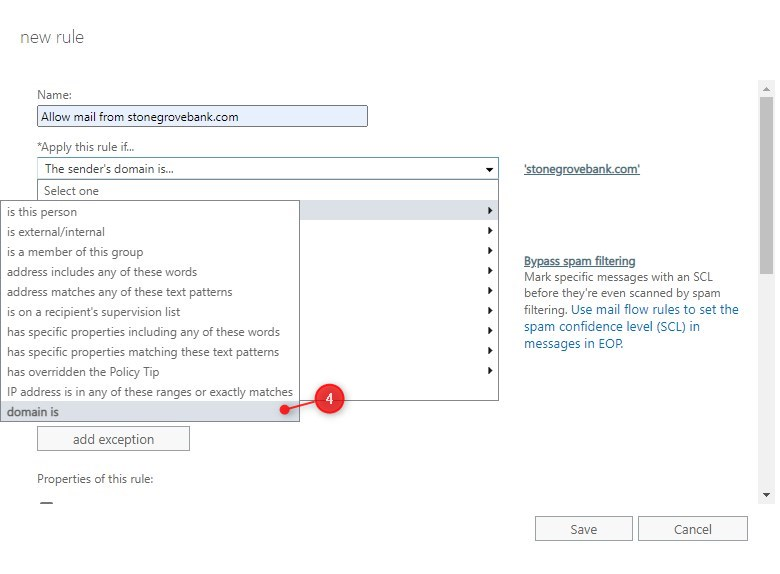
- Enter a name for the rule
- Under Apply this rule if, select Domain is
- Enter the domain that you want to whitelist
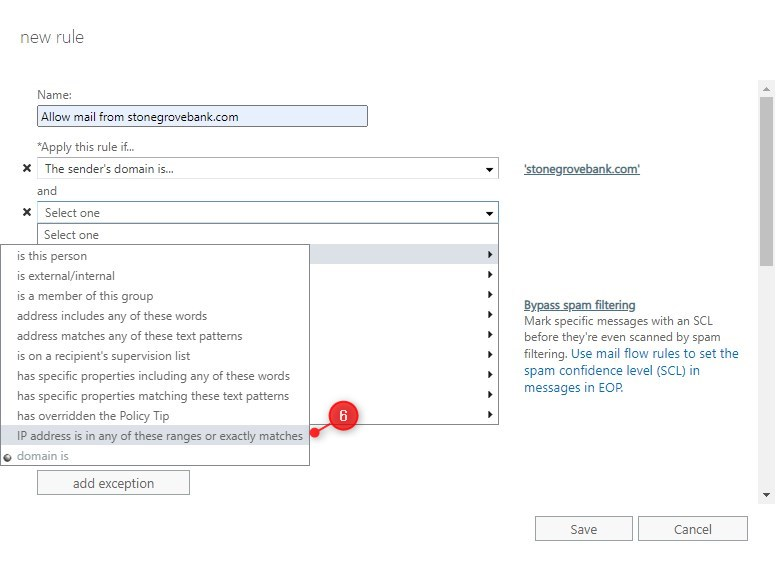
- Click add condition and choose IP Address is in any of these ranges..
- Enter the IP Address of the application.
- Other additional conditions to uses are
- The Subject or Body > Subject includes any of these words. This way you can further filter the emails based on a word in the subject line.
- A Message header > includes any of these words. Filter on DMARC result is a good way to prevent spoofing of a whitelisted domain. Add Authentication-Results under “Enter text” and dmarc=pass under “Enter words…”
- Click Add Action > Set a message header
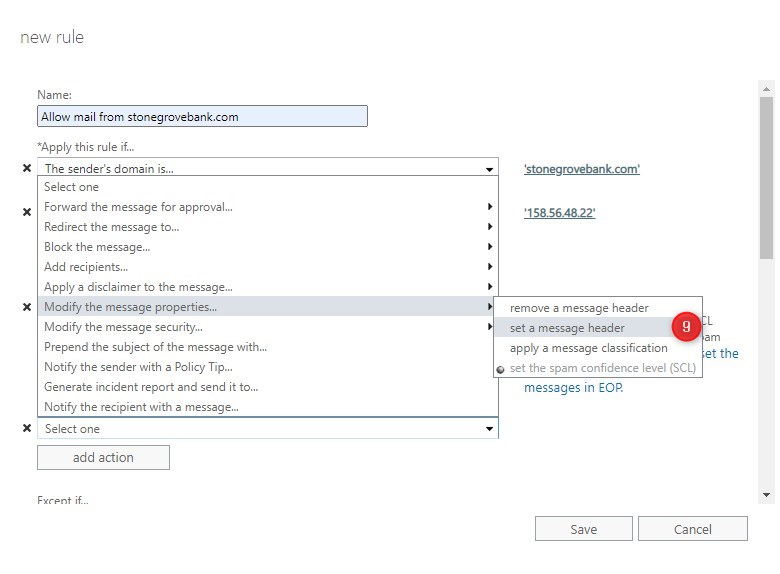
- Set the header to
X-ETRand the value to something like:Bypass spam filtering for stonegrovebank.com
The final result of the mail flow rule should look something like this to whitelist a domain in Office 365:
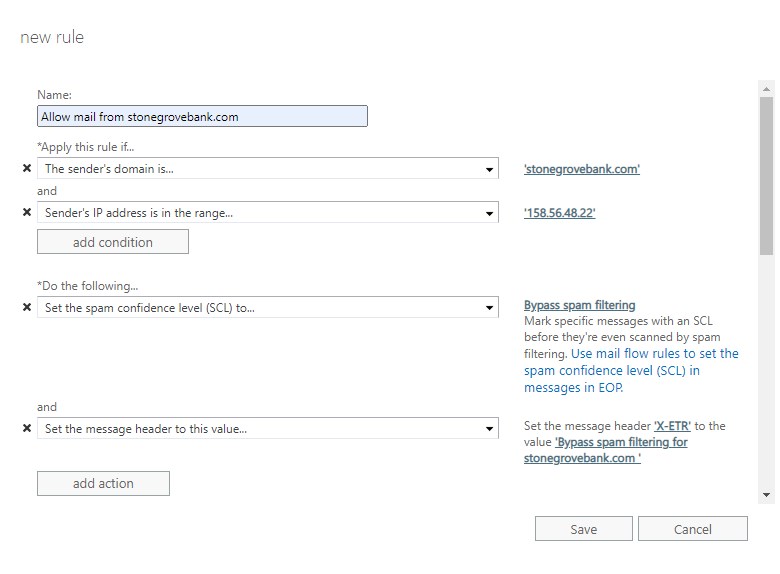
Click save to apply the settings.
Office 365 Whitelist Domain with Allowed Domains
Before we could use the allowed sender list in the Exchange Online admin center to whitelist a domain. But now we need to use the Microsoft 365 Security Center (Microsoft 365 Defender). Keep in mind that this is the least secure option to whitelist a domain. Because this way senders for this domain will bypass spam protection and sender authentication methods.
To allow a complete domain or specific sender, we need to modify the inbound spam policy.
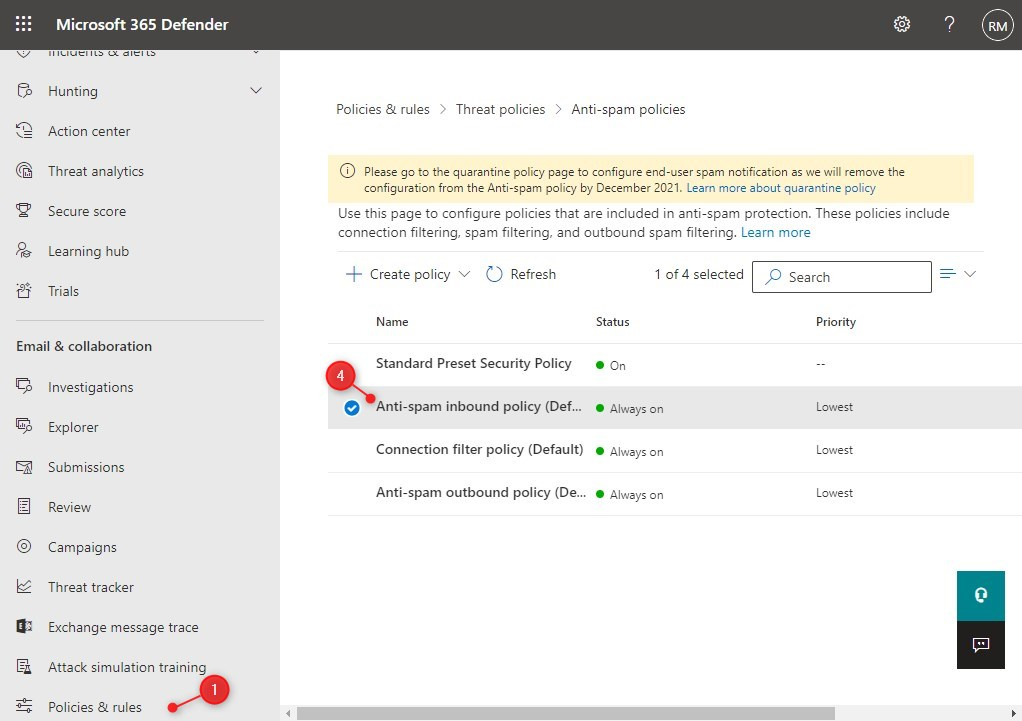
- Click on Policies & rules
- Select Threat Policies
- Open Anti-Spam (it can take a couple of seconds to load the policies)
- Click on the Anti-spam inbound policy (Default)
- Scroll all the way down in the fly-out and click on Edit allowed and blocked senders and domains
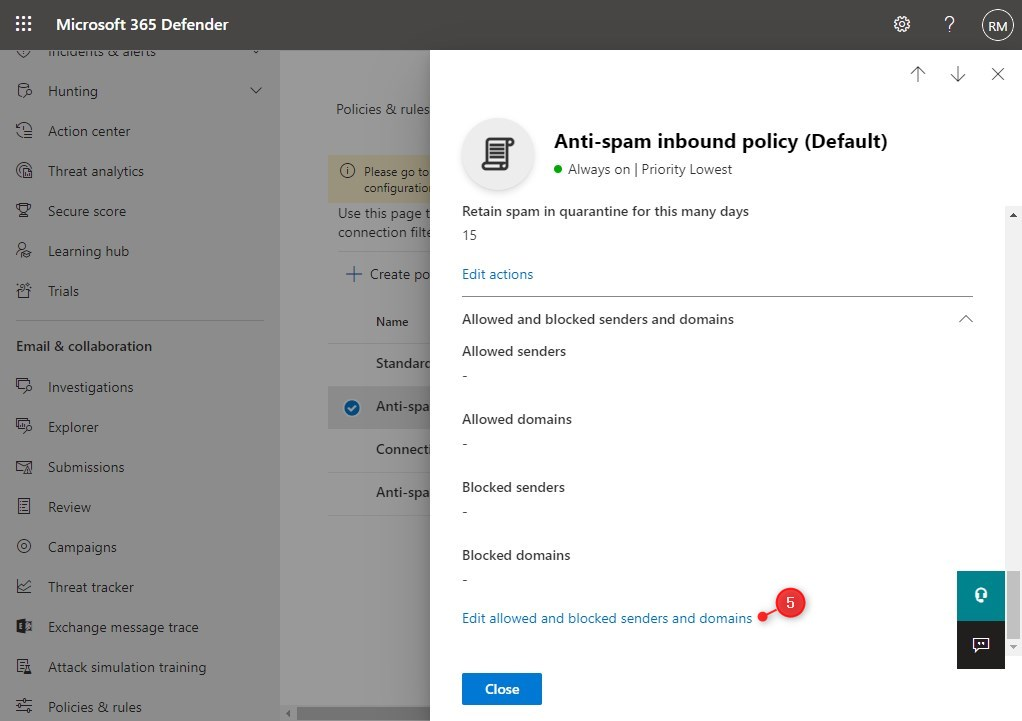
- Click on Allow domains
- Add the domains that you want to whitelist
- Click Done and Save
Mails sent from this domain should now arrive in the inbox and completely bypass the spam filter. But keep in mind, when you whitelist a domain this way, that spoofed email won’t be noticed as well.
Office 365 Whitelist IP Address
The last option that I want to share with you is the ability to whitelist an IP Address in Office 365. Personally, I prefer to use a mail flow rule for this, which allows us to combine an IP Address with a domain for example. But we can whitelist an IP address completely as well.
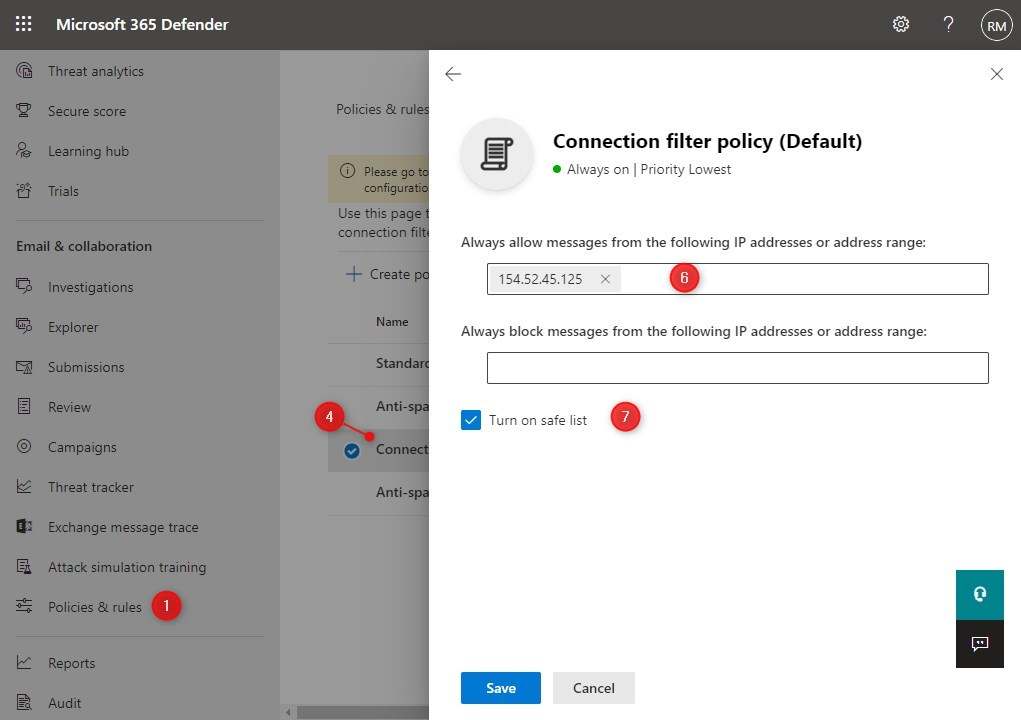
For this, we need to modify the Connection Filter Policy in the security center (Microsoft 365 Defender).
- Open the Security Center (Microsoft 365 Defender)
- Navigate to Policies and Rules > Threat Rules
- Click on Anti-Spam
- Click on Connection Filter Policy (Default)
- Click Edit connection filter policy in the fly-out
- Add the IP Address that you want to whitelist
- Enable Turn on safe list
- Click Save and close to apply the settings.
Wrapping Up
Try always to be as specific as possible when whitelisting a domain in Office 365. If you know that a part of the subject is always the same, make sure you add it as a condition. Enable the DMARC header to check if SPF and DMARC are configured for the sending domain.
Whitelisting a domain through the allowed domains list in the anti-spam policy should only be used as a temporary solution. When you whitelist a domain that way, you bypass all the security checks that will help with preventing phishing mails.
If you have any questions, just drop a comment below.


[Office 365 Whitelist Domain with Allowed Domains] – this setting can avoid to receive sender domain messages even if they land on a 3rd party email provider, right?
mail flow: external domain > email messages > 3rd party email provider > M365
Could you explain a bit more about the problem?
Thanks for the sensible critique. Me & my neighbor were just preparing to do some research on this. We got a grab a book from our area library but I think I learned more clear from this post. I’m very glad to see such fantastic information being shared freely out there.
Just wonderful and well written. Nice Job
Thanks!! This has helped me a lot.
Hi,
How can I do whitelisting for Antimalware Rules, for example I know that one specific user will send me some logs with .bat extension every day.
In my Antimalware Policy, every mail with .bat extension goes into quarantine.
How to whitelist this user with this .bat attachment with some rule through Antimalware policy?
Setting an allowed domain or sender doesn’t work?
I have an email address provided by outlook but ism being told that it is invalid.The address is wilsonchepkwkny93@mwalimu.tsc.go.ke
I have allowed domain In anti spam policy . Also make by pass spam but it is going to quarantine.
Hi, I have all rules but i can see most of emails from a whitelisted domains are quarantine .