Some settings in Exchange Online can only be changed with PowerShell. But how do you connect to Exchange Online with PowerShell? Especially when you are using MFA, or want to run your script automatically with a schedule or Azure Runbook.
PowerShell is also a great way to do a lot of the daily tasks in Exchange Online, like changing mailbox settings, adding a new mailbox, or retrieving information from it.
In this article
In this article, we are going to take a look at how to connect to Exchange Online in PowerShell, use the module in an Azure Runbook, and more.
Install Exchange Online Module
We need to install the EXO V3 Module in PowerShell before we can connect to Exchange Online. To install the PowerShell module, we are going to open PowerShell in elevated (admin) mode:
- Open PowerShell in an elevated mode
Press Windows key + X and choose Windows PowerShell (admin) - Install EXO V3 module
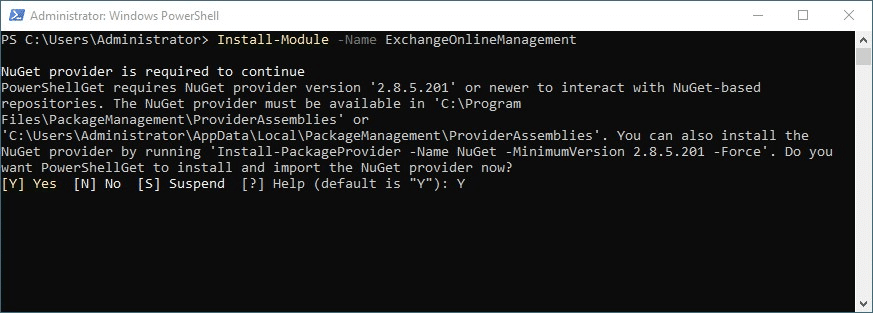
Type the command below to install the Exchange Online Management Module:
# Add -Force to it when you need to update EXO V3.
Install-Module -Name ExchangeOnlineManagement -Force
- Press Y twice
If you don’t have NuGet installed, then you will first be prompted to install PowerShellGet. Just press Y. Press Y again to install the Exchange Online module from the untrusted repository
Connect to Exchange Online with PowerShell
To connect to Exchange Online you have a couple of options. If you only enter the command Connect-ExchangeOnline then you will be prompted to enter or select your Microsoft 365 account. The latest module, v3, is MFA-aware, so you can authenticate with an MFA-enabled account.
Personally, I prefer to specify the account that I want to use for the connection, you can do this by using the UserPrincipalName parameter:
Connect-ExchangeOnline -UserPrincipalName john@contoso.com
After you are connected to Exchange Online you will get by default output with information about the EXO module. We can hide the banner by using the parameter -ShowBanner:$false
Connect-ExchangeOnline -UserPrincipalName john@contoso.com -ShowBanner:$false
The new EXO V3 module also supports connecting to another tenant. If you are a Microsoft Partner or when you are managing multiple tenants, then you can connect to another tenant by adding the -DelgatedOrganization parameter:
Connect-ExchangeOnline -UserPrincipalName john@contoso.com -DelegatedOrganization contoso.onmicrosoft.com
Automatically check if EXO Module is installed
Are you going to use the Exchange Online module in a script? Then make sure you automatically check if the module is installed before you try to connect.
Using a single cmdlet, we can list all installed modules in PowerShell. You can prevent unnecessary errors by verifying that the ExchangeOnlineManagement module is available.
if ($null -ne (Get-Module -ListAvailable -Name ExchangeOnlineManagement)){
 # Your script goes here
}
The cmd above should return a list of installed Exchange Online modules. If the result is empty (null), then we know that the module isn’t installed.
Update Exchange Online PowerShell Module
PowerShell modules are often updated, including the Exchange Online Module. The latest version EXO v3 comes with a couple of improvements that make it worth updating your PowerShell Module.
- Better performance – New EXO cmdlets are REST API-based
- More secure – V3 uses Modern Authentication
- More reliable
- Certificate-based authentication
- UseRPSSession Switch – Gives access to all existing remote PowerShell cmdlets.
To update the Exchange Online PowerShell Module we can use the following command in an elevated PowerShell window:
Update-Module -Name ExchangeOnlineManagement
Verify the update with:
Get-Module ExchangeOnlineManagement
To benefit from the new features, make sure that you update your Get-* cmdlet’s to their Get-EXO* counterparts. You can find an up-to-date list of the new cmdlets in the documentation.
Connect to Exchange Online Function for PowerShell
The complete function below can be used in scripts to connect to Exchange Online. This function checks if the Exchange Online module is installed, and when it gives the option to automatically install it for you.
It also checks for any existing Exchange Online connections in PowerShell, preventing multiple connections from the same session.
Function ConnectTo-EXO {
  <#
    .SYNOPSIS
        Connects to EXO when no connection exists. Checks for EXO v3 module
  #>
  param(
    [Parameter(
      Mandatory = $true
    )]
    [string]$adminUPN
  )

  process {
    # Check if EXO is installed and connect if no connection exists
    if ($null -eq (Get-Module -ListAvailable -Name ExchangeOnlineManagement))
    {
      Write-Host "Exchange Online PowerShell v3 module is requied, do you want to install it?" -ForegroundColor Yellow

      $install = Read-Host Do you want to install module? [Y] Yes [N] No
      if($install -match "[yY]") {
        Write-Host "Installing Exchange Online PowerShell v3 module" -ForegroundColor Cyan
        Install-Module ExchangeOnlineManagement -Repository PSGallery -AllowClobber -Force
      }else{
	      Write-Error "Please install EXO v3 module."
      }
    }

    if ($null -ne (Get-Module -ListAvailable -Name ExchangeOnlineManagement)) {
      # Check which version of Exchange Online is installed
      if (Get-Module -ListAvailable -Name ExchangeOnlineManagement | Where-Object {$_.version -like "3.*"} ) {
        # Check if there is a active EXO sessions
        if ((Get-ConnectionInformation).tokenStatus -ne 'Active') {
          write-host 'Connecting to Exchange Online' -ForegroundColor Cyan
          Connect-ExchangeOnline -UserPrincipalName $adminUPN
        }
      }else{
        # Check if there is a active EXO sessions
        $psSessions = Get-PSSession | Select-Object -Property State, Name
        If (((@($psSessions) -like '@{State=Opened; Name=ExchangeOnlineInternalSession*').Count -gt 0) -ne $true) {
          write-host 'Connecting to Exchange Online' -ForegroundColor Cyan
          Connect-ExchangeOnline -UserPrincipalName $adminUPN
        }
      }
    }else{
      Write-Error "Please install EXO v3 module."
    }
  }
}
Connect to Exchange Online as Delegated Admin (partner)
When you are managing multiple tenants, you might need to connect to Exchange Online as well. Instead of using a dedicated admin login from the client’s tenant, you can also connect to Exchange Online as delegated admin.
This way, you can use your own credentials to authenticate. To do this you will need to use the parameter -DelegatedOrganization.
# Replace stonegrovebank.onmicrosoft.com with the organization that you want to manage
Connect-ExchangeOnline -DelegatedOrganization stonegrovebank.onmicrosoft.com

# Optional, you can specify your username as well
Connect-ExchangeOnline -UserPrincipalName admin@contoso.com -DelegatedOrganization stonegrovebank.onmicrosoft.com
You can now manage all the mailboxes from the partner tenant.
Connecting Exchange Online to PowerShell without Modern Authentication
You can use the following method to connect to Exchange Online in PowerShell if your account doesn’t support Modern Authentication yet:
$cred = Get-Credential

Connect-ExchangeOnline -Credential $cred -ShowProgress $true
Check if Exchange Online is Connected
It’s a good idea to check if a connection already exists when using the Exchange Online module in scripts. Keep in mind that you can only have 5 simultaneous connections to Exchange Online. And you probably don’t want to log in if you don’t need to.
We can use the cmdlet Get-ConnectionInformation since EXO v3. If you are using an older version of Exchange Online, then you will need to use Get-PSSession.
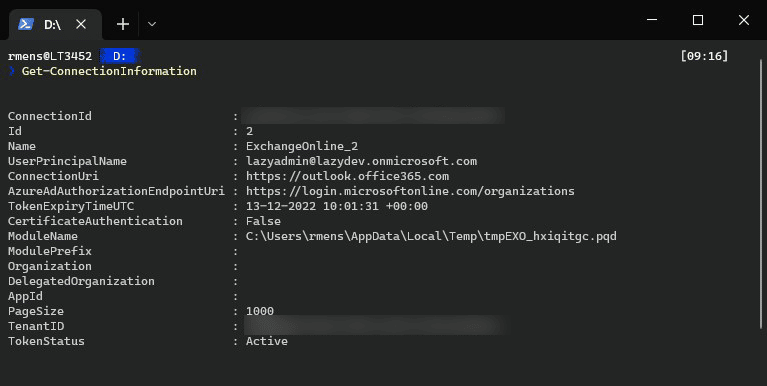
Get-ConnectionInformationWith the snippet below you can check if there is an active ExchangeOnline session for both V3 and older versions. We first check if the ExchangeOnline module is installed, and then if version 3.x is installed are not. Then depending on the version, we check for existing connections.
if ($null -ne (Get-Module -ListAvailable -Name ExchangeOnlineManagement)) {
      # Check which version of Exchange Online is installed
      if (Get-Module -ListAvailable -Name ExchangeOnlineManagement | Where-Object {$_.version -like "3.*"} ) {
        # Check if there is a active EXO sessions
        if ((Get-ConnectionInformation).tokenStatus -ne 'Active') {
          write-host 'Connecting to Exchange Online' -ForegroundColor Cyan
          Connect-ExchangeOnline -UserPrincipalName $adminUPN
        }
      }else{
        # Check if there is a active EXO sessions
        $psSessions = Get-PSSession | Select-Object -Property State, Name
        If (((@($psSessions) -like '@{State=Opened; Name=ExchangeOnlineInternalSession*').Count -gt 0) -ne $true) {
          write-host 'Connecting to Exchange Online' -ForegroundColor Cyan
          Connect-ExchangeOnline -UserPrincipalName $adminUPN
        }
      }
    }
Getting Mailbox information
With the new EXO V3 module you can now easily get the mailbox details with the following shorthand:
# Old way:
Get-ExoMailbox -identity johndoe@lazyadmin.nl

# With the EXO V2 module you can write the following shorthand
Get-ExoMailbox johndoe
Disconnecting your Sessions
Always make sure you disconnect your Exchange Online session before you close your PowerShell window. If you don’t close the session, you may end up using all 5 remote PowerShell connections to Exchange Online. If that happens you will need to wait for the sessions to expire before you can reconnect.
Disconnect-ExchangeOnline
Connecting PowerShell to Exchange Online Alternative
If you can’t use the new EXO v2 module, because you are using Basic Authentication for example, then you still can connect to Exchange Online. Keep in mind that this gets eventually deprecated, so when possible use the Modern Authentication option described earlier.
For the basic authentication method, we are going to import the Exchange Online cmdlets. First, make sure that you have set the execution policy to remote signed:
- Open PowerShell in an elevated mode
Press Windows key + X and choose Windows PowerShell (admin) - Set the execution policy to Remote Signed:
Set-ExecutionPolicy RemoteSigned
- To connect to Exchange Online we first need to store our credentials:
$cred = Get-Credential
- Next, we can create and import the Exchange Online cmdlet into PowerShell:
# Create the session
$Session = New-PSSession -ConfigurationName Microsoft.Exchange -ConnectionUri https://outlook.office365.com/powershell-liveid/ -Credential $cred -Authentication Basic -AllowRedirection

# Import it into your PowerShell session
Import-PSSession $Session -DisableNameChecking
Make sure you disconnect your session when you are done:
Remove-PSSession $Session
Frequently Asked Questions
If you get the error “Files cannot be loaded because running scripts is disabled on this system. Provide a valid certificate with which to sign the files.” then you have forgotten to set the execution policy.
Run the following cmd in an elevated PowerShell Window:Set-ExecutionPolicy RemoteSigned
You are trying to connect to Exchange Online with an MFA-enabled account while using the basic authentication option.
Make sure you install the latest Exchange Online Module, EXO V3, as explained in the beginning of the article.
You have used all 5 available connections to Exchange Online. Make sure you disconnect your PowerShell sessions.
To close the current sessions you get to run the following cmd:Get-PSSession | Remove-PSSession
error message : Access is denied
To connect to Exchange Online you will need to use an account that is global admin in Office 365. The account that you are connecting with doesn’t have the correct permissions.
Wrapping up
The new Exchange Online module is really powerful and makes working with Exchange Online a lot easier. I hope this article helped you to get started. If you have any questions, just drop a comment below.
You may also like the following articles:


Thnks for postingthis article. Not realising the EX03 was required was stopping me from using Powershell 7
Install-Module -Name ExchangeOnlineManagement -Force
Was the magin I needed. Many thanks Ruud!
Hey Ruud,
I’m getting errors when I’m trying to connect to Exchange Online and I don’t know what I’m doing wrong. I’m getting the error after the “Connect-ExchangeOnline”-command:
—————————————————————————————-
This V3 EXO PowerShell module contains new REST API backed Exchange Online cmdlets which doesn’t require WinRM for Client-Server communication. You can now run these cmdlets after turning off WinRM Basic Auth in your client machine thus making it more secure.
Unlike the EXO* prefixed cmdlets, the cmdlets in this module support full functional parity with the RPS (V1) cmdlets.
V3 cmdlets in the downloaded module are resilient to transient failures, handling retries and throttling errors inherently.
However, REST backed EOP and SCC cmdlets are not available yet. To use those, you will need to enable WinRM Basic Auth.
For more information check https://aka.ms/exov3-module
—————————————————————————————-
I can’t really understand what I need to do to get it working. Could you help out by any chance?
That is not an error, it’s only some information about the new v3 module.
How replace below code in Exchange module V3
$session = New-PSSession -ConfigurationName Microsoft.Exchange -ConnectionUri https://outlook.office365.c… -Credential $credentials -Authentication Basic -AllowRedirection
Import-PSSession $session -CommandName Search-UnifiedAuditLog
You don’t need to important the Search-UnifiedAuditLog command. It’s just available in the V3 EXO module.
Ok, so below code is fine? NewPSSession not required any more?
1st to make connection with Exchange –
Connect-ExchangeOnline -Credential $credentials -ErrorVariable connectEx -ShowBanner:$false
# Check result
If (!$?) {
Return @{message=”Failed to connect to Microsoft Exchange Online Services.”;error=$connectEx;fail=$true}
}
2 step is to execute direct command for Audit Log –
$auditEvents = Search-UnifiedAuditLog -RecordType SharePointFileOperation -Operations FileAccessed
Yeah almost:
Connect-ExchangeOnline -UserPrincipalName johndoe@lazyadmin.nl
Search-UnifiedAuditLog -RecordType SharePointFileOperation -Operations FileAccessed -StartDate 01-01-2023 -EndDate 01-02-2023
EndDate is at least required. And for Connect-ExchangeOnline, I find it easier to use the UserPrincipalName. This way MFA will also work.
Thanks a lot Rudy for your quick help. Really appreciate. Great article by the way. In case of any more queries ahead will connect. Thank you. 🙂
The problem I have with this new connection is that I cannot import a connection any longer as we could with import-pssession.
When I setup a connection in a runspace (created from a pool), that works great, but when I do a Disconnect-ExchangeOnline in one runspace, it is disconnected in all others as well.
It seems there is no way to disconnect this is only one runspace.
Great article. You may want to put in a comment about the Get-PSSession not working with the Exchange Online PowerShell Module, EXO V3. I kept getting no entries for Get-PSSession.
This link: https://learn.microsoft.com/en-us/powershell/exchange/exchange-online-powershell-v2?view=exchange-ps#updates-for-version-300-the-exo-v3-module
contains the following note from Microsoft:
“Use the Get-ConnectionInformation cmdlet to get information about REST-based connections to Exchange Online PowerShell. This cmdlet is required because the Get-PSSession cmdlet in Windows PowerShell doesn’t return information for REST-based connections.”
Thanks for pointing that out. I have updated the article.
I have been jumping from page to page trying a lot of code and FINALLY found one that worked! Thank you so much!!! You are man!
Superb and very helpful article