With PowerShell, you can extract all kinds of information from services like Active Directory or Microsoft 365. But sometimes you need to process this information further in Excel or another system. To do this we can use the Export-CSV function in PowerShell.
The Export-CSV function converts PowerShell objects into a CSV string and saves them into a CSV file. If you only need a CSV string, then you can also use the ConvertTo-CSV function in PowerShell.
In this article, we are going to take a look at how to use the Export-CSV function, how to prevent common mistakes, and what different options there are that you can use.
PowerShell Export-CSV
The Export-CSV cmdlet is pretty straightforward and only has a few properties that are useful:
- Path – (Required) Location of the CSV file
- NoTypeInformation – Removes the Type information header from the output. Not needed any more in PowerShell 6
- Delimiter – Default is comma, but you can change it
- Append – Append to an existing CSV file
- Force – Useful in combination with Append
- NoClobber – Don’t overwrite existing files
- UseQuotes – (PowerShell 7 only) wrap values in quotes or not
We are going to start with something simple, exporting our Microsoft 365 users to a CSV file. I am going to use Azure AD throughout the examples here, so if you want to follow along, make sure you connect the Azure AD first.
The Get-AzureADUser cmdlet returns all the users in your Microsoft 365 tenant, as you can see in the screenshot below. What we are going to do is to export this output to a CSV file. To do this we can simply pipe the Export-CSV cmdlet behind it:
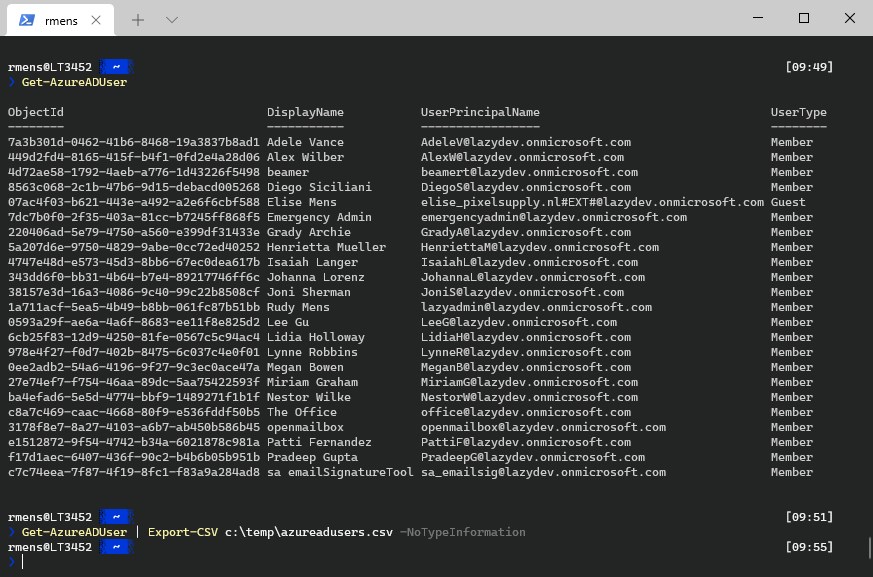
Get-AzureADUser | Export-Csv c:\temp\azureadusers.csv -NoTypeInformation
Sounds easy, right? Well if you open the CSV file you will notice that we got a bit more than we needed and not the nice list that we had seen in PowerShell before.
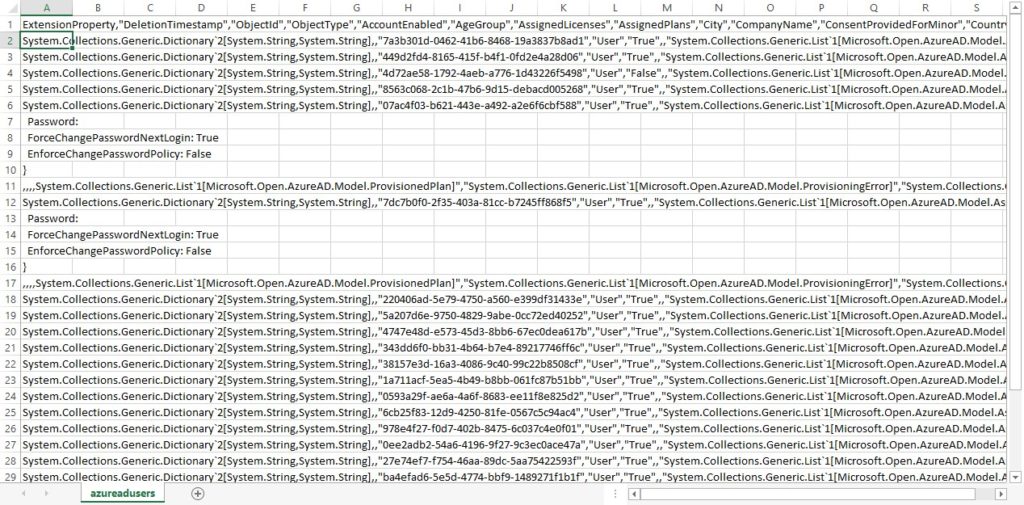
So why is this happening? The Export-CSV cmdlet exports all the individual objects from the Get-AzureADUser cmdlet. If we look up a single Azure AD user then you can see all the data that is returned from a single user object:
Get-AzureADUser -Filter "Displayname eq 'Rudy Mens'" | select *

How to Export the correct information with Export-CSV
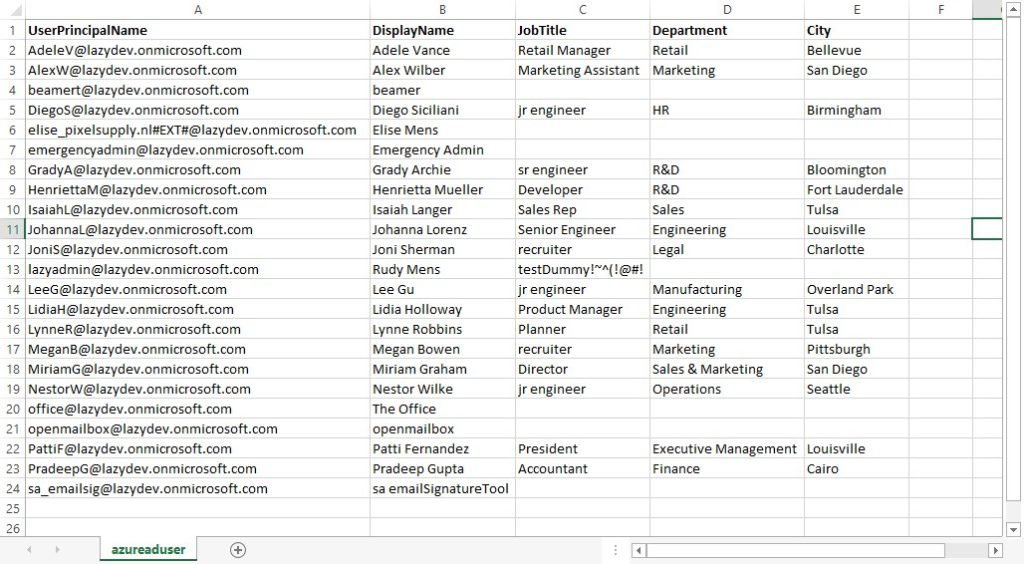
What we need to do is first select the correct information (properties) that we need before we export the user objects to a CSV file.
Get-AzureADUser | select userprincipalname, displayname, jobtitle, department, city | Export-CSV c:\temp\azureaduser.csv -NoTypeInformation
This will return the selected fields from each user in a nice CSV file that we can actually use:
Appending to CSV file with PowerShell
On some occasions, you may want to append information to a CSV file with PowerShell. Let’s say we want to add the manager of each user to the list. There is a more efficient way to do this, but in this case, we are going to loop through all the users and get the manager from Azure AD.
Tip
Learn more about creating PowerShell Scripts in this complete guide
For this example, we create a custom PowerShell object that will hold the user information and the manager. With the -append switch we can add the user to the CSV file.
$users = Get-AzureADUser

$users | ForEach-Object {
    $Manager = Get-AzureADUserManager -ObjectId $_.ObjectId

    $user =[pscustomobject]@{
        'Displayname' = $_.displayname
        'Jobtitle' = $_.jobtitle
        'Department' = $_.Department
        'Manager' = $manager.displayname
    }
    $user | Export-CSV c:\temp\usermanager.csv -Append -NoTypeInformation -Force
}
I have added the -Force switch as well. This way the CSV file will be created if it doesn’t exist and objects that have mismatched properties can still be written to the CSV file. It will only write the properties that match though, other properties are discarded.
Other useful Export-CSV parameters in PowerShell
There are a couple of other parameters that are useful when you are using the Export-CSV cmdlet in PowerShell.
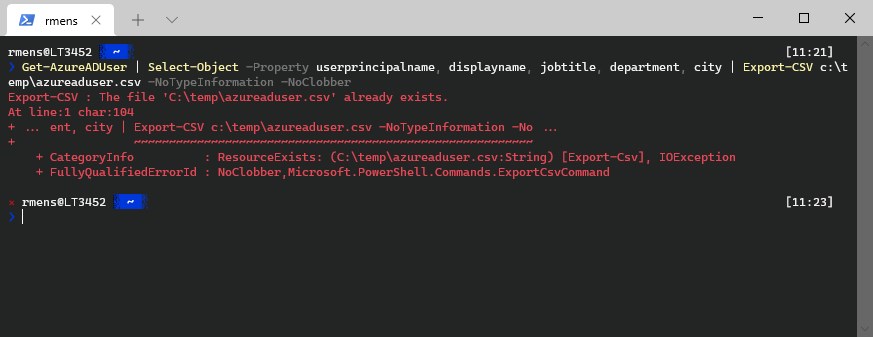
NoClobber
By default, the Export-CSV cmdlet will overwrite any existing file when used. If you don’t want this then you can add the -NoClobber parameter. This way, if the file already exists, you will get an error, preventing you from overwriting the file.
Delimiter
The values in a Comma Separated Values File (CSV) are by default separated with a comma. Not all applications follow this standard. So when you need to import the data into another application that required a semicolon ( ; ) for example, then you can change the delimiter.
Make sure though that you enclose the new delimiter in quotation marks:
Get-AzureADUser | Select-Object -Property userprincipalname, displayname, jobtitle, department, city | Export-CSV c:\temp\azureaduser.csv -NoTypeInformation -Delimiter ';'
UseQuotes
When you export objects in PowerShell 5 or 6 then all values are wrapped in quotation marks. On some occasions, you might don’t want that. If you are using PowerShell 7 then you can use the -UseQuotes parameter.
This parameter has a couple of options:
- AsNeeded
- Always (default)
- Never
Get-Process | export-csv -Path c:\temp\process.csv -UseQuotes AsNeeded
Wrapping Up
The Export-CSV cmdlet is a PowerShell function that I use quite a lot. It’s really useful to pull data out of Microsoft 365 quickly for reports or other tasks. Make sure you select first the correct properties when exporting objects. This is the most commonly made mistake when it comes to exporting PowerShell data to Excel.
If you have any questions, then just drop a comment below.


Thanks Rudy, great easy to understand article, much appreciated.