Just like with the on-premise Active Directory can we manage our users in Azure AD with PowerShell. For this, we will need to use the Get AzureADUser cmdlet in Powershell. This cmdlet is part of the PowerShell AzureAD Module.
When using Microsoft 365 your users are actually stored in the Azure Active Directory (Azure AD). You can manage them through the Azure Portal or Microsoft 365 Admin Center, but PowerShell is a lot quicker. It allows us to quickly find and export user information.
In this article, we are going to take a look at the Get AzureADUser cmdlet. I will give some useful examples for finding and exporting user information. And at the end of the article, I have a complete script to export your Azure AD users.
Note
The Azure AD module will stop working end 2022. We will need to switch over to the Microsoft Graph SDK for PowerShell. Read this article to get and export your Azure AD user with the Get-MgUser cmdlet.
Finding Azure AD Users with Get-AzureAD in PowerShell
Before we start, make sure that you have installed the Azure AD Module.
The Get-AzureADUser cmdlet allows to find and extract user accounts from the Azure Active Directory. The cmdlet only comes with a couple of parameters that we can use:
- Filter – Retrieve multiple objects based on a oDate v3 query
- ObjectId – Return specific user based on UPN or ObjectID
- SearchString – Get all users that match the searchString
- All – Retrieve all results
- Top – Retrieve only specified amount
Tip
By default, the Get-AzureADUser cmdlet only returns 100 records. At the -all $true parameter to get all results
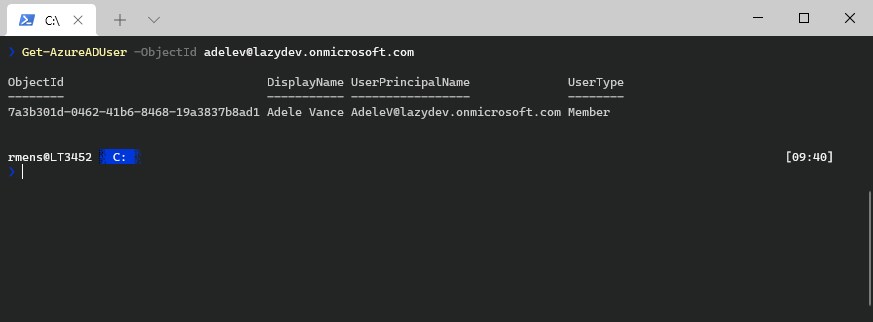
To look up a single user in Azure AD we can simply use the ObjectID, which accepts the UserPrincipalName as a value.
Get-AzureADUser -ObjectId adelev@lazydev.onmicrosoft.com
By default, the Get-AzureADUser cmdlet only returns four fields. If you want to see all properties of the user, then you can simply add select * behind add:
Get-AzureADUser -ObjectId adelev@lazydev.onmicrosoft.com | select *
I will explain more about the properties later in this article.
Using the SearchString in AzureADUser
The searchString parameter is an interesting one. According to the documentation, the searchstring parameter only searches against the first characters in the DisplayName or UserPrincipalName.
But when testing the cmdlet, I noticed that it searches through much more fields:
- UserPrincipalName – First part of the string
- DisplayName – First part of the string
- Job Title – Exact match
- Department – Exact match
- City – Exact match
- State – Exact match
- Country – Exact match
So the searchString parameter can be used to search on the user’s full name or the first part of the name. For the other fields, you will need to search for the exact value.
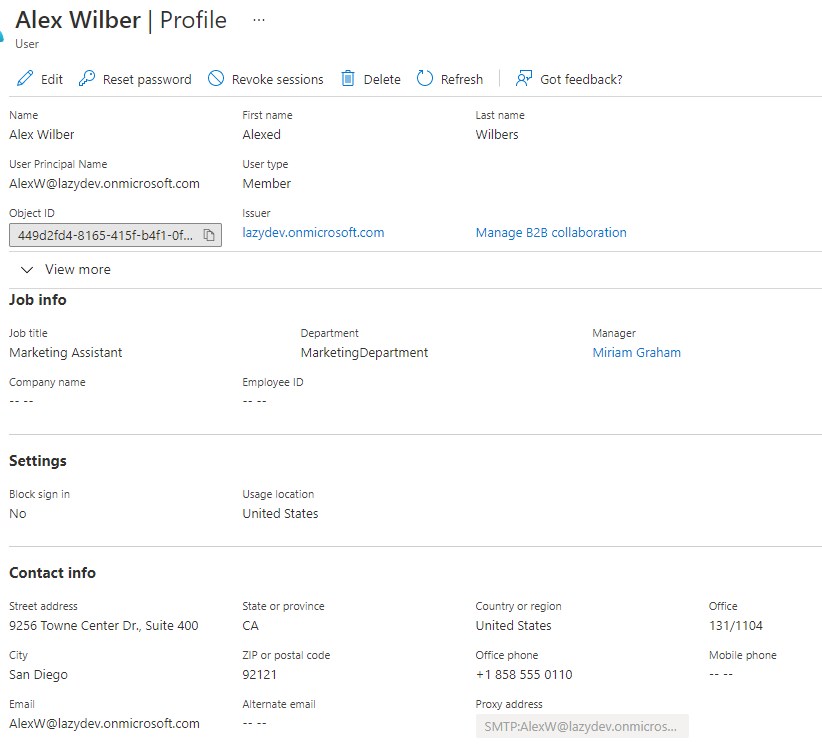
Below you see a screenshot of one of my users in my development tenant. I have renamed the first and last name fields of the user. Also, note the department name that I made unique.
Now we are going to find the user Alex Wilber in all possible ways with the Get-AzureADUsers searchString cmdlet.
First, we search on the first part of the display name:
Get-AzureADUser -SearchString "Alex"

ObjectId                       DisplayName UserPrincipalName             UserType
--------                       ----------- -----                         --------
449d2fd4-8165-415f-b4f1-       Alex Wilber AlexW@lazydev.onmicrosoft.com Member
If we would try to search on the first name “Alexed” or last name “Wilbers” then the search string won’t work:
# Search on Firstname
Get-AzureADUser -SearchString "Alexed"

---
# No results

# Search on Lastname
Get-AzureADUser -SearchString "Wilber"

---
# No results
Using searchString on other fields
All the other fields need to be an exact match. The job title of Alex is Marketing Assistant. If we would only search on the first part of the job title “marketing” then we won’t get the expected result:
Get-AzureADUser -SearchString "Marketing" | Select DisplayName,UserPrincipalName,jobtitle,department

DisplayName UserPrincipalName              JobTitle  Department
----------- -----------------              --------  ----------
Megan Bowen MeganB@lazydev.onmicrosoft.com recruiter Marketing
It returns Megan Bowen because she works in the department “Marketing”. When searching the on the whole job title of Alex, we get the expected result:
Get-AzureADUser -SearchString "Marketing Assistant" | Select DisplayName,UserPrincipalName,jobtitle,department

DisplayName UserPrincipalName             JobTitle            Department
----------- -----------------             --------            ----------
Alex Wilber AlexW@lazydev.onmicrosoft.com Marketing Assistant MarketingDepartment
We can use the same principle for the other fields, City, State, and Country.
Get AzureADUser Filter
So the searchString parameter is great to quickly find an Azure AD user on the first name, but for other data, it’s not really accurate. A more reliable way to find AzureAD users is to use the -filter parameter.
The filter query is based on the oDate v3 filter statement, which can be a bit challenging to get right when you are not used to it. Personally, I find the PowerShell Expression Language, that the Get-ADUser cmdlet uses, easier to work with.
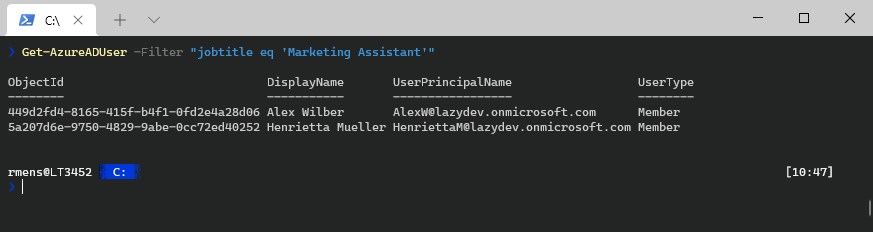
The tricky thing about the Data v3 query is that not all operators are supported on all fields. For example, we can search for all users with the job title “Marketing Assistant”
Get-AzureADUser -Filter "jobtitle eq 'Marketing Assistant'"
This will get all users where the jobtitle equals “Marketing Assistant”. But what I would expect is that we also could use ne (not equal), to get all users that are not Marketing Assisant.
Get-AzureADUser -Filter "jobtitle ne 'Marketing Assistant'"
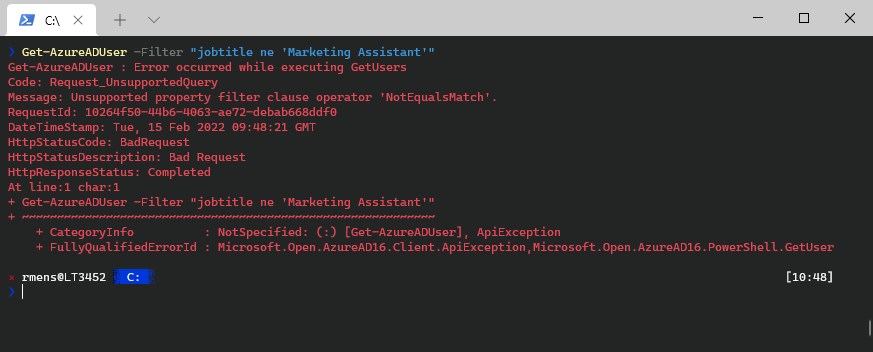
But that operator is not supported. So at the moment, only the following operators are supported by the Get AzureADUser filter parameter:
| Operator | Description | Example |
|---|---|---|
| eq | Equals to | jobtitle eq ‘Marketing Assistant’ |
| and | And | jobtitle eq ‘Recruiter’ and jobtitle eq ‘hr’ |
| or | Or | jobtitle eq ‘Recruiter’ or jobtitle eq ‘hr’ |
| startswith | String starts with | startswith(jobtitle,’recr’) |
Get-AzureADUser Filter Examples
So let’s take a look at a couple of examples when it comes to using the filter parameter on the Get-AzureADUser cmdlet:
Filter on full name
Get-AzureADUser -Filter "DisplayName eq 'Adele Vance'"
Filter on last name
Get-AzureADUser -Filter "Surname eq 'Vance'"
Search on the first part of the name
Get-AzureADUser -Filter "startswith(DisplayName,'Ade')"
Filter on UserType
Note that I added the -all parameter here because we expect more than 100 results
# Find all users
Get-AzureADUser -Filter "UserType eq 'Member'" -All $true

# Find all guests
Get-AzureADUser -Filter "UserType eq 'Guest'" -All $true
Get Disabled Azure AD accounts
Note that I added the -all parameter here because we expect more than 100 results
Get-AzureADUser -Filter "accountEnabled eq false" -All $true
Using multiple conditions
Get-AzureADUser -Filter "department eq 'Marketing' and jobtitle eq 'Manager'"
Finding Azure AD users based on other fields
When using the -filter or -searchstring parameter searching is done on the server, which only returns the filtered results. Another option is to first request all users from Azure AD and then do the filtering locally in PowerShell.
For example, when we want to search on part of the username we could do the following:
Get-AzureADUser -All $true | Where-Object {$_.DisplayName -like "*vanc*"}
You can use this on all data that is returned by the Get-AzureADUser cmdlet and this also allows us to use the not equal operators:
Get-AzureADUser -All $true | Where-Object {$_.jobtitle -ne "Marketing Assistant"} | ft
Get AzureADUser based on OU
We can use this principle also to get only the users from a specific organization unit. The distinguishedName of the OU is stored in the extension property onPremisesDistinguishedName of the Get-AzureADUser result.
To filter the users on OU we first get all the users, and then select only the users where the distinguishedname matches a like expression:
# Get all users from the OU Test-Users:
Get-AzureADUser -All $true | Where-Object {$_.ExtensionProperty.onPremisesDistinguishedName -like "*OU=Test-Users*"}
Get AzureADUser Properties
By default, the AzureAD User cmdlet only shows four fields of the user, which doesn’t give us a lot of information. But there is a lot more information about the user actually returned. If you select a single user and use the format list output, you will see all the data of the user.
Get-AzureADUser -ObjectId alexw@lazydev.onmicrosoft.com | fl
You can simply select the fields that you need by piping the select cmdlet behind it:
Get-AzureADUser -ObjectId alexw@lazydev.onmicrosoft.com | Select DisplayName, Jobtitle, Mail, Department
Export Azure AD Users to CSV
I have created a complete script that will export all Azure AD Users with the most important properties to a CSV file. The script also collects the user’s manager and you can choose to collect enabled and/or the disabled users’ accounts.
You can find the complete script here on my Github or copy-paste it from below.
param(
  [Parameter(
    Mandatory = $false,
    HelpMessage = "Get the users manager"
  )]
  [switch]$getManager = $true,

  [Parameter(
    Mandatory = $false,
    HelpMessage = "Get accounts that are enabled, disabled or both"
  )]
    [ValidateSet("true", "false", "both")]
  [string]$enabled = "true",

  [Parameter(
    Mandatory = $false,
    HelpMessage = "Enter path to save the CSV file"
  )]
  [string]$path = ".\ADUsers-$((Get-Date -format "MMM-dd-yyyy").ToString()).csv"
)

$ErrorActionPreference = "Stop"

Function Get-Users {
    <#
    .SYNOPSIS
      Get users from the requested DN
    #>
    process{
      # Set the properties to retrieve
      $properties = @(
        'ObjectId',
        'DisplayName',
        'userprincipalname',
        'mail',
        'jobtitle',
        'department',
        'telephoneNumber',
        'PhysicalDeliveryOfficeName',
        'mobile',
        'streetAddress',
        'city',
        'postalcode',
        'state',
        'country',
        'AccountEnabled'
      )

      # Get enabled, disabled or both users
      switch ($enabled)
      {
        "true" {$filter = "AccountEnabled eq true"}
        "false" {$filter = "AccountEnabled eq false"}
        "both" {$filter = ""}
      }

      # Get the users
      Get-AzureADUser -Filter $filter | select $properties
    }
}


Function Get-AllAzureADUsers {
  <#
    .SYNOPSIS
      Get all AD users
  #>
  process {
    Write-Host "Collecting users" -ForegroundColor Cyan
    $users = @()

    # Collect users
    $users += Get-Users

    # Loop through all users
    $users | ForEach {

      $manager = ""

      If (($getManager.IsPresent)) {
        # Get the users' manager
        $manager = Get-AzureADUserManager -ObjectId $_.ObjectId | Select -ExpandProperty DisplayName
      }

      [pscustomobject]@{
        "Name" = $_.DisplayName
        "UserPrincipalName" = $_.UserPrincipalName
        "Emailaddress" = $_.mail
        "Job title" = $_.JobTitle
        "Manager" = $manager
        "Department" = $_.Department
        "Office" = $_.PhysicalDeliveryOfficeName
        "Phone" = $_.telephoneNumber
        "Mobile" = $_.mobile
        "Enabled" = if ($_.AccountEnabled) {"enabled"} else {"disabled"}
        "Street" = $_.StreetAddress
        "City" = $_.City
        "Postal code" = $_.PostalCode
        "State" = $_.State
        "Country" = $_.Country
      }
    }
  }
}

Get-AllAzureADUsers | Sort-Object Name | Export-CSV -Path $path -NoTypeInformation

if ((Get-Item $path).Length -gt 0) {
  Write-Host "Report finished and saved in $path" -ForegroundColor Green

  # Open the CSV file
  Invoke-Item $path

}else{
  Write-Host "Failed to create report" -ForegroundColor Red
}
Wrapping Up
The Get AzureADUser cmdlet is quite different than the Get-ADUser cmdlet. Filtering users is a bit of a challenge, but you can always retrieve all the user accounts and do the filtering in PowerShell.
Keep in mind that the Get-AzureADUser cmdlet only returns 100 records by default. So add the -all parameter when you expect more results.
I hope you found this article useful, if you have any questions, then just drop a comment below.


HOW TO REMEVE ALL USER TYPE GUEST PLEASE
is it possible to get using Graph? get-mguser? This is wonderful and step by step and making a school boy understand these concepts. Thanks for putting this together.
Check out the following article Get-MgUser: How to Get and Export Azure AD users with PowerShell
Hi mate,
I need help retrieving Azure AD users with an empty/null company attribute using PowerShell? Could you please assist?
Thank you
This should work:
Get-AzureADUser -All $true | Where-Object {$_.company -eq $null}Hi,
Please could you give me some help.
I need to find out which Azure AD accounts are setup and tied to a particular on prem domain and also what mailbox type they have, along with their on premise attributes. Please could you help with this?
That is not something I can solve with a few lines in the comments. Contact me directly through email.
Do you have a suggestion to use instead. Coming across a few things that just don’t work the same with the on prem way and Azure AD.
I am coming from on prem AD to Azure AD and this is perfect for an import into another system I would like to do.
What I am not sure about is how you connect to an instance of Azure AD. Do you have an example of what is needed within the Powershell script to connect to an Azure AD cloud instance.
Sorry if that is vague or uninformed, in the deep end trying to figure out how to do this with a whole new view of AD
What do you mean with an instance of Azure AD? Normally you connect to Azure AD with Connect-AzureAD
yeh sorry I mucked up the powershell and it connects fine now and I am pulling in the info I need.
One other question. Is there a way to filter users whose records have only been modified in the last ## number of days.. where ## is controlled by a variable?
I tried adding this filter but it fails (days is the number I pass it);
if ($days) {
$date = (Get-Date).AddDays(-$days)
$filter = {whenChanged -gt $date}
} else {
$filter = “*”
}
I used this as the get but it fails
Get-MgUser -Filter $filter -Property $properties -ExpandProperty Manager | select $select
MgUser doesn’t return whenChanged date
Thanks, is it possible to get all the users and groups (Role Assignments) for an Azure Subscription, including their creation date?
Hi good article and didn’t know there so many ways find users with Get-AzureAD user. I guess we should all start refactforing our scripts to use MSGraph SDK for PowerShell at the vary least as this can run on PS v6.0+ whereas AzureAD modules only run on PS v5 or ealier. Finally , I think you are missing the url in this text: “Read this article to get and export your Azure AD user with the Get-MgUser cmdlet”.
Do I understand correct that get-azureaduser and get-msoluser is using the AzureAD API that MS will stop this year?
https://azure.microsoft.com/en-us/updates/update-your-apps-to-use-microsoft-graph-before-30-june-2022/
It’s delayed, they will announce a new date before 31 Dec this year.
Hi Ruud,
Isn’t it better to use ‘Get-AzureADUser -All $true -Filter $filter’
instead of ‘Get-AzureADUser -Filter $filter’
otherwise only 100 lines are shown/exported?
Is there a way to remove the first line in the exported CSV?
Yes, you are totally right. Forgot to mention it because I am using a development tenant with only 25 users.
About the Export-CSV, add -NoTypeInformation behind it