The PowerShell Get ChildItem cmdlet retrieves the child items from the specified location(s). The cmdlet is mainly used to retrieve files and folders, but it can also be used to get registry items and certificates.
The true strength of the cmdlet is in the filter options that we have. We can use different filters to only select specific child items and determine how many nested levels we want to retrieve or not.
In this article
In this article, we are going to take a look at how to use the Get ChildItem cmdlet in PowerShell and how to use the different filtering options.
PowerShell Get ChildItem
If your run the Get-ChildItem cmdlet without any parameter, then it will get all items from the current working directory. It won’t get the nested items, hidden files, or system files. Only the files and folders from the first level. So using the correct parameters is really important when using the cmdlet.
With the Get-ChildItem cmdlet (or its shorthand gci) we can use the following parameters:
| Parameter | Description |
|---|---|
| -Path | Specifies the path to get the child items from |
| -Filter | Most efficient way to filter items |
| -Include | Get’s only specified items from the path. Can be used with wildcards |
| -Exclude | Excludes specified items from the path. Can be used with wildcards |
| -Recurse | Searches also through the subdirectories |
| -Depth | Determines the number of subdirectory levels to include |
| -Force | Also returns hidden and system files |
| -Name | Returns only the names of the items |
| -Directory | Returns only directories |
| -File | Returns only files |
| -Hidden | Get only hidden items |
| -Readonly | Get only read-only items |
To simply get the files from a specified location you can use the -path parameter:
Get-ChildItem -Path C:\Temp
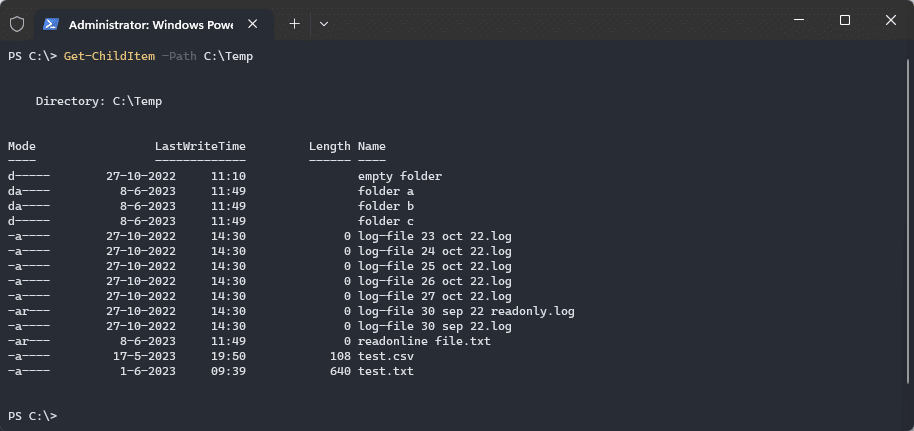
This will return only the items from the selected directory and not from the subfolder.
Including Subdirectories with Recurse and Depth
So the first parameters we are going to take a look at are the -Recurse and -Depth parameters. These parameters allow us to include items from subfolders as well. By default the -Recurse parameter will go through all nested folders:
Get-ChildItem -Path C:\Temp -Recurse
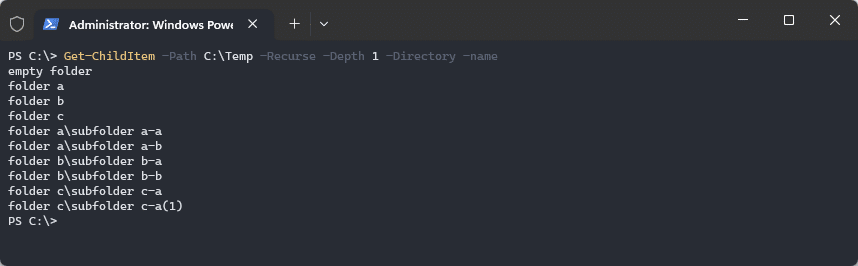
To limit this we can include the parameter -depth. This will take a number specifying how many levels deep it should go through the subfolders. In the screenshot below I also included the -Directory parameter and -Name parameter. The first gets only the directories and the latter returns only the folder names, instead of the complete object:
Get-ChildItem -Path C:\Temp -Recurse -Depth 1 -Directory -name
Using the Filter
Filters are more efficient than the other parameters for this cmdlet. When you use -Include for example, then the filter is done after PowerShell has retrieved all the objects. The filter, however, is passed to the .NET API to filter out objects, making it a lot faster.
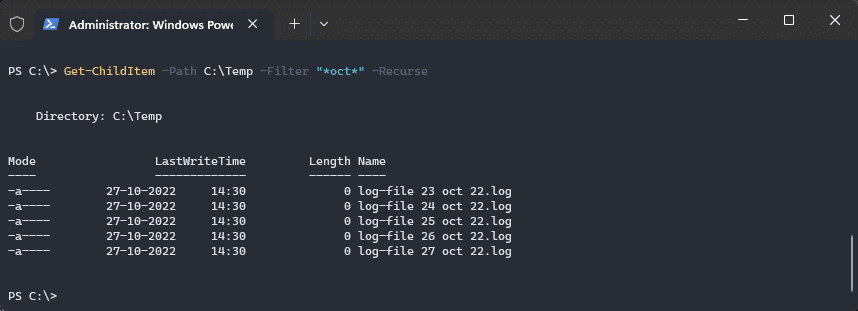
So the filter can be used to get only specific file types or folders. The filter isn’t really advanced, we can only use the * and ? wildcards in the string. For example, to get all files that have the word oct in it, we can do:
Get-ChildItem -Path C:\Temp -Filter "*oct*" -Recurse
We can also apply the filter to the file types, for example, to get all .log files, we can simply filter the filename on *.log:
Get-ChildItem -Path C:\Temp -Filter "*.log" -Recurse -Name

# Result
log-file 23 oct 22.log
log-file 24 oct 22.log
log-file 25 oct 22.log
log-file 26 oct 22.log
log-file 27 oct 22.log
log-file 30 sep 22 readonly.log
log-file 30 sep 22.log
folder b\subfolder log-file.log
The filter can also be used against directories, simply specify a part of the folder name that you want to include in the filter:
Get-ChildItem -Path C:\Temp -Filter "folder *" -Recurse -Name

# Result
folder a
folder b
folder c
Include and Exlude items
Even though the filter parameter is the most efficient way to filter items, it those have its limitations. The filter in Get-ChildItem only accepts a single string. You can’t get all .txt and .log files for example. This is where the -Include and -Exclude parameters come in. They accept an array of one or more strings to include or exclude.
For example, to get all log and txt files we can do:
Get-ChildItem -Path C:\Temp\* -Include ("*.log","*.txt") -Name
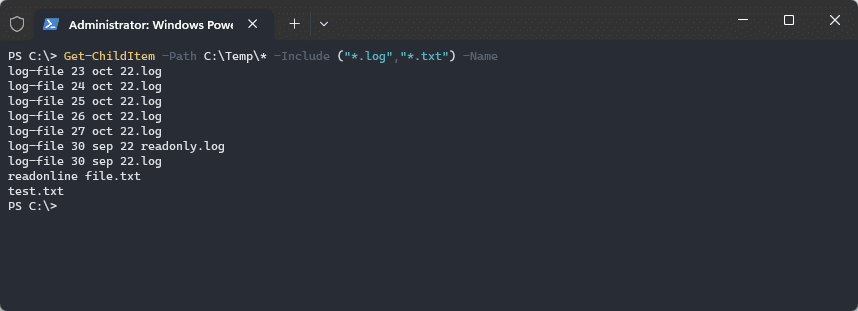
Note that we need to add an * to the path to include all items. Also, the parentheses are not necessary, but personally prefer it because it makes it easier to read the code.
The exclude parameter returns all results, except files matching the patterns specified. So if we would change the include parameter of exclude in the previous example, then the result would be:
Get-ChildItem -Path C:\Temp\* -exclude ("*.log","*.txt") -Name

# Results
empty folder
folder a
folder b
folder c
test.csv
Return only Files or Directories
Another use parameters that we can use are the -File and -Directory parameters. These parameters make sure that only files or directories are returned in the results. For example, if you want to get the complete folder structure of a folder, then can simply use the command below:
Get-ChildItem -Path C:\Temp\ -Recurse -Directory -Name

# Result
empty folder
folder a
folder b
folder c
folder a\subfolder a-a
folder a\subfolder a-b
folder b\subfolder b-a
folder b\subfolder b-b
folder c\subfolder c-a
folder c\subfolder c-a(1)
You can also combine these parameters with other parameters, like -include or -filter.
Get Readonly, System, and Hidden Files
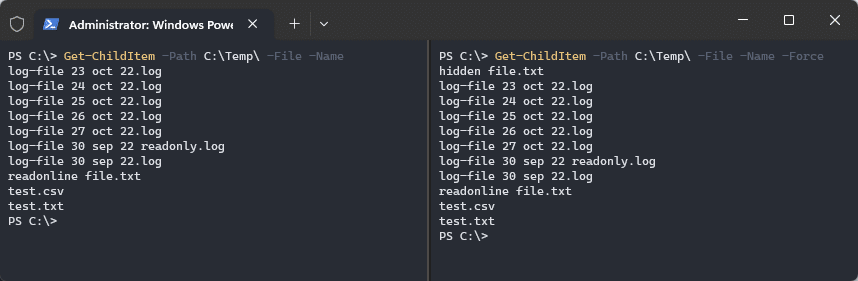
Hidden files are excluded from the results. If you want to include these files in your results as well then you can use the -Force parameter. This will return all the files from the given directory.
If you look at the screenshot below, you can see on the left side that hidden file.txt isn’t included. But if we add the -Force parameter, then the hidden file (or directory) is included as well:
We can also select only the hidden, read-only, or system files. For this, we can use their respective parameter. Note that you can’t combine these:
# Return all hidden files
Get-ChildItem -Path C:\Temp\* -Hidden

# Return all readonly files
Get-ChildItem -Path C:\Temp\* -Readonly

# Return all system files
Get-ChildItem -Path C:\Temp\* -System
Advanced Filtering with Get ChildItem
We have discussed the parameters that you can use with the PowerShell cmdlet Get-ChildItem. These parameters allow you to filter the results mainly on a part of the name, extension, or file attribute. But what if you need more? For example, get all the files older than x days. Or all files that are larger than 1 MB?
In these cases, we can use the normal PowerShell where-object cmdlet to filter the results that we got from the Get ChildItem cmdlet.
Find Large Files
To return all files that are larger than 1MB we can use the following command:
Get-ChildItem -Path C:\Temp -Recurse | Where-Object { $_.Length -gt 1MB } | Select-Object Name, Directory, Length

# Result
Name                Directory          Length
----                ---------          ------
10mb - Copy (2).bin C:\Temp          10485760
10mb - Copy (3).bin C:\Temp          10485760
10mb - Copy (4).bin C:\Temp          10485760
10mb - Copy (8).bin C:\Temp          10485760
10mb - Copy (9).bin C:\Temp          10485760
bin file.bin        C:\Temp\folder b 10485760
dummy file.bin      C:\Temp\folder b 10485760
Files older than
Another common option is to get all files that are older than x days or hours. For this, we can use the same principle as with finding large files. We are first going to get all files from the giving directory with the Get ChildItem cmdlet, and then select the results that we need.
For example, to get all the files that are created in the last 12 hours, we can compare the file LastWriteTime attribute against the current DateTime minus 12 hours.
Get-ChildItem -Path C:\temp | Where-Object { $_.LastWriteTime -gt (Get-Date).AddHours(-12) }

# Result
Name                Directory LastWriteTime
----                --------- -------------
folder a                      8-6-2023 11:49:21
folder b                      8-6-2023 14:08:31
folder c                      8-6-2023 11:49:21
readonline file.txt C:\temp   8-6-2023 11:49:49
Get Registry Items with PowerShell
Until now we have only looked at retrieving files and folders with the Get ChildItem cmdlet in PowerShell. But we can also find and retrieve registry items with the cmdlet. For example, to simply get all registry keys from a given path, we just use the -path parameter and specify the registry path:
Get-ChildItem -Path "HKLM:\Software"

Just like with files and folders, we can also get all the registry keys (subkeys) of the specified path. For this, we can use the -Recurse parameter and optionally combine it with -Depth:
Get-ChildItem -Path "HKLM:\Software" -Recurse -Depth 1
To get the value of the registry key you will need to use the cmdlet Get-ItemProperty and specify the path of the item that you want to view:
Get-ItemProperty -path "HKLM:\Software\Adobe\Photoshop\140.0"
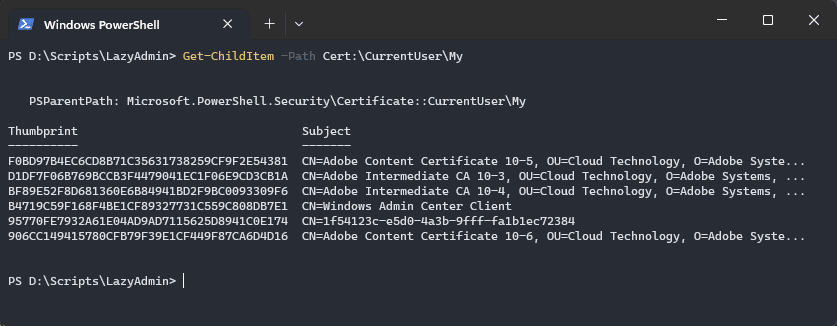
Get Certificates with Get-ChildItem
The last option that I want to show is the ability to get Certificates with the PowerShell Get-ChildItem cmdlet. For example, to view all certificates that are currently stored in the CurrentUser\My certificate store, we can simply specify the path, starting with cert:
Get-ChildItem -Path Cert:\CurrentUser\My
To filter or search through the certificate store we won’t be using the -filter or -include parameter, instead we can use the -DNSName parameter for this. For example, to retrieve the Windows Admin Center certificate we can do:
Get-ChildItem -Path Cert:\CurrentUser\My -DNSName "*Windows*"

# Result
Thumbprint                                Subject
----------                                -------
B4719C59F168F4BE1CF89327731C559C808DB7E1  CN=Windows Admin Center Client
Wrapping Up
The Get-ChildItem cmdlet allows you to easily select the items that you need from a given directory or registry path. Keep in mind that the -filter parameter is the most efficient one to use in the case of files and folders.
I hope you found this article helpful, if you have any questions, just drop a comment below.


Using Get-ChildItem, how to force the date/time to a specific format instead of the default US format? Eg, with the command:
Get-ChildItem $directory |
Sort-Object Extension |
Format-table -AutoSize -GroupBy Extension -Property LastWriteTime, Length, Name
You will need to crap the date and format it using a DateTime method