I have written before about how to install a printer and printerport from the command line. Great for batch scripts, but these days we use PowerShell for this of course.
Installing and managing printers is best done using print management on a server combined with a GPO for the deployment. But for local installation or remote sites that don’t have a print server, is PowerShell a great option to easily install the printers.
In this article
In this article, I will explain how to install the printer driver, create the printer port and finally add the printer with PowerShell.
Step 1 – Add the driver to Windows
Before we can install the printer driver, we first need to add the driver to the Windows Driver Store on the computer. The PowerShell cmdlet Add-WindowsDriver can only be used for offline Windows Images, so we are going to use PnPutil, which is installed on all Windows computers.
To add the printer driver we will need to use the .inf file of the driver. If you have downloaded the driver, then you will find the .inf file often in the main folder of the driver. For example, for the brother above it’s brimi16a.inf
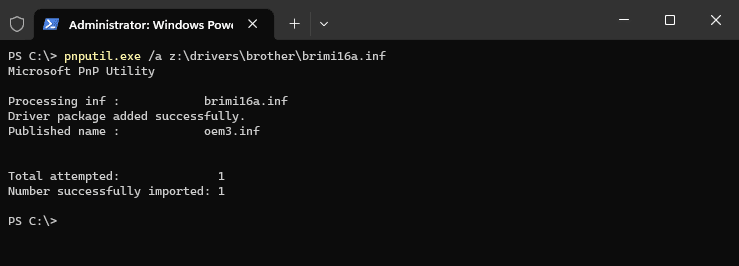
Make sure that you have opened PowerShell in an elevated mode (start PowerShell as Admin) and run the following command to ad the driver to the Windows Driver store
pnputil.exe /a z:\drivers\brother\brimi16a.inf
Step 2 – Install Printer Driver with PowerShell
With the driver loaded in the Windows Driver Store, we can now install the printer driver. To install the driver we will need to use the exact driver name for our printer.
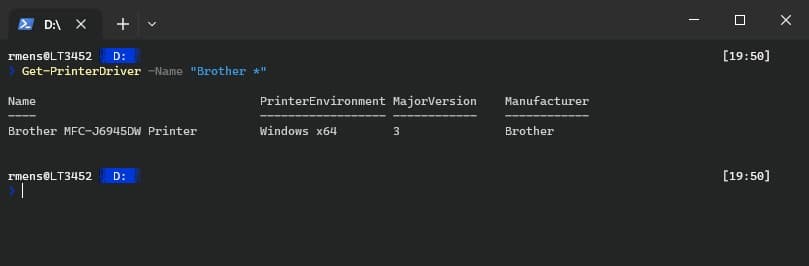
A good method to find the correct name is to install the printer first in a normal way on your own computer and then use PowerShell to look up the name of the driver with the Get-PrinterDriver cmdlet. You can use wildcards * in the name to search for it:
Get-PrinterDriver -name "Brother *"
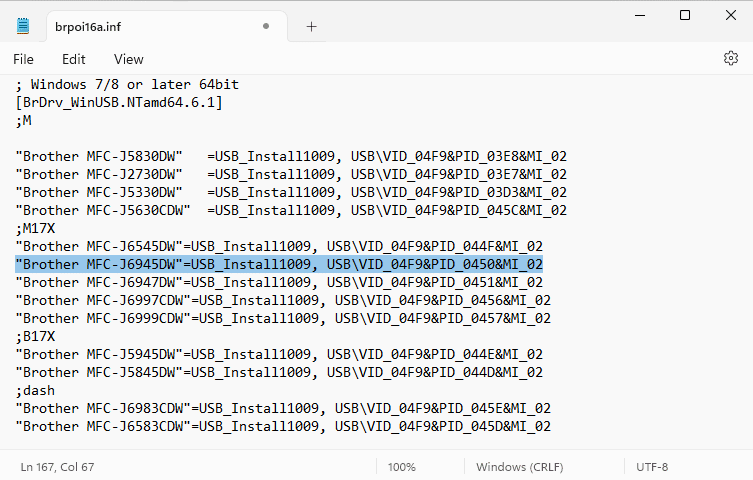
Another option is to open the .inf file that we used to add the driver to the printer store and look for the correct driver name for your printer model:
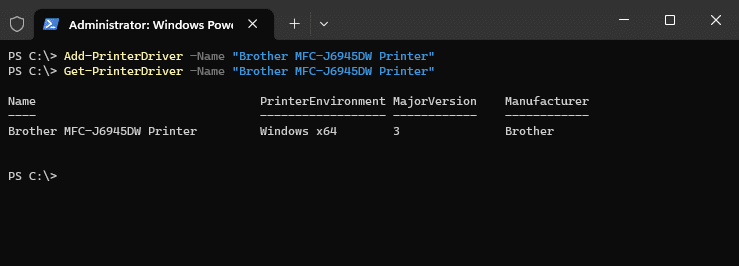
To install the printer we only need to use the printer name, that we just looked up. You don’t need to specify the .inf file, because Windows will find the correct one in the driver store:
Add-PrinterDriver -Name "Brother MFC-J6945DW Printer"

# Verify the installtion with
Add-PrinterDriver -Name "Brother*"
Step 3 – Add PrinterPort with PowerShell
When you are installing a printer that is locally connected, or with local TCP port connection, then you will need to add the printerport as well with PowerShell. For this we are going to use the Add-PrinterPort cmdlet.
The printerport always has a name. It doesn’t really matter how you name it, but best practice is that you start it with either LocalPort: or TCPPort:. When connecting to a network printer, you will also need to specify the IP Address of the printer, which we do with the PrinterHostAddress parameter:
Add-PrinterPort -Name "TCPPort:10.0.2.200" -PrinterHostAddress "10.0.2.200"

# Verify with
Get-PrinterPort
In the example above, we started the name with TCPPort: followed by the IP Address. This isn’t necesssary, you can name the port anything you want. The parameter PrinterHostAddress tells the cmdlet that we want to use the TCP port. This will also work for example:
Add-printerport -Name "LazyPrintPort" -PrinterHostAddress "10.0.2.200"
Step 4 – Add Printer with PowerShell
With the driver installed and the port created we can now add the printer with PowerShell. To add the printer, we need to use the exact driver name and the port name, as we created earlier:
Add-Printer -Name "Lazy Printer" -DriverName "Brother MFC-J6945DW Printer" -PortName "TCPPort:10.0.2.200"
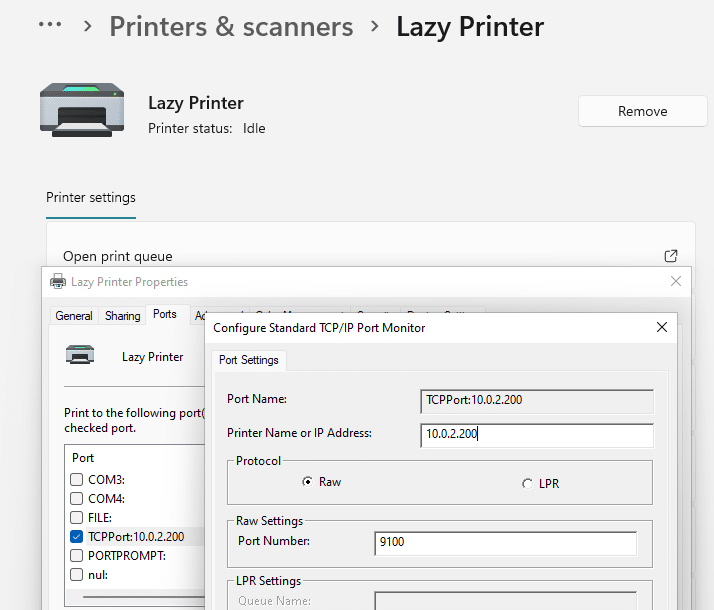
If you know open the printer setting on the computer, you will see that the printer is installed, and connected using the IP Address that we specified in the TCP Port.
Install a Network Printer with PowerShell
We can also use the Add-Printer cmdlet to install a network printer on the computer. Network printers are printers that are shared by another computer or server. To install a network printer you don’t need to install the driver first or create the port. We can simply use the Add-Printer cmdlet and specify the FQDN (Fully Qualified Domain Name) of the printer:
Add-Printer -ConnectionName \\lazysrv\lazyOfficePrinter
Complete Script
Below you will find the complete script for adding a printer with PowerShell. The script will install the printer driver, create the printer port and add the printer. The scripts also checks if the printer, driver and printerport isn’t already installed:
$driverPath = "z:\drivers\brother\brimi16a.inf"
$driverName = "Brother MFC-J6945DW Printer 2"
$printerName = "Lazy Printer"
$printerPort = "10.0.2.200"
$printerPortName = "TCPPort:10.0.2.200"

if ($null -eq (Get-Printer -name $printerName)) {
    # Check if driver is not already installed
    if ($null -eq (Get-PrinterDriver -name $driverName -ErrorAction SilentlyContinue)) {
      # Add the driver to the Windows Driver Store
      pnputil.exe /a $driverPath

      # Install the driver
      Add-PrinterDriver -Name $driverName
    } else {
      Write-Warning "Printer driver already installed"
    }

    # Check if printerport doesn't exist
    if ($null -eq (Get-PrinterPort -name $printerPortName)) {
      # Add printerPort
      Add-PrinterPort -Name $printerPortName -PrinterHostAddress $printerPort
    } else {
      Write-Warning "Printer port with name $($printerPortName) already exists"
    }

    try {
      # Add the printer
      Add-Printer -Name $printerName -DriverName $driverName -PortName $printerPortName -ErrorAction stop
    } catch {
      Write-Host $_.Exception.Message -ForegroundColor Red
      break
    }

    Write-Host "Printer successfully installed" -ForegroundColor Green
} else {
 Write-Warning "Printer already installed"
}
Wrapping Up
Adding a printer with PowerShell is a great way to automatically install printers on client devices. Make sure that you pay attention to the print driver name. This needs to be the exact name from the inf file, otherwise you won’t be able to install the printer.
You can not only run the complete script locally on a computer, but also use it in a deployment tool like PDQ Deploy or Action1 RMM.
I hope you found this article useful, if you have any questions, just drop a comment below.


Trying to install a printer from a Print Server. It installed the printer, but not the printer port. Following the \\Server\Sharename$ format but the printerport remains blank.
$printerPort = “LocalPort:\\10.1.1.61\ORES_314b”
$printerHostAddress = “LocalPort:\\10.1.1.61\Ores_314b”
Add-PrinterPort -Name $printerPort -PrinterHostAddress $printerPort
You code works fine here, maybe an permission issue?
Hi Rudy,
Any idea how I get it working this working from Intune ?
Script i can add, but how would i go ahead for printer driver installation ?
I don’t have experience with Intune. Something I will add on my list to get familiar with 😉
Missing $Dollarsign on CompleteScript line 29 printername.
Very helpful thx.
Thanks, fixed
Awesome. Thank you so much. Cheers.
Do you need an “else” statement if you also wish to remove old printers and also add new printers?
No. You can use an if statement to check if the printer is installed before removing it. If you want to learn more about PowerShell scripting, then this article might help you to get started.
Hello,
How do I install on multiple computers from a CSV or TXT list?
Use the Import-CSV cmdlet and loop through the records.
Doesn’t the driver need files ? how do I provide that?
Rudy,
thanks for providing the script. For me it was a good start-point to bulk-add 50 printers on a WS2016 Server. I wrapped your code in a foreach loop, imported necessary variables from a csv and added one line of code to do a DHCP reservation, too.
Now the bulk creation took maybe 5 minutes with all comments filled from the CSV and kept me away from the “pesky” Job – as Sainath said 🙂
This is great. But, especially with the Canon MFPs, you’re only half done.
Now you need to set default preferences like print or store and which mailbox to store in, Color or Black and White…
How do you go about setting any of these driver configuration parameters remotely? Having to log onto the console of each and every workstation seems ridiculous, but I’ve not found any other way in years of searching.
Beautiful article Ruud!
Worked like a charm on Windows 2016 Server(s).
Saved me time, to automate other ‘pesky’ things 😉
Thank you.
Cheers!
This is great but what about if you need to install an Internet Port (IPP)?
Can’t seem to find any clear reference to this anywhere….
Maybe just add : to the end of the IP? Can you give an example of what you are trying to add?
Should be colon then the portname. Such as :80 .Website took out part of the comment.
Thanks, this was Very Helpful.
I changed it slightly to make Printer Name a Variable as well.
Then appended the below linked Script to Set the paper size right after creation..
https://gallery.technet.microsoft.com/scriptcenter/Set-the-Printers-Default-1b0563c8
Script is not work for Windows 7
Thanks for this, helped me finishing my script!
How would one write a script to add a redirected port?
For in a remote desktop session?
So what if I want to run this on different network locations? It works if the driver has been installed on the computer before, but I want it to work on any computer it is run on.
Then you will have to copy and install the printer driver as well in the same script. I used pnputil for this:
pnputil.exe -a "\\domain.local\Contoso\PrinterDrivers\Canon21-75ps\CNS30HA64.INF"