PowerShell is really powerful and can make your daily work a lot easier.
With all the modules that you can load, there are a lot of PowerShell commands. But what are the PowerShell commands that you must know?
Some of the commands you might already know, but did you know you can get a full autocomplete of all possible parameters with a key combination? Or search through the commands that you entered earlier?
In this article, I have collected the top 10 basic PowerShell commands and 25 useful commands that will really help you in your daily work. If have you any other recommendations please add them in the comments below!
What are PowerShell Commands?
PowerShell commands, better known as cmdlets, are the building blocks of PowerShell scripts and modules. Cmdlets are designed to perform specific tasks, such as retrieving information, modifying settings, or creating new instances.
PowerShell cmdlets are designed to be easy to use and follow a consistent naming convention. Cmdlet names are made up of a verb and a noun, separated by a hyphen. For example, the Get-Process cmdlet is used to retrieve information about running processes, while the Set-ExecutionPolicy cmdlet is used to modify the PowerShell execution policy.
PowerShell also supports running traditional command-line tools and scripts. This allows users to leverage existing tools and scripts within PowerShell scripts and modules.
10 Basic PowerShell Commands
We are going to start with the 10 basic PowerShell commands that are most useful during your daily work. Knowing these command allow you to get more out of PowerShell and make your work a lot easier.
- Get-Help – Displays help information about PowerShell cmdlets and concepts.
- Get-Command – Lists all of the available cmdlets in PowerShell.
- Write-Host – Writes output directly to the console or other host.
- Get-History – Displays a list of previously executed commands.
- Get-Content – Retrieves the contents of a file or other item.
- Where-Object – Filters input objects based on specified criteria.
- Format-List – Formats output as a list.
- Format-Table – Formats output as a table.
- Get-ChildItem – Lists the items in a specified location.
- Get-Credential – Prompts the user for credentials.
1. Get-Help
The Get-Help cmdlet displays detailed help information about PowerShell commands. It will show the syntax of the cmdlet and the parameters that you can use. It’s a great way to learn more about new cmdlets.
For example, to display help information about the Get-Credential cmdlet, run the following command:
Get-Help Get-Credential

# Result
NAME
    Get-Credential

SYNTAX
    Get-Credential [-Credential] <pscredential>  [<CommonParameters>]
    Get-Credential [[-UserName] <string>] -Message <string>  [<CommonParameters>]

ALIASES
    None
Most cmdlets also have examples that you can view using the Get-Help command. To view the examples you will need to add the parameter -examples:
Get-Help Connect-ExchangeOnline -Examples

# Result
NAME
    Connect-ExchangeOnline

SYNOPSIS
    This cmdlet is available only in the Exchange Online PowerShell module. For more information, see About the Exchange Online PowerShell module (https://aka.ms/exov3-module).
    -------------------------- Example 1 --------------------------
    Connect-ExchangeOnline -UserPrincipalName chris@contoso.com

    This example connects to Exchange Online PowerShell using modern authentication, with or without multi-factor authentication (MFA). We aren't using the UseRPSSession parameter, so the connection uses REST and doesn't require Basic authentication to be enabled in WinRM on the local computer.
    -------------------------- Example 2 --------------------------
    Connect-ExchangeOnline -UserPrincipalName chris@contoso.com -UseRPSSession
2. Get-Command
The Get-Command cmdlet lists all of the available cmdlets in PowerShell. This command can be used to explore available cmdlets and to learn more about their parameters and usage.
To list all of the available cmdlets that contain the word “process” in their name, run the following command:
Get-Command *process*
3. Write-Host
The Write-Host cmdlet writes output directly to the console. This command can be used to display information to the user or to show information for troubleshooting purposes. Besides Write-Host, you can also use Write-Warning to write a warning message or Write-Error for error messages.
To write the text “Hello, World!” to the console, run the following command:
Write-Host "Hello, World!"
4. Get-History
When working in PowerShell, you probably often use the up arrow key to find that one command that you used earlier. The longer you have been working in your PowerShell session, the more commands you might have to go through.
But did you know that you can use the Get-History cmdlet to view all commands that you have used? PowerShell keeps track of commands that you entered during a session. By default, it will remember the last 4096 entries!
Just type Get-History to view all the last commands that you have used:
Get-History
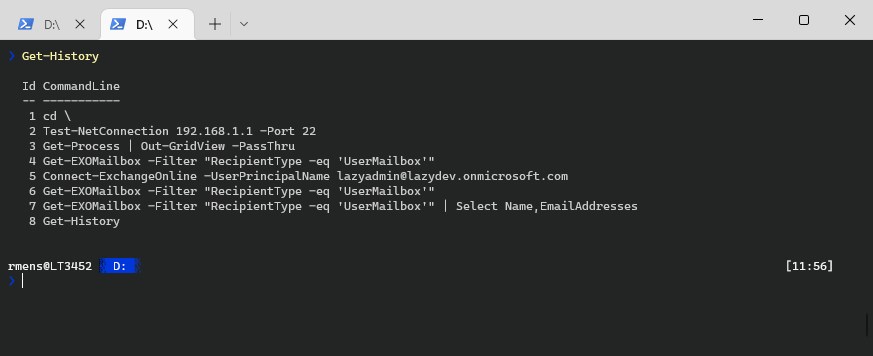
In the example, I only have 8 entries, so it’s easy to find the command you are looking for. But when you have more entries, then it’s good to know that we can also search/filter the Get-History cmdlet, by piping a Where-object to it:
Get-History | Where-Object {$_.Commandline -like "*EXOMailbox*"}

# Result
  Id CommandLine
  -- -----------
   4 Get-EXOMailbox -Filter "RecipientType -eq 'UserMailbox'"
   6 Get-EXOMailbox -Filter "RecipientType -eq 'UserMailbox'"
   7 Get-EXOMailbox -Filter "RecipientType -eq 'UserMailbox'" | Select Name,EmailAddresses
5. Get-Content
The Get-Content cmdlet retrieves the contents of a file or other item. This command can be used to read the contents of a file or to retrieve other types of data.
To retrieve the contents of a file named “example.txt”, run the following command:
Get-Content example.txt
6. Where-Object
The Where-Object cmdlet filters input objects based on specified criteria. This command can be used to select specific items from a larger set of data. Often when you retrieve information from a system or resource, more than one record is returned. By piping the Where-Object cmdlet behind it we can filter the results.
For example, to get all files that are larger than 10 MB from the given directory, we can run the command below. The Get-ChildItem will get all the files, whereas the Where-Object cmdlet selects only the files that are greater than -gt the given size.
$path = "C:\temp\files\"

# Set file size
$sizeInMb = 10

# Calculate actual file size
$size = $sizeInMb*1024*1024

# Delete all files that are larger then given size
Get-ChildItem -Path $Path -Recurse -File | Where-Object { $_.length -gt $size }
7. Format-List / Format-Table
The Format-List and Format-Table cmdlets format the output of a command as either a list or table. Formatting the output makes the results easier to read.
Format-List, in short fl, is often used when you want to see all the results of a cmdlet. Cmdlets in PowerShell often only return a selection of the data. By piping the Format-List cmdlet behind it, you can see all the data. For example, the cmdlet Get-LocalUser returns only the basic information of the user account:
Get-LocalUser Admin

# Result
Name  Enabled Description
----  ------- -----------
admin False
But when we add Format-List behind it, we can see all the information of the user account:
Get-LocalUser Admin | fl

# Result
AccountExpires         :
Description            :
Enabled                : False
FullName               :
PasswordChangeableDate : 27-6-2019 12:20:44
PasswordExpires        :
UserMayChangePassword  : True
PasswordRequired       : False
PasswordLastSet        : 27-6-2019 12:20:44
LastLogon              : 27-9-2022 13:43:46
Name                   : admin
SID                    : S-1-5-21-3190960386-960769250-3760335402-1001
PrincipalSource        : Local
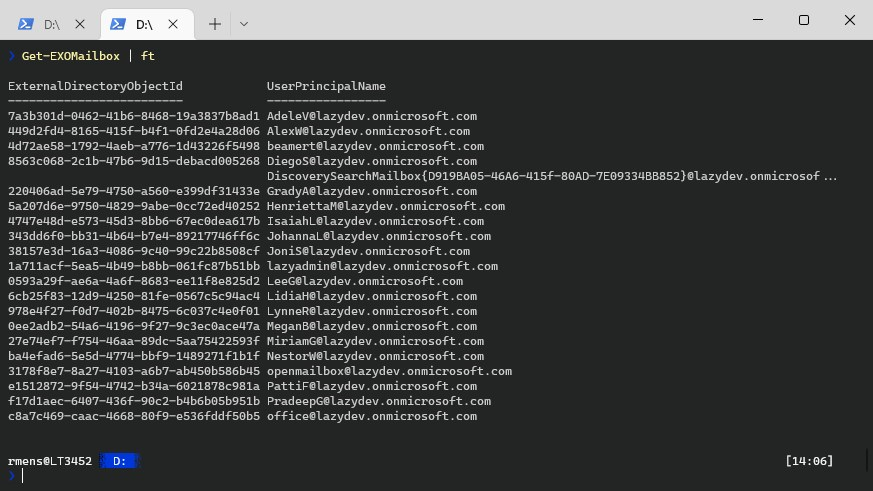
Format-Table will format the results into a table. Most cmdlets that return multiple entries will format the result by default into a table. Otherwise, you can use the Format-Table cmdlet. If the columns don’t fit in your console, then it can help to add the -Autosize parameter to the cmdlet
Get-Hotfix | ft -AutoSize
9. Get-ChildItem
The Get-ChildItem command is used to retrieve a list of files and/or directories in a specified path. It is similar to the dir command in Command Prompt. Only the advantage of the Get-ChildItem cmdlet is that we can use filter and other parameters to select only the results that we need.
For example, to get all txt files from the directory c:\test and it’s subfolders, we can use the command below in PowerShell:
Get-ChildItem -Path C:\Test\*.txt -Recurse
10. Get-Credential
The Get-Credential command is used to prompt the user for a username and password. It returns a PSCredential object that can be used to authenticate the user in other commands.
$cred = Get-Credential
Connect-MsolService -Credential $cred
This will prompt the user for a username and password, and then use the returned credentials to connect to Microsoft Online Services.
25 Useful PowerShell Commands
There are more than 200 PowerShell commands that we can use. I am not going to list all of them in this article, but here are the 25 most useful commands for PowerShell:
- Get-Random: Generates a random number or selects a random item from a collection.
- Get-Content: Retrieves the contents of a file and outputs them as objects in PowerShell.
- Get-Clipboard: Retrieves the contents of the clipboard.
- Get-Date: Retrieves the current date and time.
- Out-File: Sends output to a file instead of the console.
- Out-GridView: Displays data in an interactive grid view for easy exploration.
- Import-CSV: Imports data from a CSV file and creates objects based on the data.
- Export-CSV: Exports data to a CSV file.
- Copy-Item: Copies a file or directory from one location to another.
- Move-Item: Moves a file or directory from one location to another.
- Remove-Item: Deletes a file or directory.
- Test-Path: Checks if a file or directory exists at a specified location.
- New-PSDrive: Creates a new PowerShell drive (alias) mapped to a location in a data store.
- Enter-PSSession: Creates an interactive session with a remote computer.
- Start-Process: Starts a new process (executable) on the local or a remote computer.
- Select-String: Searches for text patterns in files or input objects.
- Start-Transcript: Starts recording a transcript of the current PowerShell session.
- Start-Sleep: Suspends the execution of a script or cmdlet for a specified time.
- Measure-Command: Measures the execution time of a script block or command.
- Measure-Object: Calculates statistical properties of objects, such as the sum, average, minimum, or maximum.
- Compare-Object: Compares two sets of objects and shows the differences.
- ConvertTo-HTML: Converts PowerShell objects into HTML format for easy display.
- ConvertTo-SecureString: Converts encrypted standard strings into secure strings.
- Set-Alias: Creates or changes an alias (shortcut) for a cmdlet or command.
- Sort-Object: Sorts objects by specified properties.
11. Get-Random
When writing scripts it’s not uncommon to use a random function to generate a random integer. But the Get-Random cmdlet in PowerShell can do more than just generate an integer. It’s also capable of selecting a random entry from an array for example.
The Get-Random cmdlet uses the RandomNumberGenerator class which allows it to generate cryptographically secure randomness. It returns by default an integer between 0 and 2,147,483,647. But of course, we specify a minimum and maximum value.
Get-Random -Minimum -50 -Maximum 150

# Result
111
Get-Random can also be used to select a random item from an array:
$array = 'apple','pear','raspberry','kiwi','banana','melon','blueberry'

$array | Get-Random

# Result
raspberry
12. Get-Content
The Get-Content cmdlet reads the content of a file and returns it as an object. You can use this cmdlet to read text files, log files, and other types of files. By default, Get-Content returns the contents of a file as a single string. However, you can use the -Delimiter parameter to split the file into individual lines or other segments.
Learn more about the Get-Content cmdlet in this article.
# Read the contents of a text file
Get-Content -Path "C:\Temp\example.txt"

# Read the contents of a file and display only the first 5 lines
Get-Content -Path "C:\Temp\example.txt" -TotalCount 5
13. Get-Clipboard
The Get-Clipboard cmdlet retrieves the contents of the Windows clipboard. You can use this cmdlet to get text, images, and other types of data that have been copied to the clipboard.
# Get the contents of the clipboard as text
Get-Clipboard -Format Text

# Get the contents of the clipboard as an image
Get-Clipboard -Format Image
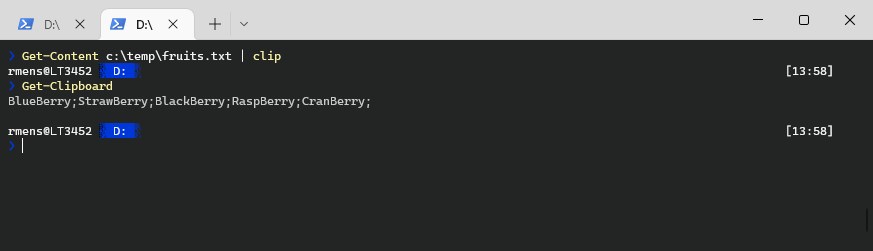
But we can not only retrieve data from the Clipboard, we can also copy data to the clipboard with PowerShell. Simply pipe clip behind your command to store the results on your clipboard:
Get-Content -path "c:\temp\fruits.txt" | clip
You can now simply paste the contents into any program that you want. To view/paste the contents of the clipboard in PowerShell use Get-Clipboard:
Get-Clipboard

# Result
BlueBerry;StrawBerry;BlackBerry;RaspBerry;CranBerry;
14. Get-Date
The Get-Date cmdlet returns the current date and time on the local computer. You can use this cmdlet to perform date and time calculations and to display the date and time in a specific format.
Make sure that your read this article to learn more about the Get-Date cmdlet.
# Get the current date and time
Get-Date

# Get the date and time 10 days from now
Get-Date -Date (Get-Date).AddDays(10)

# Get the date and time in a specific format
Get-Date -Format "yyyy-MM-dd hh:mm:ss"
15. Out-File
The Out-File cmdlet sends output to a file. You can use this cmdlet to save the output of a command or script to a text file, CSV file, or other types of file. For CSV files it’s better to use the Export-CSV cmdlet though.
# Save the output of a command to a text file
Get-Service | Out-File -FilePath "C:\Temp\services.txt"

# Save the output of a command to a CSV file
Get-Process | Select-Object Name, CPU | Out-File -FilePath "C:\Temp\processes.csv" -Encoding UTF8
16. Out-GridView
When testing scripts or working in PowerShell we often output the result directly in the console. We can format the result set as a table with format-table or in short ft. But with large data sets, this isn’t always the best option. Data may be truncated or columns are missing in your overview.
The grid view output is a great solution to that. It will output all the data in a nice searchable, sortable view in a new window. The table contains all columns, which you can sort and search through.
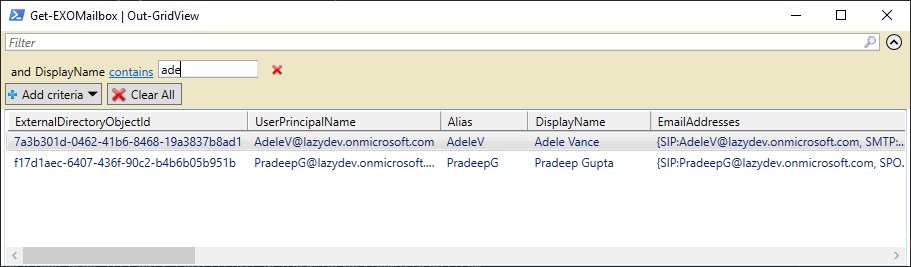
Get-EXOMailbox | Out-Gridview
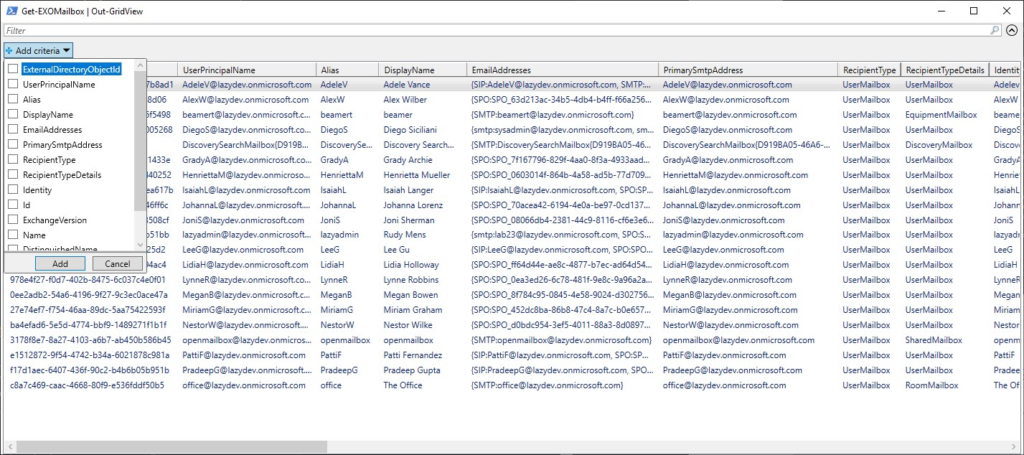
In the top left corner, you can add filters to the result set, allowing you to easily find the correct data that you need:
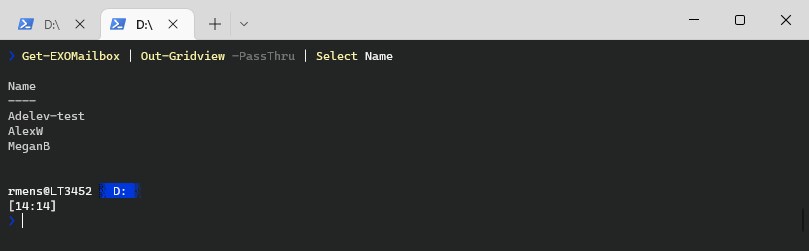
Now the best part of the gridview in PowerShell, we can select the items we need and pass them back to PowerShell. For this, you will need to add the parameter -PassThru to the cmdlet:
Get-EXOMailbox | Out-Gridview -PassThru
Select the records that you need and press Ok. You can just pipe a select behind it, or store the results in a variable.
17. Import-CSV
The Import-CSV cmdlet is used to import data from a CSV file to PowerShell. It converts the CSV file data into an object that can be easily manipulated using other cmdlets. This is useful when you need to work with large datasets that are stored in a CSV file.
Read more about the Import-CSV cmdlet in this article.
Import-CSV C:\data\employees.csv | Format-Table
18. Export-CSV
The Export-CSV command is also one of those commands that is great to use when you are retrieving data with PowerShell. We all know that Excel is great when it comes to processing data further. The Export-CSV command generates a CSV file from your data.
Add the NoTypeInformation and Encoding parameter behind it. The first will remove the header information in your CSV file and the latter makes sure that the right encoding is used.
Read more about Export-CSV in this article.
Get-EXOMailbox | Export-CSV -path c:\temp\mailbox.csv -NoTypeInformation -Encoding UTF8
19. Copy-Items
The Copy-Item cmdlet is used to copy files and directories from one location to another. It allows you to specify the source and destination locations and also provides options to overwrite existing files or retain their attributes. This is useful when you need to back up or transfer files and directories.
Learn more about the Copy-Item cmdlet in this article.
For example, the command below makes a copy of the documents folder to the folder d:\backup.
Copy-Item -Path C:\data\documents -Destination d:\backup -Recurse
20. Move-Item
We can also move items with PowerShell, with the help of the Move-Item cmdlet. It is similar to the Copy-Item cmdlet but instead of creating a copy, it moves the files and directories to the new location. This is useful when you need to move files and directories within your computer or between different computers.
Suppose you want to move a file named ‘report.docx’ from your desktop to a folder named ‘documents’. You can use the following command to move the file to the ‘documents’ folder.
Move-Item -Path C:\users\username\desktop\report.docx -Destination C:\data\documents
21. Remove-Item
The Remove-Item cmdlet is used to delete a file or a directory. It can also delete files within a directory and its subdirectories. You can use the -Recurse parameter to remove directories and their contents recursively. It can also delete read-only files, hidden files, and system files. However, it will prompt you for confirmation before deleting any read-only or hidden files.
Learn more about the Remove-Item cmdlet in this article.
To delete a file, you can use the following command:
Remove-Item C:\Temp\file.txt
22. Test-Path
The Test-Path cmdlet is used to check if a file or a directory exists at a specified location. It returns True if the file or directory exists, and False if it doesn’t exist. When working with files or directories you should really be using the cmdlet a lot. Read all about the Test-Path cmdlet in this article.
To check if a file exists, you can use the following command:
Test-Path C:\Temp\file.txt
23. New-PSDrive
The New-PSDrive cmdlet is used to create a new Windows PowerShell drive that is “mapped” to a location in a data store, such as a network drive, a directory on the local computer, or a registry key. The drive that is created behaves like a normal Windows drive and can be accessed by using standard Windows commands.
For example, to create a new drive that maps to a network share, you can use the command below in PowerShell. Learn more about the New-PSDrive cmdlet in this article.
New-PSDrive -Name "N" -PSProvider FileSystem -Root "\\Server\Share"
24. Enter-PSSession
Need to run a PowerShell command on the server? Most open a remote desktop, to start a PowerShell session on the server, but there is really no need for that. With PowerShell, we can start an interactive session with a remote computer using the Enter-PSSession cmdlet.
To start an interactive session, simply type:
Enter-PSSession -Computername LazySrvLab02

# Result
[LazySrvLab02]: PS C:\>
You can now run PowerShell commands on the server, just as if you are working directly on the server. If you need to authenticate with different credentials, then use the parameter -credential to specify the username that you want to use. You will be prompted for the password.
To exit the remote session, type Exit-PSSession
25. Start-Process
The Start-Process cmdlet is used to start a new process, such as an executable file or a script, and optionally pass it arguments. You can specify the file path, arguments, working directory, and other parameters when starting the process. This cmdlet is useful when you need to start a process from a script or command line.
Start-Process -FilePath "C:\Program Files\MyApp\MyApp.exe" -ArgumentList "-Option1", "-Option2"
26. Select-String
The Select-String cmdlet searches through a given input (text files, strings, etc.) for a specific string pattern and outputs any lines that match the pattern. This is similar to the grep command in Unix/Linux systems.
Let’s say you have a log file that you want to search for lines that contain the word “error”. You can use Select-String to do this. The command below will search through the log file and output any lines that contain the word “error”. Read more about the PowerShell Select-String command in this article.
Select-String -Path C:\logs\logfile.txt -Pattern "error"
27. Start-Transcript
The Start-Transcript cmdlet creates a transcript of a PowerShell session, which includes all commands entered and their output. The transcript is saved to a text file.
To create a transcript you will need to run the command below to start recording. When done, you can use the cmdlet Stop-Transcript. Learn more about Start-Transcript in this article.
Start-Transcript -Path C:\transcript.txt
28. Start-Sleep
The Start-Sleep cmdlet pauses a PowerShell session for a specified amount of time. This is useful for creating scripts that need to wait for a certain amount of time before executing the next command.
The command below pauses the script for 10 seconds. Learn more about the PowerShell Start-Sleep command in this article:
Start-Sleep -Seconds 10
29. Measure-Command
The Measure-Command cmdlet measures the time it takes for a command to run. This is useful for optimizing scripts and identifying performance bottlenecks.
Let’s say you have a script that you want to optimize. You can use Measure-Command to measure the time it takes for a specific command to run. For example, the following command will measure the time it takes to copy a file from one location to another:
Measure-Command {Copy-Item -Path C:\files\file.txt -Destination D:\backup\file.txt}
The output of the command will show the elapsed time, as well as other statistics such as the CPU time used and the number of garbage collections performed.
30. Measure-Object
The Measure-Object cmdlet calculates the properties of numeric objects such as the sum, average, minimum, maximum, and standard deviation. It is useful for analyzing the output of other PowerShell commands.
Suppose we want to calculate the average size of all the files in a directory. We can use the Get-ChildItem cmdlet to retrieve the files in the directory and pipe the output to the Measure-Object cmdlet to calculate the average size:
Get-ChildItem C:\temp | Measure-Object -Property Length -Average
31. Compare-Object
The Compare-Object cmdlet compares two sets of objects and returns the differences. It is useful for finding differences between two sets of data.
For example, let’s compare to array with fruits:
$fruits = "apple","kiwi","pear"
$basket = "kiwi","raspbery"

Compare-Object -IncludeEqual $fruit $basket

# Result
InputObject SideIndicator
----------- -------------
kiwi        ==
raspbery    =>
grape       <=
pear        <=
32. ConvertTo-Html
The ConvertTo-Html cmdlet converts PowerShell objects into HTML format. It is useful for generating reports and displaying data in a more readable format.
Suppose we want to generate an HTML report of the running processes on a computer. We can use the Get-Process cmdlet to retrieve the running processes and pipe the output to the ConvertTo-Html cmdlet to generate an HTML report:
Get-Process | ConvertTo-Html | Out-File C:\temp\processes.html
33. ConvertTo-SecureString
The ConvertTo-SecureString cmdlet converts a plaintext string to a secure string that can be used to store sensitive data, such as passwords or API keys, in a more secure way. It is useful for preventing unauthorized access to sensitive data.
For example, we want to store a password in a variable for use in a script. We can use the Read-Host cmdlet to prompt the user for a password, and then pipe the output to the ConvertTo-SecureString cmdlet to convert it to a secure string:
$password = Read-Host "Enter password" -AsSecureString
$cred = New-Object System.Management.Automation.PSCredential ("username", $password)
34. Set-Alias
The Set-Alias cmdlet creates or changes an alias (alternate name) for a cmdlet or other command element in the current PowerShell session. This can help to save time typing long command names or to create custom abbreviations for frequently used commands.
In this example, we create an alias l for the ls command. Now instead of typing ls to list files, we can simply type l.
Set-Alias -Name l -Value ls
35. Sort-Object
The Sort-Object cmdlet sorts objects in ascending or descending order based on one or more properties. It can be used to sort any type of object, such as files, directories, registry keys, or PowerShell objects.
In this example, we use Get-ChildItem to get a list of files and directories in the current directory. We then pipe that output to Sort-Object to sort the list by name in descending order, and finally use Select-Object to show only the first 10 items in the sorted list.
Get-ChildItem | Sort-Object -Property Name -Descending | Select-Object -First 10
Bonus Tips
Ctrl + Space
This is not really a PowerShell command, but you wish that you knew about this key combination earlier. When using a cmdlet we all often type the hyphen - and then tab through all the possible parameters that the cmdlet has.
But did you know you can view all parameters at once? To try this out, type a cmdlet and press Ctrl + Space:
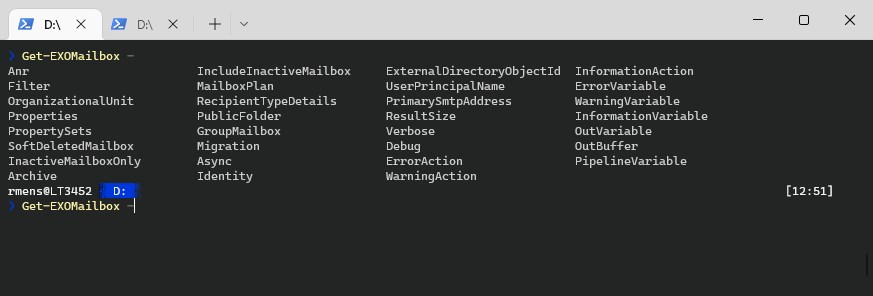
It will display all nouns and parameters that you can use with the cmdlet. Now pressing Ctrl + Space is a method you will need to get used to, but you can also set the following in your PowerShell profile:
Set-PSReadlineKeyHandler -Key Tab -Function Complete
This way you will only need to type the hyphen and press Tab twice to list all parameters.
Set-StrictMode
The Set-StrictMode command in PowerShell establishes and enforces coding rules. By default, strict mode is turned off and that can cause a real mess. When strict mode is off, PowerShell threats uninitialized variables as $null or 0, for example.
Note the following code:
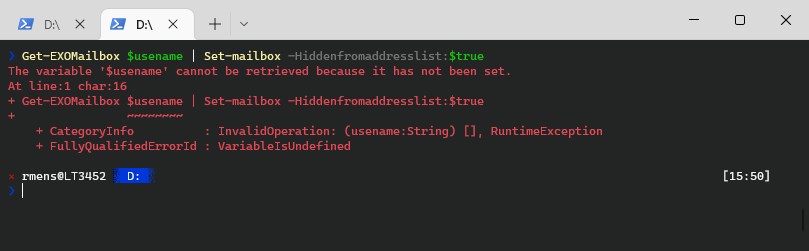
$username = 'adelev'
Get-EXOMailbox $usename | Set-mailbox -Hiddenfromaddresslist:$true
In the example above, I have misspelled the $username variable in the Get-ExoMailbox command. If Strict Mode is not enabled, PowerShell will handle the misspelled variable $usename as a $null, with the result that the cmdlet will get all mailboxes and hide them all from the address list.
When you set StrictMode to version 2, PowerShell will instead throw an error that the variable is not set.
Set-StrictMode -Version 2
I recommend adding the Set-StrictMode -Version 2 command to your PowerShell Profile.
Wrapping Up
With PowerShell, we can always learn new things, and improve our scripts or work methods, to make our work easier. These PowerShell commands can really help you with that. Commands like Set-StrictMode and the full autocomplete function are one of the best commands to know and use.
I hope you found this list with PowerShell commands useful or if you have any questions or suggestions, please drop a comment below!


Thank you for sharing.
My favorite is using VS Code and highlighting the code I want to execute with the F8 key