Do you want to get more out of your PowerShell? Then make sure you configure your PowerShell Profile to boost your PowerShell console.
The PowerShell Profile is a script that runs when you open PowerShell. It allows you to load PowerShell scripts or modules automatically, create aliases for cmdlets that you use often, and change the look of your console.
In this article, we are going to take a look at the different PowerShell Profile locations, explain how to create a profile, and give you some useful examples.
PowerShell Profile Location
What most people don’t know is that there are different profiles. You can create a profile for the PowerShell Console/Terminal and a separate one for PowerShell ISE. But it’s also possible to create one profile that is used on all locations.
To find your PowerShell Profile location we are going to use PowerShell.
- Open PowerShell
- Type $profile
$profile

#result:
C:\Users\rmens\Documents\WindowsPowerShell\Microsoft.PowerShell_profile.ps1
The $profile variable returns the profile for the current user in the current program (host). But as mentioned, there are different profiles. If you also work a lot in PowerShell ISE, then makes more sense to use the Current User – All Hosts profile.
The term Host is a bit confusing here. With Host Microsoft means in this case a PowerShell program, like the PowerShell Console or editor ISE.
| Description | Path | Command to open |
|---|---|---|
| Current user – Current host | $Home\[My ]Documents\ PowerShell\Microsoft.PowerShell_profile.ps1 | $profile |
| Current user – All hosts | $Home\[My ]Documents\ PowerShell\Profile.ps1 | $profile.CurrentUserAllHosts |
| All Users – Current Host | $PSHOME\Microsoft.PowerShell_profile.ps1 | $profile.AllUsersCurrentHost |
| All Users – All Hosts | $PSHOME\Profile.ps1 | $profile.AllUsersAllHosts |
To create a specific profile for PowerShell ISE you will need to run the command from within PowerShell ISE itself.
How to create your PowerShell Profile
Using PowerShell Profiles can really make your daily work a lot easier. You no longer need to navigate to the correct folder to run a script that you often use. Or you can create easy-to-use aliases for cmdlets that you use often.
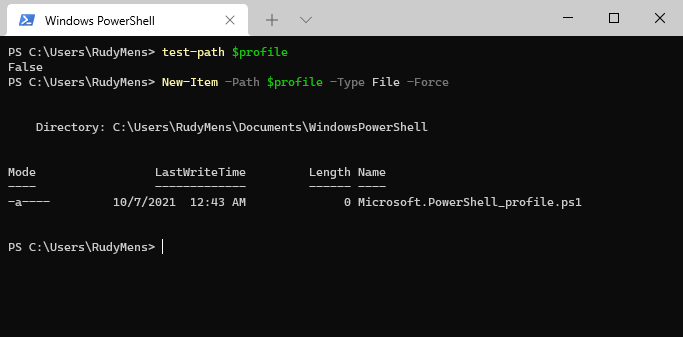
The first step in creating your own profile is to test if you already have a profile. Open PowerShell and type:
test-path $profile
If it returns False, then we need to create the profile first, type:
New-Item -Path $profile -Type File -Force

You can use the same method to create the profile of all hosts or all users using the command in the table above.
To use the profile you will need to make sure you have set the Execution Policy to Remote Signed. Otherwise, you won’t be able to run the script when PowerShell opens. Make sure you run PowerShell with elevated permissions (admin mode) to change the execution policy:
Get-ExecutionPolicy

# Set the ExecutionPolicy to RemoteSigned:
Set-ExecutionPolicy RemoteSigned
Edit the PowerShell Profile
The profile is now created, allowing you to open and edit the PowerShell Profile. Again we are using the PowerShell command to open the profile file:
ise $profile
This will open the profile in PowerShell ISE, showing a completely blank profile file. Keep in mind that the more you add to your profile, the longer it may take before PowerShell is started.
PowerShell Profile Examples
The profile is a PowerShell script, so we can right pretty much any PowerShell function in it. But basically, you want to do a couple of things in your profile:
- Style your PowerShell console
- Set default location
- Load different paths (folders) with scripts
- Set default variables
- Import modules
- Create aliases
Style your PowerShell Console
You can style your PowerShell console, settings the font and background color, and windows title for example. Personally, I use Windows Terminal and use a customized theme for it. You can read more about Windows Terminal in this article.
# Style default PowerShell Console
$shell = $Host.UI.RawUI

$shell.WindowTitle= "PS"

$shell.BackgroundColor = "Black"
$shell.ForegroundColor = "White"

# Load custom theme for Windows Terminal
Import-Module posh-git
Import-Module oh-my-posh
Set-Theme LazyAdmin
Set Default Location
By default, PowerShell starts in your home folder $home. But when I am working with PowerShell, most of the time I want to have easy access to my scripts folder. So we can set the default location to start PowerShell in:
# Set Default location
Set-Location D:\SysAdmin\scripts
Load scripts from different locations
To have quick access to your scripts, you can load the folders that contain the scripts into your environment path $env:path. This allows you to have access to all your script without the need to change directories every time:
# Load scripts from the following locations
$env:Path += ";D:\SysAdmin\scripts\PowerShellBasics"
$env:Path += ";D:\SysAdmin\scripts\Connectors"
$env:Path += ";D:\SysAdmin\scripts\Office365"
Set default variables
Another useful tip is to set default variables in your profile. For example, I often need to connect to Office 365. By settings the SharePoint Admin URL, or my UserPrincipalName as a variable in the profile, I can quickly connect to the different endpoints.
This works the best in combination with the connection scripts that you can find here on my GitHub.
# Set default variables
$adminUPN = "lazyadmin@lazydev.onmicrosoft.com"
$sharepointAdminUrl = "https://lazydev-admin.sharepoint.com"
Import modules or Scripts
Most of my scripts are writing as a function. But to really use them as a function you will need to create a PowerShell Module from it. And those module files need to be placed in your modules folder: $HOME\Documents\PowerShell\Modules.
My modules folder isn’t connected to my GitHub repository, so changes made in the scripts need to be copied to the module folder, which I always forget.
An easier method, in my opinion, is to use an alias for your scripts. This way you can call your scripts as a function, without the need of making modules from them:
# Lazy way to use scripts as module
Set-Alias ConnectTo-SharePointAdmin ConnectTo-SharePointAdmin.ps1
Set-Alias ConnectTo-EXO ConnectTo-EXO.ps1
Set-Alias Get-MFAStatus MFAStatus.ps1
Set-Alias Get-MailboxSizeReport MailboxSizeReport.ps1
Set-Alias Get-OneDriveSizeReport OneDriveSizeReport.ps1
Create Aliases for commands
You can also create aliases for commands that you often use, like:
# Create aliases for frequently used commands
Set-Alias im Import-Module
Set-Alias tn Test-NetConnection
After you have made all the changes, save your profile file and restart your PowerShell console.
Wrapping Up
A good configured PowerShell Profile can really save you time when working with PowerShell. It gives you direct access to often-used scripts, variables, and functions.
If you have suggestions or tips for the profile, then please share them below. Also if you have questions, just drop a comment below.


Thx for the examples, that gives better insides, but I could need some more help with my case below.
I want to give all user admins the same user profile on different servers in different domains. I want to manage that profile script from a central point (probably per domain), so i can add functions to it that would then be available to all the admins.
Besides that I also want to sign the script as a security measure.
Problems I have:
Do i need a gpo to place the userprofile files on the servers?
I don’t want a single point of failure, by using just one script file for the functions, how to prefend that?
Howto manage certificates and signing in this specific case?
You can use PowerShell modules to load different functions inside your PowerShell script (profile). There are a couple of ways to make this work, you could store all the modules in a central place, and load them from the PowerShell profiles. This way you only need to update the modules.
Another option is to use a PowerShell script and run it as a scheduled task, which will copy the latest versions of the script every night to the user profiles for example.
I haven’t looked into signing PowerShell scripts.
Hi Don,
Right-click the powershell shortcut, click properties, click the advanced button, tick run as admin, click apply, click ok.
Now, just left-click on the same shortcut from before and powershell will run as administrator
Hope this helps
G’day Ruud,
Thanks for the tutorial … very useful!
I find I need to run PowerShell elevated most of the time.
I’d like to have that setting in the $PROFILE.
$PROFILE starts PowerShell, styled nicely, at present but I’ve, so far been unable to do it in admin mode. Needless to say, I’ve been only a few weeks learning PowerShell … Mac OSX Linux Mint & Windows 10 … similar success with all 3 with PowerShell 6 & 7.
I know you can help … Thanks
If you open PowerShell in admin mode and then get the profile path. Any changes made there should reflect in PS admin mode.
Thank you … I understand how to edit $PROFILE … I want PowerShell $PROFILE to open each session in admin mode …
Ah sorry, I thought you meant applying the profile to the admin mode.
An option is to use Windows Terminal for this. If you open the settings, go to Windows PowerShell in the profile list, and enable Run this profile as Administrator.
Thanks for putting it in layman’s terms!
Hi, thank you for the tutorial. In the section “Load scripts from different locations”, if I’m not wrong, you show a way to execute the scripts in that directories without the complete path, but it does not work. Which could be the reason?
Have you updated the environment paths? Environment paths are locations your command line interface will look in when you try to open executable file, like a PowerShell script.
After you have updated the environment paths you will need to reopen the terminal / PowerShell windows. (or restart your computer to be sure)