Errors in your PowerShell script can stop the execution of your script, but sometimes that is completely unnecessary. Try Catch blocks in PowerShell help you to handle those errors properly.
Take the following example; You need to update the job titles of 20 employees. The HR department has given you a list with names and the new job titles, but they misspelled one of the names.
Without a PowerShell Try Catch block, your script would stop somewhere in the middle, leaving you with half the records updated. You will now need to figure out where the script has stopped and which user triggered the error.
With Try Catch in PowerShell, we can process the whole list and write a proper error message (or even send an email) when something is wrong.
In this article, we are going to take a look at how to use Try, Catch, Finally in PowerShell and how to find the correct error message to catch.
Powershell Try Catch Finally
Let’s first take a look at the basics of the Try Catch Finally block. A Try Catch block in Powershell always exists of one Try block and atleast one Catch block. The Finally block is optional, the code in this block will always run, no matter the outcome of the Try block.
try
{
    # Try something that could cause an error
    1/0
}
catch
{
    # Catch any error
    Write-Host "An error occurred"
}
finally
{
    # [Optional] Run this part always
    Write-Host "cleaning up ..."
}
In the Try block, you place the script that could cause an error. Keep this part small and don’t combine too many functions into it. The goal with a PowerShell Try Catch block is to implement proper error handling, and you can only do that when you Try one tricky function at a time.
If we take the following (simplified) example to update the job titles:
try{
	# Find the user to update
	$ADUser = Get-AzureAdUser -SearchString $user.name

	# Update the job title
	Set-AzureAdUser -ObjectId $ADUser.ObjectId -JobTitle $user.jobtitle

	# Send an email that the job title is updated
	Send-MailMessage -SmtpServer $smtp.address -To $user.mail -From $smtp.from -Subject $smtp.subject -Body "Your jobtitle is updated"
}
catch{
	Write-Host ("Failed to update " + $($user.name)) -ForegroundColor Red
}
The problem here is that if something goes wrong in the Try block, we only get an error that the update is failed. But you don’t know which part. Maybe the user is updated but was the script unable to send to mail.
A better option here is to split the Try into finding and updating the user and create another function with a Try-Catch to send the email.
PowerShell Finally block
The finally block is optional, so you don’t need to use it every time. Code inside the finally block is always executed, no matter the outcome of the Try block. You can use the finally block to close a connection for example, or as part of your logging.
Catching Terminating and non-terminating Errors
When it comes to catching errors in PowerShell, there is one thing really important, non-terminating errors. These are errors that won’t terminate (stop) the script. These kinds of errors can’t be caught with a catch block by default.
Most cmdlets in PowerShell are non-terminating. They will output an error, which you will see in red in your console, if you use them wrong, but they won’t stop the script. The reason for this the default ErrorAction in your PowerShell profile, which is set to Continue.
# To show your default error action type
$ErrorActionPreference
Take the following example, opening a non-existing directory in PowerShell with a Try Catch block:
try {
    dir "c:\some\non-existing\path"

}
catch {
    Write-host "Directory does not exist"
}
You expect to see “Directory does not exist”, but instead you get the normal red error message. The reason for this is that the non-existing path isn’t a terminating error, and the default error action is to continue.
To catch the error you will need to add the -ErrorAction Stop parameter behind your action.
try {
    dir "c:\some\non-existing\path" -ErrorAction stop

}
catch {
    Write-host "Directory does not exist"
}
Another option is to change the ErrorActionPreference at the beginning of your script or PowerShell session. But keep in mind that the preference will reset to continue when you start a new session.
$ErrorActionPreference = "Stop"
Powershell Try Catch Exception
Exceptions in PowerShell allow you to handle errors even better. Until now we just used a simple catch, that will basically catch any errors. A good way to start, but if you want to improve your PowerShell error handling even further, then you can use Exceptions.
As I mentioned in the beginning, a Try Catch block should have atleast one catch block. That means that we can have multiple catch blocks to catch different errors and handle them differently.
If we take the following example with updating the job titles:
try{
	# Find the user to update
	$ADUser = Get-AzureAdUser -ObjectId $user.UserPrincipalName -ErrorAction Stop

	# Update the job title
	Set-AzureAdUser -ObjectId $ADUser.ObjectId -JobTitle $user.jobtitle -ErrorAction Stop
}
catch [Microsoft.Open.Azure.AD.CommonLibrary.AadNeedAuthenticationException]{
	# Catch a connection error
	Write-Warning "You need to Connect to AzureAD first"
}
catch [Microsoft.Open.AzureAD16.Client.ApiException] {
	# Catch the when we are unable to find the user
	Write-Warning "Unable to find the user"
}
Catch {
	Write-Warning "An other error occured"
}
What we can do here, for example, catch the error when the connection to AzureAD hasn’t been made yet, or the error when we are unable to find the user in AzureAD. We do this by defining an exception to a catch block.
The difficult part here is finding the exception that you need to catch. The only way to find them is to run your script, and make sure you trigger the error that you want to catch. You can then find the exception in the error message or in the $Error variable
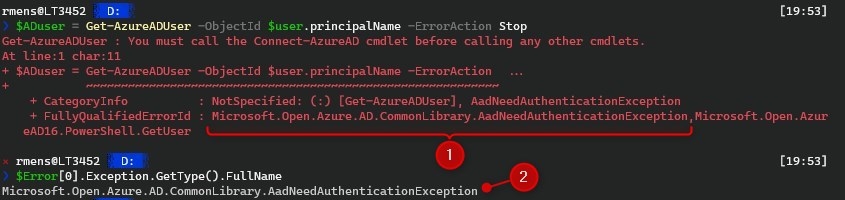
As you can see in the screenshot, we can find the Authentication exception in the error message (1). Another option is to take a look at the $Error variable. If you run $Error[0].Exception.GetType().FullName directly after the error, then you will get the full exception name that you can use in the catch block.
Powershell Error Variable
Let’s explain a bit more about the PowerShell Error variable. When an error occurs in PowerShell it will be appended to the $error variable. This variable will contain all the errors that occurred during your PowerShell session.
Instead of $error, you can also use $._ or $PSitem inside the catch block to show details about the error.
The $error variable is really useful and contains a lot of information about the error. We can not only use this information to handle the error properly but also to inform the user better.
Finding the location of the error
When you are writing a larger script, it’s handy to know the exact location of the function that causes the error. In the error variable, you will find the ScriptStackTrace. This will output the exact location of the error and the origin.
Take the following example:
$ErrorActionPreference = "Stop"


Function OpenPath($path) {
    try {
        dir $path
    }
    catch {
        Write-host "Directory does not exist" -ForegroundColor Red
        Write-Host $_.ScriptStackTrace
    }
}

OpenPath("c:\some\non-existing\path")
When you run this code you will get the following stack trace:

As you can the error occured on line 6, in the OpenPath function, which was called by the script on line 15.
This kind of information can really help you with debugging your scripts.
Show Proper Error Messages
You can write your own error messages in the PowerShell Catch blocks, but sometimes the exception messages are more than enough.
Function OpenPath($path) {
    try {
        dir $path -ErrorAction Stop
    }
    catch {
        Write-Host $_.Exception.Message -ForegroundColor Red
    }
}

#Outputs:
Cannot find path 'C:\some\non-existing\path' because it does not exist.
Couting Errors in PowerShell
A small feature of the Error variable, but sometimes really handy, counting how many errors occurred
$Error.count
Clearing the PowerShell Error Variable
The error variable contains a lot of information, you can see all properties of the Error variable by using the get-member cmdlet. The last thing I want to point out is clearing the error variable. When you are trying to find the correct exception it’s really handy to clear the variable before you run your script again.
$Error.clear()
Wrapping up
Try Catch blocks in PowerShell helps you to write better scripts, scripts that do what you want, even if something goes wrong. The hardest part is writing good catch blocks, because you will need to figured out what can possibly go wrong with your script.
I hope this article helped you to get started with the Try-Catch blocks, if you have any questions, just drop a comment below.
You may also like the following articles:


Good work LazyAdmin. Thank you.
Really good and easy to understand description.
I was fighting to get the error messages from my screen, and then it was so simple.
Outstanding work.
Hi! Excuse me, I have a question. I did everything according to the instructions.
Now the next thing I need to do is to output to a text file the information:
Date, time_Message that I’m catching
Example:
01.20.23 16:23 AAD is busy
My code:
==========================
try {
Start-ADSyncSyncCycle -PolicyType Delta -ErrorAction Stop
}
catch [System.InvalidOperationException] {
Write-Warning “AAD is busy”
}
==========================
Can you please tell me how best to do this for TXT and CSV file?
You can use Export-CSV for example, read more about it in this article.
Thank you! “-ErrorAction stop” is what I was looking for but didn’t know existed. Great article 🙂
Well explained, thank you Ruud for writing such a knowledgable article.
A fantastic article, thank you for sharing this. I have subscribed to your blog, you have some amazing content which I’ll circulate to my colleagues.
Thank you Ruud! 🙂
Hi,
i was passing by and i saw that no one has left a comment on this article yet. This is the proof that we live in an unfair world.
So i tell you today : Thank you for this article wich helped me a lot for my studies.
Have a nice day,
Chuck