When working with PowerShell we can use CSV files to import data into systems or to use it as a reference list, of users, for example, to update or get settings. To do this we use the Import-CSV function in PowerShell.
The Import-CSV function converts the CSV data into a custom object in PowerShell. This way we can easily walk through each row of the CSV file and use the data in our scripts.
In this article, we are going to take a look at how to read a CSV file with PowerShell, using the Import-CSV function, and how to read each line with the foreach cmdlet. I will also give you some tips on how to use the Import CSV function.
PowerShell Import-CSV
The Import-CSV cmdlet is pretty straightforward and only has a few properties that are useful:
- Path – (Required) Location of the CSV file
- Delimiter – Default comma, but this allows you to change it
- Header – Allows you to define custom headers for the columns. Used as property names
- UseCulture – Use the default delimiter of your system
- Encoding – Specify the encoding of the imported CSV file
We are going to start with a simple list of users that we can import in PowerShell. I have created the following CSV file that I will use in the examples below:
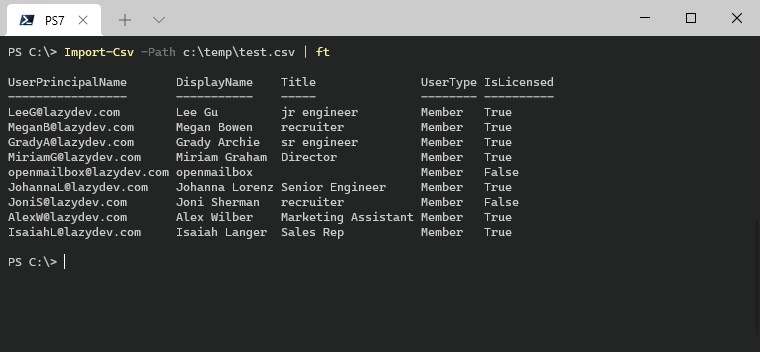
UserPrincipalName,"DisplayName","Title","UserType","IsLicensed"
LeeG@lazydev.com,"Lee Gu","jr engineer","Member","True"
MeganB@lazydev.com,"Megan Bowen","recruiter","Member","True"
GradyA@lazydev.com,"Grady Archie","sr engineer","Member","True"
MiriamG@lazydev.com,"Miriam Graham","Director","Member","True"
openmailbox@lazydev.com,"openmailbox",,"Member","False"
JohannaL@lazydev.com,"Johanna Lorenz","Senior Engineer","Member","True"
JoniS@lazydev.com,"Joni Sherman","recruiter","Member","False"
AlexW@lazydev.com,"Alex Wilber","Marketing Assistant","Member","True"
IsaiahL@lazydev.com,"Isaiah Langer","Sales Rep","Member","True"
This CSV file already had headers for each column, so we don’t need to worry about that for now. To import this CSV file into PowerShell we can simply use the following command:
Import-CSV -Path c:\temp\test.csv | ft
In this case, we don’t store the results into a variable, but immediately output it into a table with ft. As you can see, we now have all our users with all columns nicely in PowerShell.
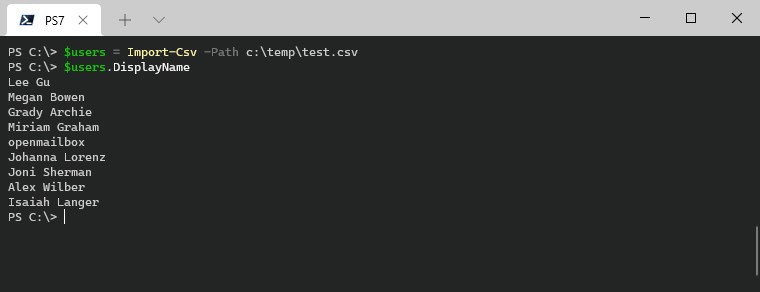
If you store the results of the import cmdlet into a variable, then you can reference each column as a property using the column name (header):
$users = Import-Csv -Path c:\temp\test.csv
$users.DisplayName
Specifying the Delimiter
A common issue when it comes to import a CSV file with PowerShell is that the delimiter is not recognized. By default, the Import-CSV cmdlet uses the , as the delimited. But here in the Netherlands for example, is the default delimiter in Excel for CSV files is ;.
So when I create in CSV file in Excel that I want to use in PowerShell, I will need to either change the delimiter in the CSV file or specify the correct delimiter in PowerShell. There are two options for this.
We can use the -delimiter parameter to specify the correct delimiter:
$users = Import-Csv -Path c:\temp\test.csv -Delimiter ;
Or use the system default delimiter with the -UseCulture parameter:
$users = Import-Csv -Path c:\temp\test.csv -UseCulture
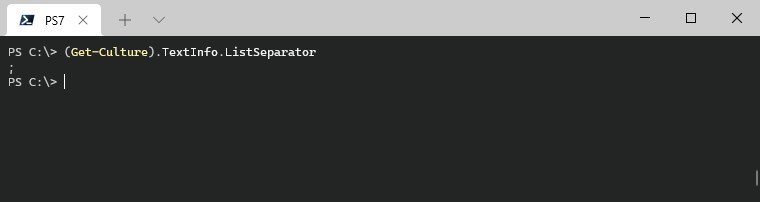
If you want to know what the default delimiter is on your computer, then you can use the following PowerShell command to get the culture information:
(Get-Culture).TextInfo.ListSeparator
Powershell Import CSV ForEach
Most of the time when you import a CSV file in PowerShell you want to walk through each line of the CSV file. For example to get the mailbox permissions or OneDrive folder size.
To do this we can combine the Import CSV cmdlet with ForEach. Inside the ForEach block, we can reference each column of the CSV file as a property of the user object in this case.
Taken the CSV file example that I have added at the beginning of the article, we can get the mailbox of each user using the UserPrincipalName like this:
Import-CSV -Path C:\temp\test.csv | ForEach {
    # Get mailbox of each user
    Get-ExoMailbox -identity $_.UserPrincipalName
}
For this to work your CSV file will need to have headers. That is not always the case, sometimes CSV files only contain values and no headers at all.
To still be able to reference each value in the CSV file you will need to add headers to the Import-CSV file cmdlet.
Adding Headers to Import-CSV
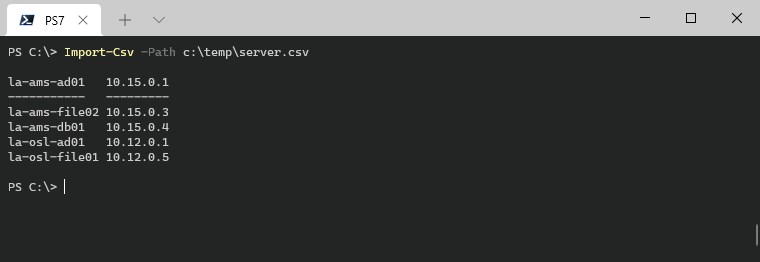
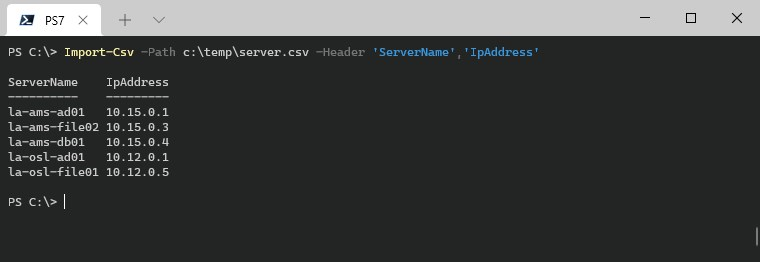
Let’s take the following CSV file with server names and the IP Address of the server:
la-ams-ad01,10.15.0.1
la-ams-file02,10.15.0.3
la-ams-db01,10.15.0.4
la-osl-ad01,10.12.0.1
la-osl-file01,10.12.0.5
As you can see, this CSV file doesn’t have headers (column names). So when we import this CSV file directly in PowerShell you will see that the first row is used as the header. This is not going to work.
So what we need to do is define the headers for the CSV file. We will need to list all headers in a comma-separated string, enclosing each header name with single quotes ' .
Import-Csv -Path c:\temp\server.csv -Header 'ServerName','IpAddress'
Important to know is that if you don’t specify all headers, the remaining columns are not imported. So if we expand our CSV file with the following columns:
la-ams-ad01,10.15.0.1,HP,DL365 G10
la-ams-file02,10.15.0.3,HP,DL380 G9
la-ams-db01,10.15.0.4,HP,DL385 G10
la-osl-ad01,10.12.0.1,HP,DL110 G8
la-osl-file01,10.12.0.5,HP,DL345 G10
And only specify three column headers, then the last column, server model in this case, won’t be imported:
Import-Csv -Path c:\temp\server.csv -Header 'ServerName','Ip','Brand'

# Result:
ServerName    Ip        Brand
----------    --        -----
la-ams-ad01   10.15.0.1 HP
la-ams-file02 10.15.0.3 HP
la-ams-db01   10.15.0.4 HP
la-osl-ad01   10.12.0.1 HP
la-osl-file01 10.12.0.5 HP
If you define more headers than there are columns, then an additional empty property is created for each object. This can be useful if you want to create an object with additional fields that you want to fill later on. For example, if you want to look up the disk space of each server, we can already add the disk space column to the imported data:
Import-Csv -Path c:\temp\server.csv -Header 'ServerName','Ip','Brand','Model','DiskSpace' | ft

# Result
ServerName    Ip        Brand Model     DiskSpace
----------    --        ----- -----     ---------
la-ams-ad01   10.15.0.1 HP    DL365 G10
la-ams-file02 10.15.0.3 HP    DL380 G9
la-ams-db01   10.15.0.4 HP    DL385 G10
la-osl-ad01   10.12.0.1 HP    DL110 G8
la-osl-file01 10.12.0.5 HP    DL345 G10
This allows us to do the following for example:
$servers = Import-Csv -Path c:\temp\server.csv -Header 'ServerName','Ip','Brand','Model','DiskSpace'

$servers | ForEach {
    $_.DiskSpace = Invoke-Command -ComputerName $_.ServerName {Get-PSDrive C} | Select-Object Free
}
How to Import only specific fields with Import-CSV
When you import a CSV file into PowerShell it will import all the columns by default. But when working with large files it can be useful to only select the data that you really need.
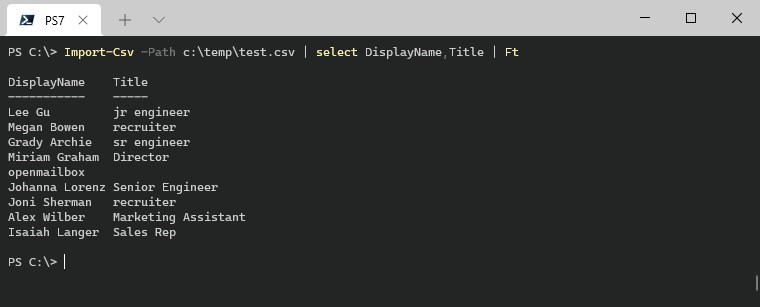
There are two ways to do this, if your CSV file has headers, then you can select only the column that you need:
Import-Csv -Path c:\temp\test.csv | select DisplayName,Title | Ft
Another option is to use the -header parameter, but this only works well when you only need the first column (or the first couple of columns). Because you can’t skip a column with this method:
Import-Csv -Path c:\temp\test.csv -Header id

# Result
id
--
UserPrincipalName
LeeG@lazydev.com
MeganB@lazydev.com
GradyA@lazydev.com
MiriamG@lazydev.com
openmailbox@lazydev.com
JohannaL@lazydev.com
JoniS@lazydev.com
AlexW@lazydev.com
IsaiahL@lazydev.com
Find values in CSV File
Sometimes you only want to look up a specific value or column in a CSV file. To do this you will need to know the column names. We can import the CSV file and then select only the records where a column matches a specified string. You can then either return the whole row or a specific column:
$csv = Import-CSV -path c:\temp\test.csv
$csv | Where-Object {$_.UserPrincipalName -eq 'AlexW@lazydev.com'} | Select Title

# Result
Title
-----
Marketing Assistant
Wrapping Up
The Import-CSV cmdlet in PowerShell is really useful when you need to work with lists or want to look up multiple entities. Make sure that you check if the CSV file comes with headings and that you use the correct delimiter.
If you have any questions, then just drop a comment below.


Great articale!
is there a way to handle the refresh of the import file?
i have imported the CSV file to a variable and all was ok but when i updated the CSV file it was not reflected on the code an it still imported the old values.
tried to open and close power shell also didn’t help
If you re-import the file into your variable, then the contents should be renewed. Are you sure that the CSV file is saved correctly? Variables are not stored when closing PowerShell, so restarting PowerShell should give you an empty variable.
Hi! Can I merge the rows of single column (csv contains only 1 column, rows total is variable, to 1 a 10000 rows)?
e.g .csv:
numbres
1
2
3
need the result this way so that it can be read: $result 1,2,3
I try this:
$csv = Get-Content -Path “C:\test\example.csv”
$csv -join ‘,’
but I don’t know how pass the join result to variable
Please help
You where almost there:
Hey just wanted to say, great article. Good introduction to this feature, helped a lot.
Nicely done on this article. Thanks.
Could you add a section, “how to lookup a value”
If $Name = ‘Lee Gu” Return JobTitle
Thanks.
T.
I updated the article. You can do something like this to lookup values:
$csv = Import-CSV -path c:\temp\test.csv $csv | Where-Object {$_.UserPrincipalName -eq 'AlexW@lazydev.com'} | Select TitleHi,
Is it possible to load a csv files, while i don’t know the headers from the file.
And with a loop I can load all headers.
E.g.:
Cell1; Cell2; Cell3
a;b;c;
1;2;3
When i load this file i am intersted in that Cell1, Cell2 and Cell3 are the headers.
Hi
i have a csv file with distributiongroups
i want to find the members and owner of all the distributionsgroups in that list, and send the output to a new csv file.
how would i do that?
With PowerShell 😉
You will need to loop through each record from the CSV file, and use the Active Directory cmdlets to retrieve the required results. A good article to get you started is this one: getting started with PowerShell Scripts.
i’m currently trying to import data from an AD export to csv into powershell and then reference the info inside the csv to get disk info. Is there a way to pull this info into a script where $xxxx = csv data.
This should work:
$import = Import-CSV filename.csvwhat if the csv file is on a onedrive share? $File = “https://business-my.sharepoint.com/:x:/p/myname/EXkdX72xGKZBrqV2VB_6rb8BZy65oTLXnh4f_prI-rSubQ”
You can try to first get the file with PnP:
Connect-PnPOnline -Url https://tenant.sharepoint.com/sites/SiteName -UseWebLogin

$url = "https://business-my.sharepoint.com/:x:/p/myname/EXkdX72xGKZBrqV2VB_6rb8BZy65oTLXnh4f_prI-rSubQ"

$file = Get-PnPFile -Url $url -AsString
Hi,
in your example, you have licenced & unlicensed users, what if I only wanted to display the unlicensed users?
You can add an where condition:
| where {$_.IsLicensed -eq 'false'}Yet again your blog comes up when I search how to do something for a project of my own! 🙂 I really appreciate all the helpful info you share.