When you need to reuse a part of your scripts multiple times or need to run the same code with only different values, then you should create a PowerShell Function.
PowerShell functions not only allow you to easily reuse a part of your script, they also give structure to your script. This will make your scripts more readable and easier to debug when things don’t work as they should.
In this article
In this article, we will look at how to create a PowerShell Function, using parameters, returning values, and of course how to use them.
Creating a PowerShell Function
To create a function you will need to give the function a name followed by curly brackets. Inside those brackets, you can place the script that you want to execute when the function is called.
How you name your function is actually quite important. In PowerShell, you will need to use one of the approved verbs followed by a singular noun. Both are written in a Pascal case, where you capitalize the first letter of each word. For example Add-UsersToGroup.
To view a list of all approved verbs, you can run the cmdlet Get-Verb in PowerShell, or check out the documentation here at Microsoft.
So for example, to create a simple function that will write something to the console (host), we can make the following function:
function Write-SomethingToHost {
    Write-Host 'show something on screen'
}
Using Parameters
Parameters allow you to pass variables or objects to your PowerShell function, which you can then use inside the function. If you are creating a small function, then you could declare the parameter by adding a variable in parentheses after the function name.
It’s even possible to declare multiple parameters this way, by separating them with a comma. But this method is not really recommended to use:
function Show-Something($test)
{
    Write-Host "show something on screen $test"
}

Show-Something -test "test"
A better way to use parameters in your function is to use a parameter block. Parameter blocks are not only easier to read but also give you more control over the parameters.
In the example below, we have defined two variables inside the parameter block that we want to use inside our function:
function Show-Something{

    param(
        $number,
        $color
    )
    Write-Host "show number $number on the screen" -ForegroundColor $color
}

Show-Something -number 42 -color "green"
Now this works ok, but there is a problem with the example above. If you don’t specify the color, then the script will throw an error. Also when you specify a non-existing color, you will get an error.
We can prevent this by validating the parameter input. The first step is to type in the input. This means that we are going to tell which data type we are expecting for the parameter. Some of the common data types that are used are:
- [string] – A simple string in single or double quotes
- [string[]] – An array of strings (to accept multiple values)
- [int] – Whole numbers without decimals
- [float] – Floating-point numbers with decimals
- [bool] – True or False
- [array] – Collection of values
- [hashtable] – Collection of key-value pairs
- [datetime] – a date-time value
- [object] – .NET Object
So for our example above, we expect both variables to be a string:
function Show-Something{

    param(
        [int]$number,
        [string]$color
    )
    Write-Host "show number $number on the screen" -ForegroundColor $color
}

Show-Something -number 42 -color "green"
Validating Parameters
But typing alone isn’t always enough. If we look at our color variable, the parameter now accepts every string that you throw at it. The only problem is that you are limited in the colors that you can use.
So we need to validate the string that is given to a set of possible values. To do this we can use a parameter validation. In this case, we will be validating against a set of values, like this:
[ValidateSet("Green", "Red", "Yellow", "Blue")]
[string]$color
But other common options to validate parameters are:
- [ValidateRange(1, 100)] – Validates a range of numbers
- [ValidateLength(1, 10)] – Validates the lengths of a string parameter
- [ValidatePattern(“[A-Za-z]+”)] – Validate a values against a regular expression pattern
- [ValidateNotNullOrEmpty()] – Ensure that a parameter is not null or empty
- [ValidateScript({ $_ -gt 0 })] – Validate a parameter using a custom script block
So for our example function, we can use the following two validations for example:
function Show-Something{

    param(
        [ValidateRange(1, 100)]
        [int]$number,
        [ValidateSet("Green", "Red", "Yellow", "Blue")]
        [string]$color
    )
    Write-Host "show number $number on the screen" -ForegroundColor $color
}

Show-Something -number 42 -color "green"
Mandatory Parameters
Another common issue with parameters in PowerShell functions are empty values. Sometimes your script really needs a value to be able to execute the script. In these cases, you can make the parameter mandatory, by adding [Parameter(Mandatory=$true)].
For example, the function below won’t work if you don’t supply a number. To prevent this, we can make the parameter mandatory:
function Get-Square {
    param(
        [Parameter(Mandatory=$true)]
        [int]$number
    )

    $Number * $Number
}
If you would to define a default value for a parameter, then you can’t make it mandatory as well. You could add the [ValidateNotNullOrEmpty()] validation attribute to it instead, but in my opinion it’s quite pointless because the parameter would always fall back to the default value.
Return Results
in PowerShell, the return keyword is used to exit a function and return a value to the caller of the function. It is, however, optional to use return in PowerShell functions. If you don’t use the return keyword, then the value of the last expression is returned by the function.
In the example below, it’s not needed to use the return keyword. The results of the last expression $InputString.ToUpper() is returned automatically by the function:
function ConvertTo-Uppercase {
    param (
        [Parameter(Mandatory=$true)]
        [string]$InputString
    )

    $InputString.ToUpper()
}

ConvertTo-Uppercase -InputString "hello world"
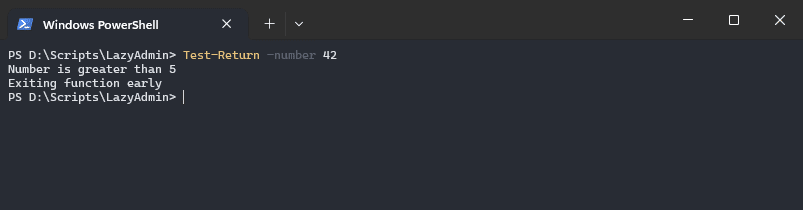
However, return can be explicitly used to exit the function early or to return a specific value regardless of the last expression.
When return is encountered in a function, it immediately exists the function. The remaining code in the function won’t be executed. This can be useful when a certain condition is met for example:
function Test-Return {
    param (
        [Parameter(Mandatory=$true)]
        [int]$number
    )
    if ($number -gt 5) {
        Write-Output "Number is greater than 5"
        return "Exiting function early"
    }
    # This code will not be executed if $number is greater then 5
    Write-Output "This line will not be printed"
}

Test-Return -number 42
Call Function
To call a function in PowerShell you need to keep in mind that you will need to declare the function first before you can call it. So your functions are at the top of your script, and you call them below it.
When calling a function you only have to type the function name. If the function has parameters, then simply type the parameter name followed by the variable or value that you want to assign to it.
For the parameters, it isn’t required to use the parameter name, but best practice is that you use names as well. This will make your code easier to read.
function Show-Something{

    param(
        [ValidateScript({ $_ -gt 0 })]
        [int]$number,
        [ValidateSet("Green", "Red", "Yellow", "Blue")]
        [string]$color
    )
    Write-Host "show number $number on the screen" -ForegroundColor $color
}

# This will work, but is not recommended
Show-Something 42 "blue"

# Use the parameter names instead
Show-Something -number 42 -color "Blue"
Advanced PowerShell Function
Until now we have looked at how to create a basic PowerShell function. Besides the basis function, we also have an advanced function in PowerShell. The principle of an advanced function is the same, but the difference is that an advanced function will have some common parameters automatically assigned to it, like Verbose, Debug, ErrorAction, and more.
To turn a function into an advanced function, you only have to add [CmdletBinding()] to the function.
function ConvertTo-Uppercase {
    [CmdletBinding()]  # < This makes it an advanced function
    param (
        [Parameter(Mandatory=$true)]
        [string]$InputString
    )

    $InputString.ToUpper()
}
Good to know is that when you turn a function into an advanced function, is that you will also need to include the param block. Even though you don’t have any parameters.
With the advanced functions enabled, you can now for example use features like Write-Verbose in your function.
function ConvertTo-Uppercase {
    [CmdletBinding()]  # < This makes it an advanced function
    param (
        [Parameter(Mandatory=$true)]
        [string]$InputString
    )
    Write-Verbose "Converting string $InputString to uppercase"
    $InputString.ToUpper()
}
We can now call the function with or without -Verbose to show what is happening in the function:

Pipeline Input
To use your function in a pipeline, you will need to declare which parameters accept the value from the pipeline. There are two options for that, you can use the ValueFromPipeline which accepts a value best on data type, or use the ValueFromPipelineByPropertyName, which allows you to match the name of the parameter.
Also, when you want to use your function in a pipeline, you will need to add a process block at least to your function.
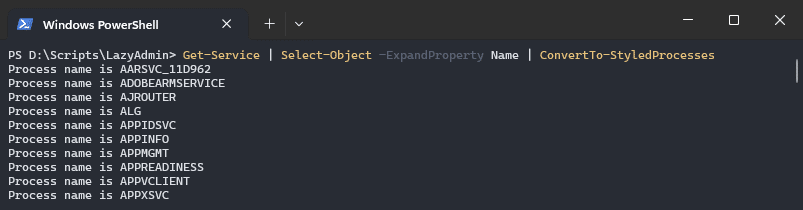
So when you are using ValueFromPipeLine, you can only pass one string through the pipeline to your function. Let’s take the following function as an example:
function ConvertTo-StyledProcesses {
    [CmdletBinding()]
    param (
        [Parameter(ValueFromPipeline=$true)]
        [string]$Name
    )

    process {
        Write-Host "Process name is $($Name.ToUpper())"
    }
}
If we pipe our function behind the Get-Service cmdlet, and select only the Name property, then we can convert the process name to uppercase:
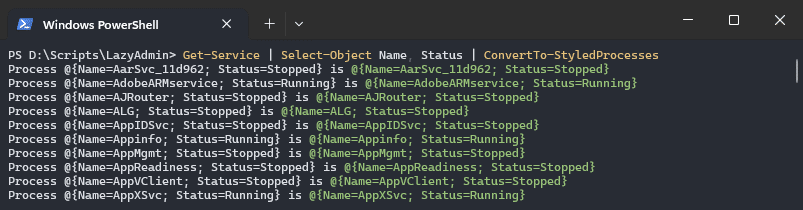
But what if we want to include the status as well in the results? Let’s say we want to give the status a color depending if the service is running or not. If you look at the function below, you might think this would work, but the problem is, that we haven’t defined how the service attributes should mapped to the parameters.
function ConvertTo-StyledProcesses {
    [CmdletBinding()]
    param (
        [Parameter(ValueFromPipeline=$true)]
        [string]$Name,

        [Parameter(ValueFromPipeline=$true)]
        [string]$Status
    )

    process {
        $color = "Green"

        if ($Status -eq "Stopped") {
            $color = "Red"
        }

        Write-Host "Process $Name is " -NoNewline
        Write-Host $Status -ForegroundColor $color
    }
}
So if we run it like this, then both the name and status attribute will be parsed to the name and status parameter:
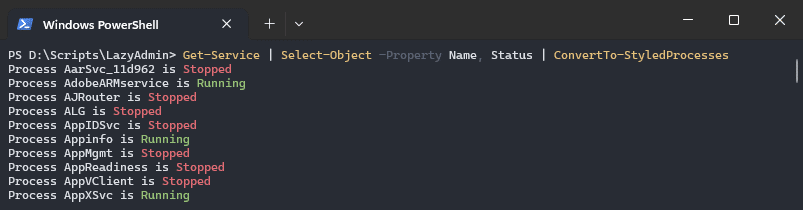
To solve this, we will need to use the ValueFromPipelineByPropertyName option instead. This way we can automatically map the properties to the correct parameters:
function ConvertTo-StyledProcesses {
    [CmdletBinding()]
    param (
        [Parameter(ValueFromPipelineByPropertyName=$true)]
        [string]$Name,

        [Parameter(ValueFromPipelineByPropertyName=$true)]
        [string]$Status
    )

    process {
        $color = "Green"

        if ($Status -eq "Stopped") {
            $color = "Red"
        }

        Write-Host "Process $Name is " -NoNewline
        Write-Host $Status -ForegroundColor $color
    }
}
Begin, Process, End
Besides the process block inside a function, we can also have a begin and end block. The begin and end blocks are only executed once when the function is called. They are optional and not used quite a lot, but in some cases, it can be useful.
For example, the function below will calculate the total price of the items based on their quantity and item prices. It will also calculate the total price of all the items together:
function Get-TotalPrice {
    [CmdletBinding()]
    param (
        [Parameter(ValueFromPipeline=$true)]
        [ValidateNotNull()]
        [pscustomobject]$Item
    )

    begin {
        $totalPrice = 0
    }

    process {
        $quantity = $Item.Quantity
        $unitPrice = $Item.UnitPrice

        $totalItemPrice = $quantity * $unitPrice
        $totalPrice += $totalItemPrice

        # Outputting each item's total price
        [PSCustomObject]@{
            Item = $Item.Name
            TotalPrice = $totalItemPrice
        }
    }

    end {
        Write-Output "Overall Total Price: $totalPrice"
    }
}
You can run/try the script above with the following example:
# Define items
$item1 = [pscustomobject]@{
    Name = "Product A"
    Quantity = 3
    UnitPrice = 10
}

$item2 = [pscustomobject]@{
    Name = "Product B"
    Quantity = 2
    UnitPrice = 15
}

# Calculate total price
$item1, $item2 | Get-TotalPrice

# Result
Item      TotalPrice
----      ----------
Product A         30
Product B         30
Overall Total Price: 60
Wrapping Up
PowerShell functions are a great way to reuse pieces of code in your scripts and give structure to your scripts. Try to keep your functions small and let them do only a single task.
When naming your functions, make sure that you use only the approved verbs, to make your functions easy to understand for others. Also, make sure that you use unique names.
I hope you found this article helpful, if you have any questions, just drop a comment below.


Hey Ruud!
Thanks for your example with functions!
I have one question regarding your last example with begin,process,end.
You wrote Write-Output in the end block and everything is ok.
When I write Write-Host instead, the output is above the output from
$item1, $item2 | Get-TotalPrice
Why does write-host behave differently from write-output here?
Thank you!
Write-Output is sends the data to the success stream of PowerShell, whereas Write-host directly prints to the console. I have recently written an article about Write-Output and how it’s different from Write-Host, you might find that interesting to read.