Even though more and more applications move to the cloud, your users will probably still need to access on-premise data or applications. To facilitate this, we needed to use VPNs. The problem however with VPNs is that they give access to your whole network, not only the desired applications.
This is where Microsoft Entra Private Access comes in, which is part of Microsoft’s Security Service Edge (SSE) solution. It allows your users to connect to on-premise resources while using conditional access policies.
In this article
In this article, we are going to take a look at how Microsoft Entra Private Access works, and how you can deploy it in your organization.
What is Microsoft Entra Private Access
Conditional Access is one of the strongest points of Microsoft Entra. It allows us to fully control what users can access, based on the access policies we have defined. We can for example require MFA for specific apps, or require a device to be healthy, or hybrid-joined.
Currently, conditional access policies can be used on all Microsoft 365 apps and a wide range of cloud-based applications. But what about on-premise applications and resources?
The problem currently with on-premise resources is that we don’t have the option for granular control as we have with conditional access policies. Of course, we can protect applications with usernames and passwords, limit access to file resources using NTFS permissions, etc. But as we all know, username and password are not enough anymore.
You may want to require MFA for specific applications or want users to log in before they can access a file share with sensitive information. And what about remote users?
To grant remote users access to on-premise resources, we often use VPN connections. And even though we can protect the VPN authentication with MFA, the risk lies in a compromised device. We often don’t have control over the remote device that the user is using.
With Microsoft Entra Private Access, however, we can fully control when, what, and how a user can access on-premise resources.
How does Private Access work?
Private Access enables secure access to any application, based on any port or protocol that uses TCP or UDP, including RDP, SSH, SMB, and FTP. It even allows you to enable single sign-on (SSO) based on SAML, HTTP headers, or legacy Kerberos authentication for both web-based and non-web-based applications.
To do this, you will need to install a client on the client device and a connector on the server. When the client tries to connect to an application on the server, the traffic is sent through Microsoft Entra. So for remote users, we are basically creating a VPN tunnel through Microsoft Entra to our on-premise resource. But there is a big difference here compared to a normal VPN connection.
A normal VPN connection gives users access to all on-premise resources after they are authenticated, while private access allows you to specify which apps or resources a user can access.
And more importantly, we can use the information about the user, device, and location to apply additional security measures, with the help of conditional access policies.
Microsoft Entra Private Access can also be used when the user works on-premise and tries to access an on-premise resource. In this situation, we don’t want all the traffic to go through Microsoft Entra, but we still want to utilize the conditional access policies.

To solve this, intelligent local access is used to determine if the user is working remotely or on-premise. When the user works inside the corporate network, only the authentication traffic is sent to Microsoft Entra, allowing us to still use the conditional access policies, while the application traffic remains locally.
Requirements
To use Microsoft Entra Private Access, you will need to have Microsoft Entra ID P1 licenses at least. The client devices need to run Win 10 or 11 and need to be either Microsoft Entra Joined or Hybrid Joined.
You will also need to have local admin rights for the installation of the client.
Install and Configure Private Access
To start using Private Access we will need to perform a couple of steps:
- Activate Global Secure Access in the tenant
- Install the Private Network Connector on the server
- Install or deploy the Global Secure Access client on the client devices
- Configure Applications and/or Services for Private Access
- Assigning Conditional Access Policies
Step 1 – Enable Global Secure Access
The first step is to enable Global Secure Access in your tenant. You will need to have the Global Secure Access Administrator role or use the Global Administrator account to activate the service.
- Open Microsoft Entra
- Expand Global Secure Access (Preview) and click on Get started
- Click on Activate

It takes a couple of seconds to activate the service. When done we need to enable Adaptive Access. This allows us to use conditional access policies and Microsoft Entra Identity Protection with Private Access.
- Expand Global Settings
- Open Session management
- Click on Adaptive Access
- Enable Global Secure Access signaling in Conditional Acces and click on Save

The last step that we need to configure for now is which traffic we want to forward to Global Secure Access. We can enable this for Microsoft 365 Access, Private Access, and Internet Access.
- Microsoft 365 Access – All traffic for Entra ID, SharePoint Online, Exchange Online, and other Microsoft 365 apps.
- Private Access – Allows you to route all traffic to your on-premise resources
- Internet Access – Route all traffic to the public internet, including SaaS apps, based on IP Addresses and FQDNs
We are going to enable both Microsoft 365 Access and the Private Access profile:
- Expand Connect and click on Traffic Forwarding
- Enable the Microsoft 365 Access Profile
- Enable the Private Access Profile

For both profiles, we will need to assign users or groups. Click on View (11) in each profile and either enable it for all users or select a group of users. As always with changes in IT, first test it out on a small group of users.
Step 2 – Installing the Connector
The next step is to install the Private Network Connector on the Windows server that has access to the application that you want to make available. The connector facilitates the outbound connection to Microsoft Entra.
You can install multiple connectors, (one per server), and group them into a connector group. All the connectors in the same group act as a single unit, allowing for load balancing and high availability.
Download the connector from the Connectors page under Connect in Microsoft Entra. Click on Download connector service and install it on the desired server.

Note
You will need to restart the server to complete the installation.
During the installation, you will need to sign in with your Microsoft Entra Admin account to connect the installation to your tenant.
By default, the connector is added the the Default Connector group. You can create new groups in the connectors page, and assign a connector to the group by simply selecting the connector and changing the group in the fly-out settings page.
Step 3 – Install the Client
With the server-side connector installed, we can now install the client. The client can be installed manually, but you can of course also deploy the client with your deployment tools like PDQ or Intune.
Download the latest version of the client in Microsoft Entra, under Global Secure Access > Connect > Client Download.


After the client is installed on the client, you will see the client running in the Quick Access tray. If you don’t have SSO configured correctly for your tenant, then the user might be prompted to sign in with their Microsoft 365 account. They only need to do this once after the installation.
If you right-click on the client, you can pause, resume, and restart the client. But more importantly, you can open the Advanced Diagnostics. The overview shows information about the signed-in user, device, and tenant ID.
In the Health check, you can quickly see if everything is running correctly and the other tabs offer us a range of tools to test and collect information.

When you open the health check, you will probably see an error that IPv4 is not preferred. The client currently only works with IPv4, meaning that traffic sent over IPv6 is not collected and redirected to the Secure Service Edge.
To change this, we can use the following PowerShell command to set IPv4 as the preferred address to use. This way, when the DNS resolves an address and gets both an IPv4 and IPv6 address back, it will use the IPv4 Address:
# Prefer IPv4 over IPv6 with value 0x20
# Rrevert to default with value 0x00
$value= 0x20

Set-ItemProperty -Path "HKLM:\SYSTEM\CurrentControlSet\Services\Tcpip6\Parameters" -Name "DisabledComponents" -Type DWord -Value $value
Step 4 – Configure Applications and Services
The last step is to create the applications and services that we want to give access to through Microsoft Entra Private Access.
Important to understand here is that the applications and services are defined based on their IP Address or FQDN and the port number of the application. We can define a single IP address to target a specific server or application or define a range of IP addresses to target all the servers in our on-premise network.
To create applications we have two options, we can use the Quick Access method or create Enterprise Applications. It’s important to understand the difference between the two:
Quick Access
With Quick Access, you create one application, that can give access to multiple resources or applications. This option is best used to give access to a baseline of resources to which all your users should have access. For example, file shares that don’t need additional authentication.
Good to know is that you can use conditional access policies on the Quick Access application as well.
Enterprise Applications
An enterprise application allows you to create an application for each resource you want to give access to. You can then assign users and groups or configure conditional access policies per application. This way you will have more control over who can access the resource and what security requirements you want to apply.
For this example, we are going to use the Quick Access application to grant access to all the RDP connections of our servers and access to the file shares, and one Enterprise Application for connecting to the server with SSH.
Creating the Quick Access Application
- Open Quick Access under Global Secure Access > Applications
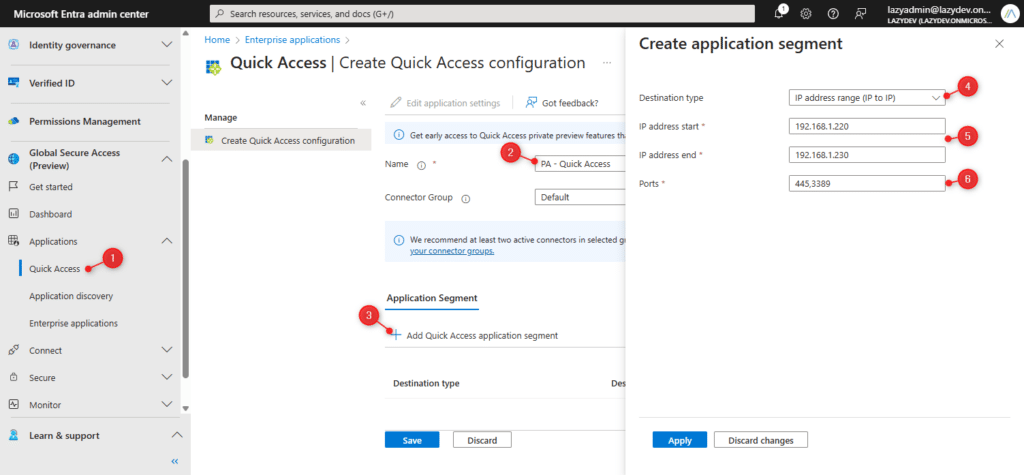
- Give the Quick Access app a name, for example, PA – Quick Access.
- Click on Add Quick Access Application Segment
- Set the destination type to IP Address Range
- Other options are a single IP Address, FQDN, or IP Address Range (CIDR) which includes a subnet mask
- Set the start and end IP Address that reflects your server addresses
- Enter the port numbers
- 445 is SMB file shares
- 3389 is Remote Desktop Protocol
- Click Apply when done
In this example, we only added one IP Address Range, but you can add multiple segments (IP Address or FQDN’s). When done click Save to create your Quick Access Application.
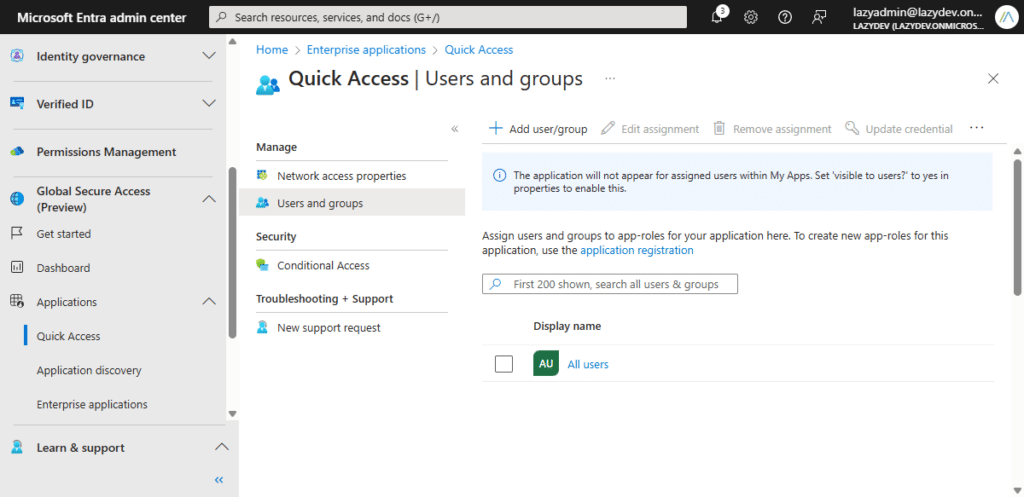
We will need to assign Users or Groups to the Quick Access application so the Forwarding Profiles are created for the users.
- Click on Users and Groups in the Quick Access application
- Click on Add user/group
- Assign a Group or user to the application
Creating Enterprise Applications
The process to create the Enterprise Applications is pretty much the same. In this case, however, you often create one application per resource. This way you have more control over who can access the resource and which policies you want to apply to it.
- Open Enterprise Applications
- Click on New Application
- Give the application a name
- Click on Add Application Segment
- Enter the segment details, and use port 22 for SSH.
- Click on Apply and Save the application

Just like with the Quick Access application, we will need to assign users or groups to the applications. To open the newly created application, you can either click on Enterprise Applications again under Global Secure Access or look up the Enterprise Application under Identity > Applications > Enterprise Applications.
I have added a tag in front of the application name, pa (standing for private access). Adding a tag like this really helps with finding the Enterprise Applications between all other applications.

Click on the newly created application and assign users or groups to the application.
Step 5 – Assigning Conditional Access Policies
With the applications created, we can now assign conditional access policies. Remember, the policies are optional. You can also use Private Access to just make the applications available to your remote users.
In this example, we are going to require an MFA and an Entra hybrid-joined device for SSH access. Keep in mind that you can also use this method for the Quick Access application as well.
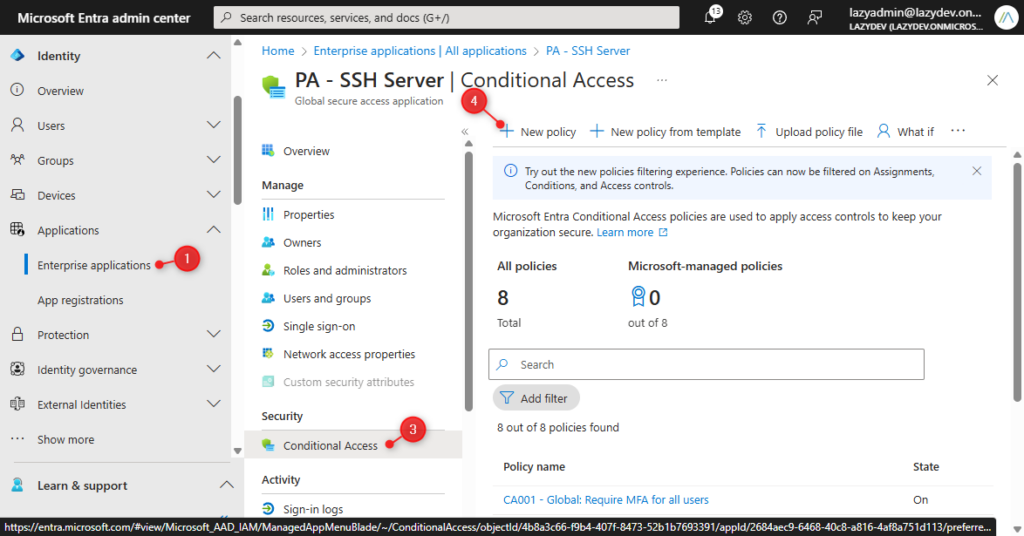
- Open Enterprise Applications (either under Global Secure Access > Applications or under Identity > Applications)
- Select your Private Access application, in this case, PA – SSH Server
- Click on Conditional Access
- Click on New Policy
- Give the policy a name
- Specify the users to apply the policy to
- The target resource is already selected (our application)
- Click on Grant and select Require MFA and Require Entra Joined device
- Click Select
- Make sure that the policy is enabled and Click Save.

You can do this for all your Private Access applications as you see fit. If you want to know more about Conditional Access Policies, then make sure to read this article as well.
Testing Private Access
With everything configured, we can start with testing out Private Access. The first step is to check if the forwarding profiles are applied to the Global Secure Access Client.
- Right-click on the client
- Open the Advanced Diagnostics

In the Global Secure Access Client diagnostics, open the Forwarding profile tab. Here we can see all the rules that have been applied to the client. Expand the Private Access rules and verify that the rules.

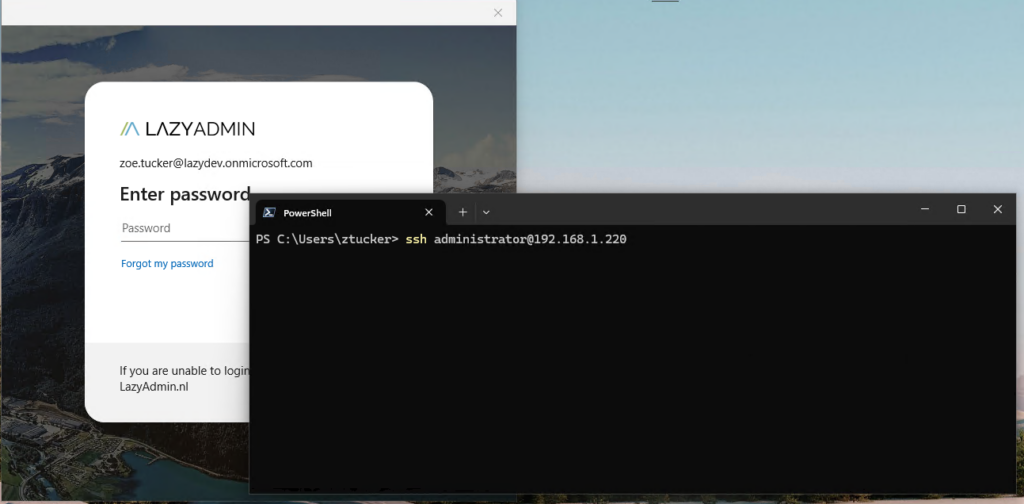
We have created a conditional access policy that requires MFA when you want to connect to one of the servers with SSH. So let’s see if that is working correctly.
Open PowerShell and connect to one of your servers with the command:
ssh administrator@192.168.1.220
As soon as you hit enter, you will see the Global Secure Access application popping up followed by the authentication dialog. After you have successfully authenticated, the SSH connection will be established.
Wrapping Up
Microsoft Entra Private Access is a great feature that can replace VPN connections in most situations. Also having the ability to add additional security layers to on-premise applications is a great feature.
Private Access is currently in Preview and only supports TCP ports at the moment. UDP support is coming (currently in Early Access) and also Private DNS is coming as well.
Hope you like this article, make sure that you try out Private Access, and if you have any questions, just drop a comment below.


Great article, man. Very well explained and detailed!
Thanks a lot, have a great day
Thanks!