Conditional Access Policies allow you to fine-grain your access control in Microsoft 365. It allows you to control from which devices, or locations users can access your resources, and specify what methods of authentication are required to access it.
The problem with MFA alone is that users can get MFA fatigue. They are prompted too often to approve a sign-in action, that they might accidentally approve a malicious login attempt. By using Conditional Access we have more control on when to show MFA or even completely block risky sign-ins.
In this article
In this article, we will look at how a Conditional Access Policy works, what the best practices are, and how to create conditional access policies in your Azure environment.
How does Conditional Access work?
Conditional Access policies are essentially if-then statements for access control. It uses different signals to decide which policy it should enforce. This policy could be to require additional authentication or to block access altogether.
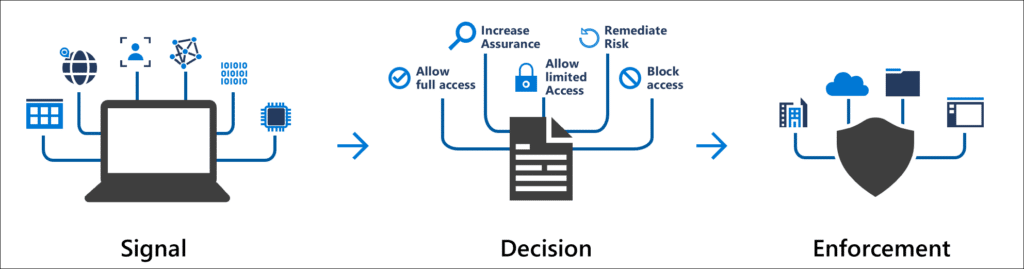
Conditional Access policies in Azure can use a wide variety of signals from different sources to determine which policy it should enforce. These signals include the following:
- User, Group membership, or Role (privileged roles)
- Device state – Based on (non)compliant devices, device platform
- Location – Trusted IP Ranges or based on countries/regions
- Application – Filter policies on specific applications or browsers
- User risk – Enforce policy based on user risk level
- Sign-In Risk – Based on real-time and calculated risk detection
These signals can be used in a policy to make a decision about if the user is granted access or if additional authentication is required. We have the following options when it comes to access control:
- Block access
- Grant access
- Require MFA – This means that the user must complete an MFA request to access to resource. You can set the authentication strength (SMS, Passwordless MFA or Phishing-resistant MFA)
- Require Device to be compliant
- Require Microsoft Entra hybrid joined device
- Require app protection policy
- Require password change – Use must change password. Works only in combination with MFA
Besides blocking or granting access, we can also enforce session-level controls, such as limiting access to specific actions within an app or applying real-time monitoring.
Conditional Access is a crucial part of modern security frameworks like Zero Trust, which operates on the principle of “never trust, always verify.” Instead of assuming everything behind the corporate firewall is safe, the Zero Trust model assumes breach and verifies each request as though it originates from an open network.
Named Locations
One of the components that you will need to use when creating a policy, is the Named Locations. These are either Countries or IP Ranges that you can use as a condition in your policy.
A common policy is to block access from all countries to your Microsoft 365, except from the countries where your users work. To create this policy you can define the countries in your Named Locations.
Another option is to add the public IP Addresses from your offices in your Named Locations. This allows you to reduce the sign-in frequency for example from these locations.
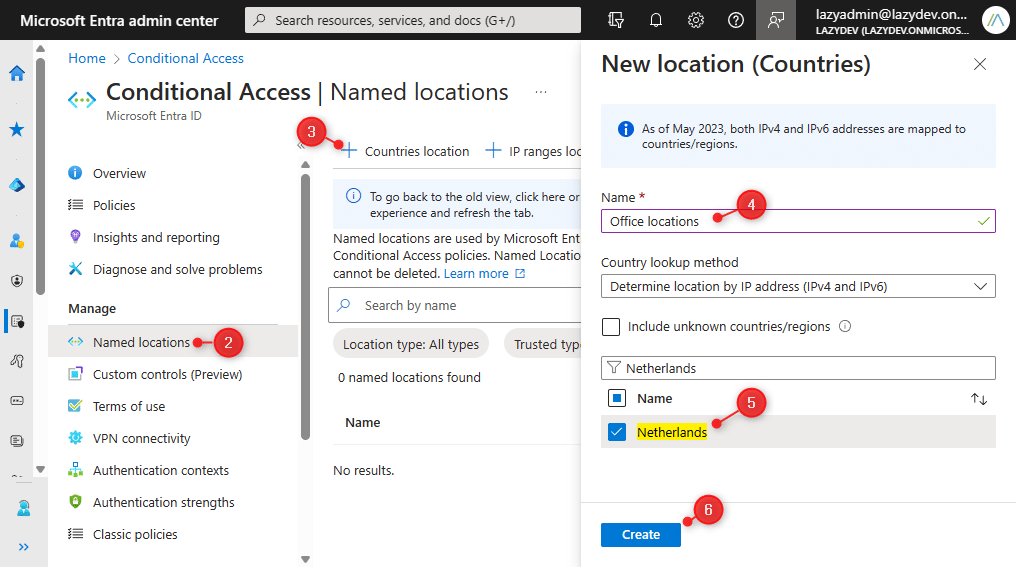
You can add a Named Location in Microsoft Entra as follows:
- Open Microsoft Entra and go to Conditional Access under Protection
- Choose Named Locations
- Click on + Countries Location
- Give your locations a name
- Select the countries that you want to add to the list
- Click on Create
Requirements
Even though Conditional Access Policies are highly recommended to use by Microsoft, they are not included in every Microsoft 365 license. To use Conditional Access in Microsoft 365, you will need to have at least a Microsoft Entra ID P1 license.
This license is included in Microsoft 365 Business Premium and Microsoft Office 365 E3. You can also buy the license separately, but it costs $6 per user per month.
It’s also important that you have an Emergency access account in Microsoft Entra. This account is not assigned to a specific user and is only used when the normal Admin account can’t be used. For example, when the global admin account is locked out due to an incorrect conditional access policy, or when MFA isn’t working due to a cell network outage.
Important
Make sure that you exclude the emergency access account from each conditional access policy that you create. This way you can never be locked out from Microsoft Entra.
Deploying a Baseline
Conditional Access Policies can be tailored to the needs of your organization, but it’s good to start with a baseline. Now to create this baseline you have a couple of options. You can create each policy manually, use the Microsoft Policy Templates, or use the Adaptive MFA setup wizard.
Microsoft currently offers 16 policy templates that you can use. These templates allow you to deploy a policy with only a few clicks. The MFA setup wizard will enable MFA if that isn’t enabled yet in your tenant and create 5 baseline policies.
Before we start with any of the policies, make sure that you have created an emergency access account which we can exclude in the policies, so we don’t lose access to Entra.
Using Adaptive MFA setup wizard
The adaptive MFA setup wizard is a great starting point for small and medium organizations. It allows you to quickly enable MFA and it deploys a Conditional Access Policy baseline for you.
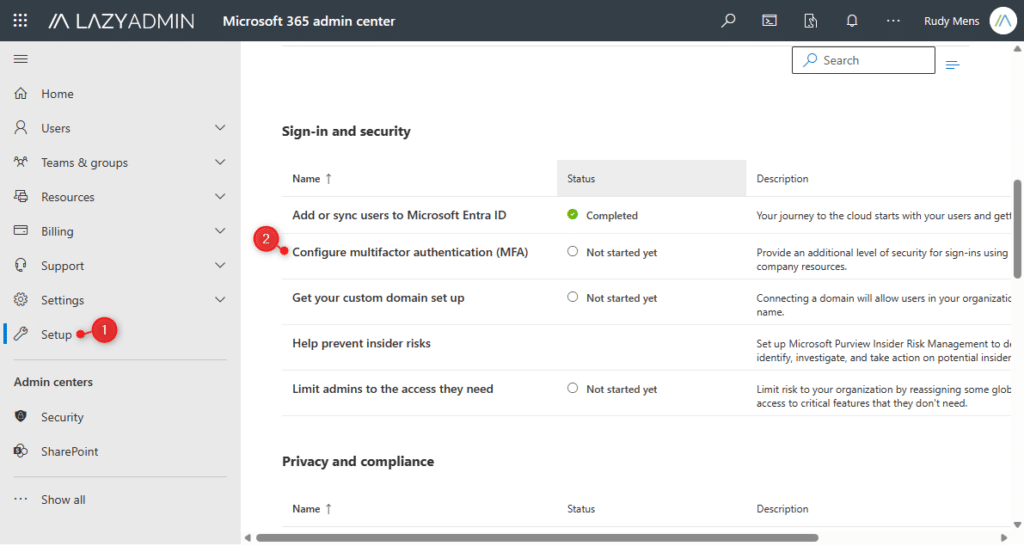
- Open the Microsoft 365 Admin Center and click on Setup
- Scroll a bit down and choose Configure multifactor authentication (MFA)
- Click on Get started
- Click Next to skip the MFA Overview
- Make sure that at least the Microsoft Authenticator App is selected.
It’s not recommended to use low-security options, like SMS and call.

- In the next step, Adaptive MFA using Conditional Access, we want to Customize the policy templates.
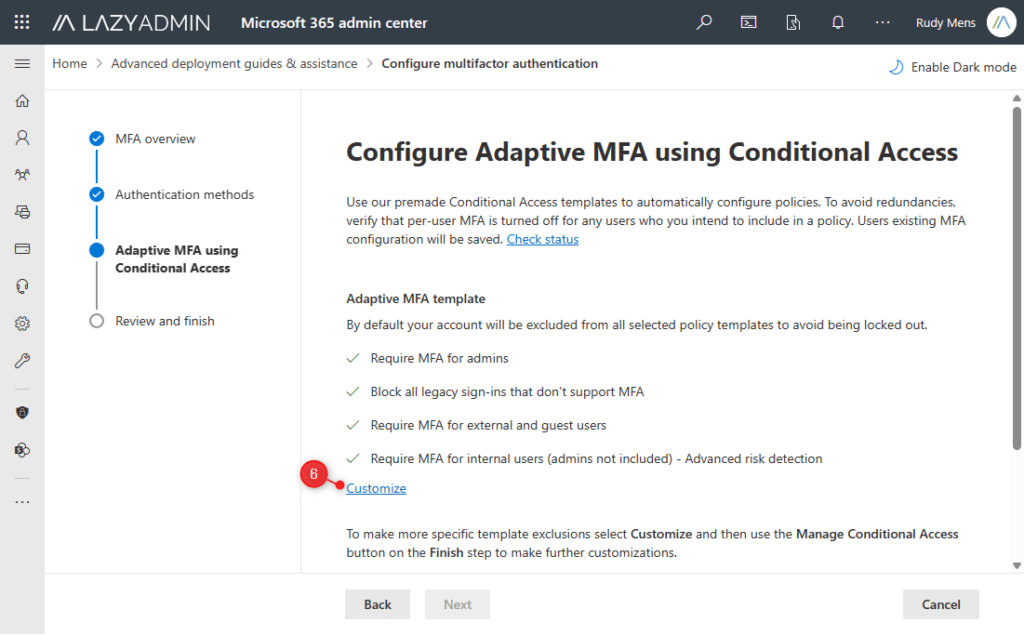
- We want to exclude our Emergency Admin account from the MFA requirement for Admins.
Expand the Require MFA for Admins and select Exclude specific users or groups. - Enter the account name of your Emergency Admin account
Note
It’s not recommended to name your emergency admin account actually Emergency Admin. This is of course way to convient for attackers. Make sure you name it something less meaning full 😉
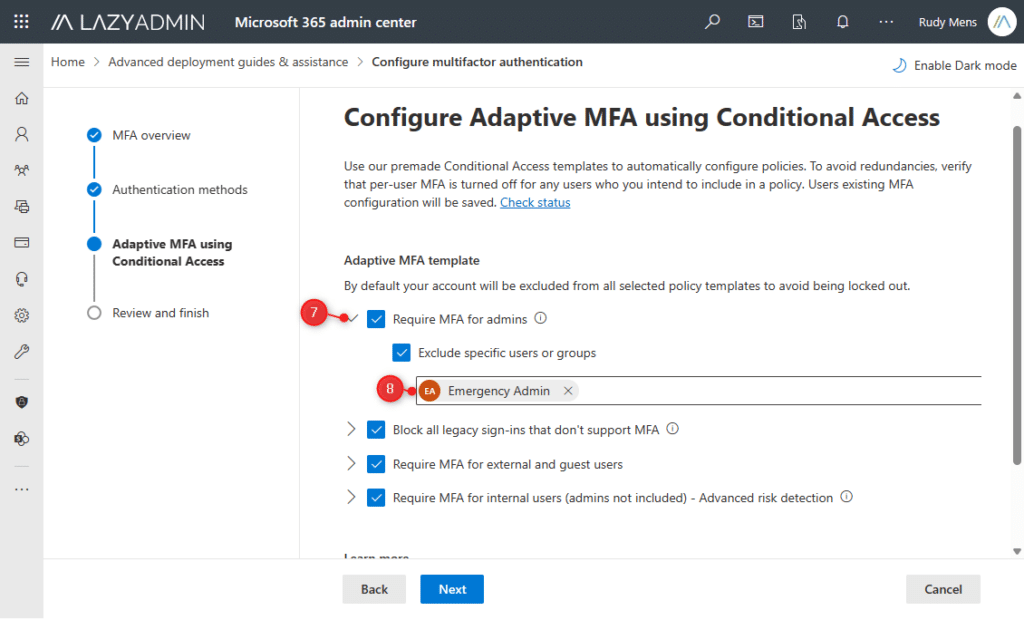
- Review the settings and click on Save Configuration
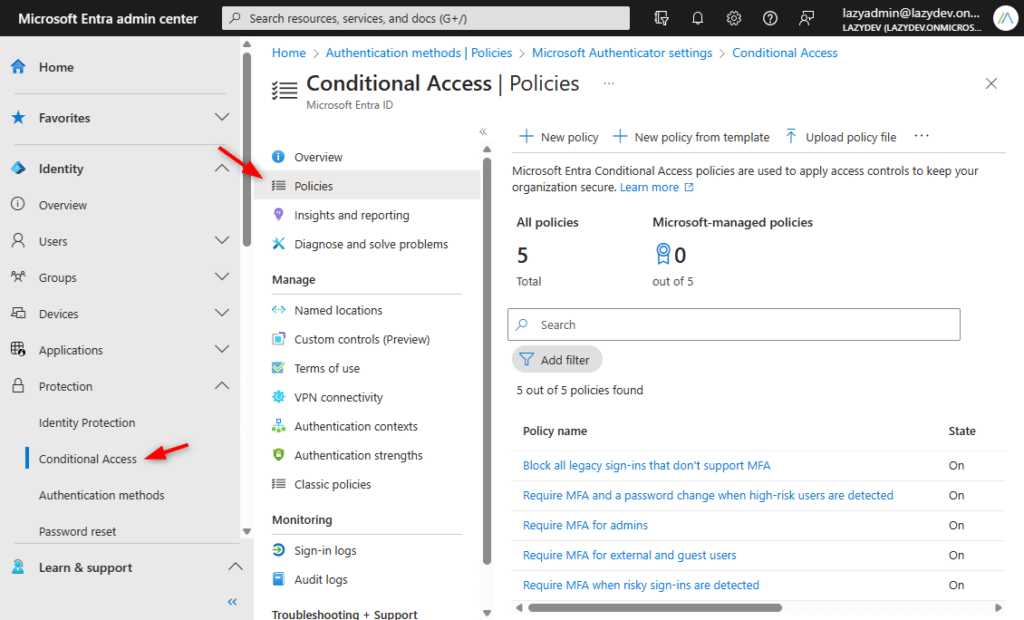
If you now open Microsoft Entra and navigate to Identity > Protection > Conditional Access > Policies, then you will see that the 5 default policies are created.
Using Microsoft Templates
The Microsoft Template policies are a great starting point and offer protection for the most common threats. There are currently 16 policies to choose from:
- Block legacy authentication
- Require multifactor authentication for admins
- Require multifactor authentication for all users
- Require multifactor authentication for guest access
- Require multifactor authentication for Azure Management
- Securing security info registration
- Require compliant or hybrid Azure AD joined device or multifactor authentication for all users
- Require compliant or hybrid Azure AD joined device or multifactor authentication for admins
- Require multifactor authentication for risky sign-ins
- Require password change for high-risk users
- Block access to unknown or unsupported device platform
- No persistent browser session
- Require approved client apps or app protection policies
- Use application-enforced restrictions for O365 Apps
- Require phishing-resistant multifactor authentication for admins
- Require multifactor authentication for Microsoft Admin portals
Just like when you create custom policies, it is recommended to deploy these policies first in Report Only mode. This allows you to test and monitor the policy so you can verify that it works as expected before you activate it.
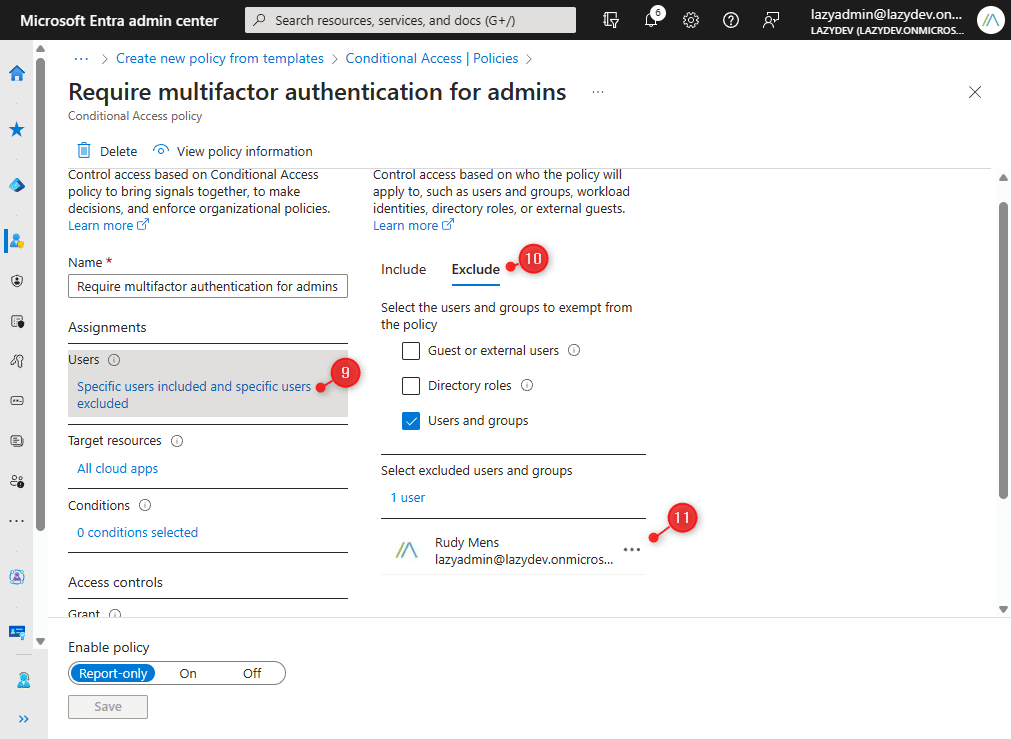
When you deploy a template policy, the current user is always excluded from the policy. This is the account that you are signed in within Microsoft Entra. You can change this after you have deployed the policy.
Deploying a Template Policy
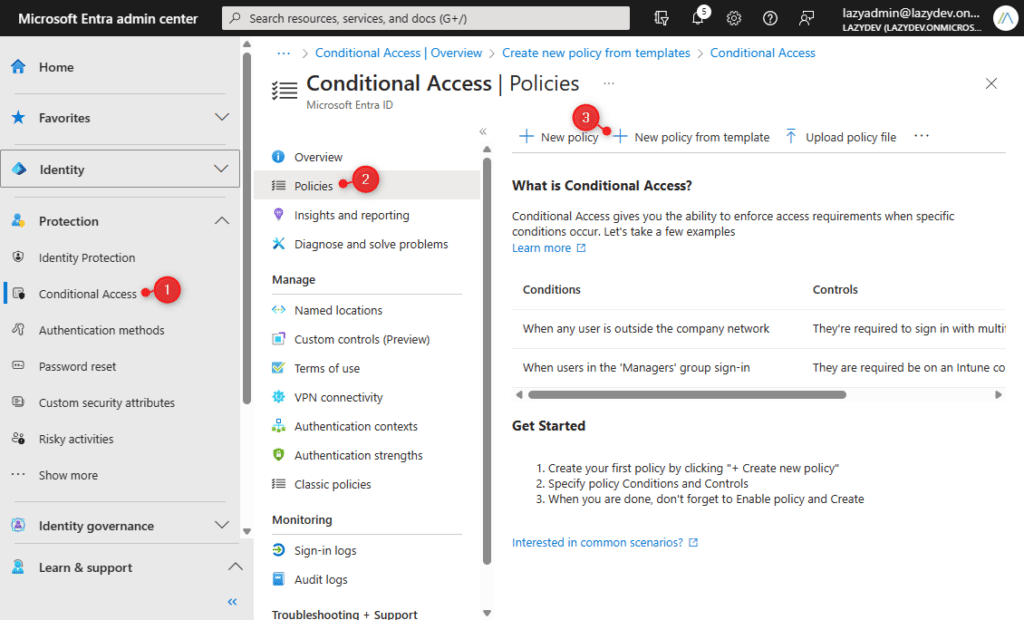
- Open Microsoft Entra and go to Conditional Access under Protection
- Click on Policies
- Click on New policy from template
- Select a template that you want to deploy. You can click on View to view the template policy.
- Click on Review + create
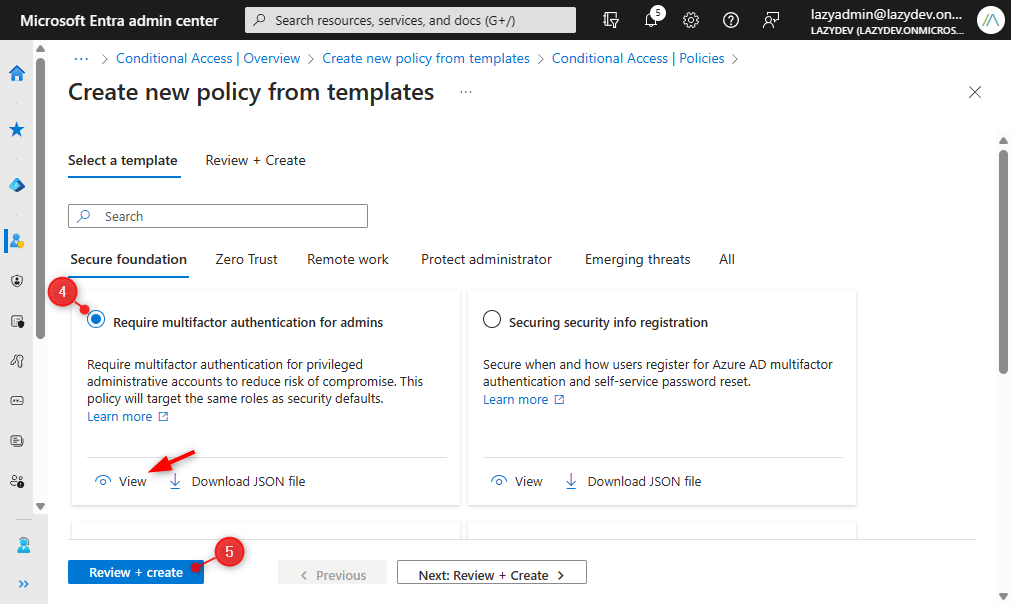
- Make sure that you keep the policy state in Report only
- Click on Create to create the policy
- Open the newly created policy
We will need to remove currently signed-in user from the exclusion and add the emergency admin account instead. - Click on Specific users included and specific users excluded
- Click on Exclude
- Remove the currently selected user and add your emergency admin account.
- Click on Save to update the policy
Which Template to use
As mentioned, there are currently 16 policy templates that you can use. You don’t need to use all of them, but I recommend testing and use the following conditional access policies at least in your Microsoft 365 tenant:
- Require multifactor authentication for admins
- Require multifactor authentication for all users
- Block legacy authentication
- Securing security info registration
- Require multifactor authentication for Azure Management
- Block access for unknown or unsupported device platform
Create a Conditional Access Policy
We can of course also create our own conditional access policies in Microsoft Entra. When creating custom policies, make sure that you test them with a small group of users first and run them in report-only mode to start with.
The first step when creating a policy is to give the policy a name. It’s important to use a proper naming convention for your policies so that you and your colleagues can easily understand what a policy does without opening it.
Microsoft has come up with a naming convention to use when creating policies. You don’t have to use it exactly like this, but they are a good starting point:

- SN – Sequence number – Allows for easy communication with your colleagues. There is even a numbering scheme that you can use.
- Cloud app – Name of the app the policy is for
- Response – For example, Block, Grant, or Require MFA
- Principal – Users, or Groups the policy is for
- Conditions – When to apply the policy, for example, on external networks
So let’s take a look at how we can create our own conditional access policy in Azure. We are going to create a policy that only allows access from countries that are listed in our named locations:
- Open Microsoft Entra and go to Conditional Access under Protection
- Click on Policies
- Click on New policy
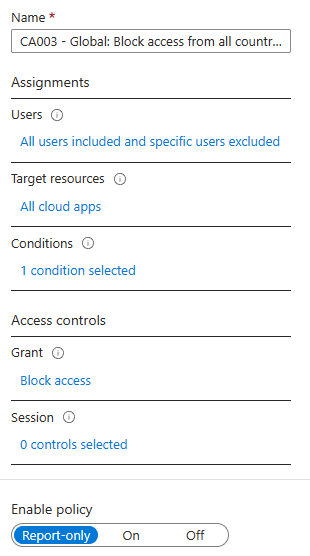
- Enter a name: CA003 – Global: Block access from all countries except named locations
- Click on Users
- Include > All Users
- Exclude > Your emergency admin account
- Target resources > All Cloud Apps
- Conditions > Select Locations
- Include > Any locations
- Exclude > Select locations and select your named location with countries to allow access from
- Grant > Block Access
Make sure that policy mode Report-Only is selected when creating a new policy. This way you can safely test and monitor a new policy before you enable it.
Testing New Policy
When you have created a new policy it’s important to thoroughly test it before you enable it in your tenant. One step is to run the policy in Report-Only mode so that you can monitor the impact of the policy.
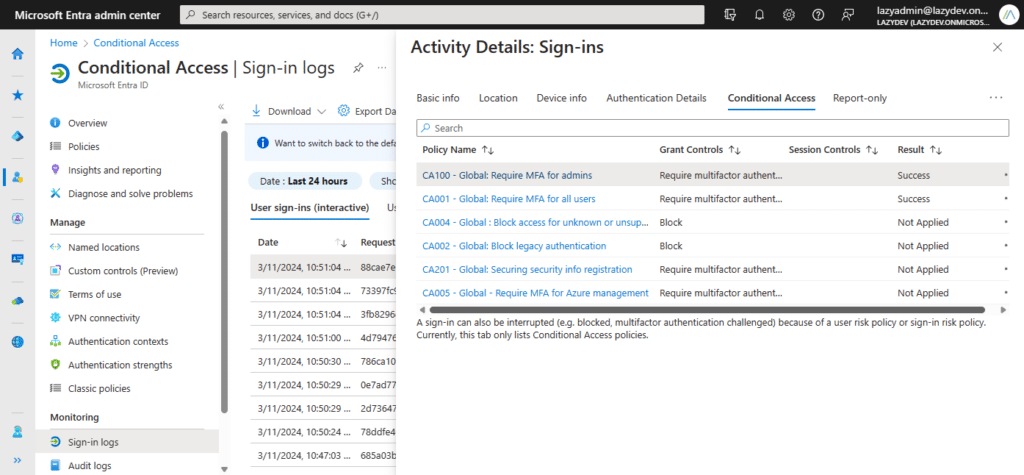
The monitor the policy, you can check the Sign-in Logs in Microsoft Entra > Conditional Access. This will show all sign-in activities and allow you to view which policies were applied or not. You can click on a policy to view the details.
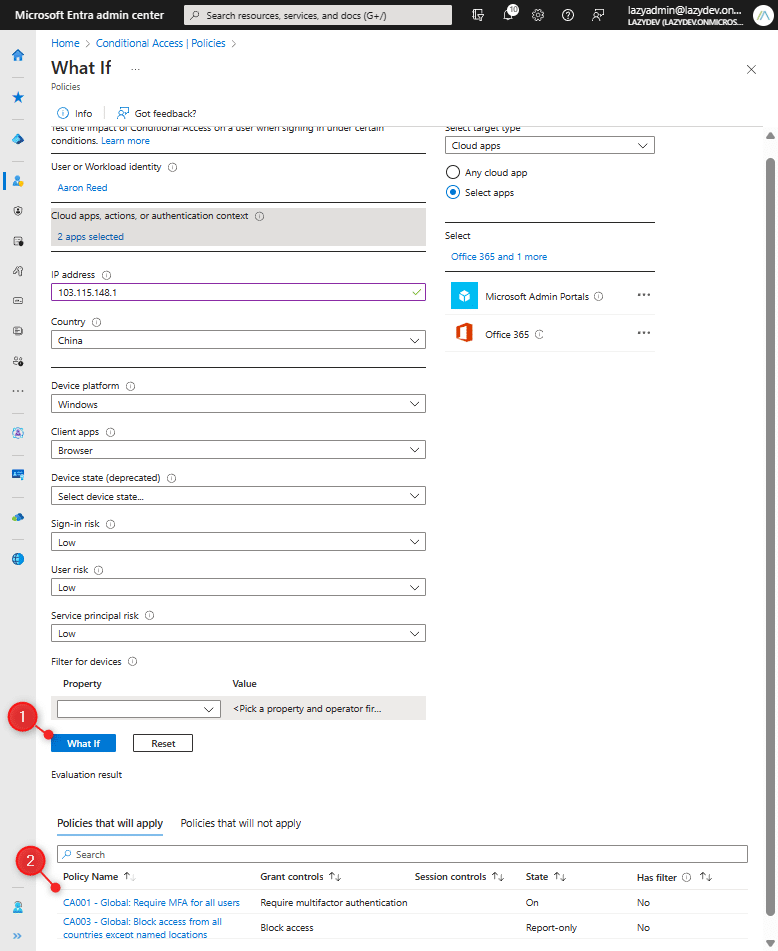
Another option to test new policies is to use the What If tool in Microsoft Entra. This tool allows you to replicate scenarios and test the impact of your conditional access policies.
You can find the What If tool under the Policies page in the Microsoft Entra > Conditional Access. It allows you to configure all conditions like user, cloud application, location, device details, sign-in risk, and more. After you have configured all the conditions, click on What If (1) and you will see which policies are applied and which are not (2)
The last option is to use the Insights and reporting tool. This tool allows you to better understand the impact of your conditional access policies. To use it however, you will need to have an Azure Subscription and enable Log Analytics. Read more in this article on how to configure and use the tool.
Import Policies
Conditional Access Policies can be exported with PowerShell to JSON files. This allows you to reuse the same policy in different tenants. Of course, you still will need to update specific users and groups, and change the emergency admin account and named location. But reusing policies will nevertheless save you a lot of time.
To import a policy, simply click on Upload policy file under Conditional Access > Policies and select the JSON file. Make sure that you set the policy state to Report-Only or Off and click on Review + Create
Best Practices
When it comes to best practices regarding conditional access policies a good starting point is the Microsoft templates. They provide a good foundation for securing your tenant. Besides the templates, I have some other policies that I recommend implementing in your tenant
- Block Access from all countries except allowed ones
This policy uses a named location with the countries from where your users sign-in from. All other countries are blocked. - Block Service Accounts from all locations except Trusted IP addresses
If you are using service accounts to connect on-premise applications with Microsoft 365, then you can limit the access to Trusted IP addresses only. - Block Guests from all Cloud Apps except Office 365, My Profile, and SharePoint Online
Guests should only have access to the apps that they need. These are in general only Office 365, My Profile, and SharePoint Online. Block access to all other cloud apps. - Require Compliant device for Admins
If you have compliance policies in place for your devices, then you should limit access to the admin portals from only compliant devices. - Require Microsoft Entra hybrid joined devices
If all your users have company-owned devices and you are using an on-premise Active Directory, then you can limit the access to hybrid joined devices. You can only require this for the admin portals or add this as a requirement to change security information. - Block Access from unused platforms
There is already a template for this policy, but I recommend limiting access to only the platforms that your organization uses. If your users don’t use Linux or macOS, then there is no need to allow access from those devices for example.
If you have Entra ID P2, then I recommend creating the following policies as well. These policies use the sign-in and user risk levels, which are part of Entra Identity Protection. It assigns a risk level, low, medium, or high based on the different parameters, like IP Address and device state.
- Block High-Risk sign-in
- Block High User Risk
- Require MFA for Low and Medium Sign-In
- Require MFA for Low and Medium User Risk
Wrapping Up
Conditional Access Policies can be quite overwhelming, but important is to start small. Start with the baseline and expand those when everything is running without problems. Also make sure that you don’t activate too many new policies at once because that will make troubleshooting a lot harder.
And, I already mentioned it a couple of times in the article, exclude your emergency admin account from every policy, so you always keep access to your tenant.
I hope this article helped you to get started with conditional access policies, if you have any questions, just drop a comment below.