Microsoft Office 365 comes with a lot of features to protect your data against today’s threats. If you create a new tenant, some but not all of these security features are enabled by default. Existing tenants however will need to keep up with the new security features and enable them manually to secure Office 365.
I have written this guide for you to use as a baseline to secure your Microsoft Office 365 tenant. All the security features can be enabled without the need for additional add-on products like Advanced Thread Protection, Defender for Office 365, or Azure Premium P1 or P2.
In this guide we are going to configure the following security settings:
- Enable Security Defaults
- Configure and check Multi-Factor Authentication (users and admins)
- Create an emergency access admin account
- Assign Role-Based Access Control (RBAC) for admins
- Enable Unified Audit Log
- Enable Alert Policies
- Enable Continuous Access Evaluation
- Enable Azure Portal Inactivity timeout
- Enable Preset Security Policies in Exchange Online
- Enable External Email Tagging
- Block Legacy Authentication Protocols
- Block SharePoint Legacy Authentication
- Block Upload of Specific File Types in SharePoint and OneDrive
- Allow Syncing only from Domain Joined computers
- Block Shared mailbox sign-in
- Block Auto-forward to External Domain
- Block User consent to apps
- Block User access to Azure Portal
- Block Guest can invite access
- Block Anonymous users can join a meeting
- Block Third-Party apps in Teams
- Limit External Sharing in SharePoint
- User Password Policies
- Corporate branding of the login page
- Configure SPF, DKIM and DMARC
Office 365 Security Defaults
Security Defaults in Microsoft Office 365 are preconfigured security settings that help you to secure your Office 365 data against common threats. These settings include:
- Enable multi-factor authentication (MFA) for all users and admins
- Blocking legacy authentication protocols
- Require users to use MFA when necessary (risky sign-in events)
- Block user access to Azure Portal
If your tenant was created after October 21, 2019, then it’s possible that the security defaults setting is enabled for your tenant.
Before you enable security defaults in Office 365 you should keep a few things in mind. You can’t make any exceptions to the policies. So you can’t disable MFA for one user or turn on the SMTP Authentication Protocol if you need it for a specific business application.
Also, you can only use the Microsoft Authenticator app using notifications for multi-factor authentication. Text messages or app passwords can’t be used with security defaults enabled.
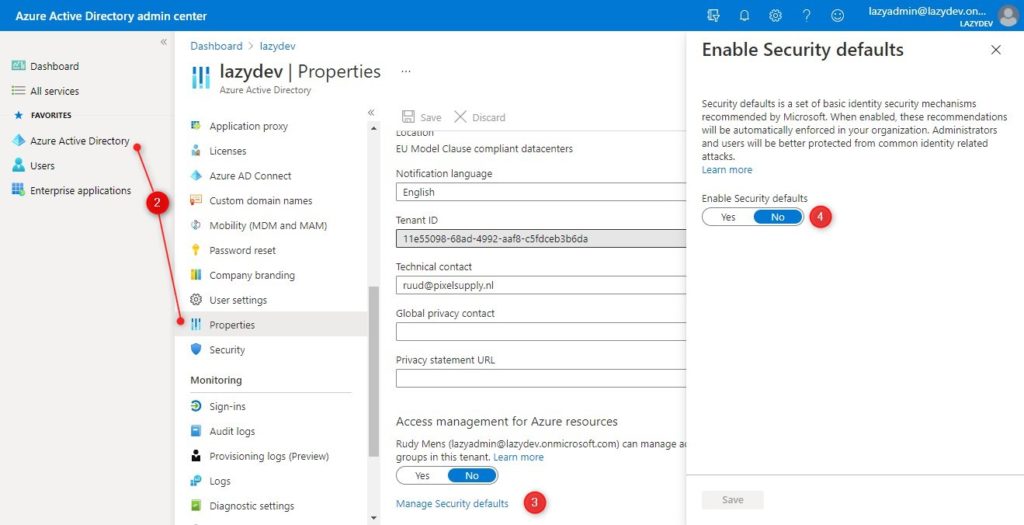
To enable or disable Security Defaults you will have to login into the Azure Active Directory Admin Center:
- Log in at aad.portal.azure.com
- Click on Azure Active Directory and select Properties
- Select Manage Security Defaults
- Enable Security Defaults
If you need to disable security defaults, then make sure you atleast enabled MFA for all the admins and users where possible and block all legacy protocols (per user).
Configure Multi-factor Authentication
Enabling multi-factor authentication (MFA) is the most recommended security measure to secure Office 365. It protects your accounts against phishing attacks and password sprays. Multi-factor authentication should be enabled for all admin and user accounts.
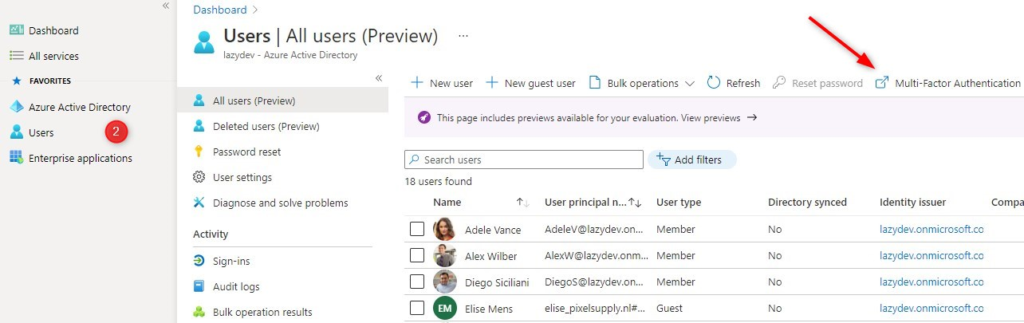
First, we are going to check the default multi-factor authentication settings.
- Log in at aad.portal.azure.com
- Select Users and click Multi-Factor Authentication
- Do not allow users to create app passwords. App passwords are needed for apps that don’t support modern authentication. You should avoid the use of these kinds of apps in your tenant.
- Disable the Call to phone and text message verification methods. These are known to be less secure. The mobile app is the preferred method to use.
- Set trusted devices to 90 days. This will lower the frequency that the users need to verify which helps to prevent them from unintentionally approving the MFA request. If they get the request too often then they will get too much used to it and maybe approve it without performing a sign-in action themself.
You can now add number matching and additional context (location and app) to the MFA request notification. This really helps with identifying who made the MFA request. Make sure you take a look at these new features (released mid nov 2021)
Enabling MFA for your users
The best way to implement MFA is based on conditional access. You get this when you use the security defaults, but if you don’t want to or can’t use security defaults, then you will need Azure Premium Plan 1 for this.
If you don’t want to use the security defaults and you don’t have Conditional Access, then your only option is to enable MFA for each user manually.
A good option is to inform your users about MFA and give them a two-week period to enable MFA themself. Users can enable MFA through the following link https://aka.ms/mfasetup.
Next, you can use this PowerShell script to get all the users that don’t have MFA enabled yet, and even enable it per user with the following script.
Create an emergency access Admin Account
Microsoft recommends that you create two emergency admin accounts. The idea behind this is that these accounts are excluded from multi-factor authentication and conditional access policies. If you don’t use conditional access policies, then one emergency account excluded from MFA is enough.
These accounts prevent you from being locked out of your Azure Active Directory in case of an unforeseen circumstance. For example, a mobile phone network outage that prevents you from approving the MFA request or the sudden leave of the only Global Administrator.
Don’t use these accounts on a daily basis, only when you lost access to Azure AD with your normal global admin account.
You can create the admin account in the Office 365 admin center under Users > Active Users > Add a user.
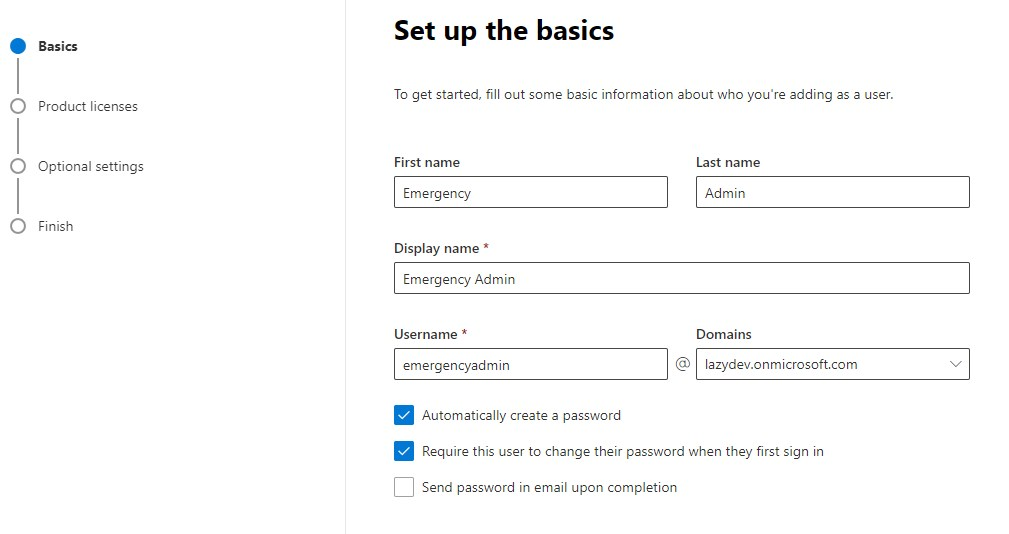
You don’t need to assign a product license to the user, only make sure you give the account Global Administrator access under the optional settings.
Write down the temporary password and change the password to a strong and very long randomly generated password. Store the password in a safe place to which multiple authorized people have access.
Make sure you exclude one account from the Conditional Access policies (if you use them) and exclude the other account from multi-factor authentication.
You can find more information about the emergency admin account here in the Azure AD documentation.
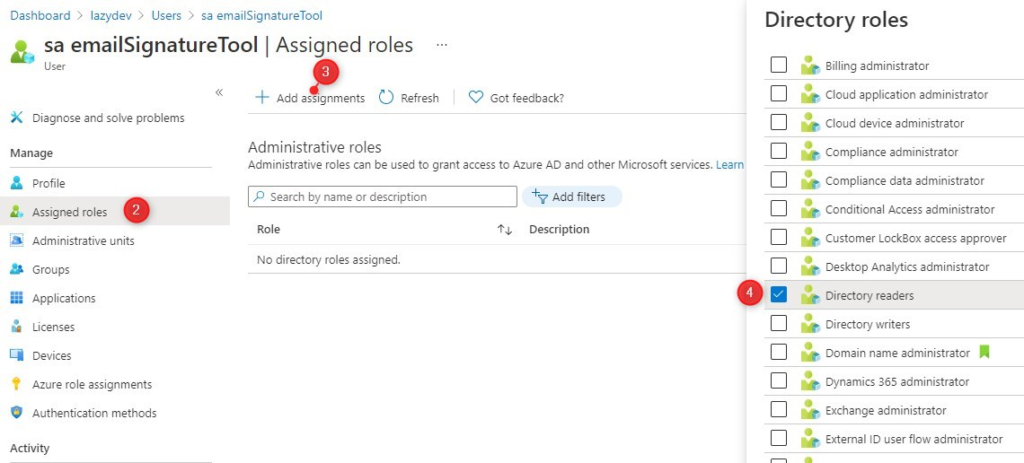
Assign Role-Based Access Control (RBAC) for admins
Role-based access control for admins is based on the principle of least privilege (POLP). User (admin) accounts should always have the minimum privilege level that is needed to do their job.
Helpdesk employees don’t need to have Global Administrator access, for example, they could probably do their job with only the Helpdesk and User administrator role.
For service accounts that only need to read user accounts from the Azure Active Directory, you could use the Directory Reader role. This allows the application to read all the user accounts.
You can assign the roles in the Microsoft Office 365 Admin Center. But I find it easier to do this through the Azure Active Directory:
- Select Users and the user you want to change
- Click on Assigned Roles
- Click Add assignments
- Select the appropriate role(s) and click on Add
You can also view all the roles and the assigned users under Roles and administrator in the Azure Active Directory.
Enable Unified Audit Log
While we need to do everything to prevent unauthorized access and to secure our Office 365 tenant, we also need to plan ahead in case someone gained access to our systems. Logging allows you to trace back when, what, and maybe even how a breach happened.
The mailbox audit log is enabled by default, but you also want to enable the Unified Audit Log. This allows you to collect all the logs in the Microsoft 365 Compliance Center, which makes it easier to search through them. It also allows you to create alerts based on events that happen.
Each entry in the Unified Audit Log is kept for 90 days by default. If you need to keep the entries longer then you will need an E5 license for your users.
We can use PowerShell to enable the Unified Audit Log. Make sure you are connected to Exchange Online and run the following cmdlet:
# Get the current Unified Audit Log status
Get-AdminAuditLogConfig | select UnifiedAuditLogIngestionEnabled

# Enable Unified Audit Log
Set-AdminAuditLogConfig -UnifiedAuditLogIngestionEnabled $true
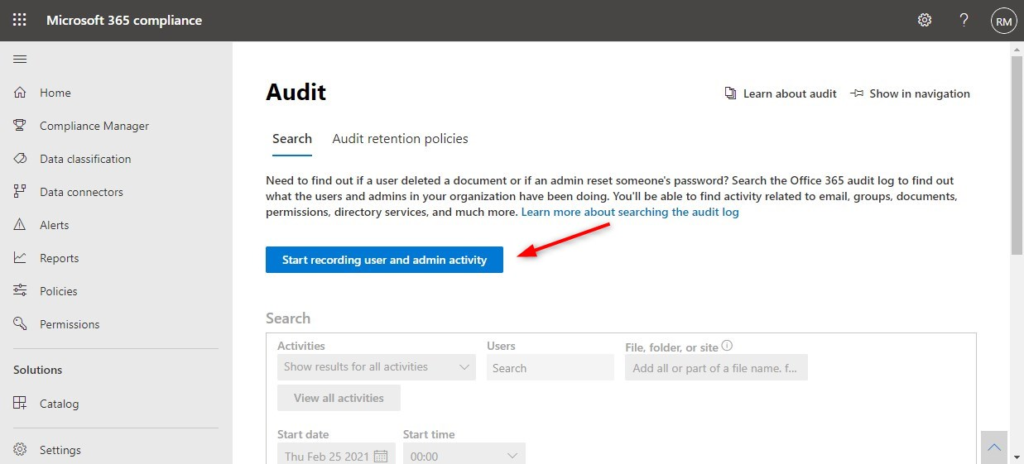
You can also enable it in the Compliance Center.
- Open the Compliance Center (Microsoft Purview)
- Click Show All in the sidebar
- Select Audit
- Click on Start recording user and admin activity
Enable Alert Policies
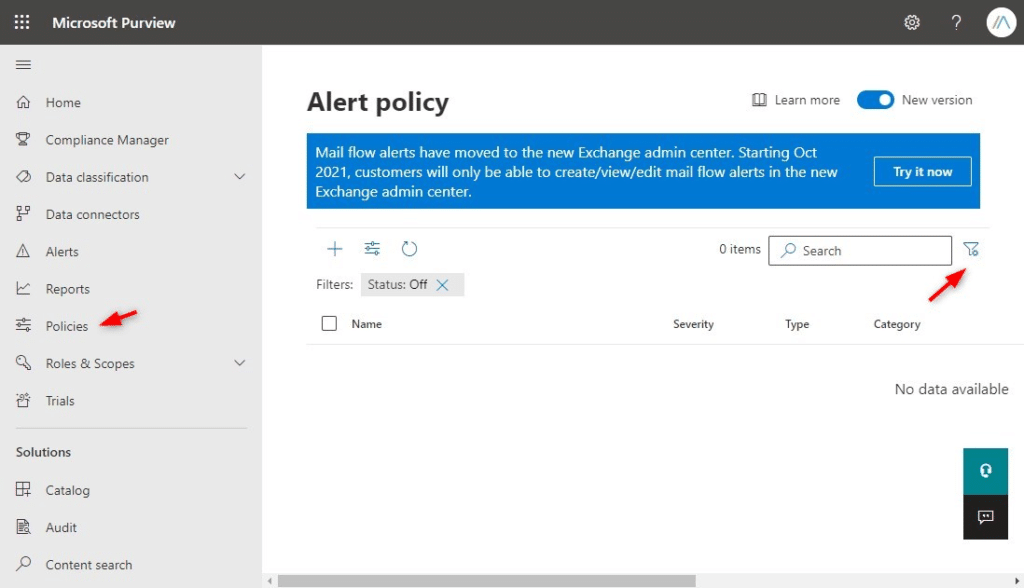
Alert Policies are enabled by default in your Microsoft Office 365 Tenant. These policies help you to track user and admin activities, and alert you in case of threats or data loss incidents. You will find the policies Microsoft 365 Compliance (Purview) under Policies. They are listed as Alert Polices.
Check if all the system-type policies are enabled by filtering the list on Status – Off.
To prevent data loss I also recommend that you create a new alert that is triggered when a Team is deleted. When a Team owner deletes a Team from the list with Teams then this can also result in the deletion of the SharePoint site and all the data.
Enable Continuous Access Evaluation
Authentication in Office 365 is based on OAuth 2.0 access tokens. These tokens authorize the user to access the services, for example when a user opens Outlook or logs into SharePoint. By default, the token is valid for one hour and refreshes automatically in the background when it’s expired.
The problem with this token lifetime of an hour is that any changes in the user’s authorization are only detected after an hour at most. When the user, for example, changes from network location, then the conditional access policies are only triggered when the token is renewed.
By enabling Continuous Access Evaluation (CAE) we can shorten this period to nearly real-time, with a max of 15 minutes due to event propagation time.
Note
Microsoft has move CAE to Conditional Access, which requires atleast an Azure Premium P1 plan. Continuous Access Evaluation is auto enabled as part of an conditional access policy. You can fine tune CAE under the Session setting of a Conditional Access Policy.
Enable Azure Portal Inactivity Timeout
In the Azure Portal, you can set an inactivity timeout for all the portal users (and admins). You will need to have Global Administrator rights to change the settings.
- Clear on the gear icon
- Select Configure directory level timeout
- Enable the idle timeout and set it to 30 minutes for example
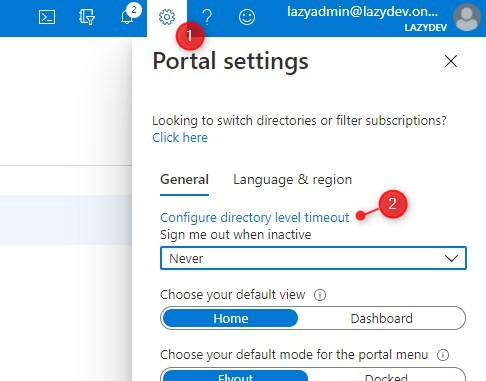
Any portal user that is inactive for more than 30 minutes will get automatically signed out. I assume that your admins already have a proper habit of locking their devices when they leave them unattended, but an extra security measure never hurts.
Enable Preset Security Policies in Exchange Online
Microsoft has created two preset security policies for Exchange Online, a standard, and a strict policy to secure your Office 365 mail. These templates contain policies to protect your Exchange Online environment against the latest attack trends.
The advantage of using one of these templates instead of creating the policies manually is that they will automatically update your settings with Microsoft’s latest recommendations.
You can find the policies in the Security Admin Center (Microsoft 365 Defender)
- Expand Email & collaboration and select Policy & Rules
- Choose Threat policies
- Click on Preset Security Policies
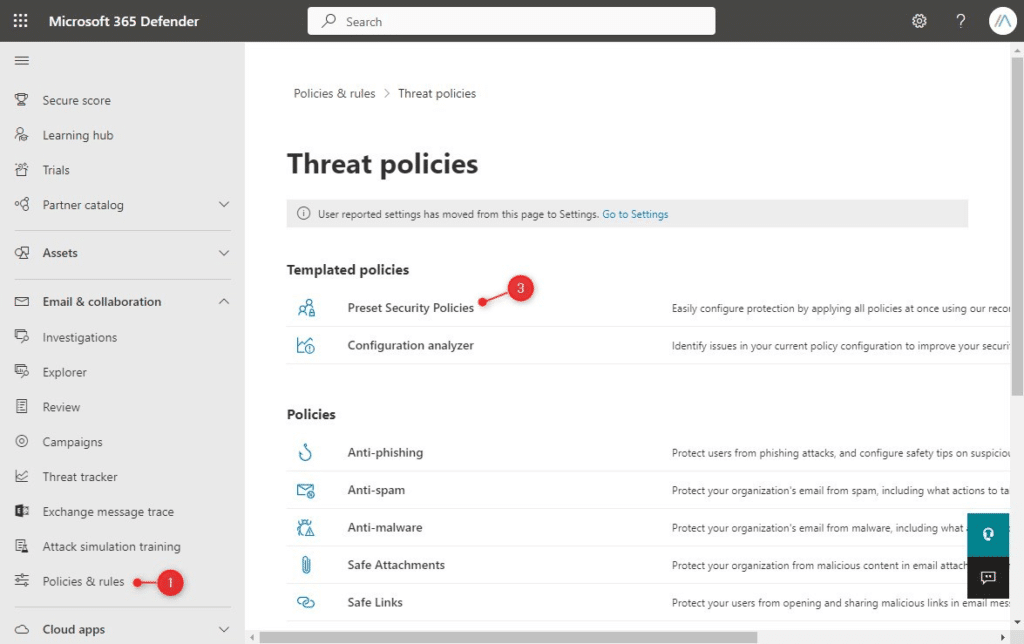
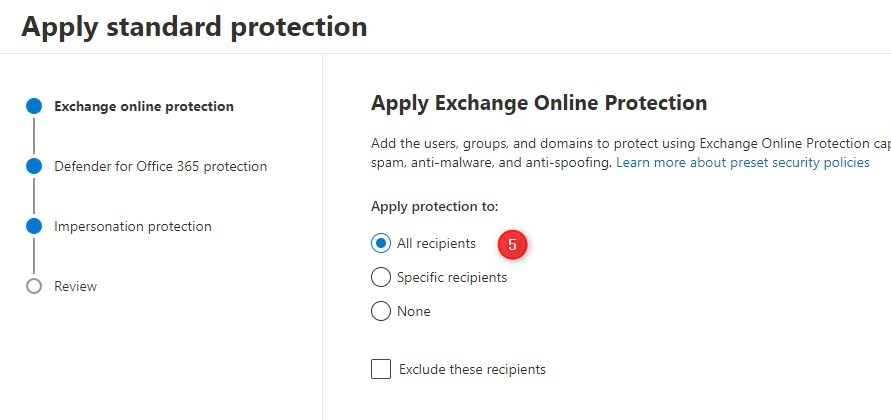
- Enable and Edit the Standard Protection
- Make sure that Apply Exchange Online Protection is set for All recipients
- Click on Next
- If you have Defender for Office 365 protection then set it also to All recipients
Depending on your license you can also configure the Impersonation protection. Add users to are likely to get impersonated, these are often the management board, directors, and HR.
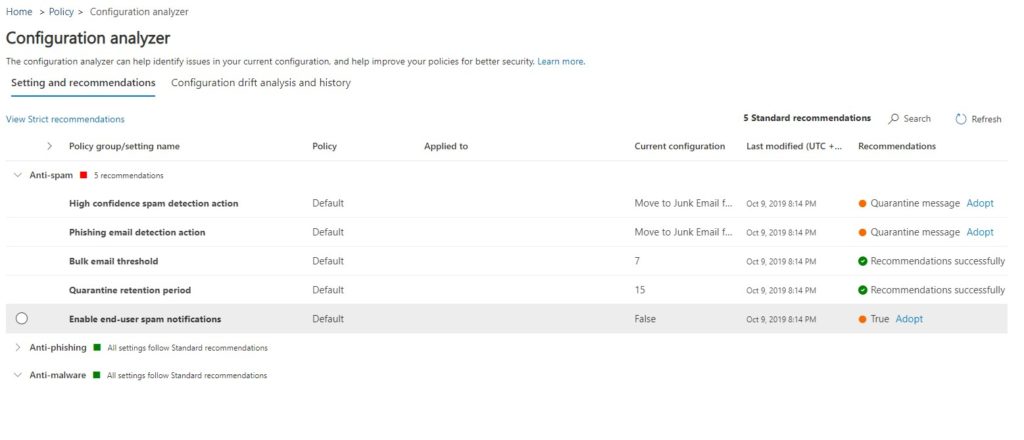
In addition to the security policy template, also check the Configuration Analyzer (which you will find under Policies & Rules > Threat Policies). This will recommend changing some settings that are not covered by the standard template that you should adopt:
- High-confidence spam detection action
- Phishing email detection action
- Bulk email threshold
- Quarantine retention period
- Enable end-user spam notifications
- Common Attachment Types Filter
I also recommend using the free 365 Threat Monitor from Hornetsecurity. This tool monitors your user’s mailboxes and alerts you when phishing mail slipped through the Exchange Online security. This is a great way to see how good (or bad) your policies are working.
Enable External Email Tagging
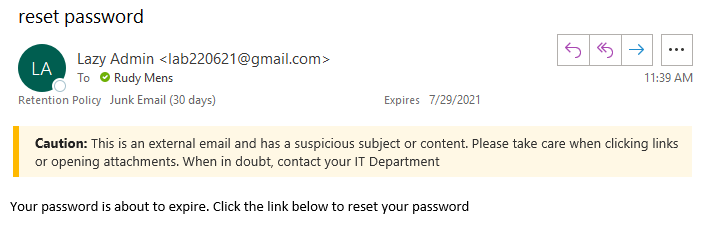
A newly released feature in Exchange Online allows you to tag external emails. External email tagging is an extra security measure to make your users more aware of the origin of the email. We see often phishing mail attacks where the attackers spoof an internal email address.
By automatically tagging all external emails, we can make it more clear to the users that the email was sent from outside the organization.
At the moment we need to use PowerShell to enable this new feature, if you want more information about it, then make sure you read this article where I explain more about email tagging.
# Connect to Exchange Online
Connect-ExchangeOnline

# Enable external email tagging
Set-ExternalInOutlook -Enabled $true

# Verify results
Get-ExternalInOutlook

# Result:
RunspaceId : 4b07eecc-34c5-4add-8ee4-80d25aa4aff4
Identity   : 11e55098-68ad-4992-aaf8-c5fdceb3b6da
Enabled    : True   # < External tagging enabled
AllowList  : {}
Besides tagging, we can also add a custom warning to external emails with specific words or phrases in the subject or body. This way we can show a warning on suspicious phishing emails.
If you want to add these warnings to your tenant, then follow this guide.
Block Basic Authentication Protocols
Basic or Legacy Authentication Protocols allow you to connect to Exchange Online without the use of Modern Authentication. This means that an attacker only needs a username and password to connect, which they can get after a successful phishing mail attempt.
Microsoft will start in Q2 of 2021 by automatically disabling the basic protocols that you are not using to secure Office 365. The plan was to disable all protocols, but that is postponed due to the pandemic.
The best option is not to wait but to start disabling the basic protocols, because they are actively used by attackers. Before you can disable them you will need to make sure that your users and business applications are not using any of the protocols.
- Open the Microsoft 365 Admin Center
- Select Reports -> Usages
- Click on View More under the Email Activity chart
- Select the Email app usage tab
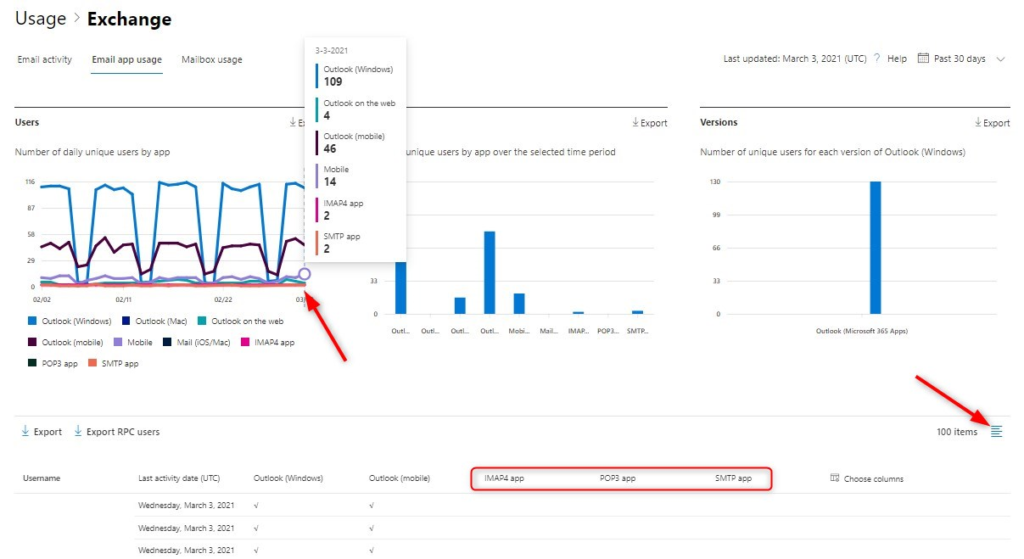
If you hover over the user’s chart you can see how many users (or accounts) are using the different protocols. In the table, under the chart, you can choose the columns. Add the IMAP4, POP3, and SMTP columns. You can now see which users are using the basic protocols.
Another good resource is the sign-ins overview in the Azure Active Directory.
- Add a filter and select Client App
- Select all the Legacy Authentication Clients
- Also, add the column Client App
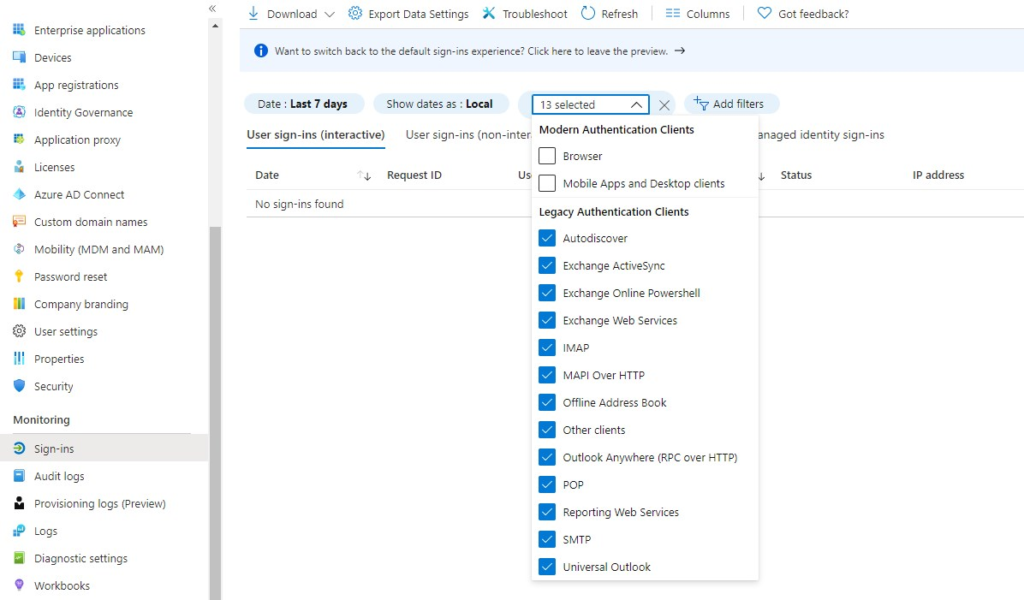
The two overviews together will give you a nice overview of all the accounts that are still using legacy authentication protocols.
Users that are still using legacy protocols (older mail clients on mobile phones, or Apple Mail) should use the Microsoft Outlook app. Inform the users about the upcoming change and give them time to migrate before you turn off the protocols.
Blocking Basic Authentication Protocols
The best option is to block all the basic authentication protocols for all users. But in an existing tenant that is not always possible. Business applications may be still using legacy protocols like SMTP or IMAP, preventing you from disabling them for everybody.
If you still need to use IMAP, for example, then disable all the other authentication protocols that you don’t need in the Admin Center (which I will explain in a bit). For IMAP, we can block the protocol for all the users that don’t need it. We leave the protocol only turned on for those few mailboxes that really need it.
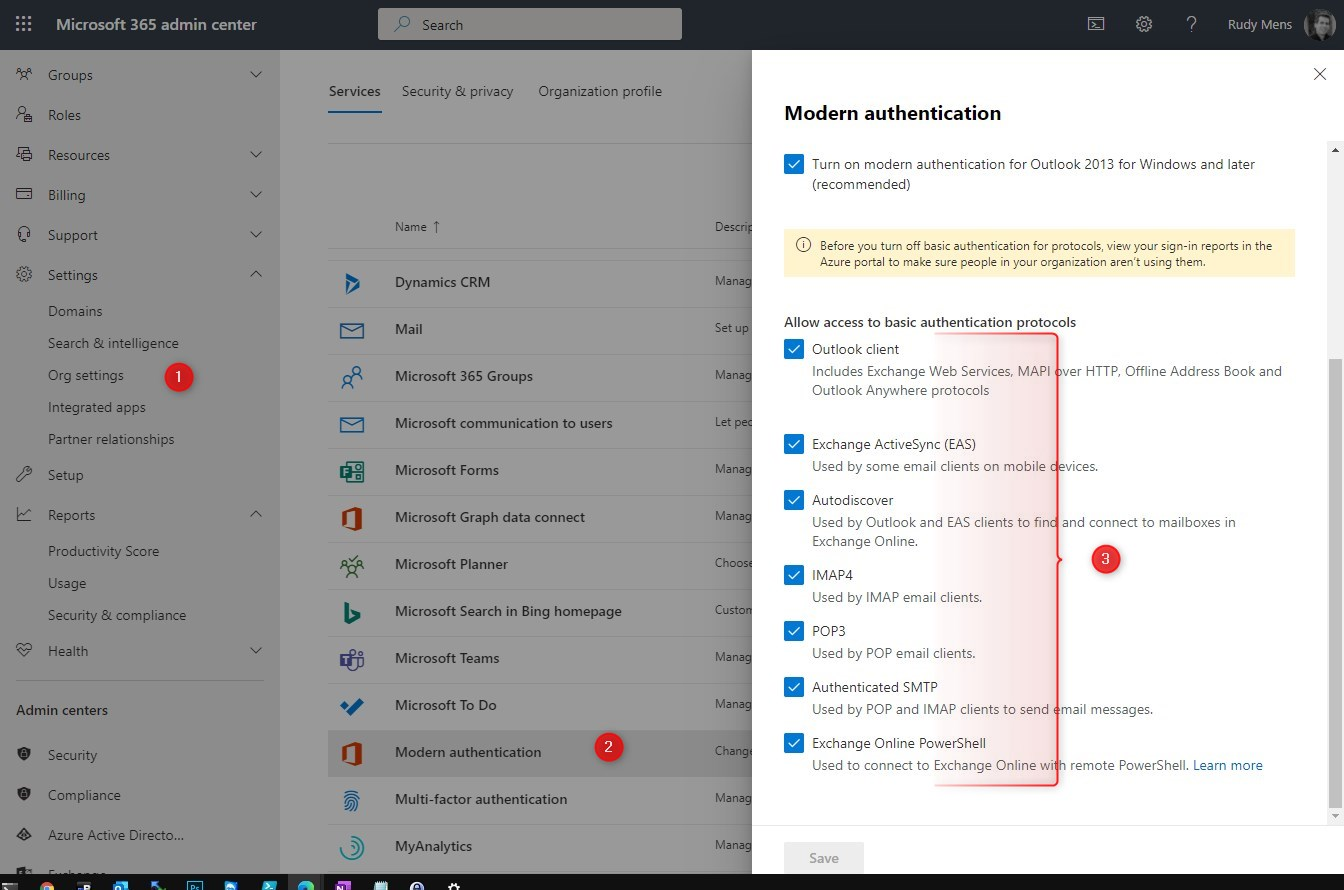
We start with the easiest option, blocking the protocols for all users is in the Microsoft 365 Admin Center:
- Expand Settings and select Org settings
- Select Modern Authentication
- Turn off all the basic authentication protocols that you are not using
We can use PowerShell to disable the protocols per mailbox. Just to be clear, per mailbox you don’t disable the authentication protocol, but the protocol itself.
If you only need to leave it enabled for a few mailboxes, then the easiest approach is to disable it first for all the mailboxes with PowerShell, and then turn the protocol back on for only those mailboxes that really need it.
# Connect to Exchange Online
Connect-ExchangeOnline -UserPrincipalName tenantadmin@contoso.com

# Get all mailboxes with Basic Protocols enabled
Get-EXOCasMailbox | Select-Object Identity,ImapEnabled,PopEnabled | ft

# Disable for all existing mailboxes
Get-CasMailbox -Filter {ImapEnabled -eq $true -or PopEnabled -eq $true} | Set-CASMailbox -ImapEnabled $false -PopEnabled $false

# Disable SMTP Authentication per mailbox
Get-CASMailbox | where {$_.SmtpClientAuthenticationDisabled -ne $true} | Set-CASMailbox -SmtpClientAuthenticationDisabled $true
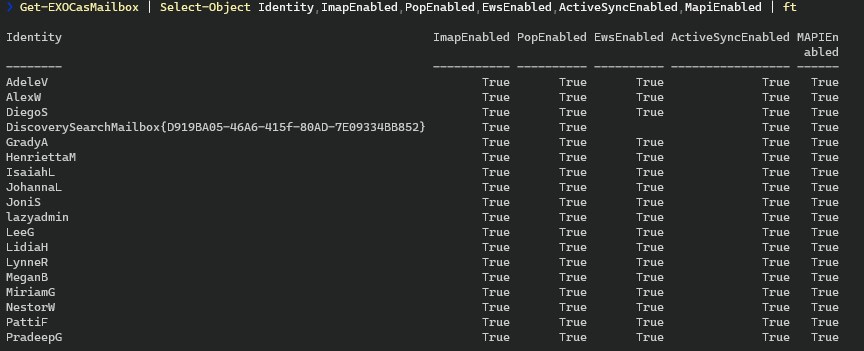
You also want to disable the legacy protocol for all the new mailboxes. We can do this by disabling the protocols on all the mailbox plans (you can have multiple plans, each corresponds with its own license type)
Get-CASMailboxPlan | Set-CASMailboxPlan -ImapEnabled $false -PopEnabled $false
Block Legacy Authentication for SharePoint
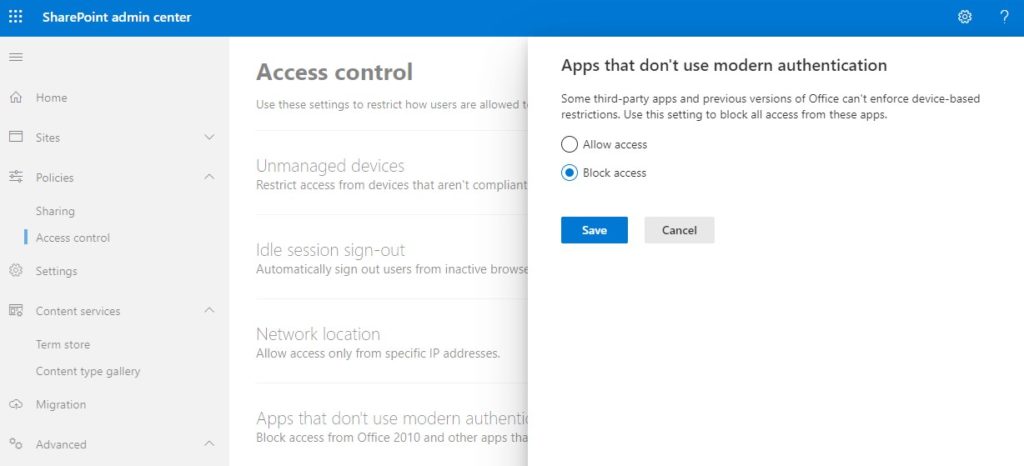
Some third-party apps in Office 365 don’t enforce multi-factor authentication and allow your users to connect to SharePoint without MFA, which is not really secure of course.
We can block access to these apps in the SharePoint Admin Center.
- Expand Policies and select Access Control
- Select Apps that don’t use..
- Block the access
Block Upload of Specific File Types
In the SharePoint admin center, we can control which file types are allowed to be uploaded to OneDrive and SharePoint. The OneDrive sync app will upload pretty much all file types by default to OneDrive or SharePoint, but there are some default exclusions including .tmp and .ini.
Now, this function isn’t really indented to be used to block potentially harmful files, but you could of course add a common ransomware extension to it. This way potentially harmful files won’t spread to different clients through a SharePoint library.
But a more practical usage of this feature is to block for example PST files, or other large files that you don’t want to get uploaded to SharePoint or OneDrive.
We can block the upload of specific file types in the SharePoint Admin center or with PowerShell:
- Click on Settings
- Click on OneDrive Sync
- Enable Block upload of specific files types
- Enter the extensions without the
.in the list
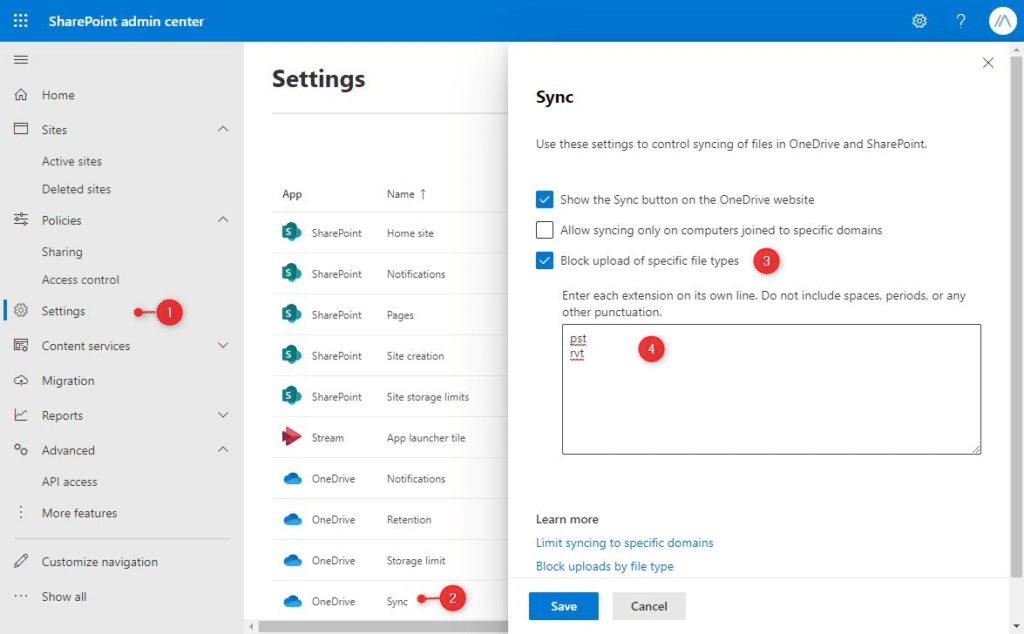
To block the file types with PowerShell:
# Connect to SharePoint Online
Connect-SPOService -Url https://contoso-admin.sharepoint.com

# Add file extensions
Set-SPOTenantSyncClientRestriction -ExcludedFileExtensions "pst;rvt"
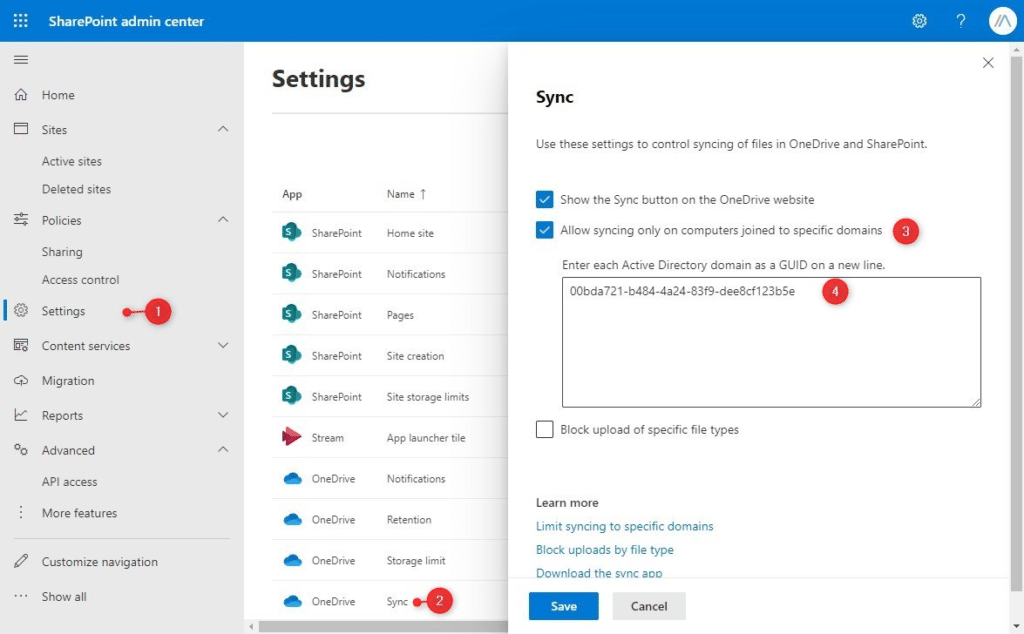
Allow Syncing Only from Domain Joined Computers
Users can sync OneDrive and SharePoint also to their personal computers. Now, this might seem useful when they are working from home, but it’s also a potential security risk. Because you don’t have any insights or control over their personal computers.
This means that you don’t know if they have proper anti-virus protection running, or if the software is a bit up-to-date. So it’s a good idea to only allow syncing from domain-joined computers. This setting is only for the on-prem Active Directory, not for Azure AD joined computers. You can use conditional access policies for Azure AD joined computers.
First, you will need the GUID from the Active Directory, which we can retrieve with PowerShell on the domain controller
Get-ADDomain | Select ObjectGUID
Next, open the SharePoint Admin Center and navigate to:
- Settings
- Select OneDrive Sync
- Enable Allow syncing only on computers joined to specific domains
- Enter the GUID of your domain
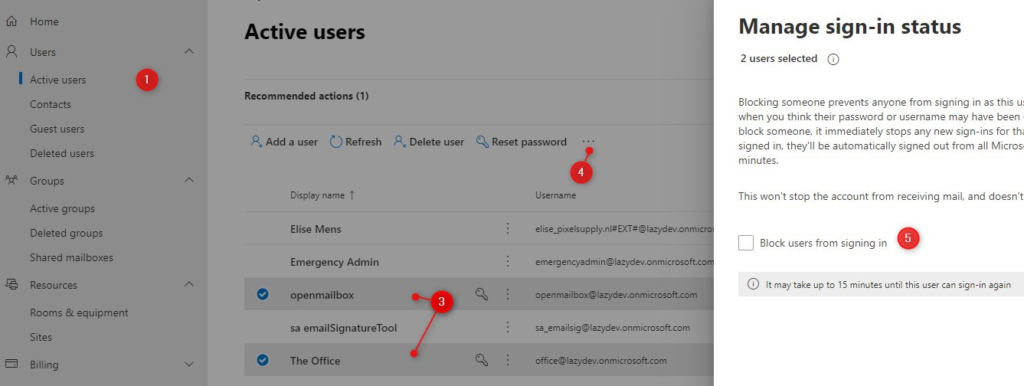
Block Shared Mailbox Sign-in
If you create a Shared, Room, or Equipment Mailbox in Office 365, it will automatically also create an active user. This user doesn’t have a license, but you can sign in with this user. All you need to have is the password.
There is really no need for a shared mailbox user to be able to sign in. Access to the shared mailbox is managed with permissions. So why leave the user account exposed?
What you should do is block the sign-in on all the Shared Mailbox accounts. You can do this in the Admin Center or with PowerShell.
- Select Active Users
- Filter the list on unlicensed users
- Select the Shared Mailbox and Resource user accounts
- Click on the eclipse and select Edit Sign-In Status
- Block the users from signing in
Disable the sign-in to shared mailboxes with PowerShell
# Connect to Exchange Online and Msol
Connect-ExchangeOnline
Connect-MsolService

# Get an overview of all Shared, Room and Equipment mailboxes
Get-EXOMailbox -Filter {(RecipientTypeDetails -eq "SharedMailbox") -or (RecipientTypeDetails -eq "RoomMailbox") -or (RecipientTypeDetails -eq "EquipmentMailbox")} | ft

# Disable the sign-in on the mailboxes
Get-EXOMailbox -Filter {(RecipientTypeDetails -eq "SharedMailbox") -or (RecipientTypeDetails -eq "RoomMailbox") -or (RecipientTypeDetails -eq "EquipmentMailbox")} | Foreach-object {Set-MsolUser -UserPrincipalName $_.UserPrincipalName -BlockCredential $true}
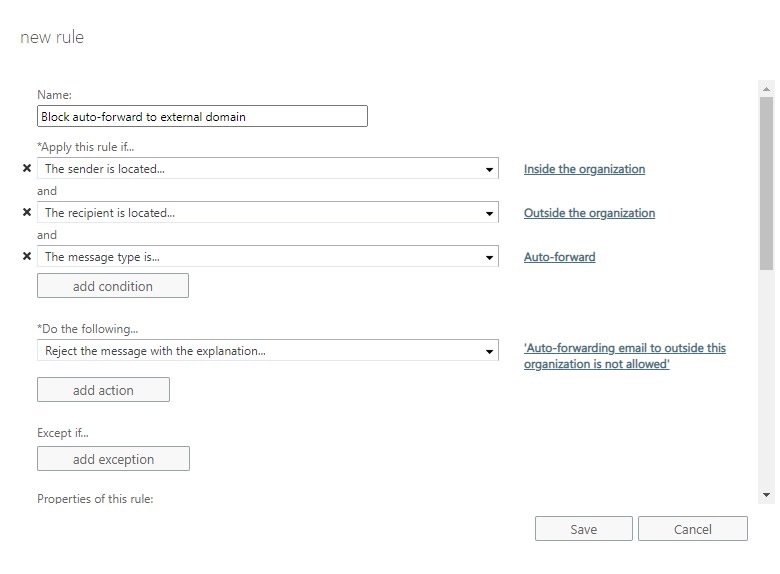
Block Auto-forwarding to External Domain
When attackers gain access to one of your user’s mailboxes they can extract the mail by creating an auto-forward rule to their own (external) mailbox. Auto-forwarding to an external domain is normally not used, so you should block it.
- Open the Exchange Admin Center
- Select Mail Flow
- Create a new rule and name it “Block auto-forward to external domain”
- Select More options at the bottom of the screen
- Configure the rule as follows:
- Apply this rule if: The sender is located – inside the organization
- Add a condition: The recipient is located – outside the organization
- Add a condition: The Message Properties – include the message type – Auto-Forward
- Do the following: Block the message – reject the message with the explanation – “Auto-forwarding to an external domain not allowed”
- Audit this rule with severity level: Medium
Block User Consent to Apps
A new way attackers try to gain access to your data is by using Consent Phishing. Instead of stealing the credentials of your users, they will trick the users into granting them permission. To do this, they create a malicious app and register it in the app store.
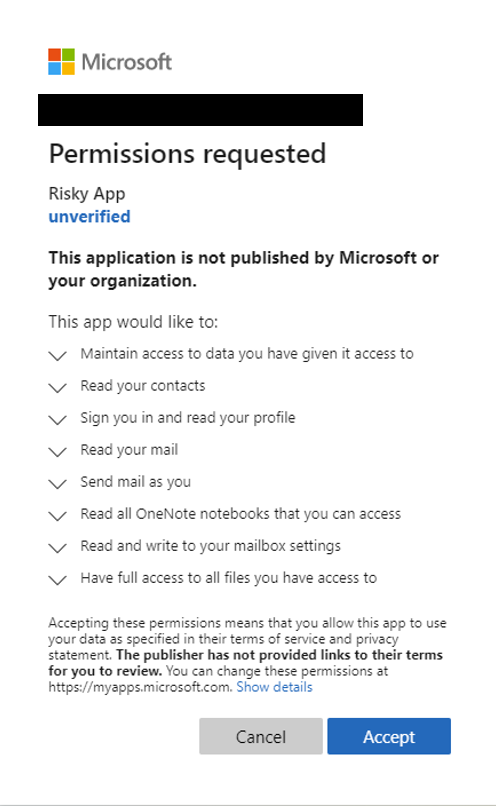
With the permissions, they can read the user’s profile, send mail on behalf of the users, and have full access to the files that the user can access.
Microsoft has already taken action to secure Office 365 further by verifying apps. But that doesn’t stop malicious apps from entering the app store.
You can prevent the authorization of the unverified apps by disabling user consent in the Microsoft 365 Admin Center and setting up the custom app consent policies in Azure Active Directory.
- Open Microsoft 365 Admin Center
- Expand Settings and select Org Settings
- Select User consent to apps
- Turn off “Let users provide consent..”
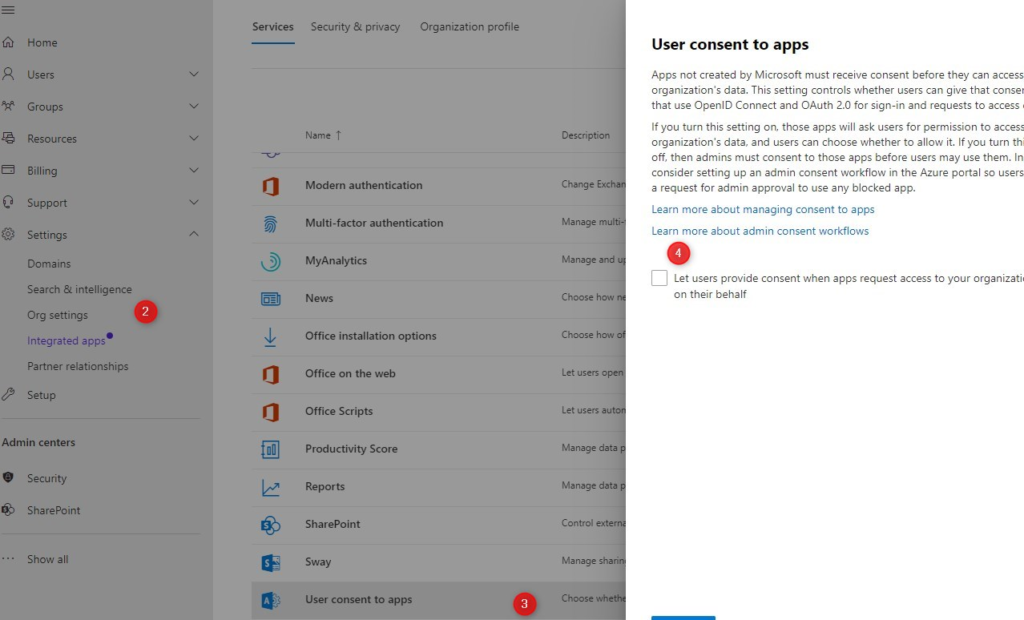
The next step is to set up the consent policies in Azure Active Directory:
- In Azure AD select Enterprise Applications
- Select Consent and permissions
- Select Allow user consent for apps from verified publishers and Do not allow group owner consent
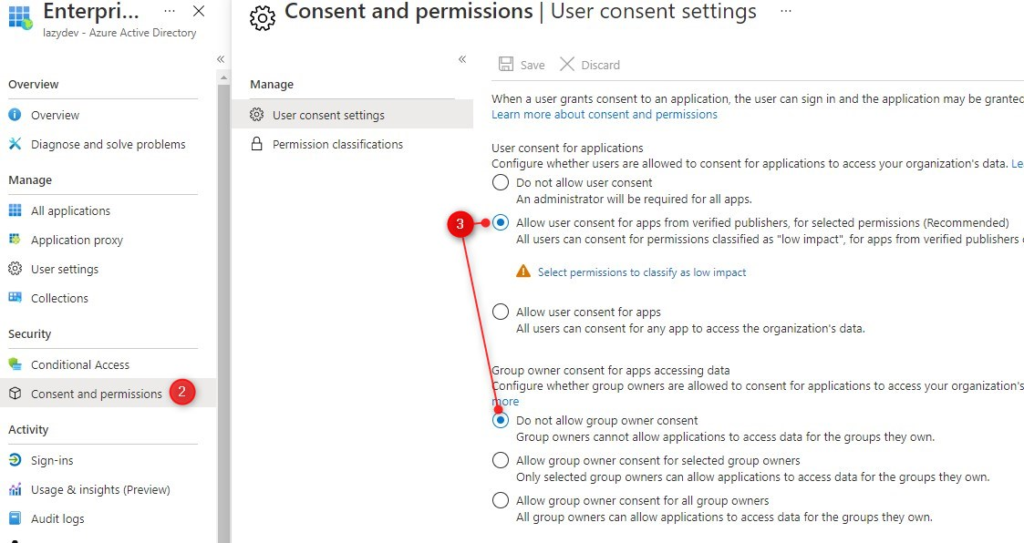
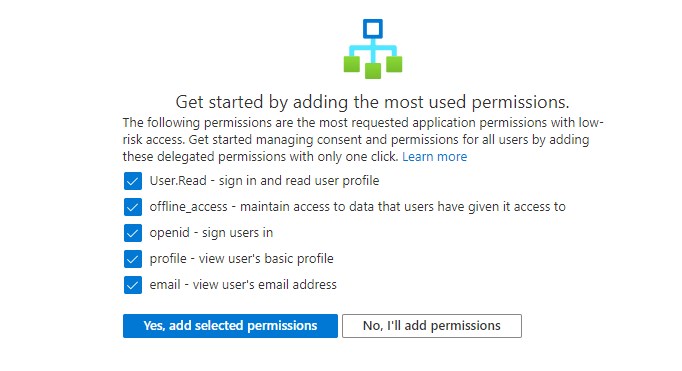
- Click on Permission classifications
- Add the 5 low-risk permissions. (You can always add custom permissions if you need to)
- Go back to the Enterprise applications and select User Settings
- Enable Users can request admin consent
- Add one or more admins for the request
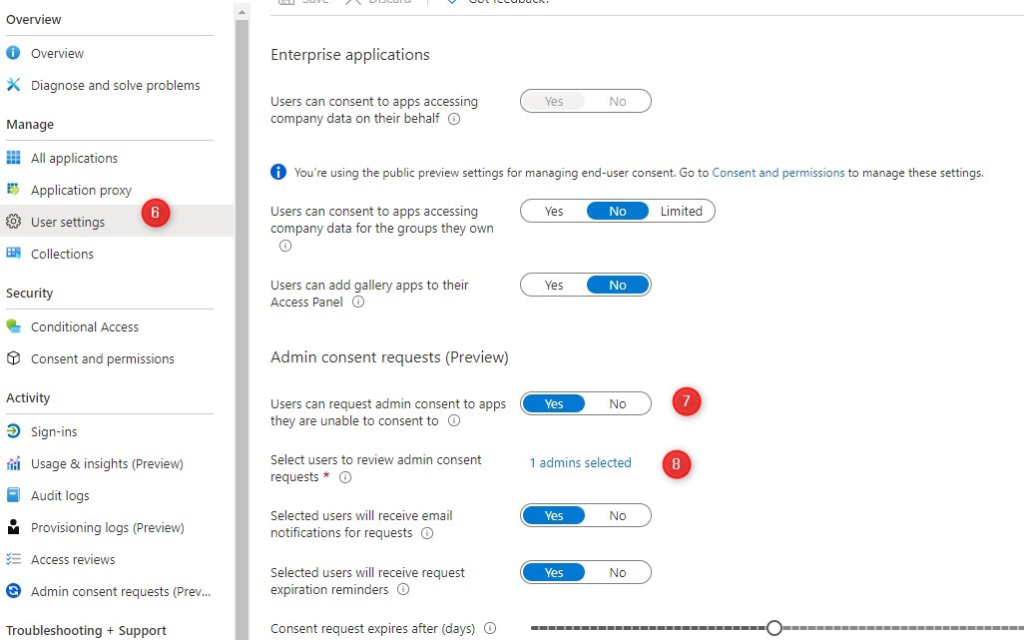
Admins will get an email when a user has requested consent. You can also see the requests under Enterprise Applications > Admin consent requests.
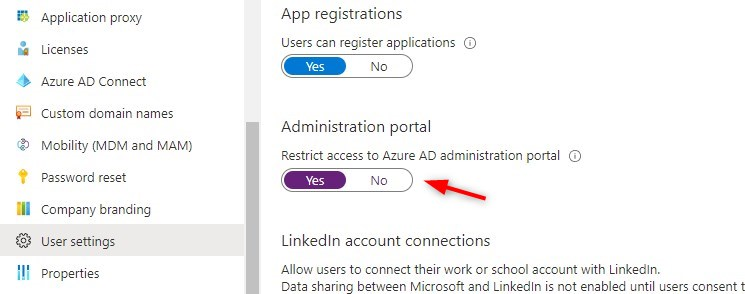
Block User Access to Azure Portal
Authenticated users have by default access to the Azure Portal and the Azure Active Directory. They only have read access, so they can’t change anything. In my opinion, there is really no need for a normal user to browse through your Azure AD settings.
We can block the access with a simple switch in Azure AD under User Settings
Block guest can invite access
Your users can invite guests to collaborate on a Word document or other resources, which is perfectly fine. But did you known that by default guests can also invite other guests?
You want to keep in control of who can access your data, so you should not allow guests to invite others.
In the Azure Active Directory, navigate to External Identities and select External collaboration settings. Make sure that Guests can invite is set to no.
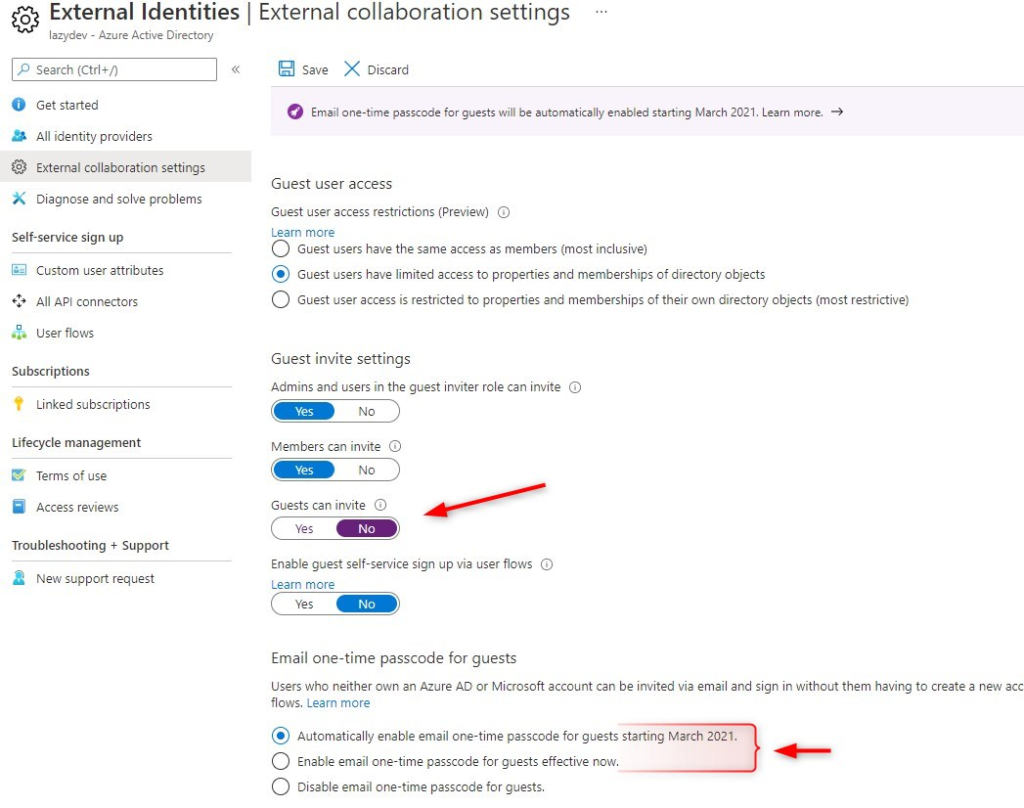
You may also want to check if the one-time passcode is turned on. This allows guests to access shared documents with a one-time passcode instead of a Microsoft account.
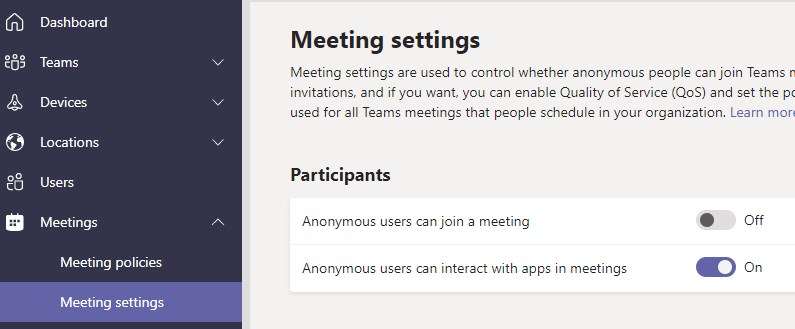
Block Anonymous Users can join a Meeting
By default, anonymous users can join any Teams meeting if they have the link to the meeting. Depending on your organization’s needs, you should turn this off. If your company holds public meetings with customers where you send out an open invitation that any can join then you will need to leave this setting enabled.
But if all the meetings are only business to business or directly with known clients/customers then it’s better to turn the anonymous access off.
- Open the Teams Admin Center
- Expand Meetings and select Meeting Settings
- Turn off Anonymous users can join a meeting
Block Third-party Apps in Teams
By default, users can add apps to Teams. Now, these apps can enhance productivity or add integration with other company software. But keep in mind that data is also shared with these apps. So you probably want to approve the app first before the user can add them to Teams.
- Open the Teams Admin Center
- Expand Teams apps and open Permissions Policies
- Open the Global (Org-wide default) policy
- Change Third-party and custom apps to Block all Apps
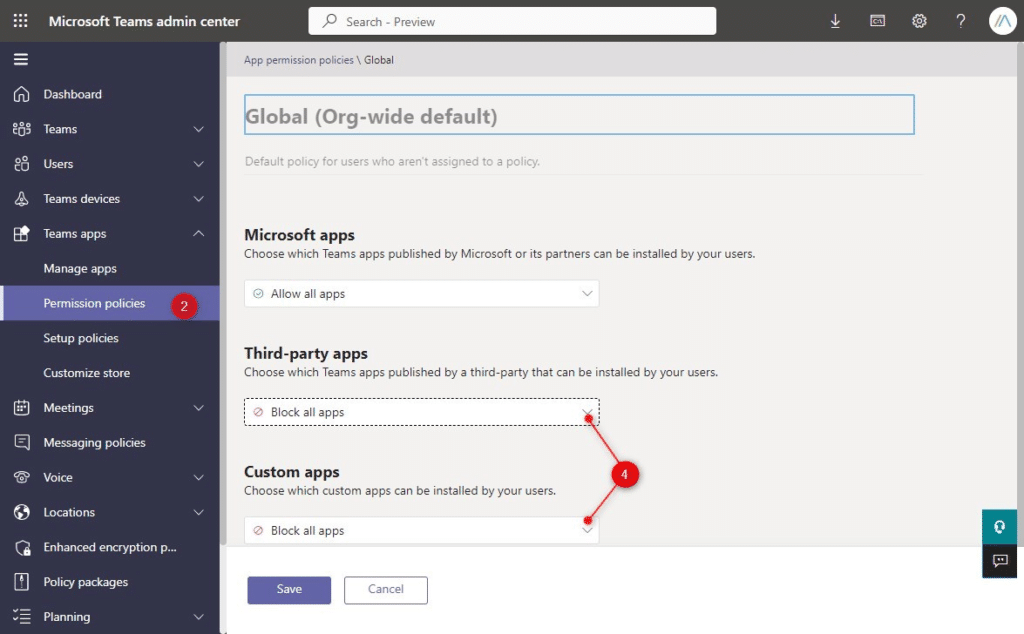
When a user requests an app, you can change the setting to Allow specific apps and block all others. You can then select the app that you want to allow.
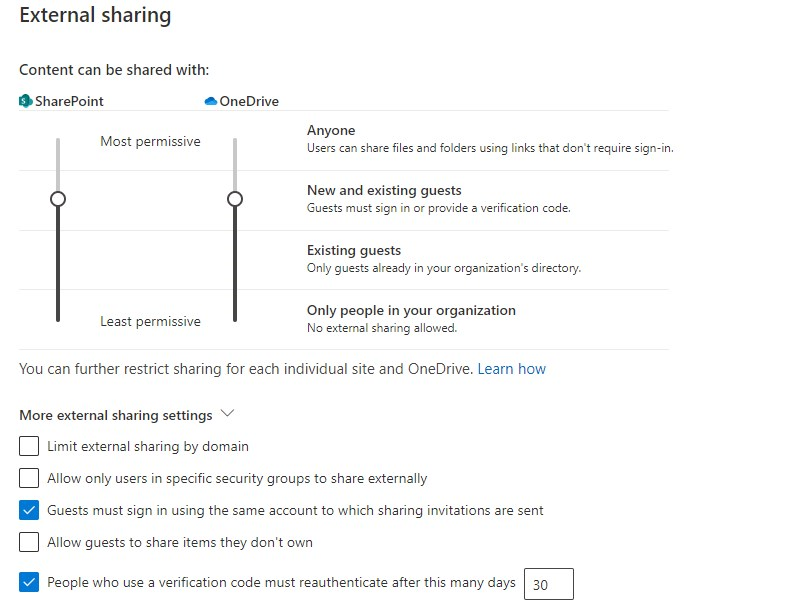
Limit External Sharing in SharePoint
Sharing in SharePoint is really convenient for your users, they can create a link, and can share it with anyone they want. But that comes with a risk, by default, anyone who gets the link can access the shared item.
To secure office 365 you want only the person that you shared the link to can access the folder. Also, it’s a good idea to add let the guest sign in or atleast enter a verification code.
- Open the SharePoint Admin Center
- Navigate to Policies > Sharing
- Change Content can be shared with to New and existing guests (this way they need to verify)
- Expand More external sharing settings
- Enable Guest must sign in using the same account to which sharing invitations are sent
- Make sure that Allow guest to share items they don’t own is disabled
- And enable People who use a verification code… and set it to 30 days.
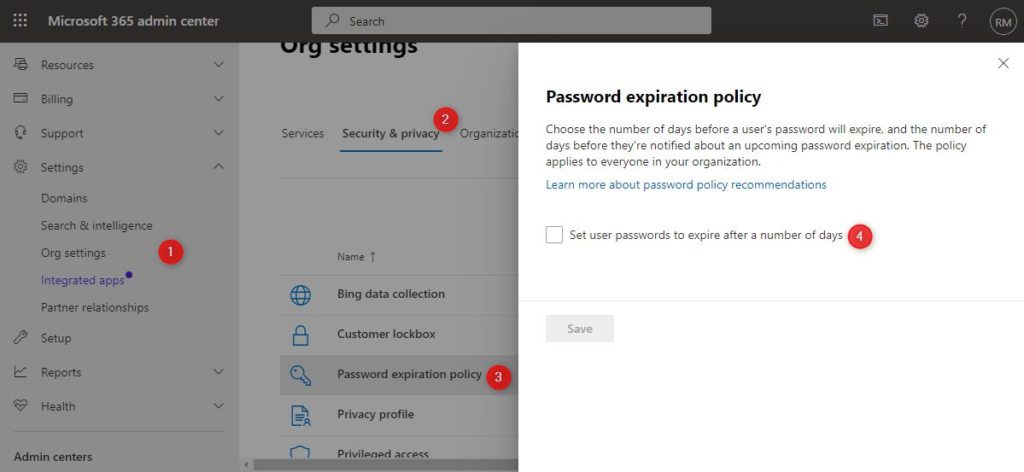
User Password Policies
With MFA enabled we can change some settings when it comes to our password policies. We can remove the password expiration policy. The latest studies showed that password expiration does more harm than good. Even Microsoft now recommends removing the password expiration requirements to further secure Office 365.
A compromised user account is pretty much always used immediately by the attackers. And users that need to change their password often tend to use a predictable pattern.
Set password expiration policy
If you are using AD Connect to sync your users and password, then the password expiration policy is taken over from your local group policy.
You can change the password expiration in the Microsoft Office 365 Admin Center:
- Select Settings and then Org Settings
- Choose Security & Privacy
- Select password expiration policy
- Make sure it’s turned off
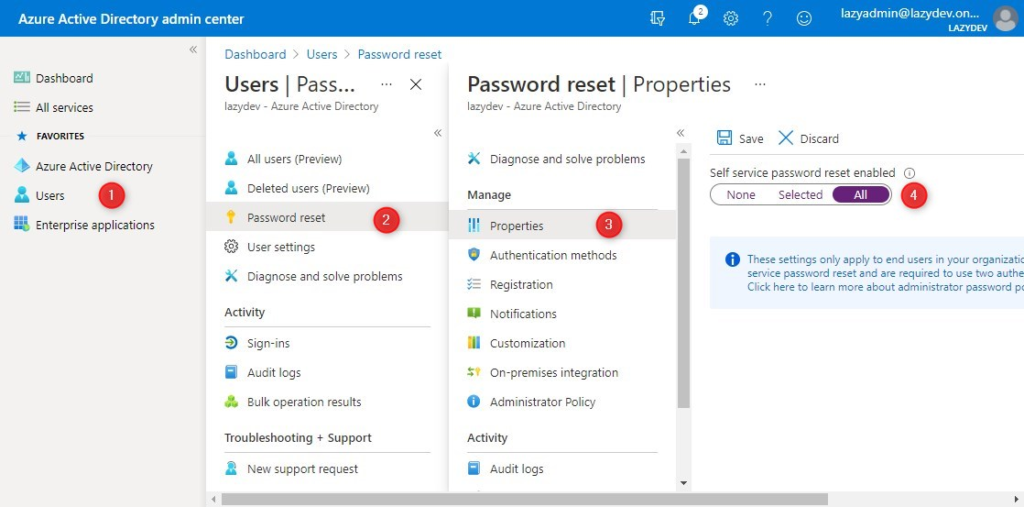
Enable Self-Service Password Reset
Allow your users to self reset their password when needed. By default is this disabled. Letting users self reset their password isn’t really a security improvement for Office 365, but it results in fewer tickets/calls to the helpdesk.
If you are using Azure AD Connect then you will need to have atleast Azure AD Premium P1 to enable password write-back. Without password write-back, you can’t use the SSRP.
What you do need to change are the requirements to reset the password.
- In Azure Portal select Users
- Choose Password reset
- Select Properties
- Enable it for all Users
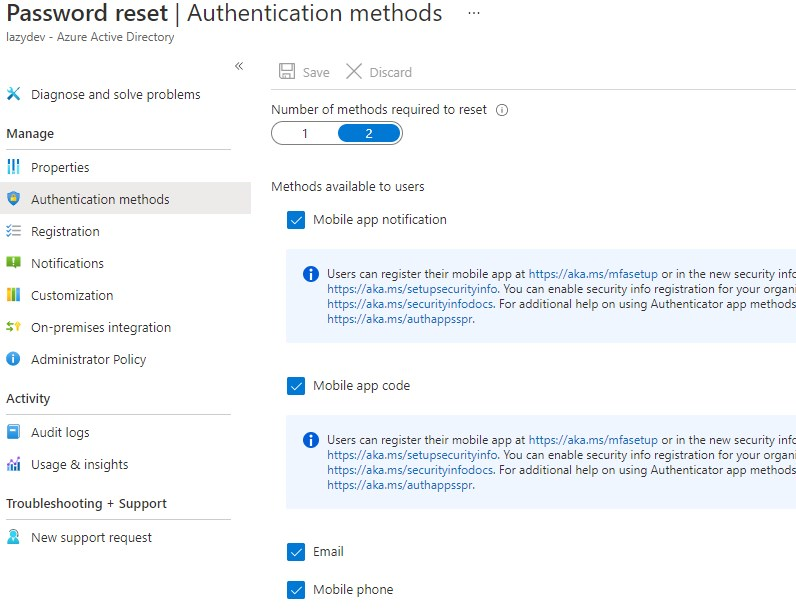
Next, we need to set the authentication methods that are needed to change a password. By default, only one method is required and that can be email or mobile phone.
Give your users atleast the option to register multiple authentication methods, including Mobile app code. You can also increase the number of methods that are required to reset a password from one to two, but before you do that make sure your users have multiple methods registered.
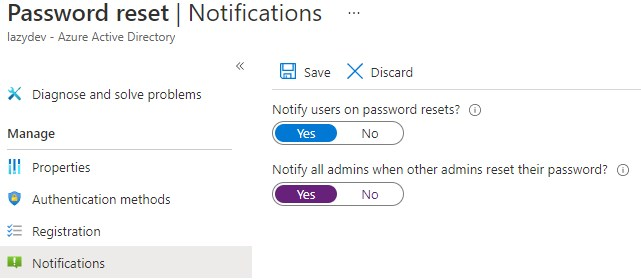
Get notified on password change
Select Notifications and make sure that users are notified when their password is changed. I also recommend enabling the admin notification alert. All admins in the tenant will get notified when other admins change their passwords.
Allow Combined Security Information Registration
If you have enabled self-service password reset (and of course you have enabled MFA), then you can make it your users a little bit easier by allowing the combined security information registration.
Without it, users will need to register the authentication methods separately for MFA and SSPR. This feature is enabled by default for new tenants that are registered after August 14th, 2020.
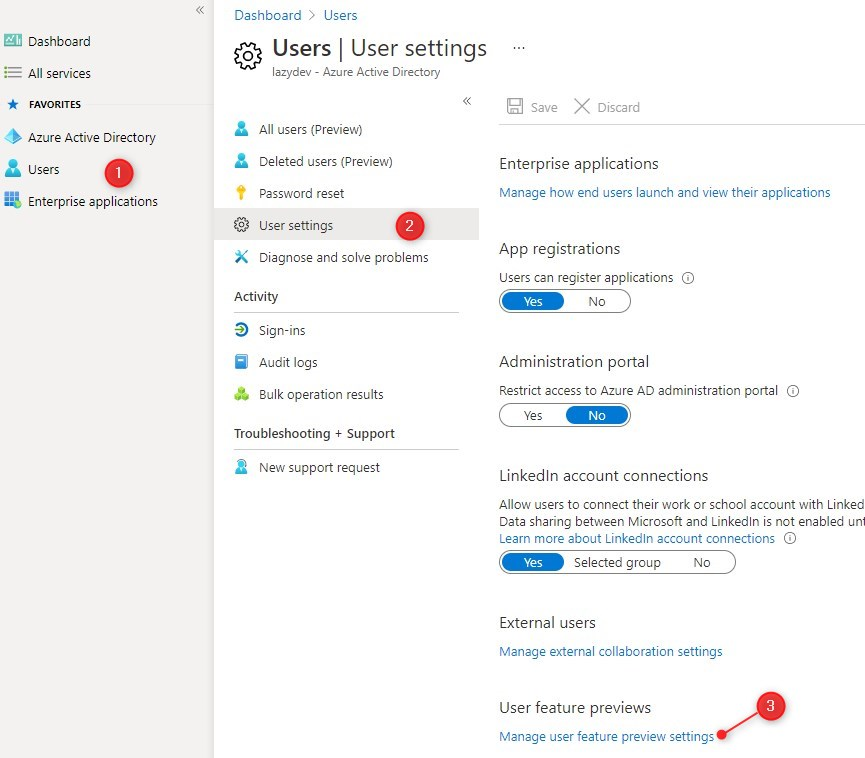
- Select Users
- Choose User Settings
- Click on Manage user feature preview settings
- Set User can use combined security information registration experience to All
Corporate branding of the login page
Branding your Microsoft 365 login screen doesn’t only look nice, it also helps you to secure Office 365. Adding your logo to the Microsoft 365 login screen can mitigate phishing attempts because your users can better recognize the malicious login screen.
I already had written a guide on how you can customize the login screen with some tips. You can find the article here. Make sure you customize it, it only takes a couple of minutes.
Configure SPF, DKIM and DMARC
Besides securing your Office 365 tenant, it’s also important to protect your mail domain. Attackers can easily spoof your mail domain if you haven’t configured SPF, DKIM and DMARC. Now, SPF is required to send any mail from a custom domain in Office 365. So you probably have that configured already.
But most don’t have DKIM and DMARC configured. SPF is a good first step, but you really need DKIM as a minimum to prevent spoofing. DMARC is a bit harder to configure, but nevertheless important as well.
Wrapping Up
If you found this Microsoft 365 Best Practice guide useful then please share it. I will keep this guide updated with the latest recommendations.
An important part to keep Microsoft Office 365 secure is to regularly check the audit logs and keep up with the security recommendations in the Microsoft 365 Security Center.
If you have any questions, or recommendations that should be added to the guide, then please drop a comment below.


Great stuff!
I’ connected to Exchange Online PowerShell and I can run the Get-EXOMailbox or Get-Mailbox cmdlets.
I’m trying to configure the external email tagging and running get or set cmdlets for it throws following error, few other cmdlets from this article throws the similar error.
Set-ExternalInOutlook : The term ‘Set-ExternalInOutlook’ is not recognized as the
name of a cmdlet, function, script file, or operable program. Check the spelling of
the name, or if a path was included, verify that the path is correct and try again.
At line:1 char:1
+ Set-ExternalInOutlook -Enabled $true
+ ~~~~~~~~~~~~~~~~~~~~~
+ CategoryInfo : ObjectNotFound: (Set-ExternalInOutlook:String) [], Com
mandNotFoundException
+ FullyQualifiedErrorId : CommandNotFoundException
Have you installed the latest version of the Exchange Online module?
Yes I’ve installed it.
Then the cmdlet should be available after you have connected to exchange online.
This is great. I use it on a checklist for our managed tenancies.
Are there any points that need changing or adding since July 22? 🙂
Cheeky I know, but thanks.
I will update the list coming week with some new tips, thanks for the reminder.
How many of these can be added to Baseline-security-check.ps1 ?
It’s possible to check them all with PowerShell, but it’s a lot of work to write a good script that will work across different tenants. And to be honest, the Microsoft 365 Secure Score gives you a pretty good insight and explanation already.
Very nice
Great list! Many thanks!
Index link to “User Password Policies” section is incorrect:
https://lazyadmin.nl/wp-admin/post.php?post=4322&action=edit#password-policy
Thanks, fixed
its really very nice and helpful, thank you so much Rudy for your time and efforts.
Well collaborated information for new tenant setup.
Can you please update screenshots for Continuous Access Evaluation (CAE) ?
Thanks.
CAE is now part of Conditional Access Policies and is auto-enabled as part of a policy. You will need to have Azure Premium P1 or P2 to use Conditional Access Policies. I have updated the article.
This is a decent guide. Thanks for the research and time invested in this article. Very helpfull.
Would like to se some guides on Risky Sign-ins and the stepps that is recommended here. Love your work
One more. By default, you can invite a person to access your SharePoint sites. But the user that accepts the invite can be anyone that finds the address link.
To force the validation of the invited person you need to go here:
https://tenantName-admin.sharepoint.com/_layouts/15/online/AdminHome.aspx#/sharing
Then expand the “More External Sharing Options”
Check the
– Guests must sign in using the same account to which sharing invitations are sent
There are some other interesting option in this page also like the
– Allow guests to share items they don’t own
– Limit external sharing by domain
Thanks, I have added it to the list.