Although wireless networks and mesh networks are getting better every year, nothing beats a wired network connection. A wired ethernet connection will give you the highest throughput (speed), the lowest latency, and the most stable network connection you can get in your home.
The only problem with wired ethernet connections is that you will have to pull the cables through your house, preferably through the walls. If you are not remodeling your home, then this can be a bit of a challenge.
I have done it twice in my own houses, ones when I was renovating my previous house. And in my current house, which was completely finished when we bought it.
In this article, I am going to help you with selecting the right materials, walk you through the process of pulling network cables, and give you some tips along the way.
Planning your home network wiring
As with any project, you should start with a plan. We not only need to know where we want our wired ethernet connections but also where they come together and how to get there.
I have broken down the planning into a couple of steps:
- Make a simple floorplan of your house.
This really helps with visualizing all the wired network connections. - Determine the locations of the ethernet connections.
Keep in mind that kids grow up and maybe get a computer or game console in their room. Think of a place for a network printer and of course don’t forget the access points. - Where to place the router and switch?
You can place a switch on each floor if that is more convenient, or run all the cables to one location. I prefer to have all the network connections in one place, this way you can maybe use one bigger switch or utilize the switches better. - How are you going to run the cable?
The attic and crawl space are both good ways to run cables through your house. - How many ethernet ports per location?
Two ethernet sockets per location are really recommended. The UTP cables don’t cost that much, and the additional cost for an extra ethernet port is minimal. But adding one later will cost you a lot more work and probably money.
Only for the access points is one ethernet socket enough of course.
You can run your cables through your HVAC ducts or any other air circulation duct. But keep in mind that you may need to use plenum cat 6 cables for this.
Home network design tool
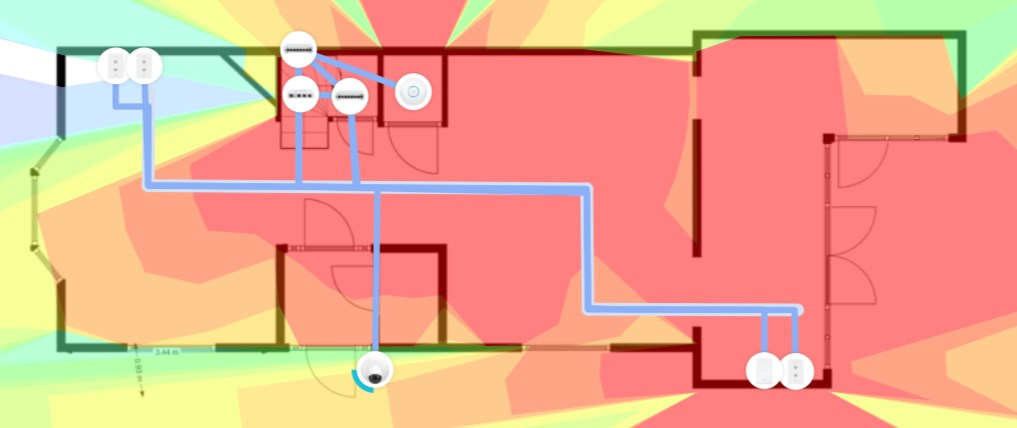
You can use the Unifi Design Center to help you with planning your home network installation. The tool allows you to place the network equipment and draw all the wires. It’s a bit more work but can really help you with planning your home network wiring.

You can use a floorplan as an underlayer to draw your walls. Next, you can place your home network equipment and ethernet wiring in it. The ethernet cables are not placed as neet as I would like, but this is just to give you an idea of the possibilities.
And one of the cool, and really useful things about the Unifi Design Center is that you also can see your wireless network coverage. So you can pick the right spot for your access points or maybe at an extra one if necessary.
If you want to know more about placing your access points, then you should read this article where I explain more about the best locations for access points.
Best Ethernet Cable for your Home Network Wiring
So with our plan completed, we are going to look at what we need. And the most important part is the ethernet cable of course. Ethernet cables are rated in categories (Cat). The categories determine the speed of the cable, how fast it can transfer data over the cable.
When selecting the cable for your home ethernet wiring, not only the speed is important, but also the quality of the cable. Don’t waste your money on CCA (Copper Clad Aluminium) cables. To get the best performance and speed out of a UTP cable, it will need to have a really low resistance, which can only be achieved with full bare copper cables.
With CCA cables you shouldn’t use PoE (Power over Ethernet). Due to the higher resistance, the cables will get hotter and over longer lengths, they will deliver less power to the device. Another problem with CCA cables is that they are brittle and not really flexible. This can result in wires that break inside the cable.
Cat 6 vs Cat 6a
These days Cat 6 UTP cables are the minimal standard to use in installations. Now there is always a lot of confusion about the difference between Cat 6 and Cat 6a. The latter is more expensive, almost 2x, but do you really need it?
| Speed | Bandwidth | Price 500 ft / 150 mtr | |
| Cat 6 | 10 Gbps up to 55 meters / 1 Gbps > 55 meters | 250 Mhz | ca. $ 55,- |
| Cat 6a | 10 Gbps | 500 Mhz | ca. $ 99,- |
As you can see there is something going on with the speed of the Cat 6 cable. It supports 10 Gbps, but only over a distance up to 37-55 meters. Any longer and the speed will drop back to 1 Gbps.
But that is not all, Cat 6 also has a lower bandwidth, 250 Mhz (Cat 5e only has 100 Mhz). Now, why is that important? You can compare the bandwidth with the lanes on a highway. On both highways, you can drive 70 mph, but Cat 6 only has 2 lanes, where Cat 6a has 5 lanes. So Cat 6a can transfer much more data at the same time than Cat 6.
So which one should you buy? For home use, Cat 6 is most of the time more than enough. The cable lengths won’t exceed 37 meters easily, so you will get 10 Gbps. The 250 Mhz is more than enough bandwidth for your home network.
Solid vs Stranded
Solid UTP Cable has one solid wire per conductor. In a UTP cable are 8 conductors, so a solid UTP cable exists of 8 solid wires.
In stranded UTP Cables the wires in a conductor exist of multiple wires wrapped around each other. This will make the cables more flexible.
For your home network wiring, you want to use solid UTP cables because the solid cables can easily be punched done into the wall jacks and patch panels. Stranded cables are only used to make patch cables from, the short cables that you use between your switch and patch panel.
Another reason to go for solid UTP cable is that you can only buy solid UTP cables in bulk (start at 250 ft (75 meters) up to 1000 ft (330 meters).
Plenum Cat6 cables
As mentioned earlier, you can run your home ethernet wiring through your HVAC ducts or any other air circulation ducts. But to do this, you may need to use a special type of ethernet cable, plenum Cat6 cables. These Cat6 cables have a special jacket to prevent fire propagation to no more than 5 feet.
Make sure you check your local fire code to see if there are requirements for the cables that you can use in your HVAC ducts. Plenum cables are more expensive than normal Cat6 cables.
Cat6 Riser cable
Just like with the plenum cables for HVAC ducts, require some countries that you use Cat6 Riser cable (CMR) in drywalls or between floors. Just like Plenum is CMR cables are flame resistant to prevent fires from spreading, for example between floors.
CMR cables are cheaper than Plenum Cat6 cables and in most countries sufficient for residential use. Again, make sure you check your local fire code for the requirements in your area.
Best Ethernet Cable Brands
There are a lot of different ethernet cable brands on the market, so which one should you buy? Keep in mind that you will need to get Cat6 cables with solid bare copper conductors.
Also, I recommend getting a 23AWG cable. The copper wires of a 23AWG cable are thicker, which is better when you are using Power over Ethernet. 23AWG wires are 0.57mm wide, 24AG wires are 0.52mm wide.
I have listed a couple of the best ethernet cable brands to help you get started with selecting the best UTP cable:
- TrueCable Cat6 – 500ft CMR – 23AWG
- Monoprice Cat6 – 500ft CMR – 24AWG
- Southwire Cat6 – 500ft CMR – 23AWG
Patch Panel for Home Network
You could connect an RJ45 connector on a solid UTP cable, but it really isn’t recommended. Ethernet cables that are hanging loose don’t look nice, aren’t easy to work with, and finding the correct cable is harder. But even more important, UTP cables with solid wires are brittle and shouldn’t be bent too much.
Watch the video below to learn how to connect wall sockets, keystone jacks, and patch panels:
Patch cables, that you use between your patch panel and switch, have stranded wires which makes them flexible and easier to bend (without breaking the wires).
So a far better option is to use a patch panel. Now, these patch panels don’t always need to be big and mounted in a rack. For a home network, there are also patch panels that can be wall-mounted and are a lot smaller.
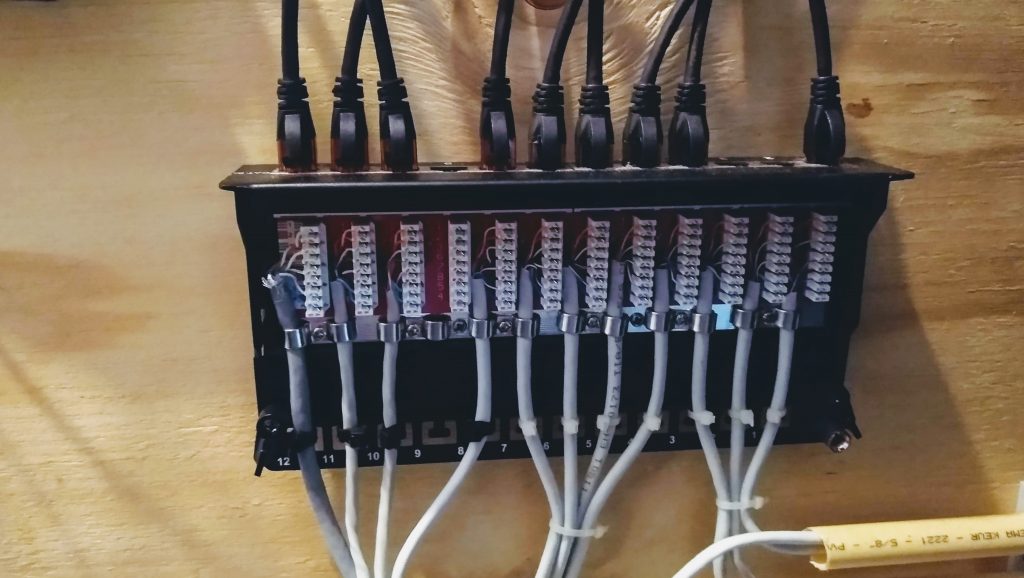
There are a couple of options available on the market. It really depends on how many connections you have what the best option is. For up to 12 ethernet connections I really like to use these wall-mounted patch panels:
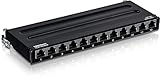
- DEVICE INTERFACE: 12 x RJ-45 ports with 50 micron gold-plated 8P/8C contacts
- 10G READY: The 12-Port Cat6A patch panel delivers a steady connection to copper gigabit & 10G switches
- SHIELDED DESIGN: Specifically designed to eliminate electromagnetic interference (EMI) and crosstalk, ensuring peak performance and data integrity
- COMPATIBLE CABLING: Cat5e, Cat6 and Cat6A cabling
- WALL MOUNTABLE: The patch panel is designed with heavy duty metal housing that is wall mountable.
If you need more than 12 ports you can either use two of these or go for a 24 port patch panel and use a 1U mounting hinge.
Ethernet Wall Sockets
So for the other end of the ethernet cables, we are going to need ethernet wall sockets. The wall sockets, in general, are different in the US than in the EU. In the US you can get wall sockets with removable keystone jacks. This will make installation a lot easier.

Because we are using solid wires, you will need keystone jacks that you can punch down, like these Cat6 keystone jacks on Amazon. For the EU you will need ethernet sockets like these on Amazon.
Surface Mounted Ethernet Sockets
You can’t always use a wall socket for your ethernet connection. For example, with your access point, you might want to use a surface-mounted socket. You can place these in a convenient location and then use a normal patch cable between the socket and access point.

Using RJ45 plugs on a Solid UTP cable
Solid UTP cables aren’t really meant to crimp an RJ45 plug-on. But that doesn’t mean that isn’t possible. Only you need to buy the right RJ45 plugs, the difference is in the blades of the RJ45 connector

As you can see in the image above, the blade in the middle will pierce through the stranded copper wire, something that isn’t possible with solid copper wires. With solid copper wires, the blades will have to skim the insulation off the side, so it will make contact with the copper wires.
Tools you need for home ethernet wiring
We got all our network products, but you will also need some specialized tools to start with your home ethernet wiring:
- Ethernet Crimping tool – if you are going to connect RJ45 plugs

- Punch down tool – to punch the cable in the keystone jacks and patch panel
- Network cable tester – (Optional)
- Basic DIY tools – like a drill, screwdriver, etc.
Running the cables
With all the tools and parts we can start with running the cables. Most of the time you are running two or more ethernet cables to the same location. You can measure the length of the required cable, but that is kinda hard to get right.
More reliable is to run one cable, cut it to length, pull it out, make a second (or more) cable and re-run them together.
Make sure you keep enough extra length on each end of the cable. You want to route the cables nicely to your patch panel. And some extra length on the wall socket side is also nice to have in case something is wrong with the connection.
Ethernet Cable Color Order
After you pulled all the cables it’s time to connect to RJ45 plugs (if you are using them) and the keystone jacks. On the keystone jacks and patch panel, you will probably find two coloring standards, 568A and 568B (or simply A and B).
568B is the most commonly used standard, both in the USA and Europe. 568A is more used in Pacific countries.
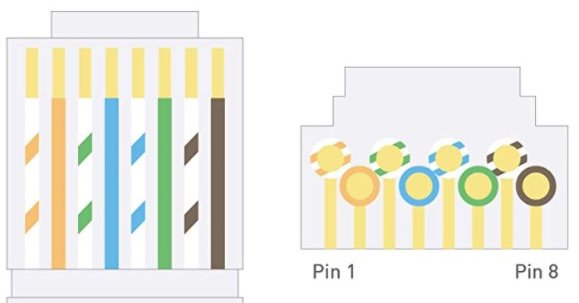
The ethernet cable color order for 568B is:
- White/Orange
- Orange
- White/Green
- Blue
- White/Blue
- Green
- White/Brown
- Brown
If you have an RJ45 plug in your hand, hold the clip down, then the left side is pin 1.
Connecting RJ45 Plugs
Connecting RJ45 plugs requires a bit more practice, but if you take your time it’s really good to do. Just make sure you strip the cable far enough 5cm / 2 inches. This will make it a lot easier to lay the wires in the correct order.
This video explains really well how to connect RJ45 plugs:
Connecting keystone jacks
Punch-down keystone jacks are pretty simple to connect. They have the coloring code on it, indicating exactly where which wire should go. Just lay the cable over the correct conductor and use the punch-down tool to connect it. The video below explains/shows it really good:
Make sure you follow the coloring code on the keystone jack or patch panel, that corresponds with 568B or 568A if you are using that in your home.
Testing your Home Ethernet Wiring
After you have pulled and connected all the ethernet cables it’s time to test them. Now there are two ways to test a cable, using a cable tester (the best way) or with a network device (notebook and switch).
You might think the fastest way is to simply connect your notebook on one end and path the other into a switch. If you can access the internet then the cable is fine. Well almost. The problem with ethernet cables is that they also work if only 4 wires are connected correctly.
The blue and brown wires are only used with 1Gbit network connections. So in theory, when the orange and green wires are connected correctly, you can get a network connection. But only with a network speed of 100Mbit.
Cables testers
A cable tester will test each individual wire in the ethernet cable. This is the best way to check if your ethernet cables connect correctly and don’t have any faults in them.
Each wire is indicated by a light on the cable tester. If the light doesn’t light up, then you have a faulty connection.
The best solution is then the cut the keystone jacket or RJ45 plug off and start over.
Wrapping up
I hope this article helped you with getting started on your home ethernet wiring project. Make sure you buy good-quality cables and keystone jacks. Keep in mind that replacing the ethernet cables is a lot of work.
If you have any questions or suggestions, just drop a comment below.
You may also like the following articles:


hello,
i was thinking … isnt it better to create “main network” from optical cables… running cross the house and basically you convert optical inside each room to eth and plug it into the switch… u dont need to think how many ports u will have per room (migh increase during the time)
and also with optical u are not limited to 10G for next decades…
Are you going to host a datacenter in your house? There is really no need for optical cables in a house. Even 10 Gbit Ethernet cables is overrated.
Hi I was wondering if you’d recommend running cat6a in conduit in the ceiling then down the walls?
Are you allowed to drill through noggins to run conduit?
Thank you for the article!
I am unfamiliar with the building code in your country, but technically it should not be a problem.
Hi,
How to lay the cable correctly. If my one camera is outside by the door. Is it possible to use an indoor cable CMR category6, connect an outdoor camera and run it through the house’s ventilation or electrical tunnels to the dream machine? Do I have to use an outside cable 5e for 1 meter and lead it through the ventilating or electrical ports?
If the wire will be exposed to weather/sun then you could just shield the wire with some outdoor PVC conduit.
Hi, Rudy
I also thought, do you think the Unify cables are any good? 6 CMR categories because I think about their products.
UniFi cables are great quality, so they will be a good choice 😉
Thank you
Your article is impressive. I am doing a small network on my new house (new to me, already has walls) and am able to run all the wiring in the attic. I was planning to use some 2″ plastic tubing to bring the wires through the wallboard ceiling. Do you have a favorite way of bringing wires through the wall board?
Here in the Netherlands, it’s common to use plastic electrical conduits and then an electrical installation box for the Ethernet Wall Sockets
Great articles Rudd – and very timely for me
About to move house, and my current wiring has grown piecemeal over 20 years or so, so it’ll be good to start from scratch this time
Appreciate the warnings about CCA cable, once you start looking, there is a LOT about (unfortunately)
As an IT professional myself (albeit mainframe databases) I do like the way you write, and always explain the reasons behind your suggestions/recommendations
Keep up the great work
Phil G
Does the cable tester you recommended also test PoE? Network cable tester
Thanks in advance!
It tests all wire pairs, so if they are all good, then PoE will also work.
Great article, thank you! My cables were installed throughout the house. Before the drywall goes up, what is the easiest way to test the cables?
Do I need to put RJ-45 jacks on all of the ends and use your recommended tester: https://a.co/d/fL3HLbf
Since one end of the cable won’t have RJ-45 jacks but will instead go into wall panels, that method feels like a lot of additional, perhaps unnecessary, work.
You can also attach the wall panels to it first. A good option might be to use wall panels with keystones, something like this: https://amzn.to/3IAJcMY. This way you can already attach the keystone, test it, finish your drywall, and put the wall plate on it later.
Very helpful thanks. However I am a bit confused about the layout at the switch/router end. If I have a router with 4 network sockets for output, does that mean that I can only install a 4-socket patch panel on the wall nearby, where my cables start running from to the rooms?
A simple diagram showing the cable arrangements in a home network would be useful.
You only have to connect a single cable between the router and switch. So you could connect up to 4 switches directly to the router.
Is the info in this article still current or has the technology changed?
Yes it certainly is
I really appreciate the article. I’m considering rewiring & reconfiguring my home network. We are hardwired to 4 bedrooms upstairs (one of which houses the cable modem and router), and 2 rooms and a garage downstairs. Fortunately we’ve got attic access and crawlspace access. My network slowed to a crawl a few weeks ago and a friend suggested I plug my laptop in to the cable modem, then the router, then the first switch, and down the line to see where the problem was. (beats bitching at the cable company who only wanted to sell me an upgrade). Now I’m inspired to clean up my hodgepodge setup. (Mostly it works well, we have a ridiculous number of hard wired devices…)
Great info! Question. My house is wired as you described above. I have a modem and I have a mesh router (Google Nest). My plan has been to hook up my “smart home” and get things using ethernet instead of wifi. But I have no clue what to do when I go down to the panel. There are cables everywhere, ethernet wires everywhere, I have no idea what goes where! Ah! Do you have any advice on where to start? Or a YouTube video that can walk me through it? Thank yoU!
Keep in mind that most smart home devices use wireless protocols, like zwave, zigbee or normal wireless networks.
About the cables, do you mean that you have a bunch of network cables coming together from network sockets throughout your house?
Surprised to see no love for cat5. I know 6 sports a higher Max speed and thus is more future proof but who owns home networking equipment that can move that much data or hard drives that can read/write that fast?
Also for cat 6 to properly support rated speeds it needs a lot more care and attention when punching down and should technically be tested to confirm performance. Cat5 is just far more diy doable.
I plan to wire my new construction house. I will be running wires for security cameras and home network. Is shielded CAT-6 worth the extra money in a riser cable for a normal residential installation? Do you have to use shielded plugs and panels?
Shielded is only needed when you run the cable beside a high-power cable (for example, the cable that runs to your car charger) So no, normally it’s no needed and yes you would also ned to use shielded plugs.
What a great article!! Thanks!!!
Thanks for the guide! Heads up, the network cable tester you have linked 404s on Amazon.
A good read, one thing that should be mentioned when running cat6 cables is bend radius and securing the cable, use velcro rather than zip ties as over clamping the sheath will affect the speed as the sheath is part of the conductor.
Bend Radius
https://www.erico.com/catalog/literature/F1275W-NAEN.pdf
Great article. I found it easy to follow and understand. The embedded videos you added were also really helpful. Thanks!
Nice