When you have UniFi devices, like access points, you will need to use a controller. Ubiquiti offers different consoles for this, like the UDM Pro or CloudKey Gen2, but you don’t have to use these. You can also install your own UniFi Controller in the cloud.
The advantage of a cloud controller is that it allows you to scale your UniFi network beyond the limitations of the console devices. A controller in the cloud also allows you to easily connect multiple sites to a single controller.
In this article, I am going to explain how to install your own UniFi Cloud Controller step-by-step.
Prerequisites
We are going to install the controller in the cloud, which means that we will install it on a hosted server, a VPS. The sizes of the VPS really depend on the number of devices and clients that you have, but the advantage of a VPS is that you can easily scale it up when needed.
The UniFi controller requires a minimum of 1 GB of memory, which is fine for a home network or small business. But when you intend to use the controller for more than 50 devices you should use at least 2GB of memory.
For this article, I am going to use Vultr, which offers great high-performance virtual machines for a good price.
Tip
If you don’t want to install and manage your own server, then HostiFi is a great alternative. Read more about them in this article.
Installing Unifi Controller in the Cloud
In the steps below we are going to use Vultr, make sure that you have created an account and set up the billing for your account.
Step 1 – Install the Vultr VPS
The first step is to create a new virtual server. Log in to your Vultr account, open Products, and click on Deploy Server. We will now need to configure our server:
Choose server: Cloud Compute
CPU & Storage Technology: Intel Regular Performance
Server location: Choose a location near your
Server image: Debian 11 x64
Server size: $5/month – 1vCPU / 1GB Memory
Auto backup: Enable Auto Backup (not necessary, but highly recommended)
Additional Features: Disable IPv6
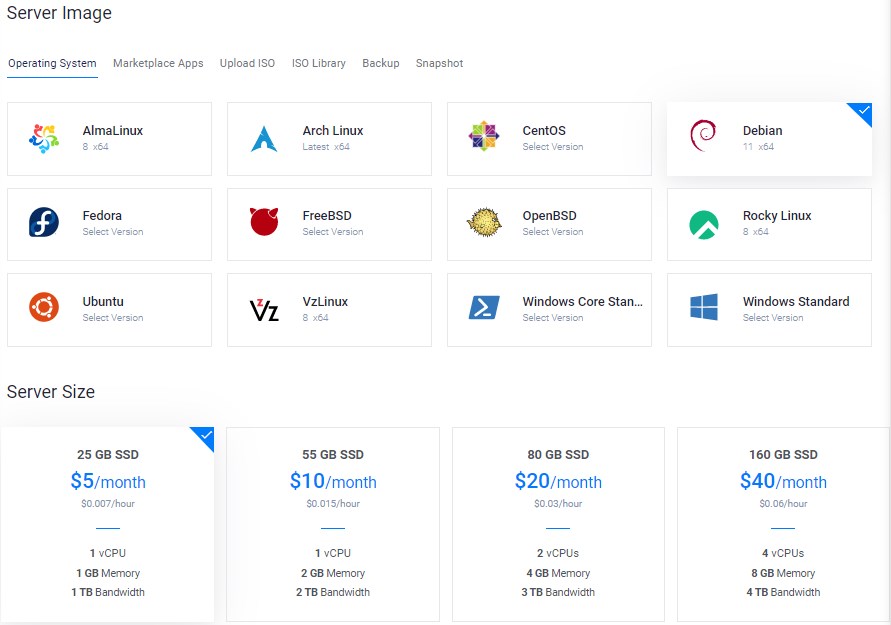
The last step is to add SSH keys and a server name. Both are important, the SSH key is required to safely connect to the server. And the hostname needs to be an FQDN, for example, unifi.lazyadmin.nl, which is publicly accessible. This is needed to create a free SSL certificate later and it also allows you to easily migrate your controller.
SSH Keys
SSH keys are used to create a secure connection between your computer and the server. In this step, we are going to upload the SSH key of your computer. If you haven’t used SSH keys before, then use this guide to create a key.
- Click Add new SSH Keys on the Vultr page
- Enter the name of your computer (this way you can easily identify it later on)
- Click Windows key + R and type: %username%\.ssh\ <enter>
- Copy the contents of id_ras.pub to the SSH key field
- Click Add SSH Key
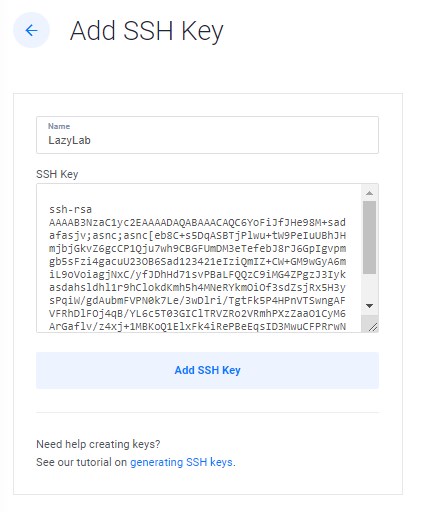
The SSH key will now be listed on the server configuration screen. Make sure that you select it!
Server Hostname & Label
The last step is to give your server a hostname. For this, you can use a subdomain of your domain. After we have deployed the server, we will know the public IP Address of the server and create the DNS records for it.
Enter the hostname, for example, unifi.lazyadmin.nl, make sure that the SSH Key is selected, and click on Deploy now

It will take a couple of minutes to install the server. Great time to get a coffee before we continue.
Step 2 – DNS and Connecting to the Server
The first thing we are going to do is configure the DNS record. DNS changes always take some time to process, and we will need it to be alive later on to configure the SSL Certificate.
When the status of the server changes to Running, we can view the public IP Address, and copy the IP Address of the server.

Go to your DNS provider (I will be using Cloudflare) and create a new A record. Give the record the same name as the server and paste the IP Address in the Value field and save the record.

Connecting to the server
Next, we are going to connect to the server. For now, we will be using the IP Address because the DNS record takes some time to propagate.
We are using the SSH key for connecting to the server, but if you don’t want to use it, then you can look up the password of the server. In Vultr, open your server, by clicking on it. In the Overview tab, you will see the password field.

To connect to the server you can either use Putty or Windows Terminal. To use Putty in combination with the SSH key we will first need to create a Private Key File. When you install Putty you also get the program Putty Key Generators (open start and search for puttygen)
- Open Putty Key Generator
- Click Load and change the file type to all files types in the lower right corner
- Select your id_rsa file and click Open
- Click save private key

Next open Putty and enter the IP Address of your server in the hostname field.
- Enter the IP Address of your server
- Expand SSH and click on Auth
- Click Browse and select your newly created Private Key File. (.pkk)
- Click Save to store to connection
- You can now open the connection

When using Windows Terminal, type:
# Replace the IP Address with the IP of your server
ssh root@95.180.45.43
Click yes to allow the SSH key

Step 3 – Securing the Server
It’s important to secure your server properly so attackers don’t gain access to your server and UniFi devices. We are going to take a couple of steps here:
- Allow SSH access only from your public IP Address
- Only allow SSH Key access
- Limit login attempts
Even though we can only access the server with our Private SSH key, it’s still a good idea to only allows access to your server from your public IP Address. For the firewall, we will be using UFW, which is installed by default on Debian 11.
Look up your public IP Address and type the following command to allow only SSH access from your network:
ufw allow from 80.90.100.110 to any port 22
Next, we need to remove the default rules that allows SSH access from any location:
# Get an overview of all firewall rules
ufw status numbered

# Result
Status: active

     To                         Action      From
     --                         ------      ----
[ 1] 22                         ALLOW IN    Anywhere
[ 2] 22                         ALLOW IN    80.90.100.110
[ 3] 22 (v6)                    ALLOW IN    Anywhere (v6)
We are going to remove rules number 1 and 3, these allow SSH access from any location:
# type ufw delete followed by the correct line number:
ufw delete 1

# result
Deleting:
 allow 22
Proceed with operation (y|n)? y
Rule deleted
We will add the ports for UniFi later on.
Change SSH Configuration
We need to make sure that you can only log in over SSH with an SSH key. For this, we are going to change the SSH configuration file
sudo nano /etc/ssh/sshd_config
Change the following line:
PermitRootLogin Yes   # change it from yes to without-password

# Enable the following line by removing the #
PubkeyAuthentication yes

# Change password authentication to no, at the end of the file
PasswordAuthentication no
Press Ctrl + X and type Y <enter> to save and close the file.
Restart the SSHD service with:
sudo service sshd restart
Limit login attempts
The last step, for now, is to install fail2ban. This tool will monitor your log files and automatically block any bad IP Address that tries to log in to your server.
# Install fail2ban, type Y to install the packages
sudo apt install fail2ban
The default configuration of fail2ban is enough for our situation, so we don’t need to configure anything on it.
There are more security steps that you can do, like changing the root pass, creating your own “admin/root” account, and changing the default SSH port number. Security is all about adding layers of protection, but for now, this is more than good enough. We have limited access to the server to our public IP Address and is only accessible with our private SSH key.
Step 4 – Configure server and Installing required components
There are a couple of components/packages required before we can install the UniFi controller. Some of these packages are not only required for UniFi but will also help us maintain the server.
First, we are going to make sure that the server is up-to-date and cleanup unused and any old software:
# Update the server
sudo apt-get update && sudo apt-get upgrade -y && sudo apt-get autoremove && sudo apt-get autoclean
Security updates need to be installed as soon as possible. Personally, I don’t want to log in every week on a server just to install the updates, so we are going to install the package unattended-upgrades.
sudo apt-get install unattended-upgrades apt-listchanges
Active the package with:
sudo dpkg-reconfigure -plow unattended-upgrades

# Click Yes
Set the correct timezone
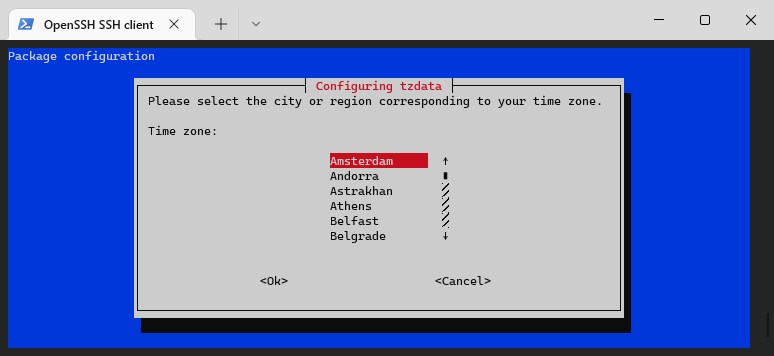
Having an incorrect timezone can really be a pain in the… The time in your log files won’t match your current time, and also in UniFi, you will see that the time is off. So we need to configure the correct timezone with:
sudo dpkg-reconfigure tzdata
Install haveged
Just like with the Raspberry Pi configuration we are going to install the package Haveged. This package will help with speeding up the startup of the UniFi Controller.
sudo apt-get install haveged -y
Install Java (OpenJDK-8)
The UniFi controller needs Java 8 to run, so we are going to install OpenJDK 8. Now this package isn’t available anymore for Debian 11, so we first need to add a different repository to the server.
# Install the necessary packages
apt-get install -y wget apt-transport-https gnupg

# Download the GPG key:
wget -qO - https://adoptopenjdk.jfrog.io/adoptopenjdk/api/gpg/key/public | sudo apt-key add -

# Add the repository
echo "deb https://adoptopenjdk.jfrog.io/adoptopenjdk/deb buster main" | sudo tee /etc/apt/sources.list.d/adoptopenjdk.list

# Install Java 8
sudo apt-get update; sudo apt-get install adoptopenjdk-8-hotspot
Step 5 – Install the UniFi Controller
So we can finally install the UniFi Controller for our cloud server. Also for UniFi, we will need to add a repository first, so we can download and install it with APT.
# Add the repository
echo 'deb http://www.ui.com/downloads/unifi/debian stable ubiquiti' | sudo tee /etc/apt/sources.list.d/100-ubnt-unifi.list

# Authenticate the repository
sudo wget -O /etc/apt/trusted.gpg.d/unifi-repo.gpg https://dl.ubnt.com/unifi/unifi-repo.gpg
The latest version of MongoDB isn’t supported by the UniFi Controller. To prevent any error during the installation we are going to change the repository for MongoDB to version 3.6:
echo "deb http://repo.mongodb.org/apt/debian stretch/mongodb-org/3.6 main" | sudo tee /etc/apt/sources.list.d/mongodb-org-3.6.list

sudo wget -qO - https://www.mongodb.org/static/pgp/server-3.6.asc | sudo apt-key add -
With the repositories added and authenticated, we can now install the UniFi controller on our VPS server:
sudo apt-get update; sudo apt-get install unifi -y
The last step is to automatically start all the required services when the server boots:
sudo systemctl enable unifi.service
sudo systemctl enable mongod.service
sudo systemctl enable haveged.service
Configure the Firewall for UniFi
Our UniFi Cloud Controller is now installed, but before we can use it we will need to configure the firewall. We will need to open the ports for the UniFi devices so they can communicate with the controller and we will need to have access to the controller GUI.
So first we will only allow access to the controller webpage from our public IP Address:
# Allow access to the controller webpage from your public IP Address
ufw allow from 80.90.100.110 to any port 8443
Next, we will need to open the STUN and UniFi inform port. You could open these for every location, or limit them based on the public IP Address where you are going to use the UniFi devices:
# Allow UniFi devices to communicate with the controller.
ufw allow 3478/udp  # STUN port
ufw allow 8080  # Inform port

# Or limit them based on public IP Address
# repeat the lines below for every public IP Address
ufw allow from 80.90.100.110 to any port 3478
ufw allow from 80.90.100.110 to any port 8080
Optional, if you are going to use the guest portal, then you will need to open ports 8880 and 8843 as well:
ufw allow 8880
ufw allow 8843
Step 6 – Install the SSL Certificate
The advantage of running our own server on a public domain is that we can add an SSL certificate to it. This way we won’t have the annoying warning anymore when we open the controller.
We will be using Let’s Encrypt, which will generate a free SSL cert for you. Make sure that the domain name is active and point to your new server.
# Install Certbot
sudo apt install certbot python3-certbot-apache -y
To use certbot we will open the required ports in our firewall. Open ports 80 and 443 with UFW:
ufw allow 80
ufw allow 443
After we have installed certbot we can request our certificate:
certbot --apache -d unifi.lazyadmin.nl

# Enter an email address when requested, so you can receive alerts
# Agree to the terms
Now we need to configure the UniFi controller to use our certificate. Steve Jenkins has created an import script that makes this a lot easier to do, so we are going to use this script. Download the script with the following cmd:
sudo wget https://raw.githubusercontent.com/stevejenkins/unifi-linux-utils/master/unifi_ssl_import.sh -O /usr/local/bin/unifi_ssl_import.sh
We need to make the script executable by giving it the correct permissions:
chmod +x /usr/local/bin/unifi_ssl_import.sh
Next, we need to configure the script. Open the script with:
sudo nano -w /usr/local/bin/unifi_ssl_import.sh
And change the following lines:
Add your domain
UNIFI_HOSTNAME=unifi.lazyadmin.nl

# Uncomment following three lines for Fedora/RedHat/CentOS
#UNIFI_DIR=/opt/UniFi
#JAVA_DIR=${UNIFI_DIR}
#KEYSTORE=${UNIFI_DIR}/data/keystore

# Uncomment following three lines for Debian/Ubuntu
UNIFI_DIR=/var/lib/unifi
JAVA_DIR=/usr/lib/unifi
KEYSTORE=${UNIFI_DIR}/keystore

# Uncomment the following line
LE_MODE=true
Save and close the file with CTRL + X and press Y <enter>
Run the script with:
/usr/local/bin/unifi_ssl_import.sh
When we now open our UniFi Cloud Controller we won’t get the security warning anymore, but instead, we have a valid SSL certificate!
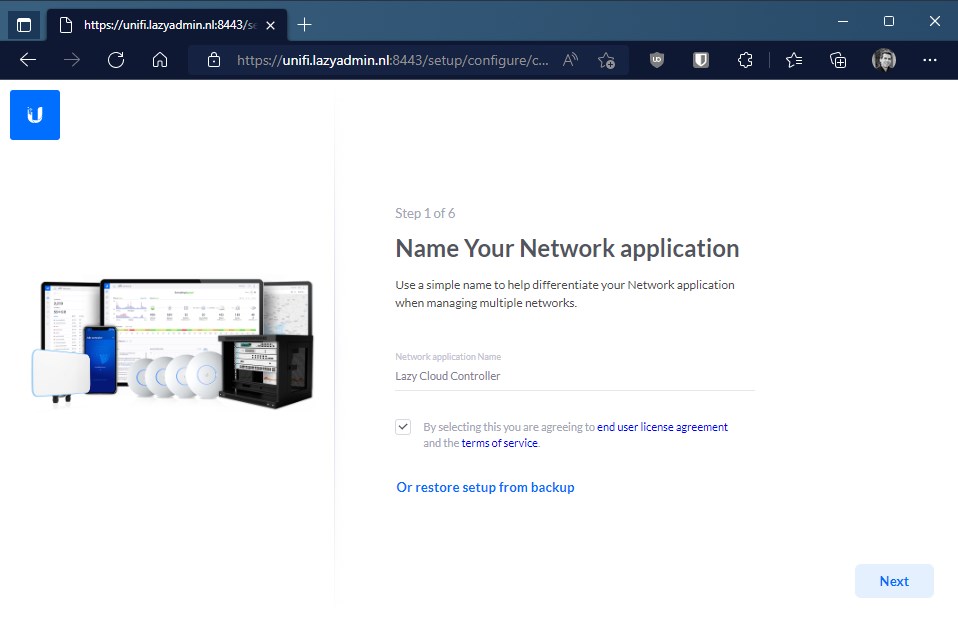
Step 7 – Configure your UniFi Network Application
With our network controller running we can start with configuring our UniFi network application. If you already have a controller you could also restore a backup if you want. Just follow the wizard for the initial configuration.
We can skip adding devices, for now, just click next.
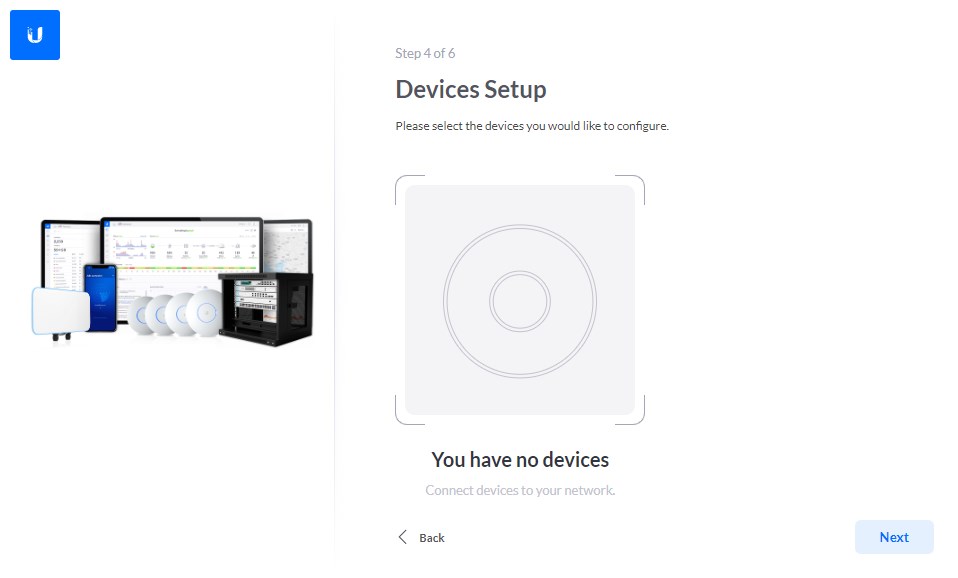
In step 5 of the wizard, you can set up your WiFi network, but again we can also do that later.
I won’t go into detail on how to configure your UniFi controller, you can read more about that in this article.
Step 8 – Connecting your UniFi devices to the Cloud Controller
So we have our UniFi Cloud Controller running, but how do we connect our UniFi devices to it? In a normal network environment, you could just connect the device to the network, and it will discover the controller automatically.
There are two ways to do this, if you have a large environment with a DNS server, then you can create a local DNS record, the other option is to set the inform address manually in the device. By default, the devices will try to connect to http://unifi:8080/inform. So you could create a DNS record in your local network, named unifi and point it to the public IP Address or FQDN of your Cloud Controller.
Using Set-Inform
The other option is to use the set-inform command on the UniFi device. This requires for you to log on to every device to set the correct address to the UniFi Cloud Controller. Connect your UniFi device, and look up the IP Address ( a great free tool for that is Advanced IP Scanner)
I am using Windows Terminal, but you can also use Putty for this:
# SSH into the UniFi device
# Replace the IP Address with the IP of your UniFi device
ssh ubnt@192.168.1.142
password: ubnt

# Set the inform address to the public IP address of your UniFi Cloud Controller
set-inform http://80.90.100.110:8080/inform
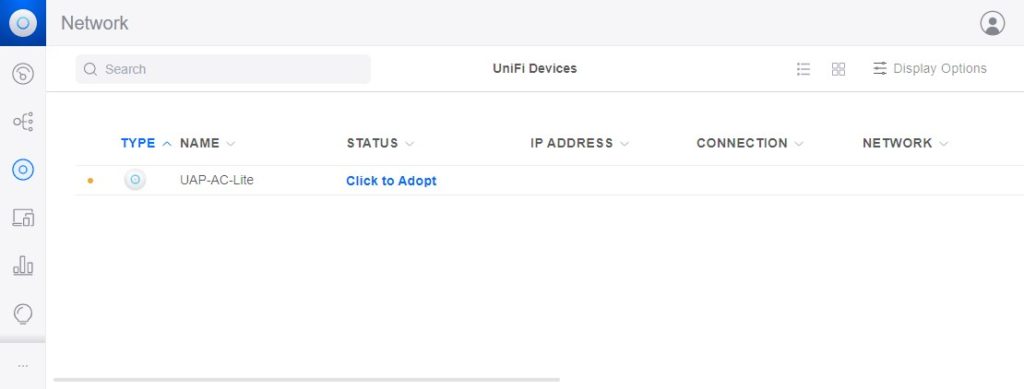
If you now open your UniFi Cloud Controller you will see the access point ready for adoption:
Optimizing your UniFi Cloud Controller
When you plan to use the UniFi Cloud Controller for a high number of devices, you will need to only increase the memory on your VPS, but also optimize the configuration file of the controller. By default, the controller is configured to run with a maximum of 1GB of memory.
So the first step is to increase the memory on your VPS. In Vultr, you can just go to your VPS > Settings and select Change Plan. After you have increased the RAM on your VPS, you will need to edit the configuration file (system.properties).
You can find this file system.properties file in the following folder on Linux:
/usr/lib/unifi/data
To change the file we will need to make an SSH connection to our server and open the file:
# Make an SSH Connection to your server:
ssh root@80.90.100.110

# Stop the Unifi service
service unifi stop

# Open the system.propeties files
nano /usr/lib/unifi/data/system.properties
The first step is to increase the amount of memory that Java can use, add or increase the following lines to 2GB:
# default value is 1024 (1GB)
unifi.xmx=2048
unifi.xms=2048
If you have allocated more than 4GB to Java (XMX), then you also need to increase the Mongo WiredTiger cache. The best option is to set it to auto mode:
db.mongo.wt.cache_size_default=true
If you are still experiencing a slow network controller, then make sure you check out this article from Ubiquiti with more tips to fine-tune your UniFi Cloud Controller.
Wrapping Up
When creating your own UniFi Cloud Controller it’s important to secure your server properly. Limit access to the controller to only your public IP Addresses, make sure that you use an UniFI Cloud account, so you can use the 2FA authentication.
In the article, I have worked under the root account. A better practice is to create a new user account with sudo privilege and disable the root account:
adduser lazyadmin
usermod -aG sudo lazyadmin

# Disable Root login in SSHD conf
sudo nano /etc/ssh/sshd_config
Instead of creating your own server, you could also take a look at the services of HostiFy for example. They offer great UniFi controllers in the cloud, completely managed by them.
I hope you found this article useful, if you have any questions, suggestions, or tips, just drop a comment below.





I can’t get Steve Jenkins script to work. Do you know if there’s an updated version?
What is the exact error that you get? Check also the Issues list on Githubm, it might contain a solution.
Disregard my previous comment, it turned out that the problem was me – I had forgotten two lines in my nginx proxy that points to the UniFi controller. All works as intended now 🙂
Hi Rudi, another great article.
I’m having some issues tho, it seems that I only can connect via https on localhost.
Or, I can connect just fine, but my credentials are rejected. Any idea what have happened?
Great article. Now have my controller running in the cloud. Have configured it for multi-site. Question is does each site have its own inform url? How do I find this out?
Thanks in advance.
No, you will have to use the same URL for each site.
Great Writeup!
To nitpick a bit: The default inform URL on AccessPoints is http://unifi:8080/inform, not http://inform:8080/inform.
Hard-Coding IP addresses is always a bit… well, suboptimal.
With a bit of DHCP elbow grease, you can even get away with not setting the inform URL at all: Using DHCP Option 15 (“Domain Name”, here: “lazyadmin.nl”), you can tell the AP’s DNS client to expand “unifi” to “unifi.lazyadmin.nl” and look it up in DNS. Of course, this requires that the DHCP server servicing the APs is under your own control.
The other (less elegant, IMO) trick one can pull is with DHCP Option 43, where you can hex-encode the controller’s IP address. From that information, the AP will self-generate an entry named “unifi” in /etc/hosts, pointing to that IP address. Still borderline to hardcoding an IP address.
Eventually, DNS (or /etc/hosts) will return the proper IP address, and the AP will connect to it.
One caveat: The HOST header in the HTTP POST request to the IP address will still be what is/was in the (unchanged) set-inform URL: “unifi:8080”. This makes running a reverse proxy in front of the controller nigh impossible.
Oh – and don’t forget to open Ports 8880 and 8843 inbound to the controller if you’re using the Hotspot Portal, and if you do, to also set the “Domain” field for the Landing Page to your FQDN (if left blank, the authenticating client will connect with an IP address in its HTTP request). If you get your certificate stuff right, the Hotspot Portal page can even be properly served using HTTPS, too (just as described here).
That is not nitpicking, the url was simply wrong, thanks for pointing out the typo.
Thanks for the guide. I’ve managed to install the new version on Ubuntu linux, but then in the new UI i have some challenges regarding different networks and VLANS.
We have three WIFI networks, one of IT Team, one for regular users and another one for Guest users.
The IT Wifi network is on the same network of the management interface and in this one the clients can get ip’s from DHCP server with not problem. But the other two networks, i’ve configured with the corresponding VLAN ID, double check that port is in trunk mode with all the required VLAN’s but in the end clients can’t get an IP.
For what i saw on the interface i can’t use DHCP relay without a physical hardware ? Is there a way of doing this without any extra hardware ?
Thank you so much.
Check this article which will explain how to configure VLAN in UniFi network.
Hi, Excellent instructions!
An additional step I would like to have is to configure fail2ban to protect the unifi gui.
Do you know how to do it?
Thanks
It is in the article, chapter “Limit login attempts”.
Awesome! Thank you for providing these detailed instructions! It’s now much less costly to spin up cloud-based UniFi controllers rather than using cloud-based UniFi providers who charge higher recurring fees. I already use VULTR too, so that’s just an added bonus.
Kudos!
Very comprehensive, Thx.
I think there’s a missing step.
add
“origin=Ubiquiti Networks\, Inc.,label=Ubiquiti Networks\, Inc.”;
to
/etc/apt/apt.conf.d/50unattended-upgrades
for unattended-upgrade to run and update.
Wow! Tried other guides, to no joy. Your, well first time! Thank you.
Excellent instructions!
Does the FQDN have to be a registered domain? (I’m just getting into the networking world and have many gaps in my understanding.)
Thanks!
Yes
This is very cool, thanks for sharing!