I like to automate as much as possible, and one of those repeating tasks is license assignment in Microsoft 365. You can automate the creation of users. It’s even possible to assign an Office 365 license with PowerShell. But most of the time it’s still a manual process, one that is prone to mistakes.
The problem, especially with medium or larger organizations, is that you create the users in the on-premise Active Directory. New users need to be synced to Azure AD (which we can force), after which we can assign a license.
But what if you are out of licenses? You will first need to increase the number of licenses or even order extra through your MSP or finance department. That takes time.
And when the news licenses are added, you will need to log back into the Admin Center to assign the license (which happens to be the part that I forget sometimes..)
The solution? Assign licenses to a group in Office 365.
Getting started
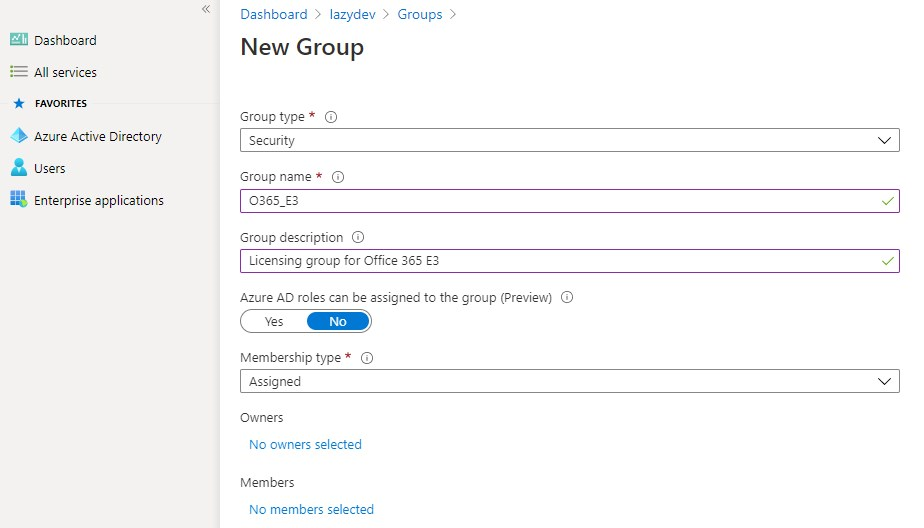
To get started with Office 365 group-based licensing, we first need to create groups to which we can assign the license too. You can create the (security) group in your local AD or in Azure Active Directory. It’s also possible to use existing groups, like department groups that you maybe already have.
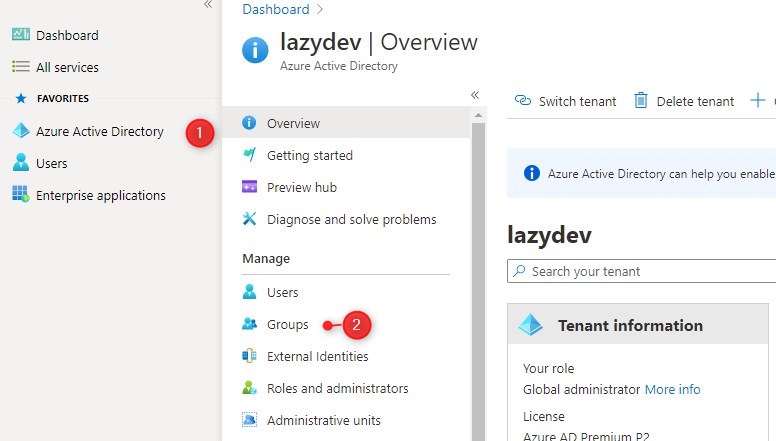
For Azure AD you will need to login into Azure AD Admin Center.
- Select Azure Active Directory on the left side
- Choose Groups
- Click New group
- Set the Group type to Security
- Give the Group a name, for example, O365_E3
- Click on Create
Adding users to the Group
I already had Office 365 E3 licenses directly assigned to the users. So what I have done is used a small PowerShell script to get all the users with an E3 license and added them to the new security group.
You will need to have the Microsoft Online Service module installed for PowerShell. We are first going to get the AccountSkuId for the license that we want to assign.
# Connect to Microsoft Online Service
connect-MsolService

# Get all AccountSkuIds
Get-MsolAccountSku

The AccountSkuId is buildup with your tenant name and an ID of the product. For Office 365 it’s ENTERPRISEPACK and for E5 ENTERPRISEPREMIUM
The next step is to get all users with the E3 license and add them to our new group. When you are using an on-premise Active Directory, then use the script below:
$msolUsers = Get-MsolUser -EnabledFilter EnabledOnly | Where-Object {($_.licenses).AccountSkuId -eq 'lazydev:enterprisepack'}

ForEach ($user in $msolUsers) {
  try {
    $ADUser = Get-ADUser -filter {UserPrincipalName -eq $user.UserPrincipalName} -ErrorAction stop

    Add-ADGroupMember -Identity O365_E3 -Members $ADUser -ErrorAction stop

    [PSCustomObject]@{
      UserPrincipalName = $user.UserPrincipalName
      Migrate           = $true
    }
  }
  catch {
      [PSCustomObject]@{
      UserPrincipalName = $user.UserPrincipalName
      Migrate           = $false
    }
  }
}
If you are using only Azure Active Directory then you can use the following script:
# Get all users with the Office 365 E3 license
$msolUsers = Get-MsolUser -EnabledFilter EnabledOnly | Where-Object {($_.licenses).AccountSkuId -eq 'lazydev:enterprisepack'} | Select DisplayName,UserPrincipalName,ObjectId

# Get the Group Id of your new Group. Change searchString to your new group name
$groupId = Get-MsolGroup -SearchString O365_E3 | select ObjectId

ForEach ($user in $msolUsers) {
  try {
    # Try to add the user to the new group
    Add-MsolGroupMember -GroupObjectId $groupId.ObjectId -GroupMemberType User -GroupMemberObjectId $user.ObjectId -ErrorAction stop

    [PSCustomObject]@{
      UserPrincipalName = $user.UserPrincipalName
      Migrated          = $true
    }
  }
  catch {
      [PSCustomObject]@{
      UserPrincipalName = $user.UserPrincipalName
      Migrated          = $false
    }
  }
}
Office 365 Group-Based Licensing
With the new group created and the users copied (or manually added) to the new group, we can now start with assigning the Office 365 license to the Group.
- Login to Azure AD Admin Center
- Open Groups
You can find it under Azure Active Directory on the left side and then Groups

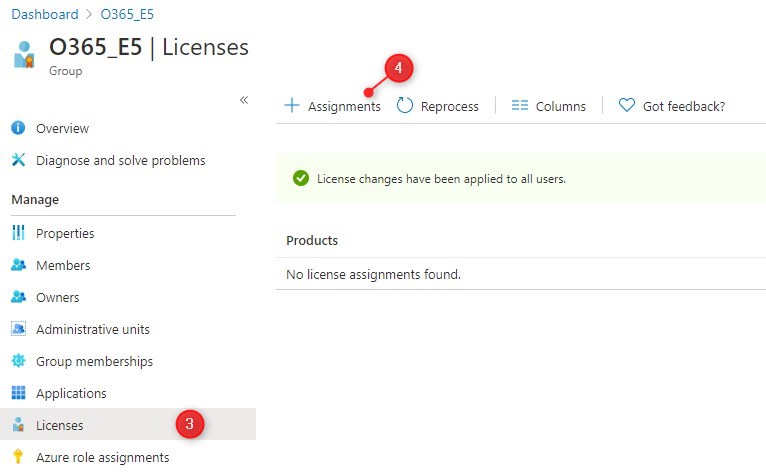
- Open your new Group and select Licenses
Find the new group that we have created and select licenses on the left side
- Select Assignments to assign a new license

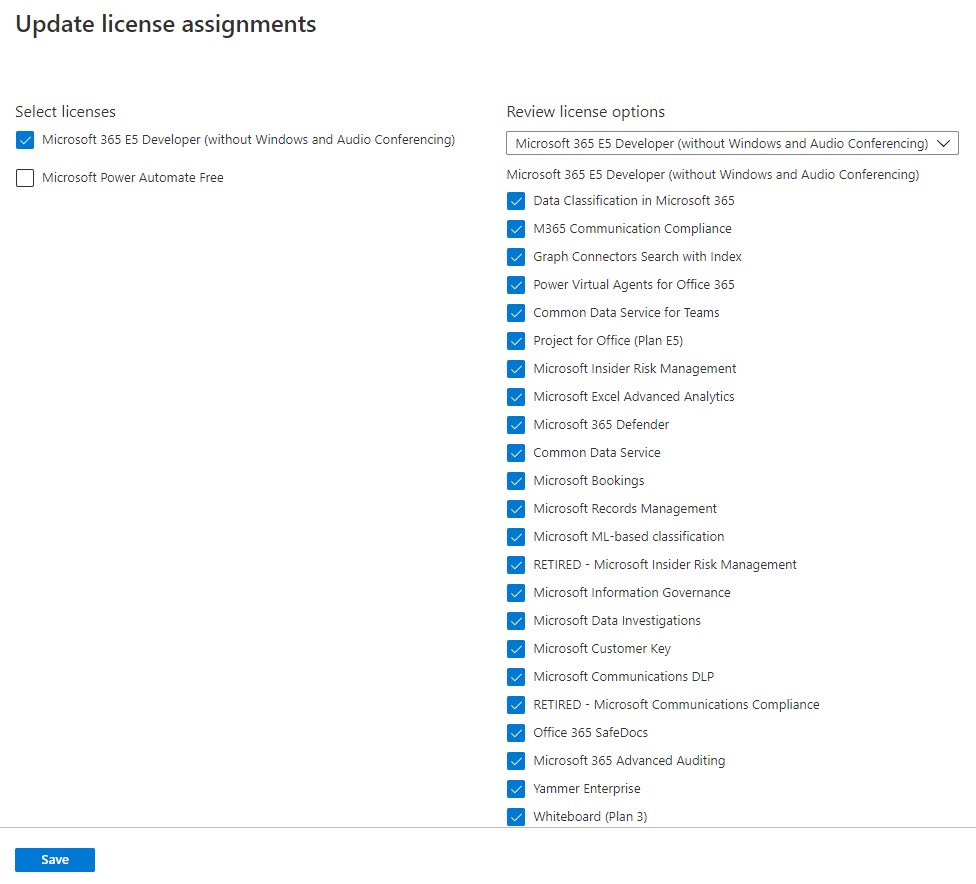
- Select the license you want to assign to the Group
You can change the license services if you want. For example, remove Yammer or Sway if you don’t want to use it.
Click on Save and close the license screen when done.
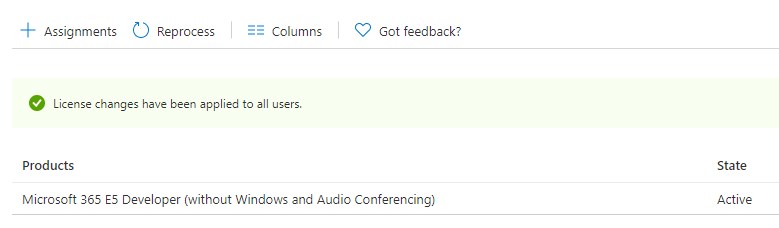
- License are assigned
It can take a couple of minutes until all the users are processed. If you refresh the screen after a couple of minutes you will see that the license changes have been applied

Inherited vs Direct licenses
Users can have directly assigned licenses and inherited licenses. Directly assigned are the licenses that you have manually assigned to the users. The inherited are the licenses that the users gets based on the group membership.
If you already had manually assigned licenses to the users, then you will need to remove the directly assigned license. Not because they now have two licenses, but if you remove them from the group later, they will still have the directly assigned license.
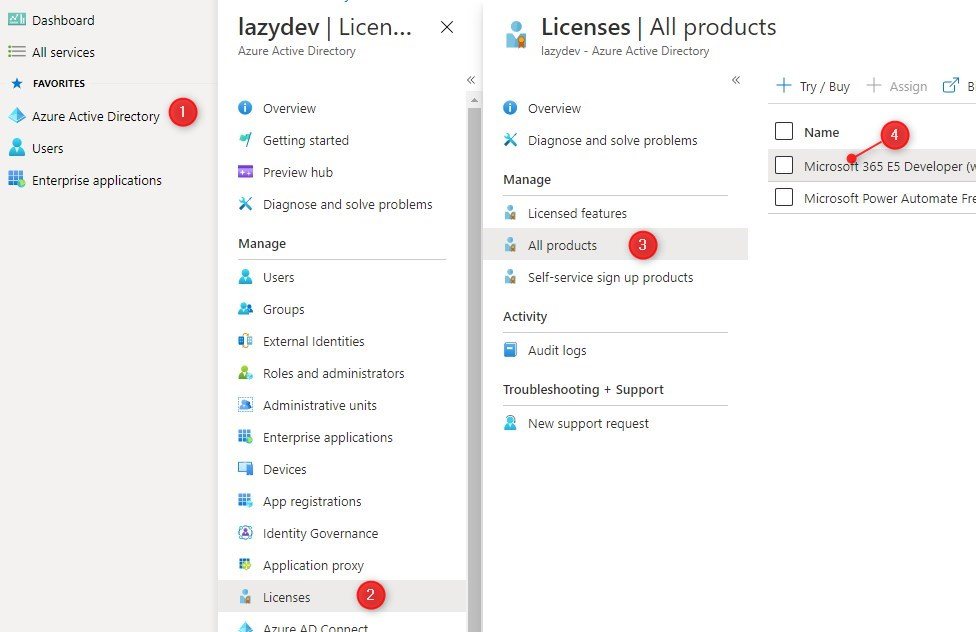
- Open the Azure Active Directory in Azure AD Admin Center.
- Select Licenses
- All Products
- Open the license that you just have assigned to the group.
You will now see a list of all licensed users. In the column Assignment Paths, you will see how the user has gotten the license, Direct, or Inherited. Behind inherited you will also see from which group the user has inherited the license.
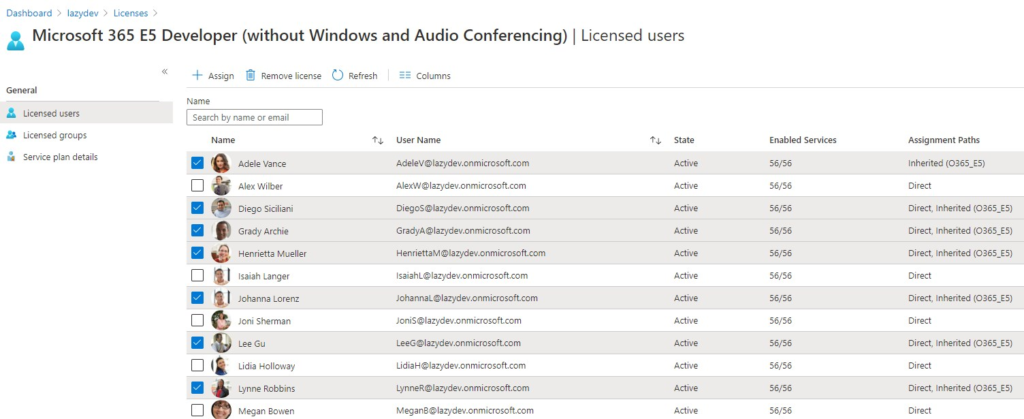
Select the users with the direct and inherited licenses and click Remove License to remove the direct license.
The users won’t notice anything from the removal as long as you keep the license and services the same. Otherwise, test it first with a small group of users.
Wrapping Up
You can assign users to multiple groups, so you could create a base group with Office 365 E3 for example and a separate group with PowerBI Pro. Using multiple groups, and each group for one license, gives you more flexibility when it comes to assigning licenses to the user in Microsoft 365.
Using Office 365 Group Based Licensing is easy to set up and takes way another manual step in creating and managing your users.
If you have any questions, just drop a comment below.


Good afternoon, everyone:
There is another point to bear in mind as of January 2024.
From what I’m reading in Microsoft’s documentation (https://learn.microsoft.com/es-es/entra/fundamentals/concept-group-based-licensing) and I understand, you need to have Azure Entra ID P1 or P2 if your 365 licenses are not Premium or E3.
A shame and a lot of cash
What about UsageLocation which can’t be specified with the group? How would we assign this? Some Licenses depend on this, and all licenses is not availble in certain countries.. 🙁
You will need to set the location of the user in Azure AD:
– Sign in to the Azure portal in the User Administrator role.
– Go to Azure AD > Users and select a user.
– Select Edit properties.
– Select the Settings tab and enter a location for the user.
Hi Rudy,
I figured out you can automate this in AzureADConnect to automatically full this in based on the attribute ”c”, since it’s a common thing for Servicedesk/HR to fill out 🙂
Hi! Did all the steps. It all worked out. Great article!
But I don’t understand how to make when adding user to local group(AD on-prem) “License O365 E3” user will be added also to cloud group(Azure AD) and get license.
That is, tech support engineers don’t have access to Azure, but have access to local AD. I want them to be able to assign licenses from local AD.
If you have created the groups in Local AD, then they should be available in Azure AD for the assignment. You should then be able to follow the steps under “Office 365 Group-Based Licensing”
-Created a group in AD.
-Synchronized it, it appeared in Azure
-Added a user (AD) to the group
-Synchronize it with Azure
The user did not show up in that group in Azure.
What am I missing?
That is odd, sounds like an issue with Azure AD Connect. Might be worth to double check the settings and check for errors.
You wrote: “But what if you are out of licenses? You will first need to increase the number of licenses or even order extra through your MSP or finance department. That takes time.”
This step is not omitted? If too few licenses are available, they are not automatically purchased. Even with a group assignment, enough licenses must be purchased. This cannot be automated …?
No, not that I am aware of. As far as I know, Microsoft requires human interaction to purchase licenses. Otherwise, your script could accidentally buy 1000 licenses for example.
Hi,
I am using Power Automate to create a user and assign to group so that it will add the license automatically. However, it won’t generate any error if the license is not assigned because of license shortage. How can we set Azure to increase the number of license automatically? Or, at lease generate an error so that Power Automate can pick it up. Thank you.
I think your best option here is to first check how many licenses you have available and if that is 0 then send an email to purchase additional licenses. As far as I know you can’t purchase licenses through PowerShell.
Hello,
Can we use PowerShell to configure Office 365 Group Based Licensing.
I cannot find any option to assign a licenses to a dynamic group i created.
New-AzureADMSGroup -DisplayName “Dynamic Group 01” -Description “Dynamic group created from PS” -MailEnabled $False -MailNickName “group” -SecurityEnabled $True -GroupTypes “DynamicMembership” -MembershipRule “(user.department -contains “”Marketing””)” -MembershipRuleProcessingState “On”
Hi Rudy,
Please is it possible to assign one license to two or more Azure AD Group? Thanks
Yes, you can repeat step 5 of “office 365 Group Based Licensing”
Hi Rudy Mens, after running the script for on-premise Active Directory, all Users get the Migrate state “False”. Do you have any advice?
Did you check the
Get-MsolAccountSkuresult that it matches the AccountSkuId on line 2 of the script?Great article! Will this work with nested groups (AD groups synced from AD to Azure)?
Yes, that’s exactly how I am using it as well. Users are members of a group in the local AD.
Sorry, I wasn’t clear – I meant nested local AD groups synced to Azure.
Let’s say User1 is a member of Group3, Group3 is a member of Group2, Group2 is a member of Group1. Licenses allocated to Group1. Will User1 get license allocated? Looks like it didn’t work for me and licenses allocated only to direct members of the group.
Ah yes, that is indeed a good question. I have no idea if that will work, will have to test it out as well.
OK, nested groups won’t work 🙁
“Group-based licensing currently does not support groups that contain other groups (nested groups).”
https://docs.microsoft.com/en-us/azure/active-directory/enterprise-users/licensing-group-advanced
Bummer, thanks for sharing!
Hi,
in the azure script is a little error.
The line:
try {
# Try to add the user to the new group
Add-MsolGroupMember -GroupObjectId $groupId -GroupMemberType User -GroupMemberObjectId $user.ObjectId -ErrorAction stop
Should be:
try {
# Try to add the user to the new group
Add-MsolGroupMember -GroupObjectId $groupId.ObjectId -GroupMemberType User -GroupMemberObjectId $user.ObjectId -ErrorAction stop
Thx for the post!
Thanks
Hi,
This works well but how can we prevent users do become member of two groups. For example Microsoft Business Premium and Office E1?
You can first get all the existing users with one of the licenses and check if the user isn’t present in one of the two lists.
With the code below you can get all users with a specific license
# Get all users with the Office 365 E3 license

$msolUsers = Get-MsolUser -EnabledFilter EnabledOnly | Where-Object {($_.licenses).AccountSkuId -eq 'lazydev:enterprisepack'} | Select DisplayName,UserPrincipalName,ObjectId
Wondering if you have tried using powershell to assign a license to a group or is it only done through the GUI
I haven’t done that. You can assign a license to a user with PowerShell though
We have Office 365 E3 licenses. Do you happen to know if this will work for them? The documentation says “Office 365 Enterprise E3” which I think it technically different.
This will work with every Office 365 license
Group based, when you have 9 on-prem forests syncing to one tenant,each with different particularities
You can create different license groups in Azure. To assign the users to their groups you will need to use filters to select the correct users from the Active Directory.
How would you do this when merging 10 entities, 9 on-prem and one cloud to a single tenant?
Do you mean how to assign the licenses to the users?