Making backups of your data is important, and the same goes for your Unifi Controller. If an update fails and bricks your controller, you will need to reset every Unifi device to adopt it again. The controller self does make backups, but they are stored on the controller self.
You won’t be able to access your backups if your Cloudkey or Raspberry Pi doesn’t work anymore. So it’s a good idea to store/sync your backups to an offsite location, the cloud. This can be pretty much any cloud provider, more than 40 are supported, among the popular ones like Dropbox, OneDrive, and Amazon S3.
There are two ways to set this up, manually, using Rclone, or through a free service called BackiFi. In this article, we will discuss both solutions. I will walk you through the setup of both options. It will take you around 5 minutes to set up.
Backify vs Rclone
So before we start with the how-to’s, first a quick comparison between the two solutions. With Backify and Rclone you can basically achieve the same result. The advantage of Backify is that it makes it really easy to set up your Unifi Controller Backup. You can simply add one or more cloud storage providers and set up the backup schedule.
But for Backify you need a static IP Address (or you could use a DDNS service) or domain that points to your controller and create an account for them in your controller.
Important!
There is one downside that I need to mention first. For BackiFi to work you will need to create a super admin account in your Unifi Controller. Only users with the role of super admin can access the backups in the controller. This comes with a risk, you give someone else basically full access to your network controller. The super admin requirement is by design from Ubiquiti, at this point you simply can’t limit the API access.
They store the login details encrypted in their database, but BackiFi needs to decrypt the password to access your controller to copy the backup out of it. You should always be careful with this because you can’t be 100% sure what they are doing. I have talked to them, they sound legit, but keep this in mind.
BackiFi is a free service, created as a side project by a couple of developers. I really like their solution and good intentions, but always be careful with giving someone access to your network.
Tip
If you manage multiple Unifi network sites then it might be more convient to use a hosted Unifi Controller in the cloud. This way you don’t need to worry about backups and keeping your network up-to-date.
Go straight to the BackiFi review or start with the Rclone method:
How to use Rclone to backup your Unifi Controller
So we start with the manual way to backup our Unifi Controller to the cloud (or other location). Rclone is a command-line program that helps you with managing files in cloud storage locations.
With Rclone we will make the connection to the storage of our choice and set up the sync between the backups created by our Unifi Controller and our cloud storage. Rclone is completely open source and free to use.
This how-to will work for pretty much any Unifi Controller, so it doesn’t matter if you are running it on a Raspberry PI, Cloud key Gen2 of UDM, only the location of the backups can be different.
1. Get SSH access to your Controller
Login to your controller over SSH. You can use either Putty, Windows Terminal, or any other SSH Client for this. Use the IP Address of your controller and the login credentials to connect.
2. Install Rclone
Installing Rclone is pretty simple, just run the following command
curl https://rclone.org/install.sh | sudo bash
Wait until you see rclone v1.53.1 has successfully installed.
3. Configure your Cloud Storage
We can now connect our cloud storage in Rclone. I am going to use Dropbox in the example. First, we open the rclone config and then add a new N storage provider
# Open the config
rclone config

# Create a new storage provider
n

# Give the storage a name
sdn_dropbox
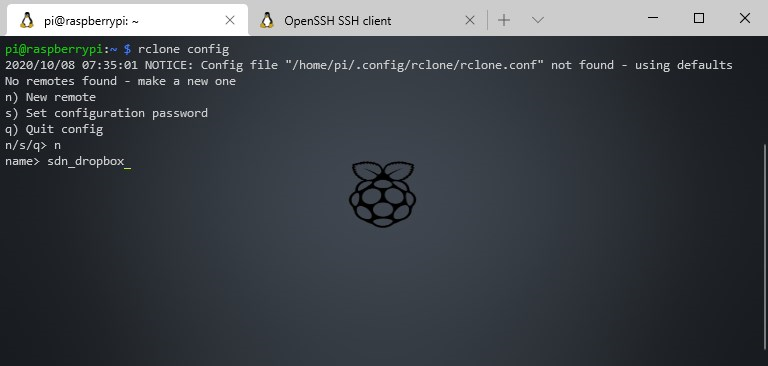
All supported storage providers are listed. Enter the number of the storage provider you like to add. For Dropbox, it’s 9.
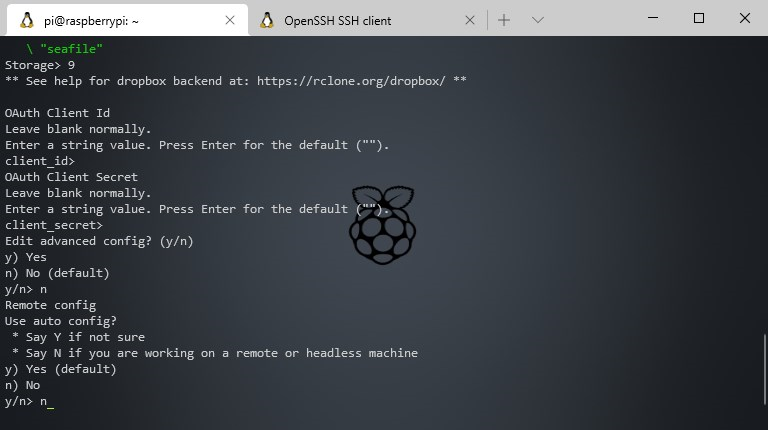
We will need to do the authorization for Dropbox on our computer because we can’t open a web browser from the command line. So leave everything blank and skip the configs.
If you are using another storage provider, then check these manuals for the instructions to authenticate it.
# Enter the number for Dropbox
9

# Leave the Dropbox App Client Id blank
ENTER

# Leave the Dropbox App Client Secret also blank
ENTER

# Skip the advanced config
N

# Skip the auto-config
N
Completing authorization
We need to complete the Dropbox authorization on our computer. Download Rclone here for your PC.
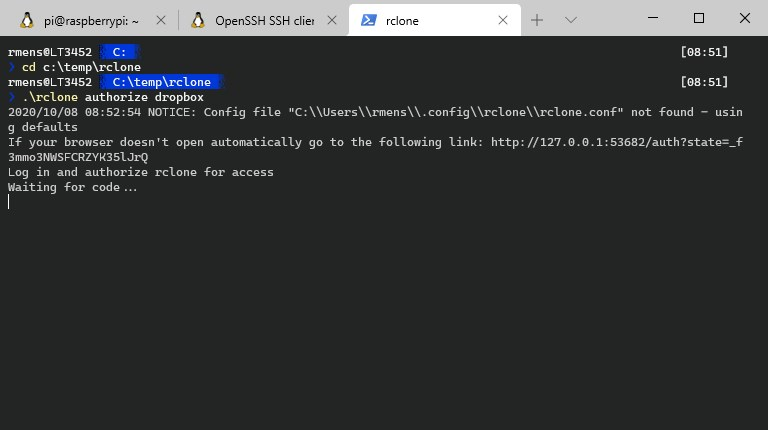
Unzip the folder and extract the files. We need to open the directory in CMD or PowerShell, so I have extracted it to c:\temp\rclone.
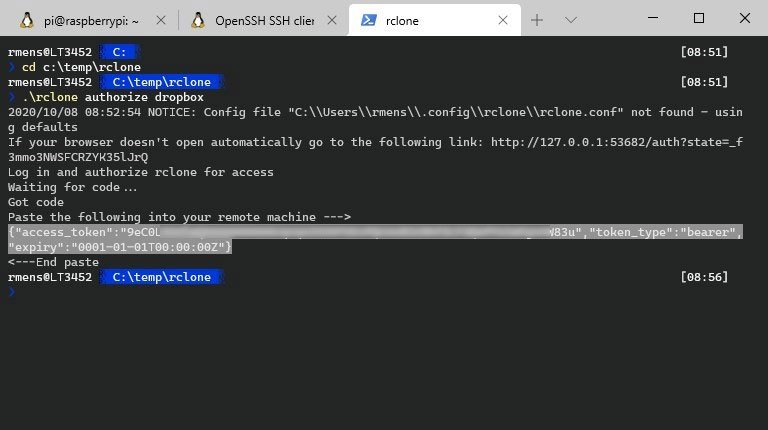
Open CMD (Windows key + R > CMD) or PowerShell. Navigate to the extracted files. Next, we are going to authorize Dropbox.
cd:\temp\rclone

# Authorize Dropbox
.\rclone authorize dropbox
Your web browser will open to authorize Dropbox.
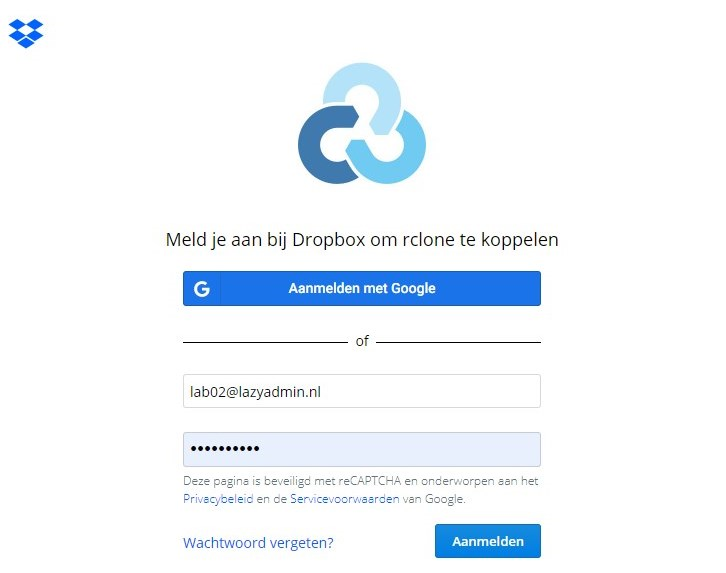
Click on Sign-in and Allow Rclone to access your files and folders. You will see a success screen, we can close the window and go back to our Rclone config on our computer.
So in our local CMD or PowerShell session, we now have an authorization code. We need to copy this code to our Rclone config on the Unifi Controller.
Highlight the code and right-click to copy it.
Then head back to the SSH session on your Unifi Controller and past the token. To past in SSH, simply right-click again. Press Y to save it.
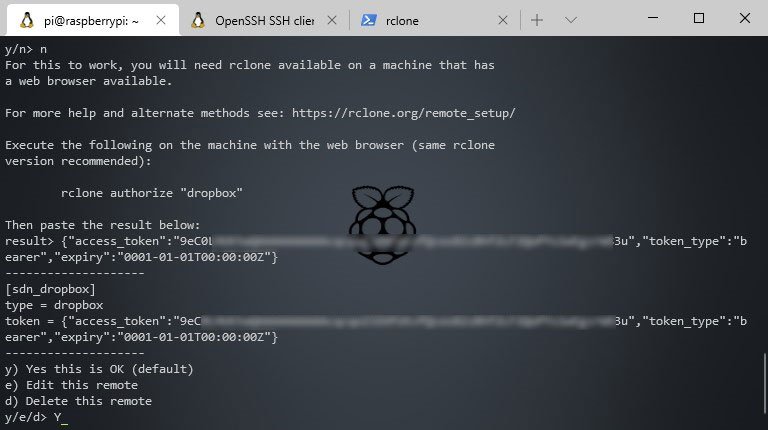
We can now quit ( q )the configuration of our Dropbox storage.
4. Setting up Dropbox
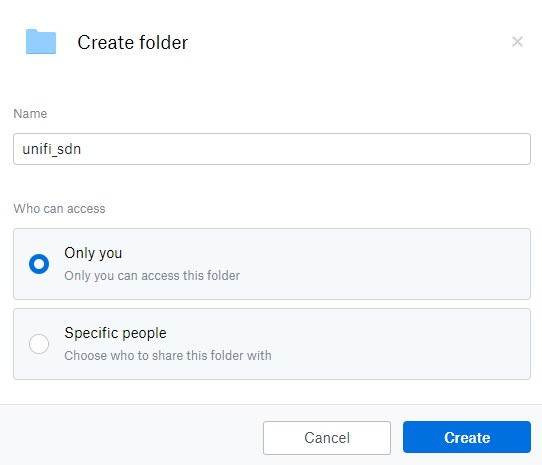
So before we are going to sync our Unifi Controller backup files, we need to create a folder in Dropbox to store them.
Open your Dropbox and create a new folder backups with a subfolder unifi_sdn.
5. Syncing to Dropbox
We can now start the sync of our backup files. Go back to your SSH session on your Unifi Controller. Run the following command to sync the files.
We are using the sync function from Rclone and not the copy. If you would use copy, then your Dropbox will run full with backups, they will never get deleted.
Sync will also remove old files, it keeps the Dropbox folder in sync with the backups listed in your Unifi Controller. Keep in mind that Dropbox has 30-day file retention, so if something goes wrong you can always restore the files in Dropbox.
If you want to keep the files indefinitely use rclone copy instead of rclone sync.
If you are using a CloudKey Gen2, then use the following path to copy the files from: /srv/unifi/data/backup/autobackup
# Replace sdn_dropbox with the storage name that you created in step 3
# Replace unifi_sdn with the dropbox folder name that you created in step 4

rclone sync /var/lib/unifi/backup/ sdn_dropbox:backups/unifi_sdn

# For a CloudKey Gen2 use the following cmd:
rclone sync /srv/unifi/data/backup/autobackup/ sdn_dropbox:backups/unifi_sdn
The files should now be synced to your Dropbox folder.
If you get a permission error, that for example can happen on a Raspberry PI, then we need to add your user to the Unifi group.
# Replace pi with the username that you are loggedin with.
sudo usermod -a -G unifi pi
6. Create a scheduled job
We don’t want to run the Rclone command manually every time. So we need to create a Cronjob for this.
# Open Crontab  - choose Nano (2) if you haven't open crontab before
# On the Cloudkey Vim will open, press INSERT to edit the file after you opened it.
crontab -e

# Schedule the job, the same path as in step 5
# We run it at 3 am, every day.
0 3 * * * rclone sync /var/lib/unifi/backup/ sdn_dropbox:backups/unifi_sdn

# Press Ctrl + X to close and choose Y to save.
# On the CloudKey press Ctrl + C twice and then type :wq to save and close
That is all. Your Unifi Controller backups will now be copied every night to your Dropbox storage. You can always restore your controller from a backup.
Unifi Backup location CloudKey Gen2
The backup files on your CloudKey Gen2 are stored in a different location than in your Docker or on your PI. You can find the backup files in the following folder:
/srv/unifi/data/backup/autobackup
Unifi Protect Backup
We can also backup our Unifi Protect configuration. You can pretty much follow the same steps as above, only you need to use a different folder to pull the backups from.
The Unifi Protect Backup files on the CloudKey Gen2 are stored in the following location:
/etc/unifi-protect/backups
If you want to sync your Unifi Controller and Unifi Protect then you can simply create two Cronjobs for this. You don’t need to add another cloud storage first, but I would recommend creating a new folder for the backup in your Dropbox.
The default text editor on the CloudKey Gen2 is Vim, so the commands are a little bit different when it comes to editing and closing the file:
# Open crontab
crontab -e

# Scroll down the end of the file with your arrow keys and press INSERT to edit the Cron file
0 2 * * * rclone sync /etc/unifi-protect/backups sdn_dropbox:backups/unifi_protect

# Press Ctrl + C  twice
# Type :wq    (shorthand for Write and Quit)
BackiFi Review
BackiFi makes back-upping to the Cloud a lot easier, but it does require that you have a static IP Address or domain name pointing to your Unifi Controller.
Now, most household internet connections don’t have a static IP, but a dynamic one. That means that your IP address can change after rebooting your router (which sometimes happens in the middle of the night for an update, without you knowing it)
A solution for this is to set up a DDNS record, this is a free domain that automatically updates with your public IP Address. I have written an article on how to set up DDNS, you can find it here.
Also, BackiFi needs a super admin account. I have written my concerns about it at the beginning of this article. To keep things a bit secure, we are going to set up an event notification, so we can keep track of when the account is used to log in (this should always match our backup schedule).
1. Accessing your Unifi Controller from the internet
So before we can start with BackiFi we first need to make sure our Unifi Controller is accessible from the internet. I have written a detailed guide about this before, so if your controller isn’t accessible from the internet, then follow the steps here.
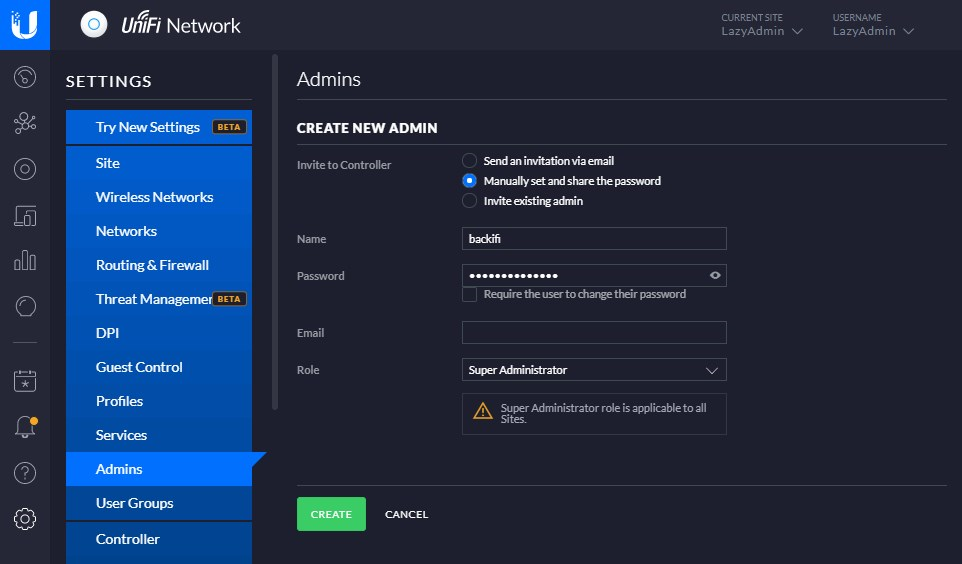
2. Create a super admin account for BackiFi
Open your controller and go to Settings > Admins. Create a new user and make sure you manually set the password and tick the “Require the user to change their password” box.
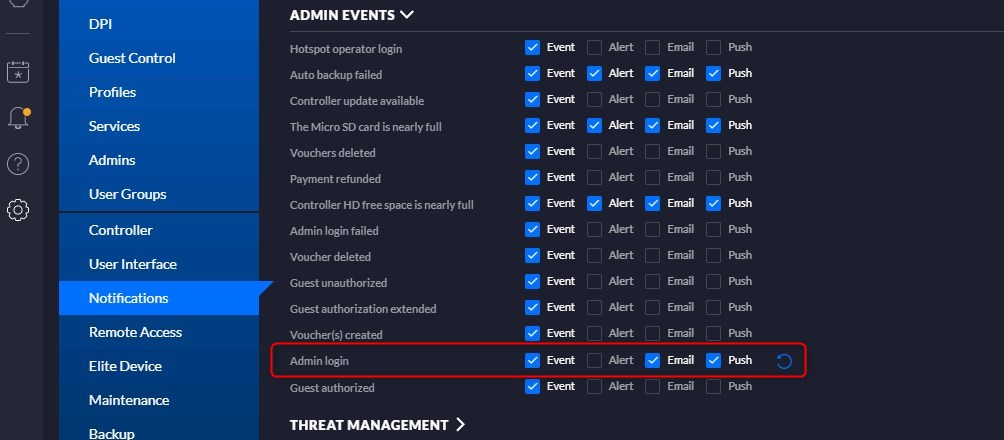
Setting up Notifications
Every login event is already logged in your Unifi Controller. You can see all the logins under Events > Admins. But you can also set up an email or push notification if you like to keep track of the logins.
- Open Settings > Notifications
- Expand Admin Events
- Enable Email and/or Push
3. Configure BackiFi
Create an account at BackiFi and log in.
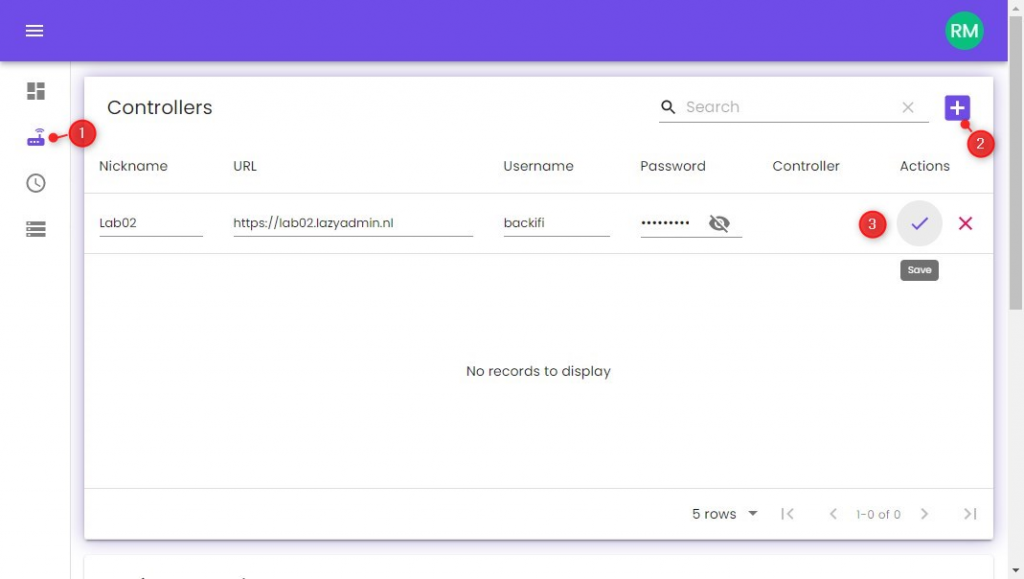
- Click on Controllers on the left side
- Add a new controller
- Enter the details and click on save (make sure you add the port number 8443 behind the URL)
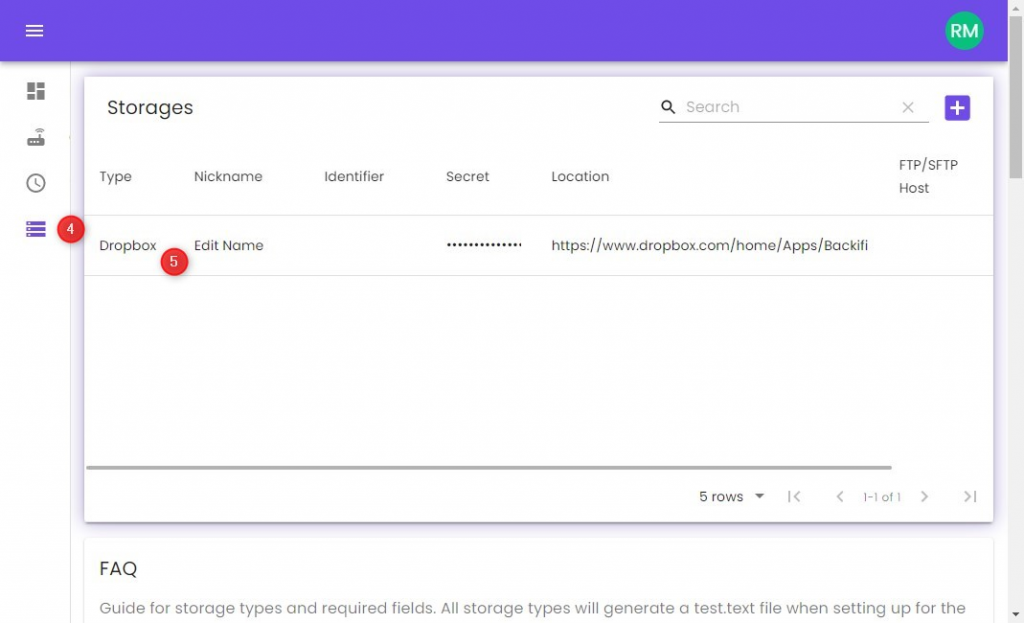
- Click on Storage
- elect Dropbox from the dropdown menu and authorize BackiFi to access your Dropbox files and folders
- Make sure you edit the name afterward, otherwise you can’t use it later in the configuration.
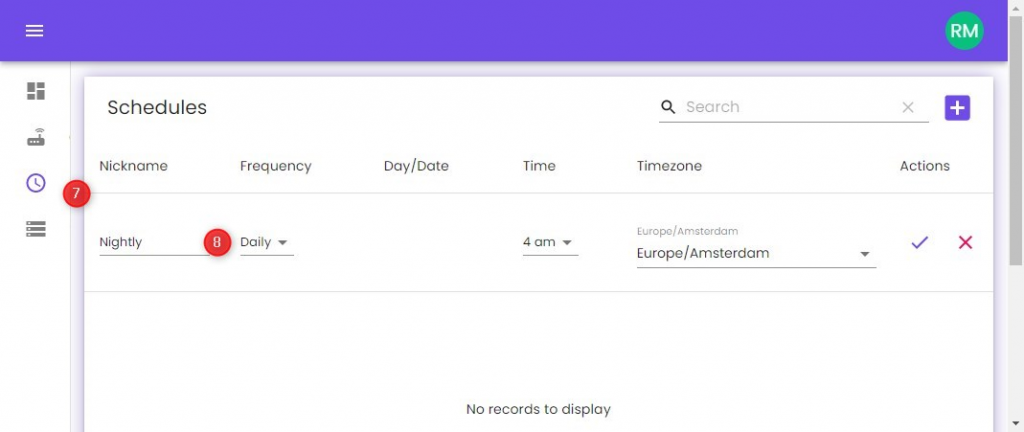
- Click on Schedule
- Create a new Schedule
- I have created a nightly schedule that runs at 4 am
So with everything set up, we can now connect it all together. Open the configurations, and select your Controller, Schedule, and Storage.
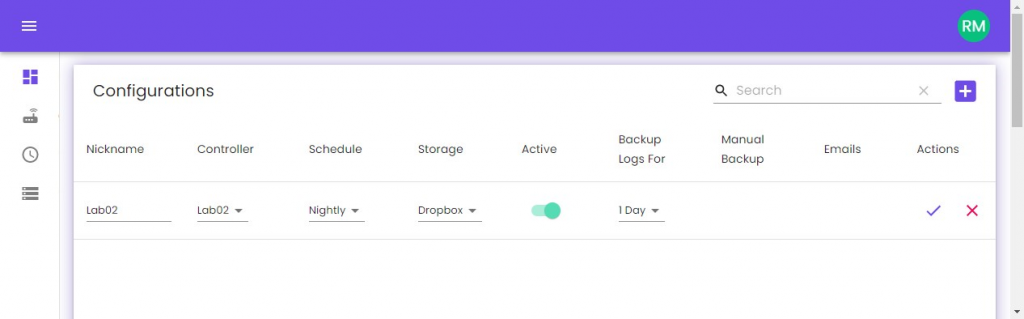
You can manually run the backup to see if it works. It will take a couple of minutes before you will see the backup file in your Dropbox folder (under Apps > BackiFi).
The difference with the Rclone method is that BackiFi will generate a new backup in your Unifi Controller and copies it to your cloud storage. So it doesn’t sync the backups that are listed in your controller under Settings > Backup.
Wrapping up
Coping the backups of your Unifi Controller to the cloud is pretty easy with both solutions. I like the simplicity of BackiFi, but it would be better if we could create API users in our Unifi Controller with the correct permissions. How BackiFi is set up now they simply have too much access to your controller, they can not only pull the backup out of it but also all the stats, connected clients, etc. I don’t say they do that, we simply don’t know it / can’t see or control it now.
If you have any questions, just drop a comment below.


I discovered your product after upgrading my aws controller to 7.3.83
In this version, we have no control on setting the password during the creation of a new admin account. It seems to all be done via email invitation.
Any solutions to this?
You can create a new local admin account by disabling the checkbox Allow remote access.
Hi Ruud,
Het is gelukt, thanks!
CK gen2 plus:
OS type not supported …while installing Rclone
That is strange, had it running on a plus for more than a year.
Please note: When trying to install this Rclone on Unifi Dream Maschine Pro with OOB settings follow this steps. Else you will get ” bash: command not found ” errors.
1. Enable SSH and set password on Unifi OS WebUI (not Unifi Network App) under Advanced
2. SSH into Dream Maschnine Pro by its IP (you will be promted with ” # ” only)
3. Execute: unifi-os shell (now you will be promted with ” root@ubnt:~# ”
4. Execute: apt-get install unzip
5. Execute: curl https://rclone.org/install.sh | sudo bash
6. The location of local backup files on Dream Maschine Pro for step 5 is /data/unifi/data/backup/
The rest is pretty the same.
Dennis
Hi, why the dimension of file created automatically by autobackup function of cloud key ha size of 40MB, but the backup file created with Backifi have only 2MB dimension?
I have no idea, maybe they compress the backup
I try with curl https://rclone.org/install.sh | sudo bash on cloud key gen1, but have a certificate error, try with -k option, but nothing. Another question, i try backup with Backifi, but why the autobackup of cloud key have 40Mb dimension, and backup of Backifi on cloud have only 2Mb dimension?
I’s possible to install rclone on Cloud Key Gen1?
I think it should be possible. The gen1 seems to be running a version of Debian 8.
Hi,
Does this also backup all the video footage from Unifi Protect?
Thanks
Damon
No, unfortunately not.
Hi,
Thanks for a great article. I just have to remember to reset it up after every CK 2+ firmware upgrade. I don’t suppose you have any tricks to make it persistent? 🙂
Thanks
Michael
No, unfortunately not.
Hi,
I have my unifi controller 6.0.43 on my raspberry Pi 4B, and I have the impression that the autobackup function does not perform any backups; I tried to set an automatic backup every hour (so for testing) but after several hours if I do it from the shell
cd /var/lib/unifi/backup and then ls -la I get this:
total 12
dr-xr-xr-x 3 unifi unifi 4096 Jan 13 10:15.
dr-xr-xr-x 4 unifi unifi 4096 Jan 16 20:59 ..
dr-xr-xr-x 2 unifi unifi 4096 Jan 13 10:15 autobackup
If I enter the autobackup folder it is empty as well.
Some idea? Or is it a known problem with this version of the Unifi controller?
Thanks for a possible answer.
Are they also not listed in the controller?
Hi Rudy, exact do not even appear in the controller’s web interface; another thing if I try for example to press the blue button “Download File” you can see the animation of the circle that continues to run indefinitely without ever generating any file
Is Backblaze B2 an option? As I have only been using AWS S3 for fiddling I am not amused at the costs compared to B2
Yes, that is also possible.
Hey, Ruud, thanks for article. I am running Controller on my QNAP and was wondering if there is another solution – like just to sync some QNAP folder, where backup is stored with e.g. Dropbox?
I am going to try that Rclone version, but this just cross my mind.
You can use rclone inside the docker container and copy the data to dropbox indeed. The problem with syncing folders from within QNAP is that the data is stored inside the container. So you will probably need to mount the backup folder first.
@Sjefsbamsemumsen
I had the same issue and solved with a small change to the suggested command.
Type this one:
sudo usermod -aG unifi pi
Everything is going well.
@Ruud, excellent tutorial, thanks!
Thanks a lot for the tutorial. Like Nathan I am stuck at getting the first sync running. My controller is running on a PI 3 and even after running
sudo usermod -a -G unifi pi
my user does not have access to the unifi folder:
cd: unifi/: Permission denied
Any idea how I can fix this?
Thanks! 🙂
chown 777 /var/lib/unifi
After that sudo usermod -a -G unifi {$username}
Hey Ruud, thank you so much for these tutorials. I had great success yesterday porting my unifi controller software from my PC onto an RPi already running PiHole thanks to your guidance.
I worked through this tutorial for backups as well, and got stuck on one of the last steps. Was unable to get rclone to read the unifi backup folder on the RPi, it comes back saying the folder is unavailable. Tried the permissions trick as well, and it didn’t resolve the problem. Any suggestions?
And if you navigate on the PI to this folder: /var/lib/unifi/backup/ and then do LS to see the contents of the folder
the following chmod change fixed this for me, use need the r and x bit set to access the unifi folder
cd /var/lib/
sudo chmod -R 555 unifi/
Thank-you Ruud – this is great advices.