Most internet connections from a home network or small office don’t have a fixed public IP Address. Normally this isn’t a problem, but what if you want to access your security camera from the internet, or your NAS?
You can’t use your public IP Address, because that can change every month. A normal domain name isn’t going to work either, because that also requires a fixed IP Address.
With Dynamic DNS you can use a (free) domain name that will automatically keep up with the changes of your public IP Address.
In this article we are going to take a look at home the dynamic DNS service work, which (free) services you can use, and of course how to set it up in your router.
What is Dynamic DNS
So lets first start by taking a close look at what Dynamic DNS is. And to do that we will have to take a look at how a typical home network looks like.

In our example home network we have a standard modem/router that is provided by our ISP. We also have a NAS, that has a fixed Ip address of 192.168.1.210. Inside our home network, we will have access to our NAS. We can simply enter the IP address of the NAS in our browser to access it for example.
But you might also want to access the files on your NAS when you are at the office for example. Now to do this you will have to start with forwarding a port in your router. I have written a detailed guide about port forwarding.
To access the NAS from the internet you will have to enter your public IP Address, in this case, 131.32.33.34, and if you add the correct port number to it, you can access your NAS. You can find your public IP Address by going to myip.com.
Dynamic public IP Address
This all sounds may be pretty straight forward, but there are two problems here. One is that a IP address is hard to remember, so a better option is to use a domain name.
The other issue is that your public IP Address (131.32.33.34) isn’t static. That means that if you reboot your router, you can get another IP address from your provider. So that is really inconvenient and also the reason you can’t use a normal domain name.
Dynamic DNS to the rescue
So what you want is an easy to remember domain name that is always pointing to the correct public IP address of your internet router.
In order for this to work, something will have to keep your (free) domain name update to date with the correct public IP address. Now your provider isn’t going to do this, but your router can!
Most routers have a built-in Dynamic DNS client. This client is able to connect to one of the common free Dynamic DNS providers and can keep your domain name up to date with the correct public IP address.
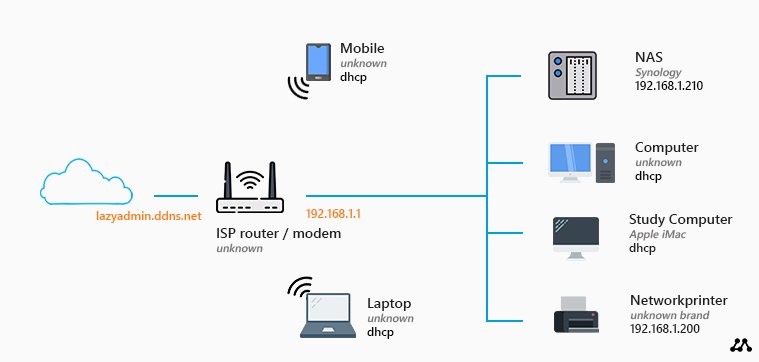
So with DDNS, we can access our home network through lazyadmin.ddns.net, much easier to remember and it will always point to the correct IP address of the router.
How to configure Dynamic DNS?
We are going to configure dynamic DNS within our router. I am going to use the free DDNS service No-IP in this guide because they are really easy to configure. Later on, I will tell you more about the different services.
Configuring Dynamic DNS:
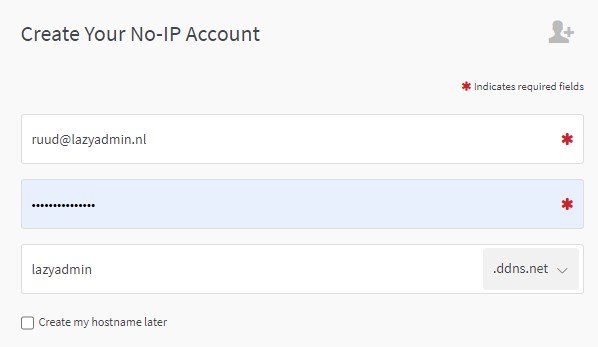
- Sign up for a free account at noip.com
Go to noip.com and click on the green button Signup in the top right corner.
Create an account and choose a domain name.
Click on Free sign up at the end of the page
- Login to your router
Enter the URL of your router in the browser to login, typically 192.168.1.1 or 192.168.0.1
Check this article to find the correct address - Find the DDNS settings page
You will have to locate the Dynamic DNS page in your router. You can probably find it under the advanced tab:
– Netgear > Advanced Setup > Dynamic DNS
– Asus > WAN > DDNS
– TP-Link > Advanced > Network > DDNS
– EdgeRouter > Services > DNS
– LinkSys > Security > Apps and Gaming > DDNS - Configure DDNS
Select No-IP as DDNS Provider
Enter your username and password from No-IP
Enter the hostname that you created with No-IP
Save the settings - Done
You have now succesfully configured your Dynamic DNS. To check it, ping your DDNS name, lazyadmin.ddns.net for example. You should get a respond from your router.
DDNS Client
If your router doesn’t support DDNS, then you can also use a DDNS Client that you can install on a computer. Simply download the Dynamic DNS Update Client here at No-ip.com. The tool will update your DDNS record automatically when your public IP address has changed.
Keep in mind, don’t install this on a notebook that you use in other networks (like work, or school), because it will then update the record to the public IP address of that location. So use a computer for this 😉
Free Dynamic DNS services
In this article I have used No-IP, but there are more free DDNS services of course. I have chosen for No-IP because they work with most router brands, so they are really easy to setup.
But they have a downside as well. The free plan requires you to confirm the free hostname every 30 days. So every 30 days you will have to log in. Another issue is that the free account can show an ad before it redirects you to your home network.
DuckDNS
DuckDNS is totally free and doesn’t require any logins. It’s a bit harder to set up, but there are enough installation manuals online for each router. All you need to do is point the DDNS client in your router to a custom URL.
Afraid.org
This is one of the better DDNS providers that is also easy to configure in your router. Downside of Afraid.org is that they don’t have really nice domain names.
But it’s totally free, no ads etc, so maybe a better option then No-IP.com if you don’t care about the domain name.
Alternative to Free DDNS Providers
You can also use your own custom domain name in combination with Dynamic DNS. Some DNS providers offer DDNS services for there clients. NameCheap is one of those providers where you can buy your own domain name, like lazyadmin.nl, and add a DDNS service to it.
A domain name isn’t really expensive, around $10 per year at NameCheap.com and they offer their Dynamic DNS service for free for domain names that are registered by them.
So if you don’t like the ads, or don’t want to check in every 30 days then this can be a very good and affordable option.