When you have remote access enabled in your UniFi Gateway, then you can always access your UniFi console through unifi.ui.com. But to connect external UniFi devices to your console, you will need to use your public IP Address. With Dynamic DNS however, we can use a hostname.
Dynamic DNS is a great option when you have a dynamic public IP Address. Not all internet providers give you a static public IP Address. They are assigned dynamically when you (re)boot your modem/router.
In this article
In this article, I will explain how you can configure Dynamic DNS for your UniFi gateway.
UniFi Dynamic DNS
Dynamic DNS is easy to configure these days in the UniFi Network app. It’s part of the advanced internet settings and supports the most popular Dynamic DNS providers. The UniFi Network app will automatically update the public IP address in the DDNS provider when it’s correctly configured.
To use DDNS you will need to make sure that your UniFi Gateway has a public IP Address. When the UniFi Gateway is connected behind a modem or router from the ISP, you will need to make sure that the modem is configured in Bridge Mode and forwards the public IP address. You can find the assigned IP Address in the UniFi Network dashboard:
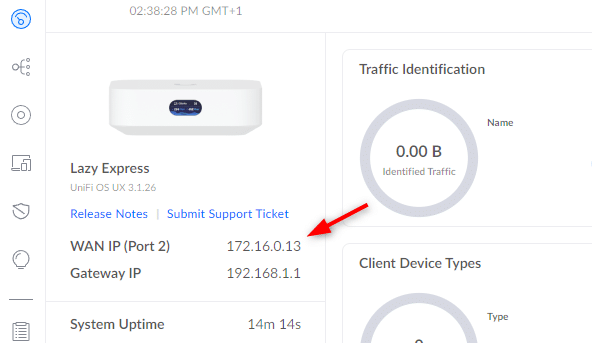
The IP Address in the screenshot above won’t work, because it falls in the private IP address range (RFC 1918).
To configure DDNS you will need to create an account with one of the DDNS providers. In the example below we will be using No-IP, which is free to use. If you already have a domain, then you can also use Cloudflare, which I will show you as well.
Method 1 – Using Free DDNS Provider NoIp
Before we can configure Dynamic DNS in UniFi, we first need to create an account. As mentioned, we will be using the free DDNS provider No-IP. When creating the account, make sure that you write down the username and password, because we will need that later.
- Create an account at https://www.noip.com/sign-up
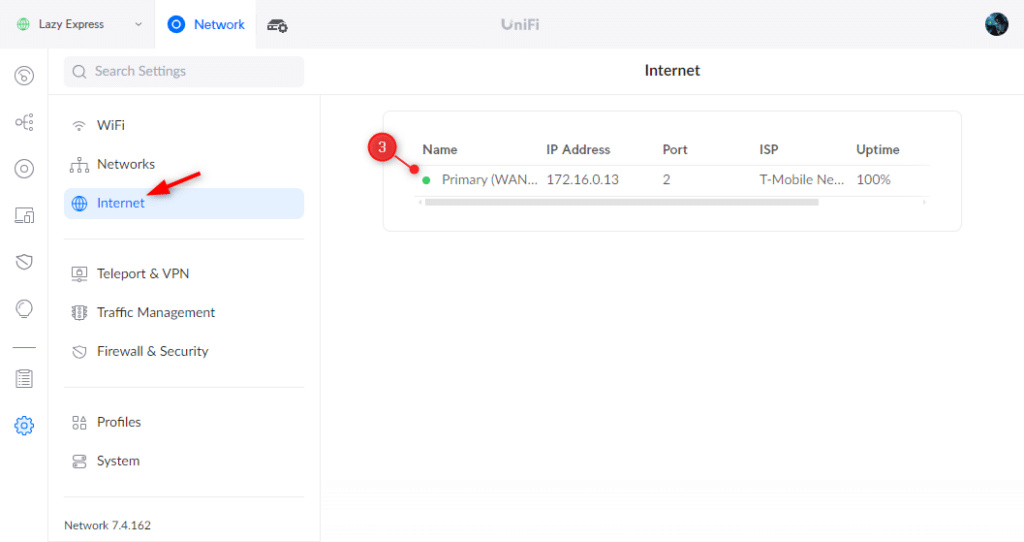
- Open your UniFi Network Console
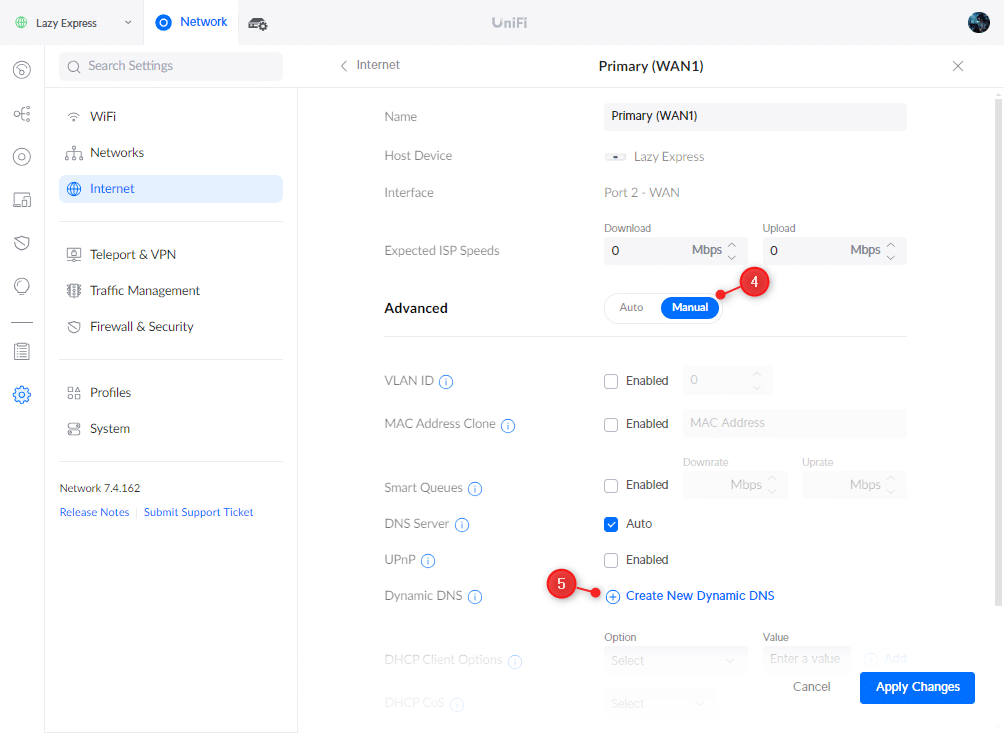
- Go to Settings > Internet and select your Primary WAN connection
- Enabled Advanced Settings
- Click on Create New Dynamic DNS
Note
For the credetials, you will need to use the username and password that you use to sign in at No-IP.com. The username is not your email address!
- Configure the Dynamic DNS
- Service – NoIP
- Hostname – yourhostname.ddns.net
- Usersname – The username from your No-IP account (not your email address)
- Password – The password from your No-IP account
- Server – Leave blank!

- Click on Create and Apply Changes
It can take a couple of minutes for the DDNS record to update. Keep in mind that UniFi will only update the records if your WAN IP Address changes.
Once everything is configured, you can use the hostname to connect external UniFi devices to your network or use the hostname for VPN connections for example.
Method 2 – Cloudflare
If you have your own domain name, then you probably want to use that or a subdomain on it for your hostname. There are some DDNS providers supported where you can use your own domain name, like NameCheap, but they require that your DNS records are also managed by them.
I prefer to use Cloudflare to manage my DNS records, but Cloudflare is unfortunately not supported by default in UniFi for Dynamic DNS. We can however still use Cloudflare, by using an open-source Cloudflare worker script.
The steps to set this are up perfectly explained on the linked page. The only thing good to know is that you will need to use Dyn as the DNS service provider instead of DynDNS.
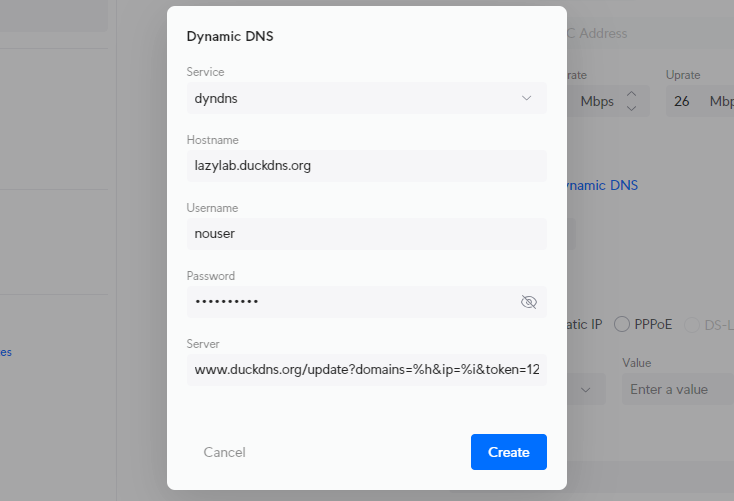
Method 3 – DuckDNS
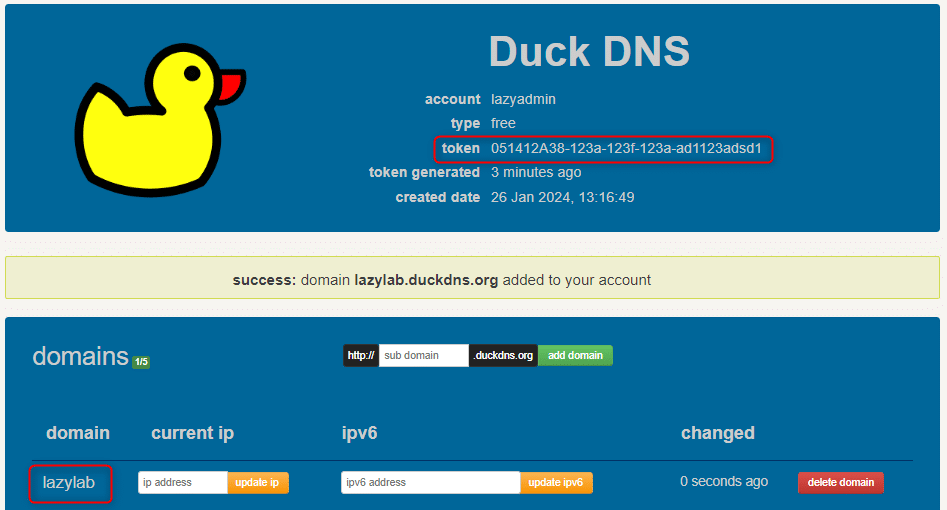
Another popular free Dynamic DNS service is DuckDNS. With the latest UniFi Network update, we can now also use DuckDNS as a DDNS service in UniFi.
- Create an account at DuckDNS
- Register a hostname (subdomain)
- Note the token and subdomain name
With the DuckDNS registration completed, we can now go over to the UniFi Network app. I will just show the Dynamic DNS settings here, check Method 1 for detailed steps to enable DDNS.
- Go to the advanced WAN settings (Settings > Internet > WAN connection > Enable Advanced)
- Click on Create Dynamic DNS
- Configure it as follows: (replace [token] with your DuckDNS token)
- Service: dyndns
- Hostname: yourdomain.duckdns.org
- Username: nouser
- Password: nopassword
- Server: www.duckdns.org/update?domains=%h&ip=%i&token=[token]
- Click on Save
Wrapping Up
Using Dynamic DNS is a great way to easily access your UniFi network from outside. Especially if you have a lot of VPN clients or external devices and don’t have a static public IP Address.
The free DDNS providers are often good enough. The Cloudflare option is great if you have your own domain, but it’s a bit more work to set everything up. For home use, I would simply go for one of the free services.
I hope you found this article helpful, if you have any questions, just drop a comment below.


The link to the worker script for Method 2 Cloudflare returns 404.
Thanks for pointing out, I have updated the article with the correct link : https://github.com/willswire/unifi-ddns
Hi Rudy, excellent article. I’m scratching my head on one point. If my router can’t be put in bridge mode, could I use port forwarding in the router to achieve the same result? I’m ultimately trying to make my plex server accessible. Thank you for any short input,
You can use port forwarding to access plesk, but UniFi won’t be able to automatically update the DDNS record, because the WAN IP of the UniFi gateway never changes.