When writing code in any language it’s important to add comments. This also applies to your PowerShell scripts. Although they may sometimes be short, adding comments in PowerShell is nevertheless important.
Comments not only help others to understand your code, but they are also a great reminder for yourself when you read your code. They can be used to explain functions, or when testing your script to comment out parts of your script.
In this article
In this article, we are going to take a look at how to add a comment in PowerShell, and how to use comment blocks.
Comment in PowerShell
Just like in most programming languages, we can use the # to add a comment in PowerShell. When adding comments to your scripts, always try to explain your thoughts or reasoning. Or briefly describe what a function does.
The reason for this is that a well-written PowerShell script is often pretty obvious. If you look at the example below, the comment doesn’t really add any value to the code.
# Get Admins
$admins = Get-Admins
A better option in this case might be to explain what we are getting:
# Get all users that have an admin role
$admins = Get-Admins
Comments can also be used to comment out a part of your code or a function. This is often handy when you are testing your script and you want to skip a part of it. Simply add the # in front of the function that you want to skip and PowerShell will ignore the function.
For example, in the small script below, we are creating 10 test files. To test your script without actually creating the files, you could for example comment out the New-Item cmdlet. This way only the Write-Host function is executed.
# Path for the test files
$path = "C:\temp"

# Create 10 test files in the given path
1..10 | % {
    $newFile = "$path\test_file_$_.txt";
    # New-Item $newFile  # This cmdlet is skipped due to # infront of it
    Write-Host $newFile
}
PowerShell Block Comment
In general, it’s recommended to keep your comments short and to the point. But in some cases, you need multiple lines to explain what a function does. For up to two lines of comments, it’s okay to use the # in front of each line.
But when you need more, then it’s easier and better to use a block comment in PowerShell. The advantage of a block comment is that you can easily edit the comment, collapse it in your IDE (Visual Studio for example) and they are easier to read.
As you can see in the example below, the # works fine when you only need two lines for your comment:
# Storing the path of the log file for easy modification
# Changing this variable updates the log file location throughout the script.
$LogFile = "C:\Logs\output.log"
But when the comments are longer, then a comment block is more useful and easier to read. To create a block comment, you start it with <# and end the comment block with #>:
<#
    Get all the permissions of each mailbox

    Permission are spread into 4 parts.
    - Read and Manage permission
    - Send as Permission
    - Send on behalf of permission
    - Folder permissions (inbox and calendar set by the user self)
#>
Comment-Based Help for Functions
Your scripts, and actually also your functions, should always start with a comment block. This comment block is written in a particular format, which makes it easier to read and also allows us to display the information with the help cmdlet.
This format is known as a comment-based help. It’s written inside a PowerShell comment block and uses help keywords to format the comment block. The comment-based help exists out of a couple of sections. You don’t need to include them all, but the Synopsis and at least one example of how to use the function are recommended.
function Get-UserInfo {
    <#
    .SYNOPSIS
        Get the Microsoft 365 user information
    .EXAMPLE
        Get-UserInfo -Username 'meganb@contoso.com'

        This will get the M365 information of the given user
    #>
    [CmdletBinding()]
    param(
        # Microsoft 365 username
        [Parameter(Mandatory = $true)]
        [string]$Username
    )
    # Rest of the function code
}
It’s best practice to place the comment-based help section inside your function instead of above it. This way it’s harder to forget to update to comment when you make changes to the function.
If your function uses parameters, then make sure that you add comments to each parameter, explaining what information you are expecting.
For the beginning of a script, you often add more information. Like a longer description of what the purpose of the script is, a couple of examples on how to use the script, and a notes section where you can add information like the last change date, writer, etc.
<#
.SYNOPSIS
    A short one-line action-based description, e.g. 'Tests if a function is valid'
.DESCRIPTION
    A longer description of the function, its purpose, common use cases, etc.
.NOTES
    Information or caveats about the function e.g. 'This function is not supported in Linux'
.LINK
    Specify a URI to a help page, this will show when Get-Help -Online is used.
.EXAMPLE
    Test-MyTestFunction -Verbose
    Explanation of the function or its result. You can include multiple examples with additional .EXAMPLE lines
#>
Using the Comment-based Help
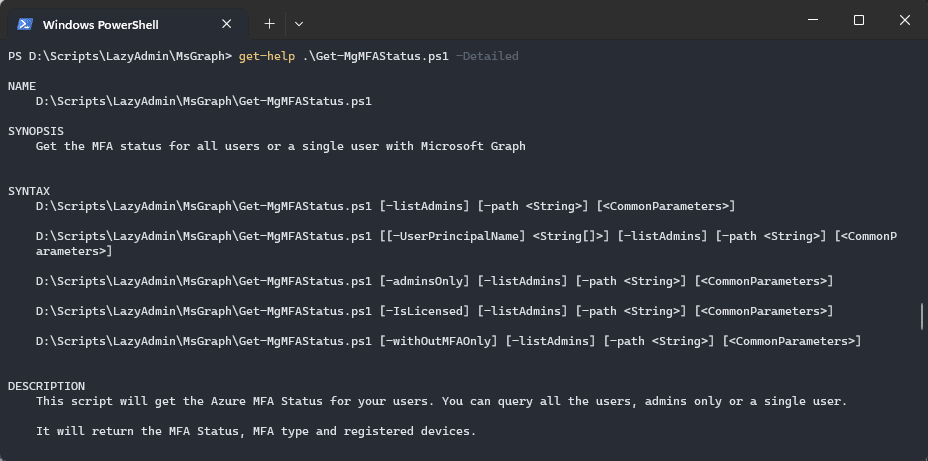
When you have added the comment-based help block to your script or function, it allows you to view this information using the get-help cmdlet in PowerShell. If you run the command without any parameter, then it will only show the synopsis, description, and syntax of the functions.
But we can use parameters to show additional information from the comment-based help section:
-DetailedProvides more detailed information about the command, including examples.-ExamplesDisplays usage examples for the command.-FullShows the complete help content, including detailed descriptions and examples.-OnlineOpens the online documentation for the command in the default web browser.
So for example, if we want to view the detailed information of my MFA status script with examples, then we can do:
Get-Help .\Get-MgMFAStatus.ps1 -Detailed
Wrapping Up
It’s important to add comments in your PowerShell when you are writing a script. Functions may seem really logical when you write them, but if you need to update the script 6 months later, comments can really help you understand your own code and thoughts 😉
I hope this article gave you a better understanding of how to use comments in PowerShell. If you have any questions, just drop a comment below.


