Deleting folders and cleaning up directories can be a time-consuming task, especially when you need to perform the same task on multiple computers. With PowerShell, we can easily create a small script to find and delete all the folders you want.
The advantage of PowerShell is that it allows us not to only delete a single folder, but complete directories or only folders with a specific name. It’s also possible to delete only empty folders for example.
In this article
In this article, we are going to take a look at how to delete folders with PowerShell, and how to use the different options to delete only specific folders.
Delete Folders with PowerShell
To delete folders with PowerShell we will need to use the Remove-Item cmdlet. This cmdlet can not only be used to delete folders, but also for removing files, registry keys, and more. We will focus on deleting folders in this article.
The Remove-Item cmdlet comes with a couple of parameters that we can use to specify the folder that we want to remove:
| Parameter | Description |
|---|---|
| -Path | Specify the path of the items that need to be removed. |
| -LiteralPath | The exact path the item |
| -Include | Specifies a path element to include, for example, *.txt |
| -Exclude | Specifies a path element to exclude, for example, *.txt |
| -Recurse | Delete items in the specified location and in all subfolders |
| -Force | Used to delete read-only files or hidden items |
| -Confirm | Prompt for confirmation |
| -WhatIf | Run the command in test mode. Won’t delete anything |
To delete a single folder in PowerShell, we will need to specify the full path to the folder. Good to know is that this command will delete the folder with all contents in it, even if you haven’t specified the -recurse parameter. You will get a warning though if you haven’t used the -recurse parameter and the folder contains content.
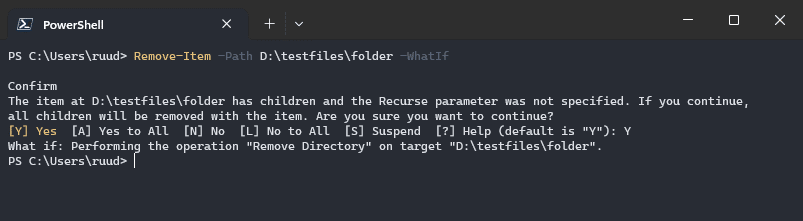
So it’s important that you check if you have the correct folder before you actually delete it. That is why I recommend to run the command first with the -WhatIf parameter to check the result:
# Remove the folder D:\testfiles\folder in test mode
Remove-Item -Path "D:\testfiles\folder" -WhatIf
In the example below, the folder wasn’t empty. So we will need to confirm that we want to delete the folder and the content.
The last line, What If, shows which operation is performed on the target path:
Instead of -WhatIf we can also force the confirm prompt. This way you can still double-check if you are deleting the correct folder and confirm the action before it’s deleted.
Remove-Item -Path "D:\testfiles\empty folder" -Confirm

# Result:
Confirm
Are you sure you want to perform this action?
Performing the operation "Remove Directory" on target "D:\testfiles\empty folder".
[Y] Yes  [A] Yes to All  [N] No  [L] No to All  [S] Suspend  [?] Help (default is "Y"):
Delete Folder and Contents
When you want to delete a folder and all its contents with PowerShell, then you must use the -Recurse parameter. This way all subfolders, and files in the given directory will be removed. The parameter won’t give a warning, it will just remove all the contents.
The command below will delete “Folder A” and the contents of it:
# Delete folder A and all contents
Remove-Item -Path "D:\testfiles\folder A" -Recurse
If you only want to delete all the content that is inside “folder A”, then we must use a wildcard inside the -path parameter:
# Delete all subfolders and content inside Folder A
Remove-Item -Path "D:\testfiles\folder A\*" -Recurse
Force Delete Folder
When you try to delete a folder that contains read-only items or items that are in use, you will get an error message that you do have not sufficient access rights to perform this operation.
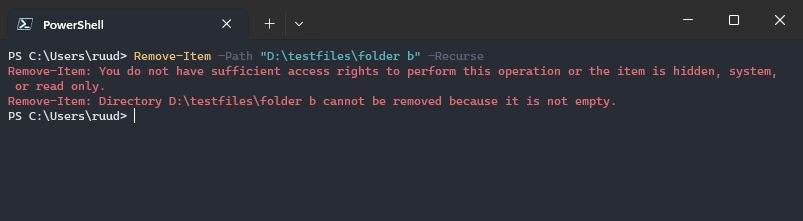
To delete a folder that contains a read-only item, hidden files, or files that are in use, you can use the -Force parameter:
Remove-Item -Path "D:\testfiles\folder B" -Force

# or in short:
rm -r -force "D:\testfiles\folder"
Delete Multiple Folders
To delete multiple folders with a single command we can either specify multiple paths or use one of the filtering options. I will explain filters later in this article. You can specify multiple folders to delete by using a comma-separated string:
Remove-Item -Path "D:\testfiles\folder d", "D:\testfiles\folder e" -Recurse
Another option is to create an array with all the paths and loop through them with a foreach statement.
Delete Folder if Exists
When using the Remove-Item cmdlet inside scripts, it’s a good idea to test if the folder exists before you try to delete it. We can do this by using the Test-Path cmdlet. This will check if the folder exists and return true or false based on the result. By using this inside an if statement we can make sure that the folder is only deleted if it exists:
$folder = "D:\testfiles\folder B"

if (Test-Path -Path $folder ) {
    Remove-Item -Path $folder
}
Using Filters to Delete Folders in PowerShell
We have now looked at the basic principles to delete a folder with PowerShell. But besides deleting a folder from a specific path, you often encounter situations where you need to delete all folders that are older than x days or contain a specific word in the folder name.
There are a couple of methods to select only the folders that we need to remove in PowerShell. But with all methods, make sure that you test the selection first before you actually delete the folders.
Using the Include Filter
The -include filter allows you to specify a part of the string that the file or folder must contain that you want to delete. It works in combination with the wildcard character in the path.
Important to note here is that both files and folders are deleted that contain the given name. For example, to delete all folders (and thus also files) that have the word test in them:
Remove-Item -Path "D:\testfiles\folder c\*" -Include "*test*"
You can also specify multiple keywords for the include filter, simply separate them with a comma.
Using the Exclude Filter
With the -exclude filter, we can delete all the contents in a specific folder, except folders that have a specified word in the name. Again, the filter works on both files and folders, so all files that match the filter as well won’t be removed.
For example, to remove all files and folders from the specified path, except the contents in the folder “la-test-folder”, we can do:
Remove-Item -Path "D:\testfiles\folder c\*" -Exclude "la-test-folder"
Just like with the include filter, you can use a wildcard in the exclude string, or specific multiple strings (folder names) to match.
Delete Folders older than
A situation that is quite common is to delete all folders that are older than x days. To do this we will first need to calculate the folder date. Let’s say we want to delete all folders that are older than 30 days. The first step is to get the date from 30 days ago:
# Get the date from today minus 30 days
$dateTime = (Get-Date).AddDays(-30)
The next step is to get all the folders in the given path that are older than the given date. We can do this by comparing the lastwritetime of the folder with the datetime that we calculated:
Get-ChildItem -Path $Path -Recurse -Directory | Where-Object { $_.LastWriteTime -lt $dateTime }
We now only have to pipe the Remove-Item cmdlet behind it to actually delete the folder and its contents. Again first test the results with the -WhatIf parameter before actually deleting the folders.
$dateTime = (Get-Date).AddDays(-30)
$path = "d:\testfiles\"

Get-ChildItem -Path $Path -Recurse -Directory | Where-Object { $_.LastWriteTime -lt $dateTime } | Remove-Item -Recurse -WhatIf
Remove Empty Folders
To remove only empty folders with PowerShell you will need to create a small script. The script will need to check for each subfolder in the given folder if it contains items or not. When it doesn’t contain any items only then can the folder be deleted.
I created a script that you can use the remove empty folders, you can find the script in this article.
Wrapping Up
PowerShell is a great tool when you need to delete multiple folders or want to clean up a particular directory automatically. Keep in mind that the Remove-Item cmdlet is also used to delete files, so make sure you test your scripts before using them.
Also, keep in mind that your files are deleted permanently, they won’t go to the recycle bin.
I hope you found this article useful, if you have any questions, just drop a comment below.


