Mail merge is a powerful feature in Outlook that allows you to easily create and send personalized emails to a large number of recipients. Whether you need to send out a mass email to customers or employees, mail merge makes it easy to personalize the content and ensure that each email is tailored to the recipient.
To create a mail merge we will need a Word document for the content and a list of contacts. For the latter, we can use your contacts in Outlook or an Excel list. Both options will be explained in this article.
In this article, we are going to take a look at how to use mail merge in Outlook. Including a step-by-step guide for creating and sending a mail merge.
Mail Merge in Outlook
With a mail merge, we are going to send a personalized email to a large number of recipients. The contents of the mail will be personalized (the greeting, address block, for example) using placeholders. So to send out a mass email in Outlook using mail merge we need two things:
- A list of contacts
- The letter/mail to send
If you have all your contact in Outlook then we can start the mail merge from within Outlook. The first step exists if selecting or filtering the contacts, after which we can create or select the word document that we want to use for the email body.
Step 1 – Selecting the contacts in Outlook
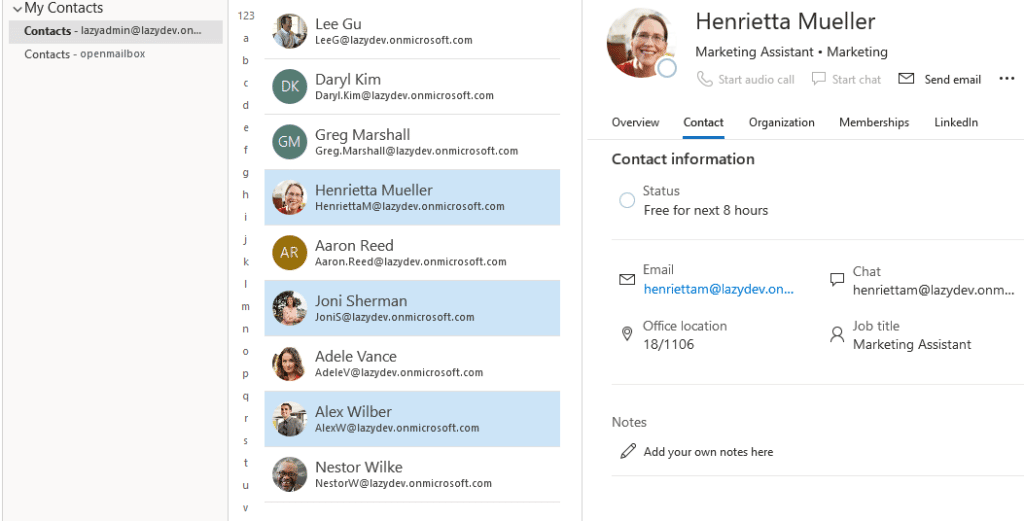
The first step is to select the contacts in Outlook. If you only want to select a handful of contacts, then it’s easiest to hold down the Ctrl key and select the contacts in the list:

Another option apply a filter on your contact list. Let’s say you want to send an email to all contacts from a specific company. To do this we can create a filter based on the company name in Outlook.
- With your contacts list opened in Outlook, click on View
- Open the View Settings
- Click on Filter
- Enter the company name and select the field Company field only
- Click Ok – twice

Only the contacts that match the filter are now listed in your contacts list.
Step 2 – Start the Mail Merge
With the contacts selects or filtered we can start the mail merge in Outlook. The mail merge button is located in the Home ribbon:

If you are using the small ribbon, then you will need to click on the 3 dots (eclipse) on the right side and select Mail Merge:

A dialog appears after you have clicked on mail merge. Here we can choose which contacts we want to use, create the content for the mail body, and select where we want to merge everything to.

- Contacts – Choose either all contacts in current view (if you have filtered your contacts or want to email everybody in your contact list), or Only selected contacts.
- Document file – If you already have a Word document ready, then you can select it. Otherwise choose New Document
- Contact data file – We can save the settings for later usage
- More options – Select Merge to Email and enter a subject line
Make sure you select Merge to Email in the merge options and write the subject line for the message. Otherwise, you will only create Word documents for each contact.
Step 3 – Create the email content
I have chosen to create a new Word document, but you can also select an existing document. I personally prefer to first write the document normally and then insert the merging fields where needed.
So in Word, you will see that the Mailings tab is selected. In the center of the menu, we will find the buttons to insert the merge fields.
Greeting Line
The first merge field that we are going to insert is the greeting line. Place your cursor at the location where you want to insert the greeting line. Click on Greeting Line in the mailings tab:

You will get a dialog that allows you to format the greeting line. You will see a preview of the result in the dialog:

When done click on Ok. You will now see the merge field «GreetingLine» in your document.
Address Block
In the example letter that I am using, I need to verify the address details of our employees. For this, we can insert an address block. Just like with the greetings line, we can configure the address block.

If some fields don’t match, then click on Match Fields in the lower right corner to select the correct fields from your contact. After you have clicked on Ok, you will see the placeholder «AddressBlock» in your document
Other Merge Fields
We can also insert other merge fields into our document. In this case, we have used Outlook as our source list. So we can only select fields that are available in Outlook. Let’s say we want to insert the company name into the letter:
- Place your cursor at the location where you want to insert the company name
- Click on Insert Merge Field in the menu
- Choose Company from the list
Step 4 – Preview the result
Before we are going to actually send the email using the mail merge function, we first want to check the result. For this, we can use the Preview Results function which you can also find in the menu ribbon.
The result of your document should look something like this:

I have highlighted the merge fields that I have placed inside my Word document. When we click on Preview Results, we can verify if everything merges correctly and even browse through all the contacts to check each individual result:

Step 5 – Sending the Outlook Mail Merge
With our document completed and merge fields added we can send the email to all the contacts. In the menu click on Finish & Merge and choose Send Email Messages

The last step is to verify the To field, which is set to match the email field from the contact, subject line, and mail format. Click on Ok to send personalized emails to the contacts.

If you open your Outlook and navigate to your Sent Items, you will see that each email is sent to the contacts.
Outlook Mail Merge with Attachment
Adding an attachment to a Mail Merge in Outlook is by default not possible. To accomplish this you will need to use either plugins or a workaround to prevent Outlook from sending the email, so we can manually add the attachment.
Let me first briefly explain the workaround method. This option is only feasible when you only have a handful of recipients. What we are going to do is set Outlook in offline mode, this way it won’t be able to send emails. We can then add the attachment to each email, after which we turn the offline mode off.
- In Outlook open the Send / Receive tab and click Work Offline
- Create the mail merge according to the steps above.
- Go back to Outlook, open your Outbox folder
- Add the attachment to each email
- Turn Work Offline off
Using an add-in
There are a couple of add-ins available that you can use to create Outlook Mail Merges with attachments. I have tested a couple of them and found the Merge Tools add-in the most convenient one to work with.
- Download the add-in and open the zip folder
- Copy the MergeTools – 2022.dotm file to the following folder:
%appdata%\Microsoft\Word\Startup - Restart Word
You should now see an additional Tab in Word named Merge Tools. If you don’t see the new tools, then refer to the Read Me file which came with the download.
Create the mail merge as described in the steps above or below (mail merge from Excel to Outlook).
- Open the Merge Tools
- Click on Merge with Attachments
- Select either the field that contains the path to the attachment or click on Browse for attachments to be included with all messages
- Set the Merge Destination to Merge to Email Message
- Select the Email Address field from your source list
- Enter a subject for your email

By default it will merge all the emails and save them in your Drafts > Merge Tools folder. This is great for the first time, allowing you to double-check the results. But you can also send the emails immediately, by selecting Send.
Click on Continue, and Ok to proceed with merging. You will get a notification about the trial version, which allows you to test the plugin 20 times. If you like the tool, then you can support the creator by buying a license which will remove the notification.
Mail Merge from Excel to Outlook
In the example above we have used our Outlook contacts as a source for the mail merge. But often you have an excel list, probably export from a CRM application, with all the contacts that you need to email. We don’t need to import these contacts to Outlook first, but we can use the Excel list as a source for the mail merge.
In this case, we are going to start in Word with the document (email body) that we want to email.
Step 1 – Select the recipients
Open your Word document and click on the Mailings tab. We are first going to Select the Recipients:
- Click on Select Recipients
- Choose Use Existing List
- Navigate to your Excel file and click Open

Check if your Excel file has column headers. If not then make sure you uncheck “First row of data contains column headers”. Click ok to import the recipients.
It’s always a good idea to verify the imported contacts. Click on Edit Recipient List in the toolbar. This will show all the contacts and fields that we can use. Click Ok to close the dialog if every looking correct.

Step 2 – Adding the Merge fields
Adding the merge fields works the same as in the previous chapter. Just make sure that the merge fields are correctly matched. For example, the address block didn’t recognize the address details.
To match the correct fields, you can click on Match Fields in the Address Block dialog. You can now select the correct column from the Excel file for the address details.

Step 3 – Preview and Sent the email
After you have inserted all the correct merge fields we only need to verify the result using the Preview Results button. If everything looks good, then click on Finish & Merge and choose Email Message from the drop-down list.

Now as you might notice, the To field and Subject are empty. So make sure that you select the correct Excel column in the To field that contains the email address of the recipient and enter a Subject line for the email.
When done, click on Ok to send the emails.
Wrapping Up
Mail Merge with Outlook is a great way to easily send personalized emails to a large number of recipients. Keep in mind that not all mail servers like it when you send an email to 1000 recipients at once. So this method is great for up to 100 recipients or so. If you need more, then using a mail service, like MailChimp, is a better option.
It’s a bit disappointing that we still can’t add attachments using the built-in tools. But the Merge Tools Add-in doesn’t cost much and solved this problem nicely.
I hope you found this article useful. If you have any questions, just drop a comment below.


