Working at a remote location or at different hours is pretty common these days. But how do you, or your colleagues, keep track of where and when someone is working? You can create appointments in your Outlook calendar, but there is a better way.
By setting your working hours and locations in Outlook, your colleagues can easily when and where they can reach you.
In this article
In this article, I will explain how you can configure it in Outlook, quickly change your location in your calendar, and view the working hours of your colleagues. I will also explain how you can configure the default working hours for all users.
Set working hours in Outlook
If you open your Outlook calendar, then if you look closely, you will see that your calendar has two colors, a light grey for the non-working hours and days, and white which represents your working hours. By default, it’s set from 8:00 am to 5:00 pm and from Monday until Friday.
Besides the hours, we can also configure the work location in Outlook. Unfortunately, you can only choose between Office and Remote as the location. It’s not possible to create custom locations at this moment, although it’s a highly requested feature.
You can change both the work hours and location in Outlook Online as in the new Outlook app. The steps are exactly the same:
- In Outlook or Outlook Online, open the Settings
- Select Calendar
- Click on Work hours and location

Here you can configure which days you work, and on which hours you are available. As you can see in the screenshot above, you can also configure the location where you work. As mentioned, custom locations are not possible at the moment, but you can choose between Remote and Office.
If you click on the location drop-down, then you might only see Remote as an option. To select Office as the location, simply type Office in the drop-down box:
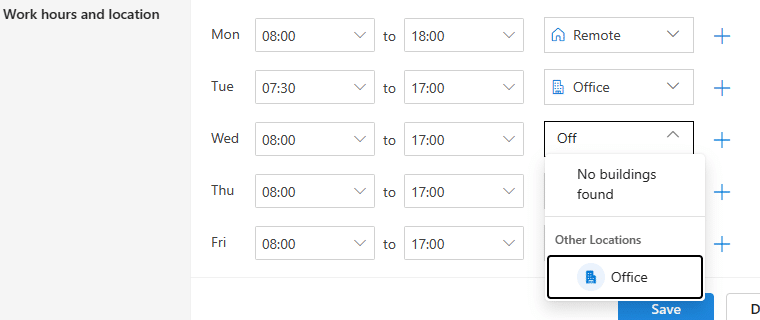
As you can see in the screenshot above, when you start typing in the location box, it says “No buildings found”. This suggests that it’s possible to custom Buildings. Unfortunately, this is actually not possible at the moment, but I am sure that we will see this in the near future.
Adding Multiple Shifts to Outlook Calendar
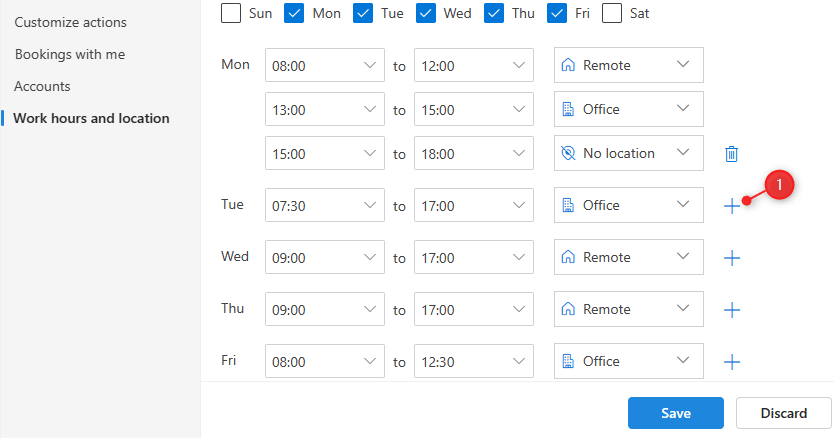
Not everybody works from 9 to 5 or the whole day at the same location. To solve this you can add multiple shifts/working hours to one day in your calendar, each with its own location.
Click on the + plus icon behind the day to add a new row. You can configure only 3 timeslots per day, more is not possible.
Viewing and Changing Work Locations
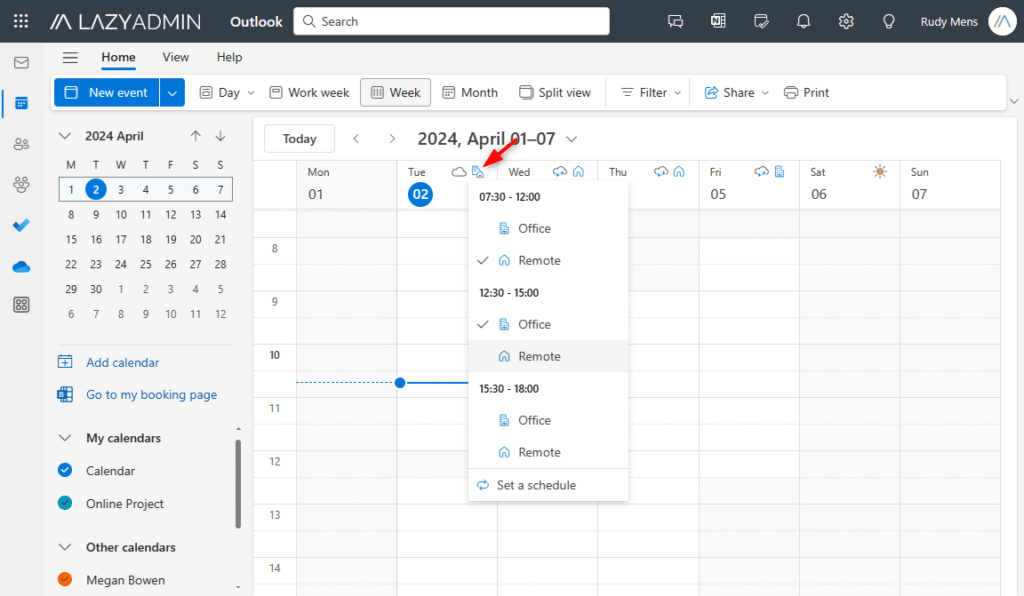
The locations and working hours that you have configured will be displayed in your Outlook calendar. If you open your calendar, you will see at the top, next to the days, a small icon representing the work location. If you have multiple locations, then both are displayed.
When you need to change your work location for a single day, then simply click on the work location icon in your calendar, and select either Remote, Office, or non as the new location:
When you schedule an appointment in Outlook you can view the work location of your colleagues in the Scheduling Assistant. It will display the work location as a small icon behind the name of your co-worker:

Change Work Location in Teams
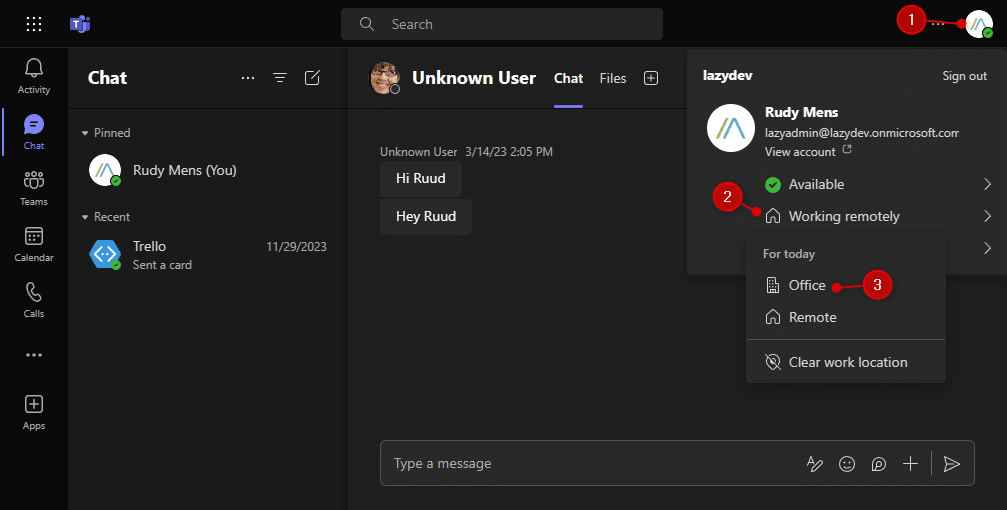
The work locations that you have configured in Outlook will also be visible in Teams. This allows your team members to quickly view where you are working from. Just like in your Outlook calendar, you can also change your work location in Teams:
- In Teams, click on your Profile icon
- Click on the work location (Working remotely or In the Office)
- Change the location
Configure Work Hours for all Users
The default working hours in Outlook are set from 8:00 am to 5:00 pm and from Monday until Friday. We can change this for all users with the help of PowerShell. Make sure that you have the Exchange-Online module installed before you continue.
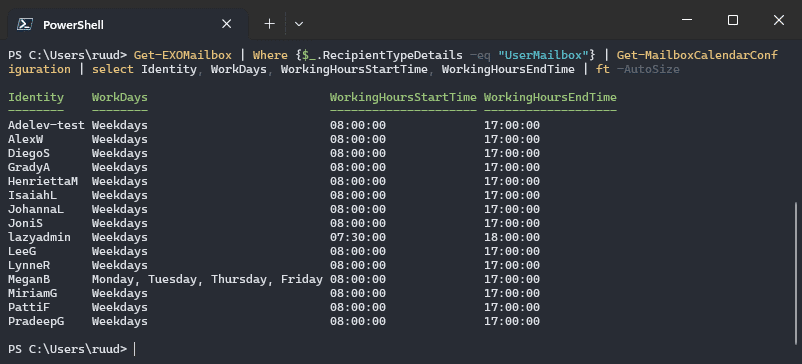
To set the working hours and days we are going to use the Set-MailboxCalendarConfiguration cmdlet. Before you configure it for all users, it’s a good idea to first check the current settings of all your users. Some users may have already configured it, and you don’t want to override it.
# Supress the warning "WARNING: Events from Email parameters of this cmdlet are deprecated. Use Get-EventsFromEmailConfiguration instead"
$WarningPreference = 'SilentlyContinue'

# Get all configured working hours
Get-EXOMailbox | Where {$_.RecipientTypeDetails -eq "UserMailbox"} | Get-MailboxCalendarConfiguration | select Identity, WorkDays, WorkingHoursStartTime, WorkingHoursEndTime
Tip
This is only a small tenant, but when you have a lot of users, then it’s easier to export the results to a CSV file.
To update the hours, I recommend that you first test it out with a single user. When you are sure that the configuration is correct, you can update it for all users.
# Test it with a single user
Get-EXOMailbox -identity meganb | Set-MailboxCalendarConfiguration -WorkingHoursStartTime 08:30:00 -WorkingHoursEndTime 16:00:00

# Update the workhours for all users
Get-EXOMailbox | Where {$_.RecipientTypeDetails -eq "UserMailbox"} | Set-MailboxCalendarConfiguration -WorkingHoursStartTime 08:30:00 -WorkingHoursEndTime 16:00:00
When you are updating the calendar settings, you might also want to check or update the following settings for your users:
- WorkDays
- WorkingHoursTimeZone
- WeekStartDay (Default Sunday)
- TimeIncrement (30 minutes by default)
- DefaultMeetingDuration (30 minutes by default)
- ShowWeekNumbers
If the meetings in your company are always at least an hour, then it makes sense to change the default meeting duration for example to an hour, instead of 30 minutes.
Wrapping Up
Having your work hours configured correctly in Outlook really helps with creating appointments. It prevents your colleagues from booking meetings when you are out of the office, saving a lot of time with rescheduling, etc.
Also, the work location is really convenient. With a lot of us working from home these days, it’s good to know where somebody is working, so you know how to contact them quickly.
I hope you found this article helpful, if you have any questions, just drop a comment below.


This is cool, but people working in different countries have different work patterns. For example, across the Middle East and in many Muslim countries the work week starts on Sunday and ends on Thursday. It would be great if you updated this article to show how to apply the settings according to group membership or locations.
Great tip!
Thanks