My old home network existed of network devices screwed to a piece of plywood and a wall-mounted patch panel. It didn’t look nice, but when we bought this house a couple of years ago I just couldn’t find a good space for a mini server rack for my Unifi gear. (And I had to do other jobs in the house first).
For a long time now I wanted to upgrade my home network with the UDM Pro and also replace the two 8-port Unifi switches with one 16 port switch. But both required a rack. And you don’t screw a UDM Pro against a piece of wood…
If you want to know more about the Unifi Dream Machine Pro, then make sure you read my review!
So the time came to find a place for a small network rack, and after some planning and measuring I was able to re-arranging the under stairs closet and to fit in (build-in actually) a 7U mini server rack.
Also, I really like the look of the Unifi hardware, with the aluminum cases, but as you probably know, there is no patch panel or blind panel on the market in the same color. Ubiquiti has announced their own patch panel and even an Unifi mini rack, but it’s still unknown when they will be available.
Parts I used to build my Unifi Rack:
- 7U Lande Netbox Soho Mini Rack
- UDM Pro
- Unifi USW-16-PoE Gen2 switch
- 2U Vented Blank Panel
- 1U Blank Panel
- 2x 1/2U Blank Panel
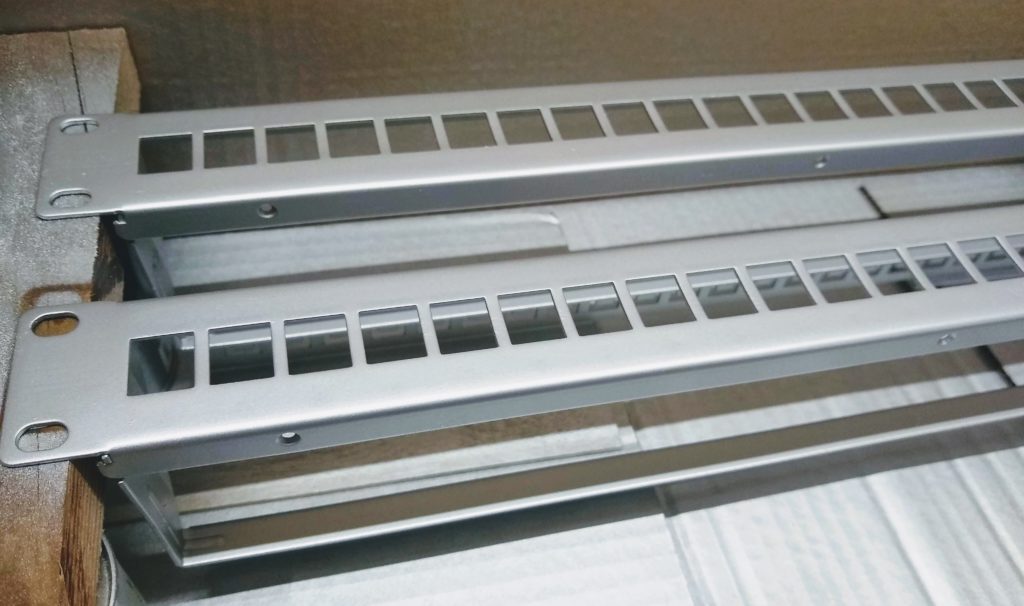
- 2x 24 ports Keystone Patch Panels
- 24x Keystone Cat6 RJ45 Couplers
- 24x Keystone Inserts black
- Black Rack Screws and Cage nuts
- 3x Unifi Patch Cable – Blue – 0.1m
- 20x Unifi Patch Cable – White – 0.1m
- 2x 120mm fan – Noctua NF-S12A PWM
- Universal Adapter 3V- 12V
- Aluminum Spray Paint – (I used spray paint from Auto-K)
Preparing the home network rack
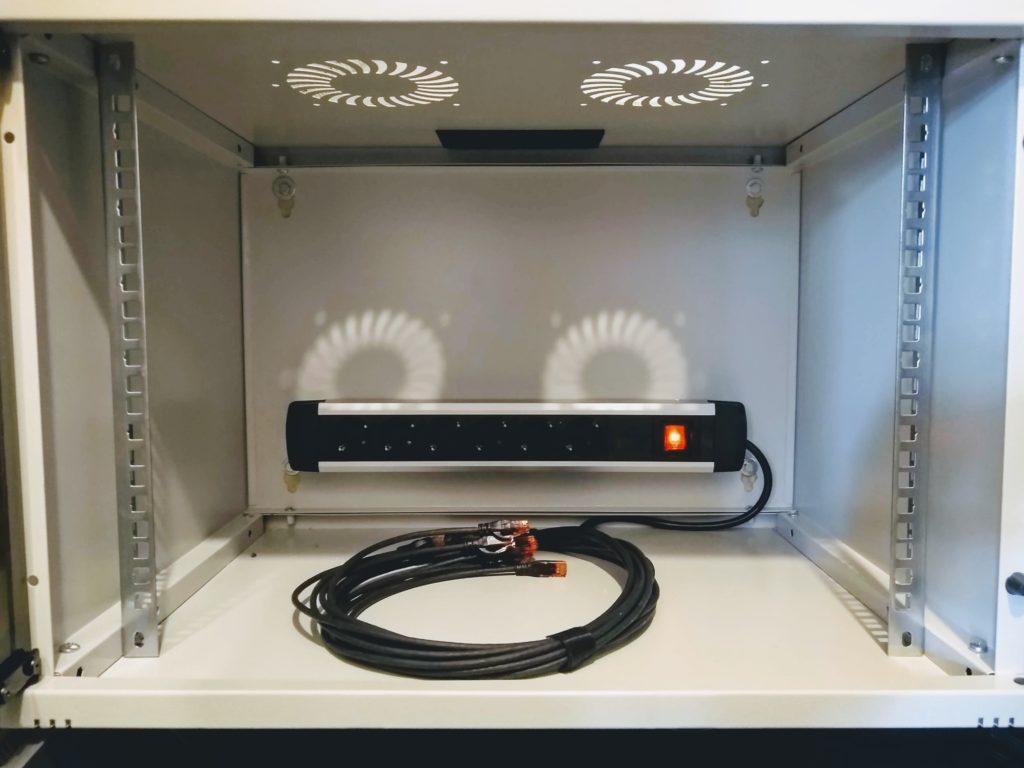
For the cabinet, I have used a 7U Lande Netbox Soho which comes with a glass door. The cabinet is only 400mm deep, so you will need to use an angled c13 Power cord for the UDM Pro. I have left the UPS outside of the cabinet, and attach the powerstrip with double-sided adhesive tape to the back of the cabinet.
Having some airflow inside your cabinet is important for the lifetime of your network equipment. You can buy optional fans for the cabinet, but they make quite a lot of noise (45db). So instead I have used Noctua NF-S12A fans, which are the quietest fans that you can buy.
The UDM Pro also has fans that can make quite some noise when you install the hard disk for Unifi Protect. You can replace the fans in the UDM Pro with Noctua NF-A4x20.
To power the fans you can use a universal 3V-12V adapter on which you can regulate the voltage.
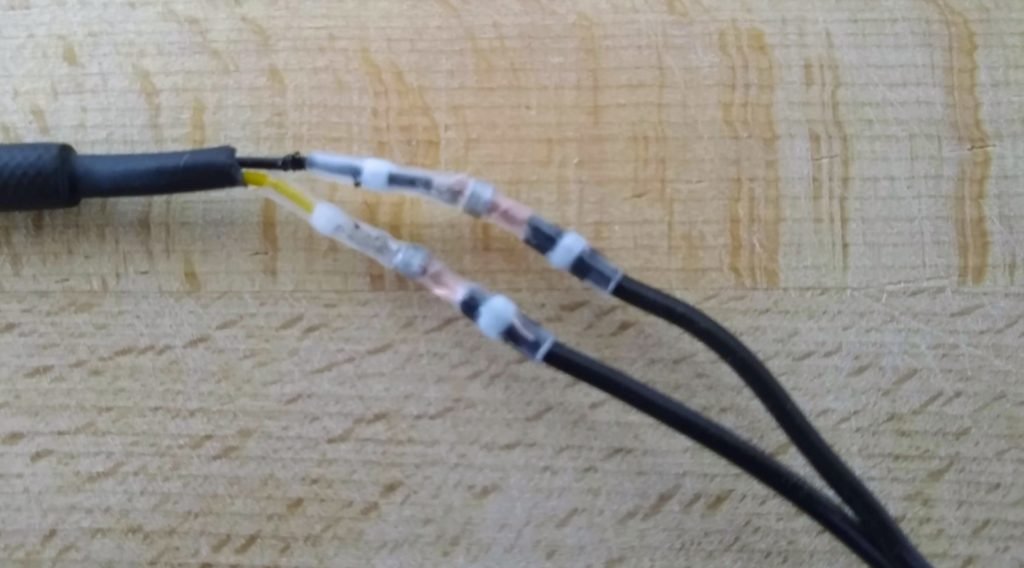
Running the fans on 9 volts gives a nice airflow to keep the UDM Pro on a steady 36 degrees. You can use solder seal wire connectors to easily connect the wires of the fan to the adapter. Make sure you check if the fan rotates in the correct direction before you solder them.
Painting the rack parts
To get that Unifi rack look and feel we will need to paint the patch and blind panels. The advantage of a keystone panel is that you don’t have to worry about the RJ45 connectors ;). Sand the components with a super fine 400 grit sanding paper before you paint them.
For the paint, I have used Auto-K Silver Aluminium Spray. I gave them two coats of paint with 15min between them. Some aluminum spray paints need to be baked in the oven to harden properly, so make sure you read the description. The Auto-K paint should be dry enough after 15 min, but I left them dry for the night to make sure the paint was hard enough and wouldn’t scratch.
Wiring the patch panels
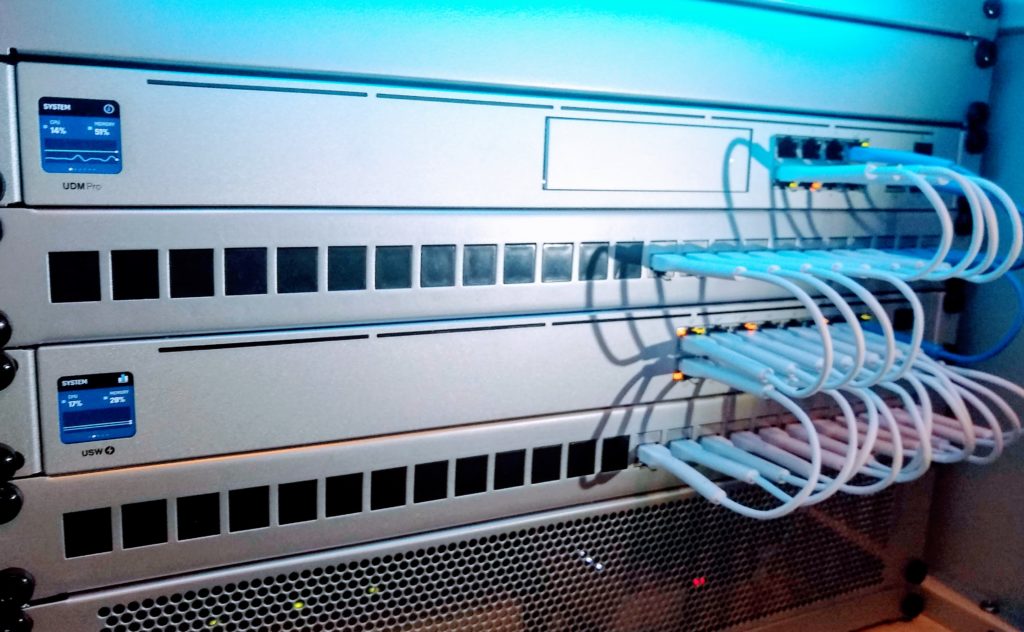
I have only 14 active network connections, so the 16 ports PoE switch from Unifi is big enough for me. The downside of the 16 port switch is that all your ethernet connections are located on the right side of the device.
So I decided to use two patch panels. This allows me to use short, 10cm, Unifi patch cables for all the connections. What I also don’t want are cables that go over a device, or use brush panels to hide the cables.
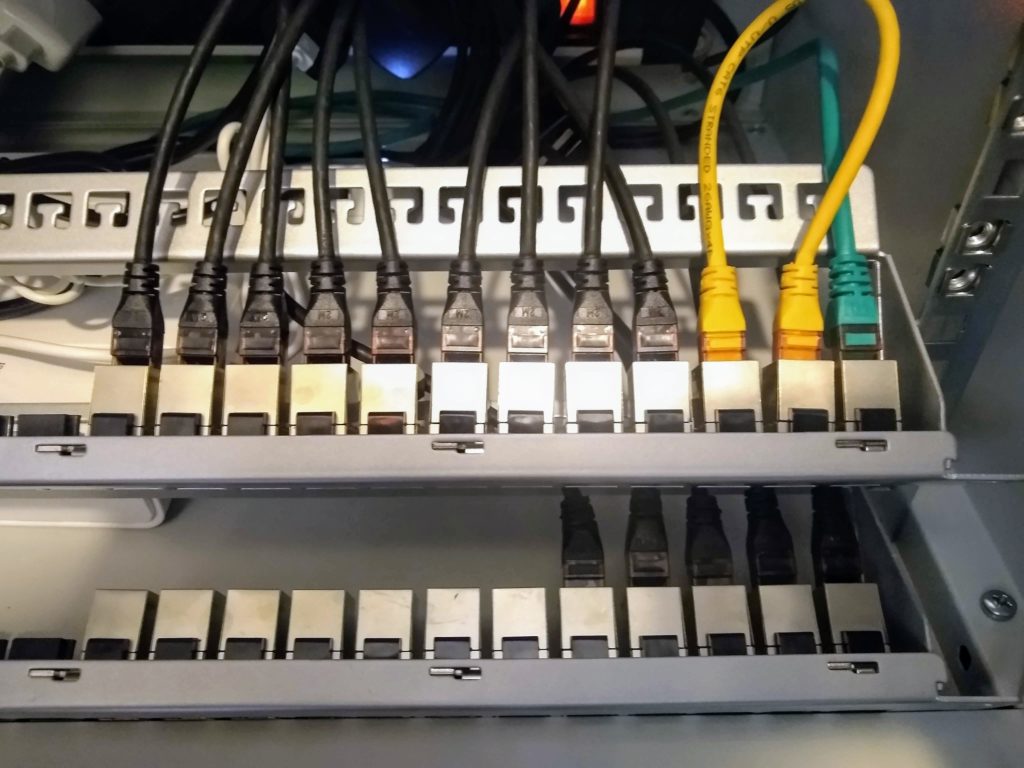
Placing one patch panel between the switch and the UDM Pro allows me to make every connection I need from a patch port to a device, using only the short cables. This means that the connection from UDM Pro to the switch, goes from port 23 on the patch panel to port 22 (the yellow patch cable), so in the front, I can use the short cables and keep everything clean and nice looking. The green cable is the incoming WAN connection from the modem.
Normally I would use normal keystones (where you punch down the cable in), but I already have a (wall-mounted) patch panel and unfortunately are the ethernet cables too short to connect to the new patch panels.
All the network devices, like the Raspberry Pi, Smart hubs, etc, are connected to the patch panel from the back and not directly to the switch.
The keystone ports that I didn’t need are covered with black keystone inserts.
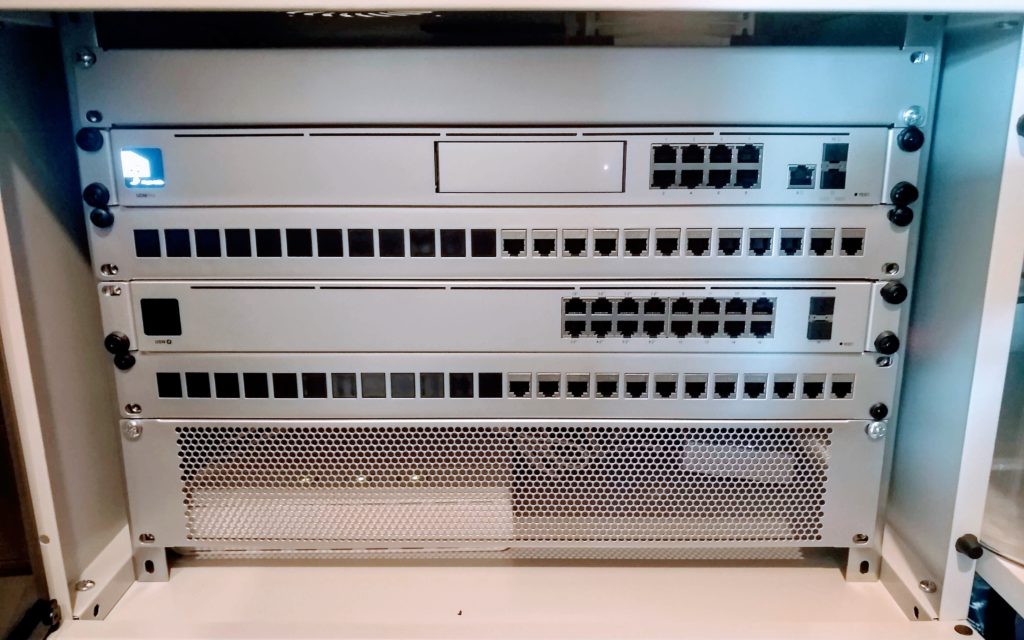
Final Result of the Unifi Rack
This rack had two small gaps at the top and bottom which I didn’t like. So I ordered two 1/2U blank panels to cover it. To do this you will need to drill a coupe of holes in the rack rails.
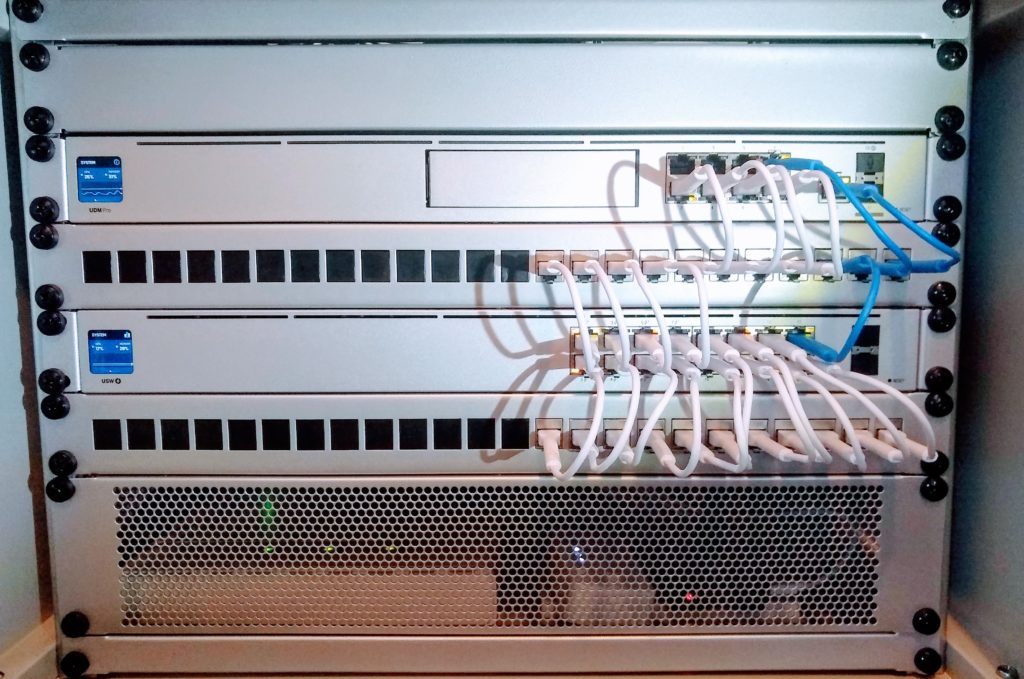
I have used the really thin 10cm long Unifi Patch cables. The blue cables are the WAN connection and the link between the UDM Pro and the Unifi switch.
Behind the vented blank panel are all the small network gear, like the modem, Pi and Smart hubs.
If you have any question about my Unifi Rack, then just drop a comment below.


Amazing article! Well done! I’m about to order this stuff and I was wondering if there was a reason you used Ethernet to connect the USW to the UDM instead of using the UC-DAC-SFP+ cable?
1Gbit is more than enough for my network. I don’t need to transfer much data to a NAS or something like that. And my ISP connection is only 50mbit at the moment. But they are finally laying fiber in the street, so that will change things.
Hello !
Nice setup !
I think I’ll do the same kind of setup but there’s one thing I don’t understand.
It’s how you connect cables coming from outside your rack to the patch pannel.
If I check on the amazon page of the Keystone Cat6 RJ45 Couplers I can see you need to connect a cable to clips (I mean, each cable from a RJ45 cable) so the front Cat6 connector is on the patch panel painted cover side. But on your picture, I can see that you directely connect the RJ45 (behide the patch panel) to a similar Cat6 connector…
Can you explain ?
The link should go to product B01FHC1BZ8 on Amazon, which are RJ45 couplers where you can plug a normal RJ45 in the back and front, just like you see in the picture. Another option is to use rj45 keystone jacks, but then you will need to connect (punch down) every single wire of the ethernet cable. Keystone jacks are the common way to use in a patch panel, but in my case I already had normal ethernet cables, so the couplers were easier to use.
Hi !
Sorry, now I understand. This is because Amazon.to link redirect ro amazon.fr (I’m from belgium so I use amazon.fr) and it seems the link is not the same and redirect to another kind of keystone. If I search your reference on amazon.com, I get the correct one. Thanks for your reply ! I don’t know yet how the cable will come to my rack…
Dear Ruud,
That is a nice rack you built there. I’m trying to get my wiring a bit tidied up too and I have installed two patch panels next to my USW24POE.
Now it’s time to replace the old patch cables and I was wondering the same thing as Mike: what are the exact dimensions of the Unifi patch cables? You say you’ve employed 10cm cables, but then I don’t understand why they look much longer on your pictures.
Could you please let me know how long the thin part of the patch cables is, and how long the total cable, including the connectors? That would be very helpful to me.
Thanks in advance.
They are unfortunately much longer. Only the thin part of the cable is 10cm long. The total length is 22cm
Thanks for the information. For me this is not unfortunate but good news, as I was afraid the 10cm cables would be too short. Now I could order them without worries.
Just wanted to say thanks for all your info and advise. I’m a newbie to all this but really enjoying learning. Your website has been invaluable.
I have bought all the kit I need. Still finishing up routing the network cables and then I’ll finally be able to turn everything on and see what happens! I’m installing the LTE too for back up as my business relies on payments via card processing and our internet access is poor (no full fibre yet!) Have you any experience with the U-LTE?
TIA.
I don’t have any experience with the U-LTE yet
How far out do the Unifi patch cables stick if you don’t bend the boots?
I am considering getting them for patch in my Unifi switch, but I have a door on my rack and only about 60mm from the front of the switch to the door. Bending them of course is the back up plan, but there is a preference to keeping them straight.
They stick out 90mm in total. It’s 55mm for the thick (bendable) part of the cable. You cloud bend the cable itself almost 90 degrees then, but I won’t recommend that.
Thanks for confirming the dimensions!
Terrific guide.
One question – did you wire both fans onto the same adapter?
Yes, they only require 0,12 amp. Adapter output 1 amp. And you can easily daisy chain them together.
Gorgeous. Nicely Done.
Spray paint was inspired.
Great article. I have just ordered an edge router after reading your website. Thanks for all the tips. It makes it easy to understand for a novice. Greetings from uk