When you want to extend your wireless network you don’t always have to option to connect every access point wired to your switch. In these cases, you can create an Unifi Wireless Uplink connection. With a wireless uplink, you connect the access point wireless to another access point. This way you only need to have power for the access point.
Keep in mind that a wired connection is always preferred. Because it will give the best performance for your wireless devices and it’s easier to maintain. However, when that is not possible, we can create a wireless uplink with pretty much any Unifi access point.
In this article, I will explain how to set up an Unifi wireless uplink connection, take a look at multi-hob uplinks and explain the difference between mesh and uplink.
Wireless Uplink Requirements
Before we start it’s important that you are running one of the latest Unifi Network versions. Also, make sure that the firmware on your access points is up to date and that all access points are running on the same firmware version.
You can create a wireless uplink with pretty much all the latest Unifi Access Point and also some of the older models. The only difference with the older models is that they don’t support multi-hop (mesh network):
- UAP
- UAP-LR
- UAP-Pro
- UAP-Outdoor
- UAP-Outdoor+
- UAP-Outdoor5
- UAP-IW
The UAP-AC and UAP-AC-Outdoor do not support wireless uplink at all.
To create a wireless uplink you will need to have at least one connected and configured Unifi access point within range of the new access point.
Configure Unifi Wireless Uplink
We are going to start with a simple setup, connecting a single Unifi access point wireless to another. During the set up we will talk about the downlink and the uplink access point. Downlink is the access point that is wirelessly connected to the uplink (wired) access point.
Make sure that you have configured static channels on your wired access points. The downlink access point can be set to auto, but the uplink access point should have a fixed channel. Use channels 1,6 or 11 for 2.4GHz and 36 or 44 for 5Ghz.
Step 1 – Adopt your new access point
The first step is to adopt the new access point in the Unifi network. The fastest way to do this is to connect the access point with a wire to the switch. However, it’s also possible to wirelessly adopt the access point (more about that later).
Step 2 – Enable Meshing on the Uplink Access Point
Meshing is most of the time enabled by default and set to Auto. It’s better to use the manual mode, so we can control how the access points are connected.
- Select your Uplink access point (the one that stays wire connected)
- Click on Settings
- Make sure the Meshing is enabled
- Set meshing to manual
- Enable Downlink
- Disable Uplink.
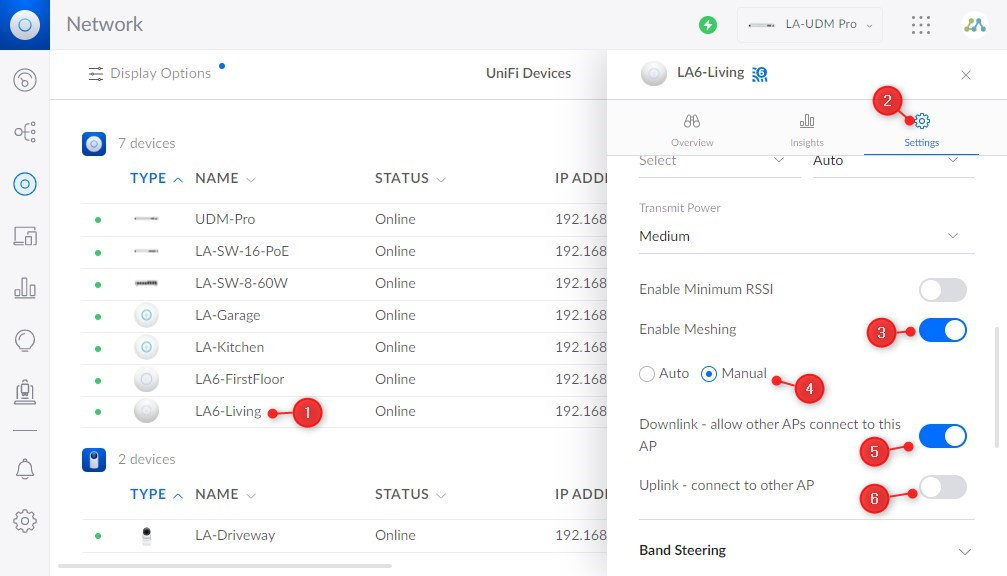
With Downlink enabled we allow another access point to connect to this access point (the LA6-Living in this case). We disable Uplink, to make sure that this access point doesn’t connect wirelessly to another.
Step 3 – Enable meshing on the Downlink Access Point
Next, we need to enable meshing on the downlink access point. In this situation, we only have a single downlink access point and a single uplink access point. We could leave meshing on auto, but we are going to set a fixed uplink access point:
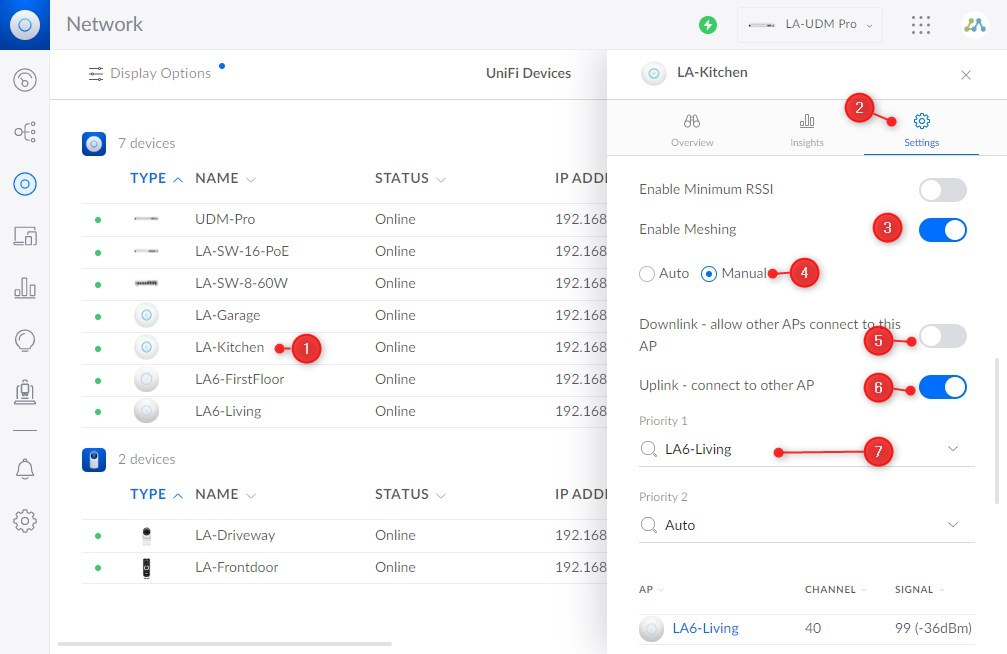
- Select the new access point (the access point that is going to be connected wirelessly)
- Click on Settings
- Enable Meshing
- Set it to manual
- Disable Downlink
- Enable Uplink
- Select your Uplink Access Point under Priority 1
Step 4 – Place your Downlink Access Point
With the Unifi Wireless Uplink configured you can now disconnect your access point from the switch. Place the access point within range of the uplink access point and powered it on with only a PoE Adapter.
It can take a couple of minutes until the access point reappears Online in the network console. You might also see briefly the status Isolated. Just give it some time.
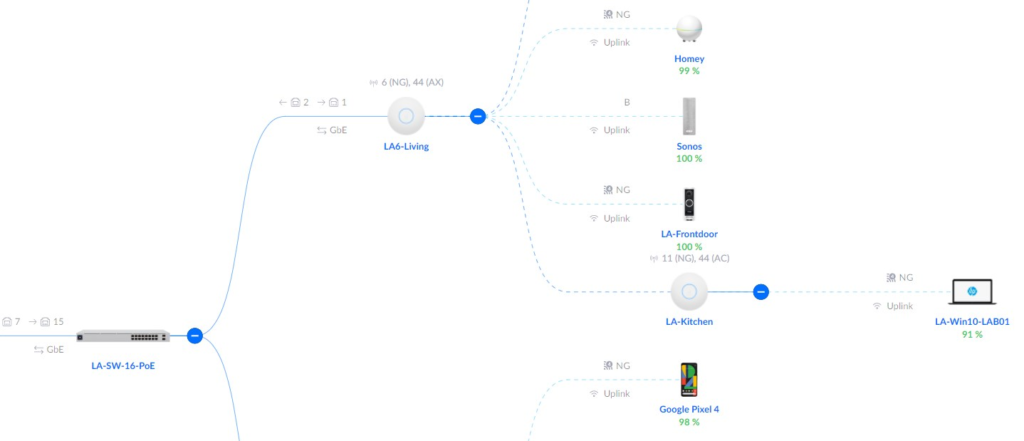
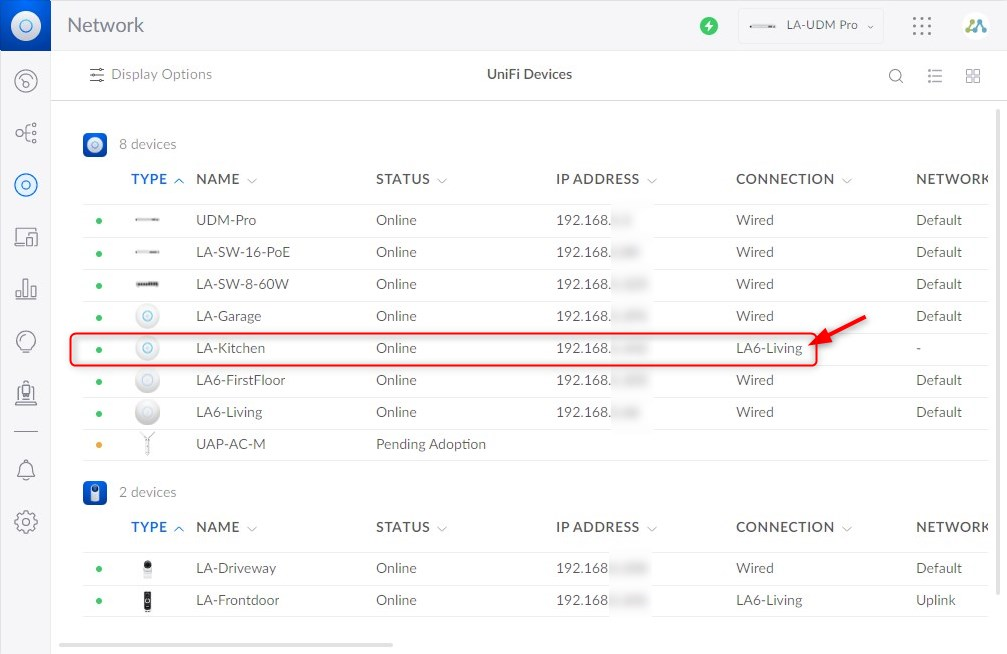
When it’s online you should see that it’s connected to your Uplink access point:
Creating an Unifi Wireless Bridge
The Wireless Uplink function on the Unifi access points can be used to create a wireless bridge. This way you can create a wireless connection to your garage in your garden and connect an Unifi Switch and camera on the downlink access point.
To create a wireless bridge you simply need to follow the steps described above to create a wireless uplink connection. The only extra step that you will need to do, is to connect your switch or device to the LAN port of the PoE adapter. Another option is to use a PoE-capable switch, in that case, you can simply connect the switch straight to the downlink access point.
I have tested the wireless bridge setup, somehow my Unifi Network Console doesn’t show the client behind the downlink access point in the topology view. It lists the device as wired connected directly to the main switch, where actually the uplink access point is connected.
Managing Wireless Uplink Connections
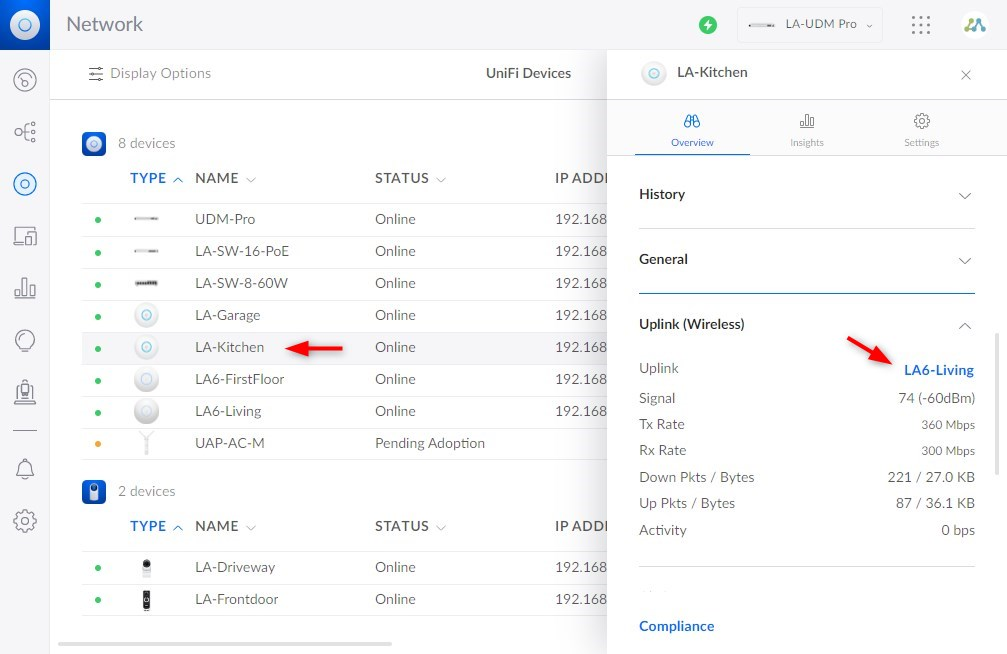
When the wireless uplink is active we can view the details of the connection in the overview of the access points. The downlink access point will report in the overview tab the Uplink access point to which it’s connected and the signal strength of the connection.
Configure a second uplink access point
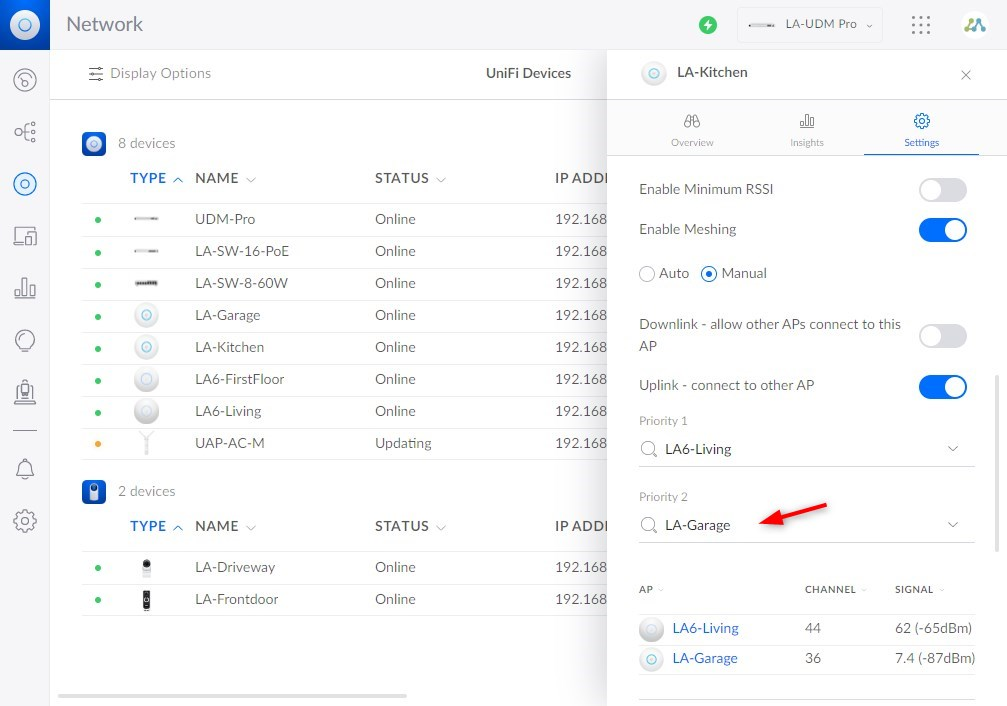
A downlink access point can only connect to a single uplink access point at the time. However, it’s possible to configure a second access point as a fallback. This way the downlink access point will remain connected in case the connection is lost to the uplink access point.
For this, you will need to have a second access point in the range of the downlink access point. Make sure that you have enabled meshing on the second access point and allow downlink connections.
- On the downlink access point open settings
- Scroll down to Meshing
- Select a second access point under Priority 2
You can also leave this setting the priority 2 on auto in case you have multiple uplink access points in range that could be used as an uplink access point.
Multiple Downlink Access Points to a Single Uplink
It’s possible to connect multiple downlink access points to a single uplink access point. But keep in mind that every access point will consume resources from the uplink. So don’t connect too many access points to a single one. Try to keep it at two as max.
You can simply set the same access point as priority 1 in the downlink access points.
Multi-Hop Wireless Uplink
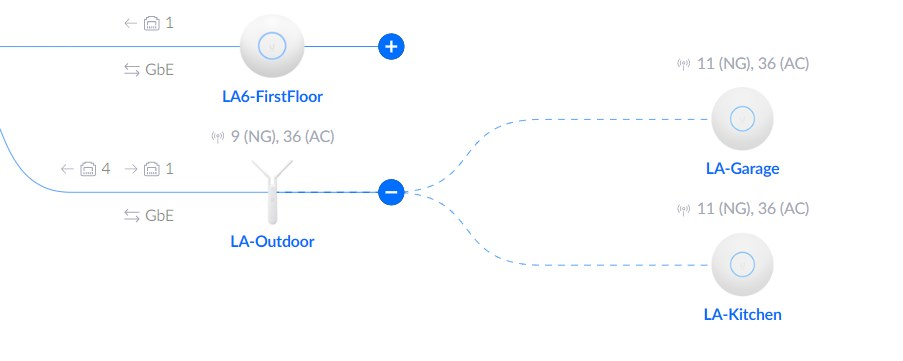
Creating a mesh network or multi-hop wireless uplink is also possible with the latest firmware. To configure a multi-hop wireless uplink you will need to enable Downlink and Uplink on the first downlink access point (LA-Kitchen in the example below):

Make sure that Downlink is disabled on the second hop (LA-Garage in the example) and only Uplink is configured. For the best performance, you should set the priority to the first downlink access point (LA-Kitchen).
Frequently Asked Questions
When clients don’t connect to the new downlink access point, then make sure that you are using different channels between the uplink and downlink access point. The clients will have issues connecting when both access points are on the same channel
Make sure that all access points are members of the same Broadcasting group under Settings > Wifi > and then your wireless network.
If you don’t see the option Enable Meshing on the access points, then Wireless Meshing is probably turned off in your wireless settings.
1. Open Settings
2. Select WiFi
3. Scroll down and enable Wireless Meshing
Also, make sure that you set the Connectivity Monitor Type to Gateway.
When you have your downlink access point wired and connected for configuration, you might be unable to select the uplink access point.
If you have enabled Uplink – Connected to another Access Point, then just disconnect the access point from the switch. Only connect it to a PoE adapter and it will show up in your Unifi Console.
Wrapping Up
Creating an Unifi wireless uplink network is pretty easy. It should work with meshing set to auto, but I prefer to manually configure the uplink access points. Also, keep in mind that you disable the Downlink function on the access point that you don’t want to use as an uplink access point.
If you have trouble connecting or finding the uplink access points then make sure that you have configured static channels that don’t overlap.
If you have any questions, just drop a comment below.


Thanks for the article. I have my AC-PRO set up as a wireless bridge and it is working. However, whenever it reboots, it does not reconnect. (I have a lot of power outages where I live). In order to reconnect, I need to disconnect the bridged ethernet port and reboot again. Then it connects fine. This behavior happens both with the 2nd port on the POE injector and with the secondary ethernet port on the AC-PRO. Any idea how to resolve this so the wireless bridge reconnects at reboot? It seems like if there is another device connected through ethernet, it tries to get the internet connection through that instead of establishing the wireless connection.
I have various subnets and VLANs, my main management subnet is 10.55.0.1 on VLAN55.
I also have other subnets and VLANs, one specifically for IoT type devices on subnet 10.13.0.1 on VLAN13.
Two WAPs (“Meshing”, “Manual” and “Allow Wireless Downlinks”) are as follows:
– UAP nanoHD with IP 10.55.0.10
– UAP U6-Mesh with IP 10.55.0.12
This is the one WAP (“Meshing”, Manual” and “Allow Wireless Uplinks”):
– UAP AC Pro with IP 10.55.0.13
– UAP-AC-Pro’s Main ethernet port is connected to a PoE power adapter which is then plugged into an AC outlet.
– UAP-AC-Pro’s Secondary ethernet port is connected directly to a device with linux distro.
The device with the linux distro successfully connected with a DHCP IP address of 10.55.0.101.
Up to this point, this is great as far as connectivity from the linux distro device out to the internet.
However, I would prefer that this linux distro device would instead get an IP from the subnet 10.13.0.1 on VLAN13.
So I suspect this is simply not possible as I have everything wired and configured. But would like to ask anyway, is it possible to modify the configurations to make this work and allow the linux distro device to get an IP from the subnet 10.13.0.1 on VLAN13?
One thought I had is that if I instead connected my UAP-AC-Pro’s Secondary ethernet port to a managed switch, and configure that switch port to be trunked, and then connect my linux distro device to one of the other switch ports configured as VLAN13 untagged.
I’ve not yet attempted this, wanted to ask here if this could possibly work?
Thanks in advance!
Scott
The secondary port is bridged port. It will receive the same traffic as the primairy port. Only option indeed is to attach a managed switch to the secondary port.
Hi and thanks for the article but my issue is: I had a professional installer installing my mesh UniFi access point network and setting up my passwords but not that I want to change my password and or access my system, he is not returning my calls. So my question is: How do I access my network.
Thanks
You really need the password, there is no other way to gain access. Only other option would be to factory reset every device.
Thanks – this was a life saver – much appreciated. Matt in San Diego!
You DaMan! Aloha for creating this expert topic.
–Nick
You mention:
“However, it’s also possible to wirelessly adopt the access point (more about that later).”
I can’t find that “later” part – do you have any hint for me how to wirelessly adopt APs?
hmm, I seem to have forgotten to write that part indeed… But there are two methods to connect the AP, wired (as described) or wireless. With the latter, you must ensure that you have configured one AP with meshing enabled. Power on the other AP (using the POE adapter, without the LAN cable) and it should become visible in the UniFi controller.
How do you set this up (ONE wireless SSID, multiple access points) without the wireless uplink? I have 5 rooms, all with ethernet points, connected to the USG. Can I just purchase a supported UAP-PRO or whatever, connect it to the wall ethernet (and POE of course) and provision both from my controller, WITHOUT enabling wireless uplink (because they are hard wired). Will they be considered meshed or two APs broadcasting the same SSID (would this be in conflict)? Thanks for your help!
One SSID and multiple access points is the normal behavior of Unifi. Wireless uplink is only needed when you are unable to hard wire and accesspoint
Thank you! That’s exactly what I am noticing after connecting the new Unifi 6 Mesh. Thank you for your response. It’s great!
How do you force it to use the Ethernet and not mesh at all? turn the meshing off?
Yes, just disable allow meshing on the devivce.
Brilliant article. Clean and to the point.
I could not get this to work with 2 U6-Pro’s and I am wondering if you need dual connections as if I setup with just a POE injector with no network connection it works but as soon as I connect to a POE switch the AP remains offline in the console.
WOW! Thank you so very much for writing such a detailed example of how the uplink and downlink works. UI is very relaxed in their documentation, they selectively mention this feature. You did a superb job and I am thankful for not only making it easy but a joy to read.
Cheers
Unifi Network removes priority uplinks when I apply settings
A great and thorough article. Thank you. It worked perfectly. First time. 2 AP LR’s.
One small glitch is you need to install Java 8 (2014…?) to get the desktop (browser) mac version of the Network interface to work but thats a minor (although odd) inconvenience.
The Network iOS app does not have this level of access and seems only good for stand alone devices.
Thank you again.
Hi Ruud,
thanks you very much for this usefull how-to. Just a quick question: do you know if the NanoHD supports “wireless uplink” ?
Best Regards,
Stephane
Yes, that should work.
Hi I wanted to setup my NAS in a closet without ethernet and found this article. Worked like a charm with my 2 NanoHDs. Thanks Rudy for the great how to and Stephane you will have no issues if you follow Rudy’s instructions.
Thanks again.