The Active Directory Users and Computers (ADUC) console is used to manage your Active Directory. It’s installed by default on a domain controller, but you can also install ADUC on other servers and computers as well.
ADUC is part of the Remote Server Administration Tools (RSAT), which allows you to easily install the required management console with only a few clicks. This allows you to manage your Active Directory from your own Windows 11 workstation for example.
In this article
In this article, we will look at how to install Active Directory Users and Computers on other servers and install ADUC with the help of the RSAT tools on Windows 10 and 11. We will also look at some of the basis features and I have a time saver tip for you!
Install Active Directory Users and Computers
When you install a domain controller, the Active Directory Users and Computers console is added by default. But you probably don’t want to give all your helpdesk technicians access to the domain controller to only create a new user or reset a password for example.
We can install the ADUC console on any member server and even on Windows 10 and 11. When using Windows 10 or 11, you will need to make sure that you are using the Professional or Enterprise edition. The home version is of course not supported because you can’t join it to a domain.
To install the Active Directory Users and Computers console, we are going to add the RSAT feature, which stands for Remote Server Administration Tool. RSAT exists out of 27 tools in total, but we are going to install only the following tools:
- Active Directory Users and Computers (ADUC) – To manage and create user and computer objects in the Active Directory
- PowerShell Active Directory Module – Allow you to use PowerShell to manage your Active Directory
- Active Directory Domains and Trusts – Create and manage trusts between domains and forests
- Active Directory Sites and Services – Used to manage sites and services
- ADSI Edit – Allows you to modify AD Objects on attribute level
- Active Directory Administrative Center – View the history of PowerShell commands that are used to manage the AD. Configure password policies and view AD Trash
Install ADUC on Windows Server
To add the ADUC console to a Windows Server we are going to use the Server Manager.
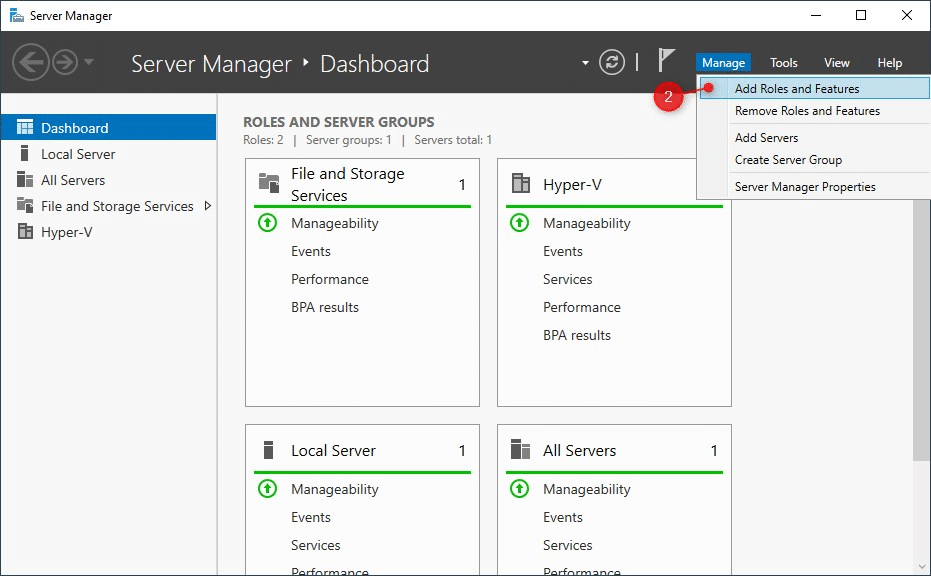
- Open the Server Manager (you can find it in Start or on the taskbar)
- Click on Manage > Add Roles and Features
- Click Next (4x)until you are at Features
- Expand the Remote Server Administration Tools
- Expand Role Administration Tools and AD DS and AD LDS Tools
- Select AD DS Tools and I recommend installing the Active Directory module for PowerShell as well
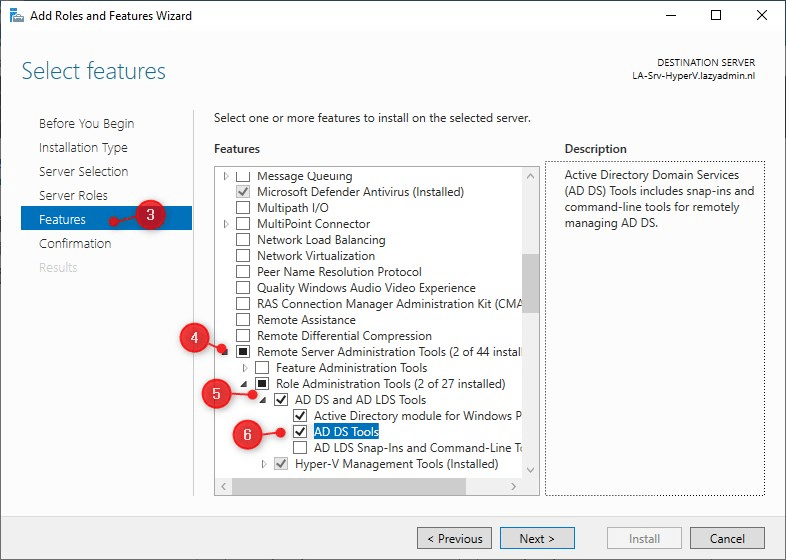
- Click and Install to install the ADUC tool.
It will take a minute or two to install the new feature. When it’s completed, you can find the Active Directory User and Computers console in the start menu under Windows Administrative Tools.
Active Directory Users and Computers on Windows 11
You can also use Windows 10 or 11 to manage your Active Directory. This way you don’t need to sign in on the Domain Controller every time you need to create or modify a user object for example.
To manage your AD from Windows 11, you will need to install ADUC with the help of the RSAT tools. Just like on a server, this is a feature that we can easily add.
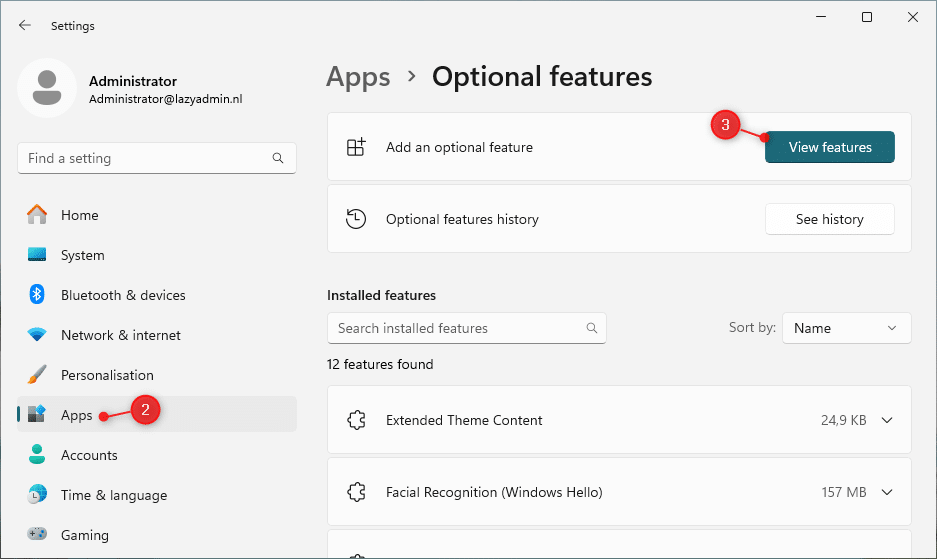
- Right-click on Start and open the Settings
- Go to Apps and choose Optional Features
- Click on View Features
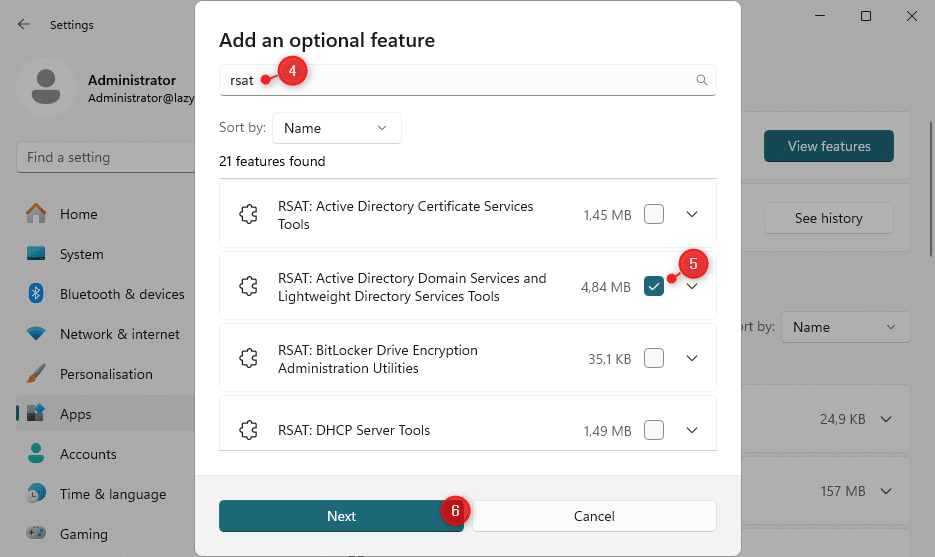
- Search for RSAT
- Select RSAT: Active Directory Domain Services and Lightweight…
- Click on Next and Install to install the feature
After you have installed the RSAT feature, you will find the Active Directory Users and Computers console in your Windows 11 start menu.
Using PowerShell
We can also install the RSAT tools with the help of PowerShell. The advantage of using PowerShell is that you can easily add the tools to remote servers, without the need to of logging in on each device.
To install the ADUC tools on Windows 11 with PowerShell, you can use the following command:
Add-WindowsCapability -Online -Name Rsat.ActiveDirectory.DS-LDS.Tools~~~~0.0.1.0
You can verify the installation with:
Get-WindowsCapability -Name "Rsat.ActiveDirectory*" -Online | Select-Object -Property DisplayName, State

# Result
DisplayName                                                                         State
-----------                                                                         -----
RSAT: Active Directory Domain Services and Lightweight Directory Services Tools Installed
To install the ADUC tools on Windows Server with PowerShell, you can use the following PowerShell command:
Install-WindowsFeature RSAT-AD-PowerShell
Using Active Directory User and Computers
The ADUC is mainly used to create and manage user accounts, computer objects, group membership and reset passwords. In small environments, all these tasks are often performed by a single IT member, but the larger the environment, the more you want to work with limited roles and delegation.
Let’s take a look at how to perform some of these tasks in the ADUC.
Creating User Account
Creating a new user is one of the common tasks that you can do within the Active Directory Users and Computers. First, navigate to the OU or container where you want to create the new user account.
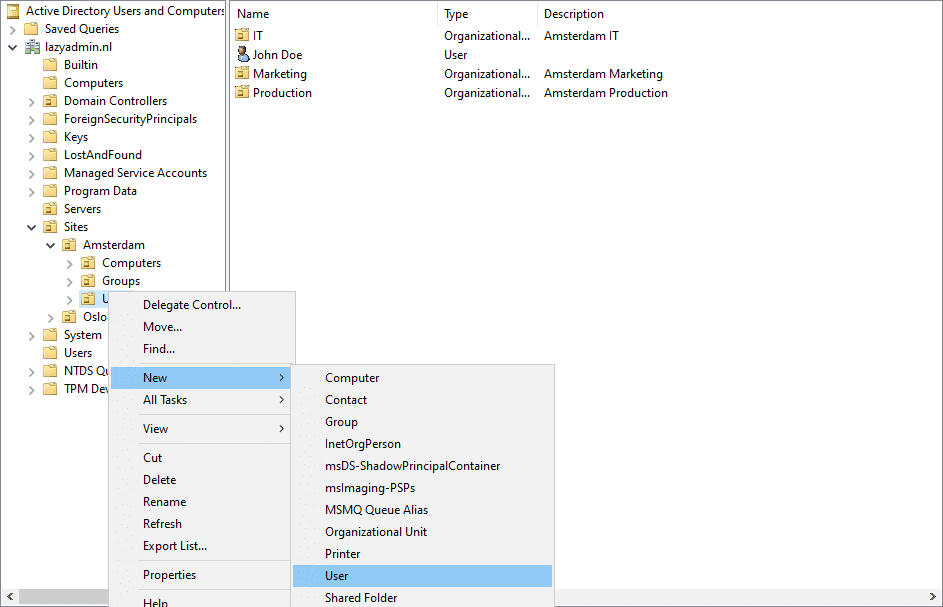
- Right-click on the container or organizational unit (OU), and choose New > User
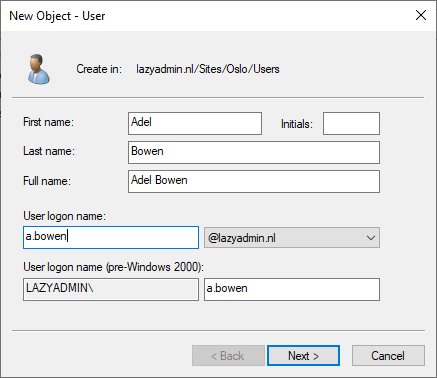
- Enter all the details in the New Object – User dialog, like the name, and logon name.
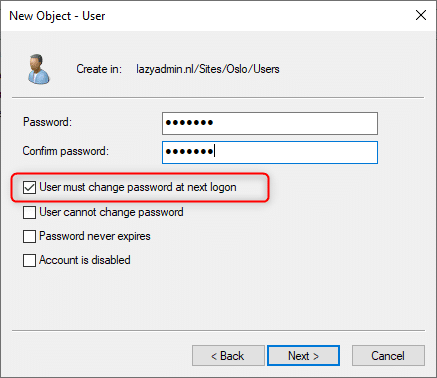
- On the next screen, enter a password. The best practice is to set a temporary password, and enable “User must change password at next logon”. This way the user can configure a strong password that only he or she knows.
- Click Next and Finish to create the user.
The user account is now created, but you are often not finished yet. If you open the newly created user object, you will see that you can enter more information about the user, like contact details and job title.
You will also often need to make the user a member of specific groups so the user has access to all the required resources.
An easier way to create a new user is often to copy an existing user. This way all the group memberships are copied, and also the address details from the company, for example, are copied to the new user.
Reset, Enable, and Disable Accounts
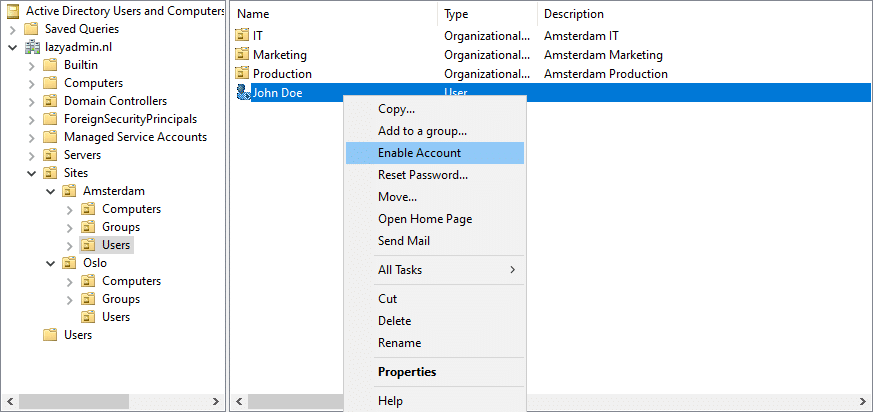
When a user enters a password wrong more than 5 times, the account can get blocked by the Active Directory. We can simply enable the account, or disable it, by opening the context menu of the user object in the ADUC.
- Right-click on the user
- Choose Enable Account
The same method can also be used to disable an account or reset a password. With the latter, you will need to enter a new temporary password for the user.
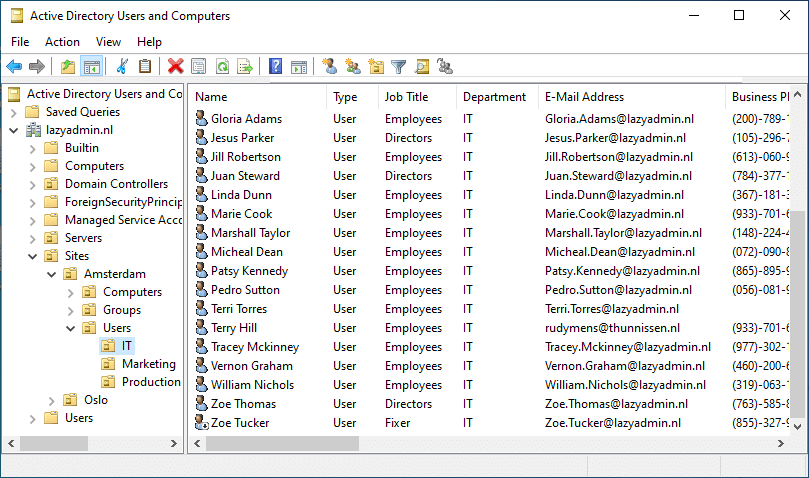
Adding Collums
By default, the Active Directory Users and Computers will only show the name of the user, object type, and description. It can, however, be useful to add more columns to the overview. For example, you can show the department, job title, or phone number of the user in the overview.
This way you don’t have to open every use if you just want to check or verify some of the information.
To change the column, click on View > Add/Remove Columns and select the columns that you want to include.
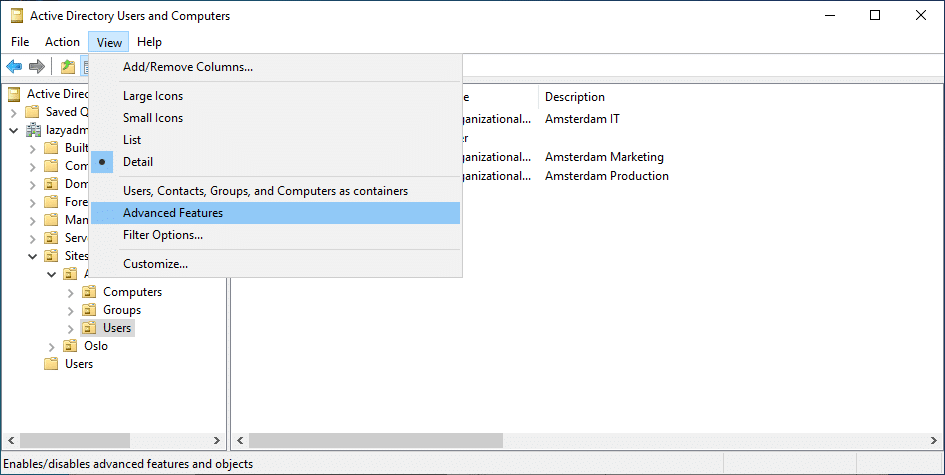
Showing Advanced Properties
By default, the ADUC will show you the basic containers and properties of objects. For most cases, this will be enough, but in some occasions, you will need to modify specific attributes. For example, when you need to set the proxyAddresses attribute.
To view all properties and containers, you will need to enable the Advanced Features in ADUC. Click on View > Advanced Features to enable it.
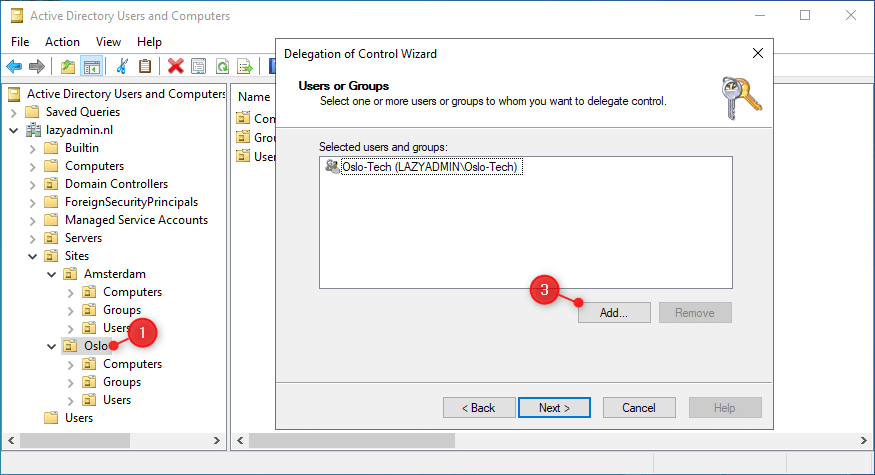
Setting Up Delegated Access
Delegated access allows you to give permission to users or groups to manage a specific set of users, computers, groups, or other objects in the Active Directory.
For example, we have two sites in our Active Directory, Amsterdam and Olso. We only want to give the IT guys in Oslo access to the AD objects of Oslo.
- Right-click on the OU where you want to give delegated access on
- Choose Delegated Control
- Click Next, Add the user(s) or security group to which you want to give access, and click Next
- Select the permissions that you want to give, for example, only reset user passwords, or full access to create and delete accounts. You can also create custom tasks if needed.
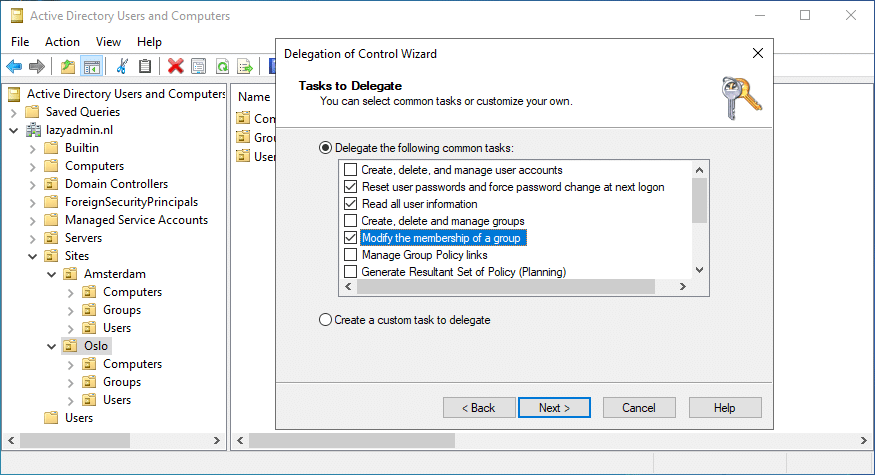
- After you have selected the permissions, click Next and Finish to assign the permissions.
Finding Objects
In larger environments, it can sometimes be difficult to find that specific computer or user. Instead of clicking through all OU’s or Containers, you can also use the search function in Active Directory Users and Computers to quickly find it.
The search function works from the selected container or OU down. So if you select the default Users container, then it will only search in the users.
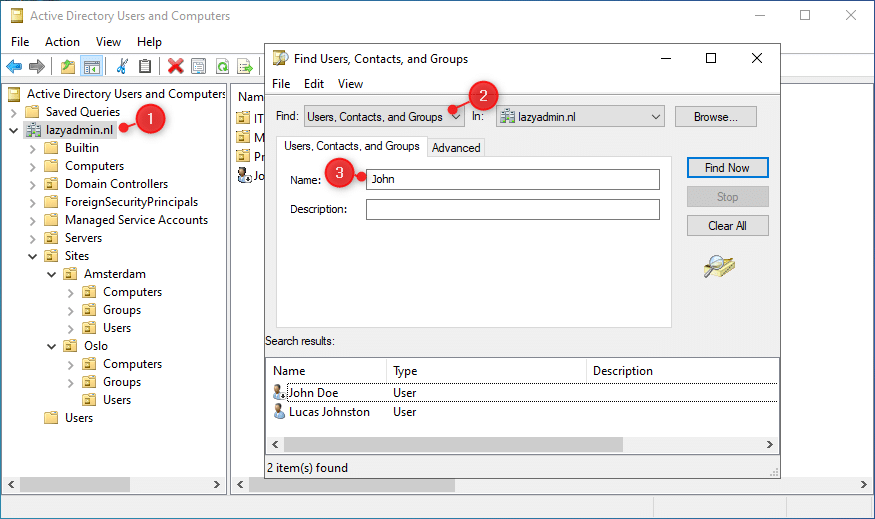
Personally, I search always on the domain level. For this, simply right-click on your domain name (1) and select Find.
In the Find dialog, you will need to select what you are searching for (2). By default, Users, Contacts, and Groups are selected. But you can also search for Computers, Printers, or Organizational Units for example.
Enter the name, or a part of, that you are searching for and click on Find Now
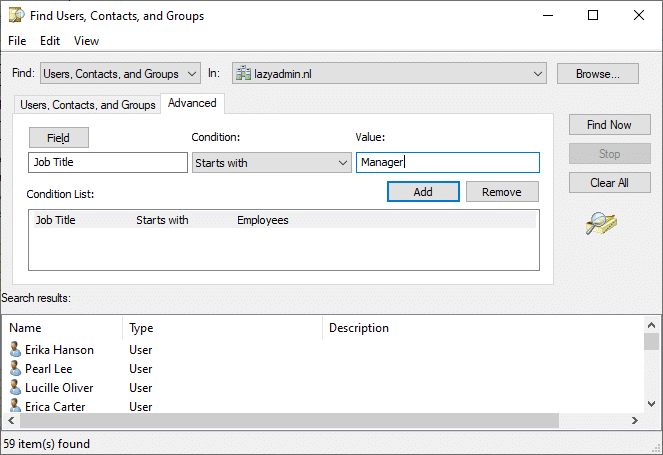
You can also use the Advanced search option, which allows you to specify multiple conditions to search on. For example, we can find all employees that have a specific job title:
Using Queries
The Saved Queries in the Active Directory Users and Computers is often an overlooked feature that is really handy. It allows you to create custom search queries in your Active Directory and save them.
You can use some of the built-in queries, use the advanced search features, or even create your own LDAP query for the search folders.
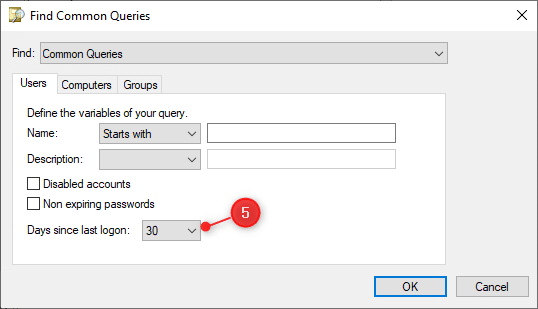
A simple example to create is the Inactive accounts queries:
- Right-click on Saved Queries and choose New > Query
- Enter a name (this is how it will be displayed in the sidebar)
- Select the folder on which you want to run the query, for example, your users
- Click on Define Query

- Select days since last logon, and set it to 30 days for example.
- Click Ok (twice) to create the search query and view the results.
Wrapping Up
By installing the Active Directory Users and Computers on your computer you can easily manage your Active Directory without the need of logging in on the domain controller every time.
If you are not using PowerShell a lot, then make sure that you try out the Saved Queries feature to create your own collection. These can really be time savers in your daily work.
I hope you found this article helpful, if you have any questions, just drop a comment below.