Domain Controllers are a vital part of your network. They handle the authentication of your users and often run services like DHCP and DNS. So when you need to change the IP of a domain controller then you will need to do that with care.
Good to know is that when you have multiple domain controllers, it’s pretty easy to change the IP Address. But when you only have a single DC, then things are a bit more challenging.
In this article
In this article, I will explain how you can change the IP of a Domain Controller, what you need to prepare, and what you need to check when done.
Preparing IP Change
You really should have two domain controllers at least in your network. Especially if you need to make changes to the configuration of your domain controller. So the steps below are based on the scenario that you have atleast two domain controllers.
Before we are going to change the IP of the Domain Controller, we need to make sure that our domain is healthy. This means that the replications are up-to-date and without errors. You can quickly check the domain health with the DCDiag tool. Just open PowerShell or Terminal and run:
# Check health Domain Controller
dcdiag

# Check DNS health
dcdiag /test:dns /v
Besides the domain controller health, we will need to check the health of the DNS and make sure the DNS servers are configured correctly on the domain controllers.
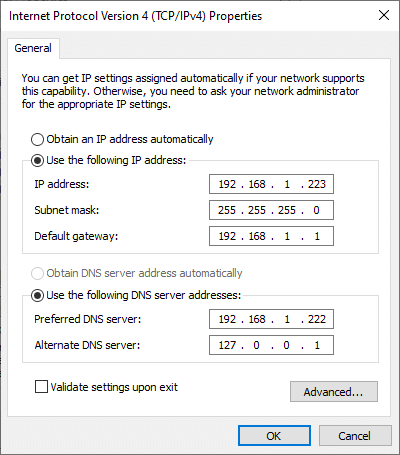
The preferred DNS server on the domain controller should be pointing to the other DNS server (domain controller). And the alternate DNS server should be set to the loopback address (127.0.0.1), like this:
With the Domain Controller health and DNS checked, we can safely change the IP Address of our Domain Controller.
Other Important Notes
When you change the IP address of the domain controller, there are some other things you will need to keep in mind as well:
- DNS – Your servers probably have a static IP Address, so make sure that you update the DNS server setting after you have changed the IP Address.
- DNS server clients – Make sure that you update the DNS server in the DHCP Scope
- DHCP – If the domain controller is running DHCP, then make sure you update the helper address in your router/firewall
- NTP – Update the NTP server address in your printers, NAS, AP, or other network equipment
Change IP Domain Controller
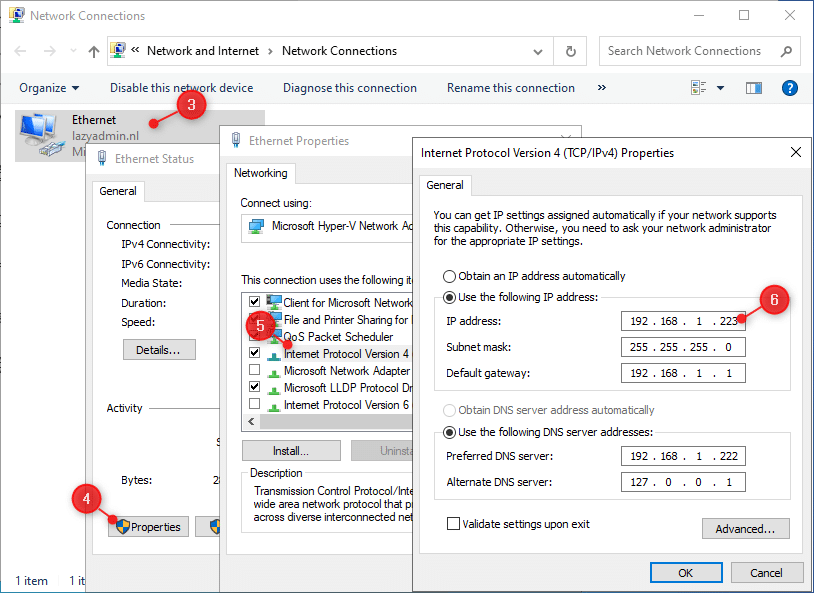
To change the IP of your domain controller, make sure that you log in locally. In case of a VM, go to your Hyper-V Manager, right-click the VM, and choose Connect. This way you won’t lose connection to the machine when you change the IP Address.
- Right-click on Start and choose Network Connections
- Choose Change Adapter Options
- Double-click on the Ethernet adapter to open the Properties
- Click on Properties
- Open the Internet Protocol Version 4 (TCP/IPv4) properties
- Change the IP Address of the Domain Controller
Also, make sure that you check the WINS record in the IPv4 properties under Advanced. Update the record if it was pointing to the old IP Address of the domain controller.
After you have changed the IP Address, we need to run two commands. First, we are going to register the host record with the following command:
ipconfig /registerdns
Next, we will need to update the SPN (Service Principal Records) and check if all tests are passed.
dcdiag /fix
If you also changed the subnet of the domain controller, then you will need to make sure that you add the new subnet in the Active Directory Sites and Services.
Updating Other Domain Controllers
With the IP changed on the Domain Controller, we now need to make sure that the DNS records are updated on the other domain controller.
Open the network adapter on the other domain controllers, and make sure that you update the preferred DNS server to the new IP Address of the domain controller. Also, check under Advanced if the WINS record was configured to the old IP Address and update if necessary.
Updating Servers
As mentioned in the beginning, you will need to update the DNS server records on the other servers in your network. You can do this manually, but for this, we can also use a small PowerShell script.
I assume that you have all your servers in one OU in your Active Directory. We will first get all the servers (double-check that there are no domain controllers in the results)
$servers = Get-ADComputer -Filter * -SearchBase "OU=Servers,DC=lazyadmin,DC=NL"
We will then check each network adapter of each server, check if DHCP isn’t enabled on the adapter, and if DNS is even configured on it. If that is the case, then we can update the DNS settings:
ForEach ($server in $servers) {
    Write-Host "Updating $($server.name)"

    Invoke-Command -ComputerName $server.name -ScriptBlock {
        $netAdp = Get-WmiObject Win32_NetworkAdapterConfiguration | Where-Object {$_.DHCPEnabled -ne 'true' -and $_.DNSServerSearchOrder -ne $null}

        if ($null -ne $netAdp) {
            $netAdp | Set-DnsClientServerAddress -InterfaceIndex 2 -ServerAddresses ("192.168.1.222","192.168.1.224") -WhatIf
        }else{
            Write-Host "Unable to update DNS settings" -ForegroundColor Yellow
        }
    }
}
Updating Clients
Your clients should be able to work without any issues. During the change, they could access the other domain controller for the authentication and DNS. The clients will receive the new IP address of the domain controller automatically when they renew their IP Address.
If a client does experience issues, rebooting it solves most of the issues. If that isn’t possible, you can run the ipconfig /renew and ipconfig /flushdns command on the client. This way the client will receive the new IP Address of the domain controller and clear the DNS cache.
Wrapping Up
When you have two or more domain controllers, then changing the IP address often goes without any issues. Just make sure that you inventory applications and network appliances that are using the static IP Address of the DC.
After you have completed the migration, you can run this Active Directory Health report to check if everything is running without issues.
I hope you found this article helpful, if you have any questions, just drop a comment below.