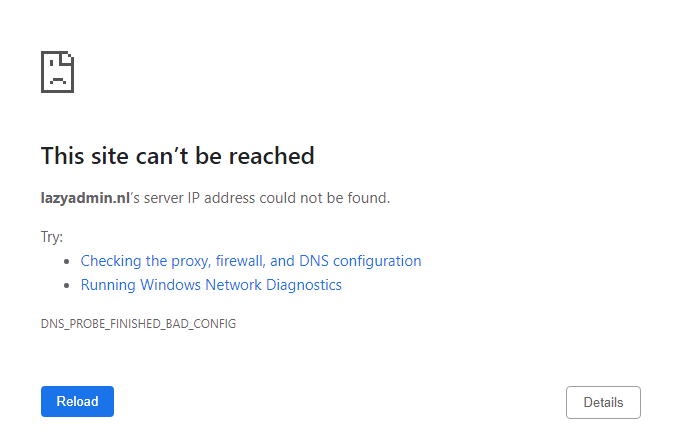
You open Chrome and navigate to your favorite website. But instead of the webpage, you get This site can’t be reached, with the error code DNS_PROBE_FINISHED_BAD_CONFIG. This error message indicates that there is something wrong with your DNS settings.
It’s possible that only one device in your network gets this error, but when the problem is related to your DNS server then multiple devices can have the same error. DNS errors are quite common and can easily be fixed.
With the steps below you should be able to get back online in a couple of minutes. We are going to start with the most common solution, that will work for most. If it doesn’t work for you, just go to the next step.
How to Fix dns_probe_finished_bad_config
The error message dns_probe_finished_bad_config indicates that your browser is unable to resolve the DNS address. When you visit a website, the domain name will be translated to the corresponding IP address of the webserver.
When your browser is unable to contact the DNS server you will first see the error DNS_PROBE_STARTED followed a few seconds later with the message DNS probe finished bad config. To solve this error we are going to flush the local caches and check our network settings.
1. Flush the local DNS Cache and reset Network Configuration
The first step is to flush the local DNS cache. Your computer keeps a local list of all DNS addresses that you have used. Sometimes it gets outdated or corrupt, which can result in the error dns_probe_finished_bad_config.
To clear the cache we can use a simple command that we can run in PowerShell or command prompt:
- Right-click on start or press Windows key + X
- Choose Windows PowerShell or Windows Terminal (on Windows 11)
- Type all the commands below and press enter after each command:
- ipconfig /flushdns
- ipconfig /release
- ipconfig /renew
- netsh winsock reset
- netsh int ip reset
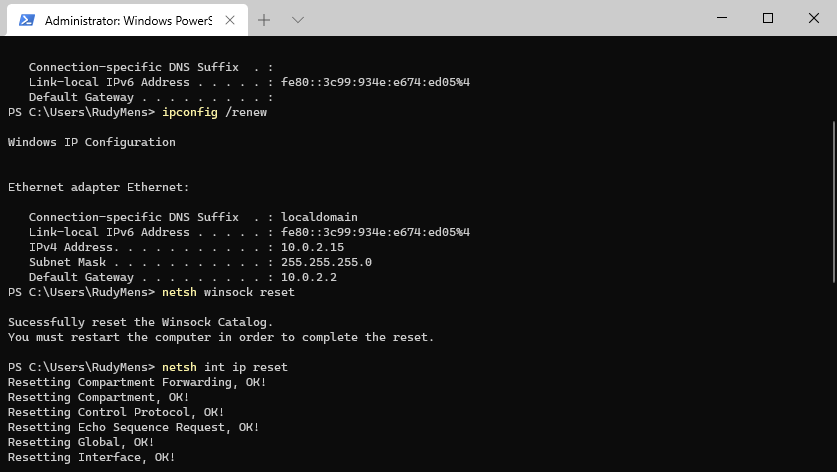
Refresh the webpage to see if the problem is resolved.
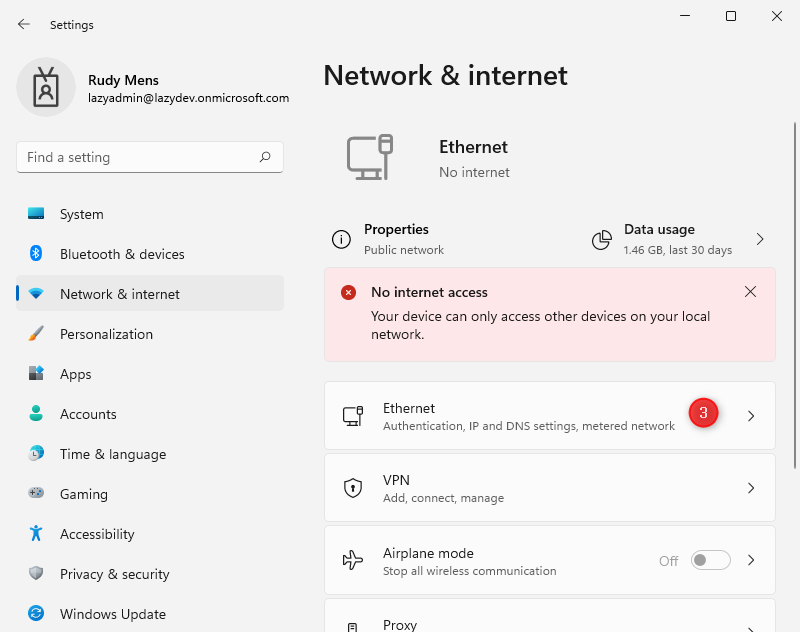
2. Change your DNS server
The DNS server that your computer uses is assigned by the modem or router of the network that you are connected with. For your home network is this most of the time the DNS server from your internet service provider.
There could be an issue with the DNS server. DNS records change all the time, but some DNS servers are slow with updating their record. So we are going to change the DNS server that your computer is using to the best DNS server that is available.
You can safely do this, your computer will still work on other networks as well. The steps are slightly different in Windows 11, so I have created different steps for Windows 10 and 11.
Steps for Windows 10 (scroll down for the steps in Windows 11)
- Right-click your startmenu
- Select Network Connections
- Click on Change adapter options
- Double-click on your (wireless) network adapter
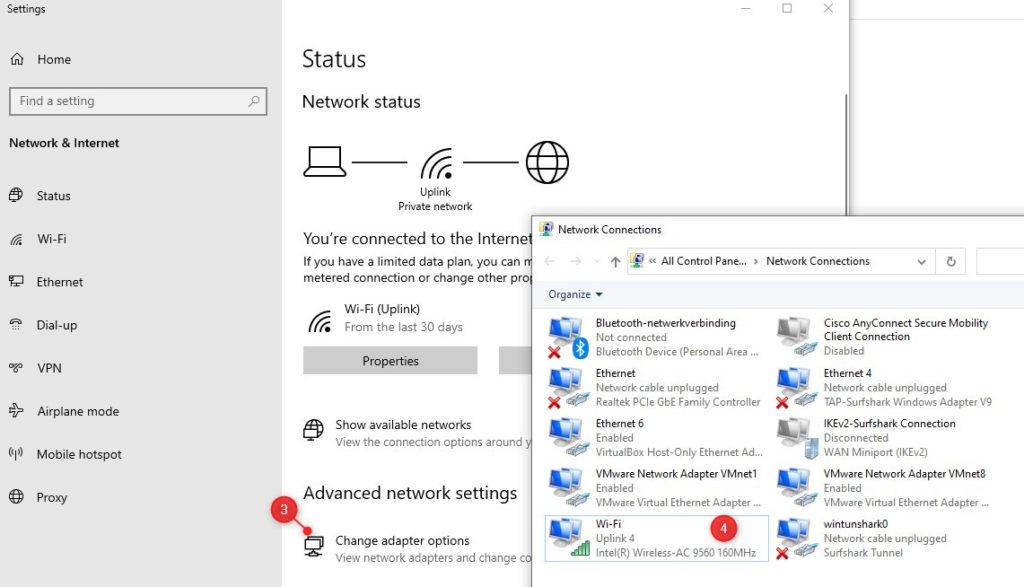
- Click on Properties
- Double-click on Internet Protocol version 4 (TCP/IPv4)
- Enable Use the following DNS servers addresses
- Enter 1.1.1.1 for preferred and 1.0.0.1 for alternate DNS Server
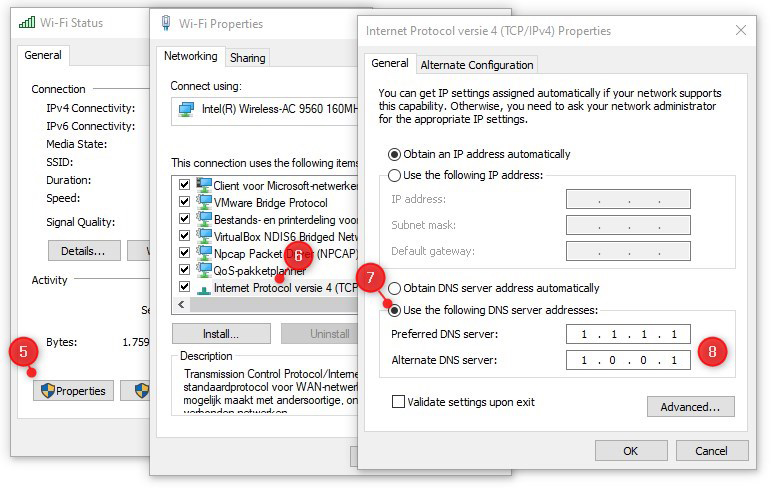
Click Ok to apply the settings and close all the screens.
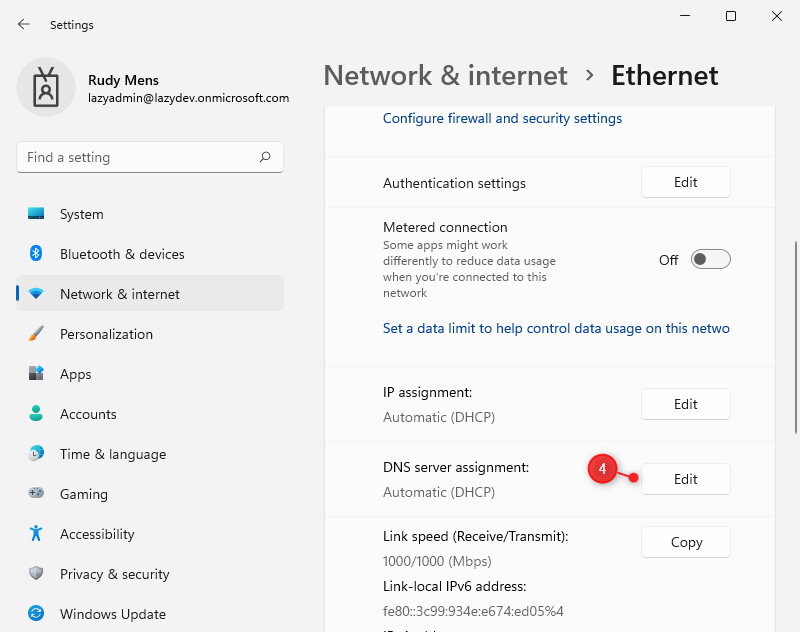
Steps for Windows 11
- Right-click the start menu or press Windows key + X
- Click on network connections
- Open Ethernet settings
- Scroll down and Edit the DNS Server Assignment
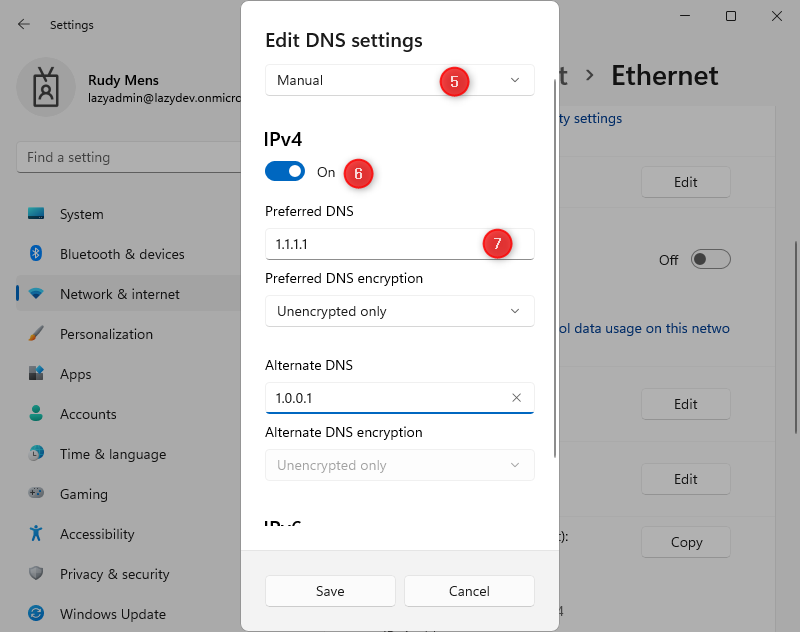
- Change the setting to Manual
- Enable IPv4
- Enter 1.1.1.1 as preferred DNS and 1.0.0.1 as alternate DNS
Restart your browser and see if you are able to visit the webpage in question.
If this solution worked for you and the issue occurred in your home network, then change the DNS server settings in your router as well. This way other network devices in your house won’t have any issues either.
3. Disable IPv6 to resolve dns_probe_finished_bad_config
Another command cause of DNS issues like dns_probe_finished_bad_config is the use of IPv6. This new network protocol is turned on by default on most computers these days, but not all networks are configured correctly yet.
So your computer might be using the new IPv6 protocol but is this way unable to resolve the DNS server. We can safely turn off IPv6 in Windows using the following steps (again different steps for Windows 10 and 11)
First steps for Windows 10:
- Right-click on start or press Windows key + X
- Open Network Connections
- Click on Change adapter options
Continue below the steps for Windows 11
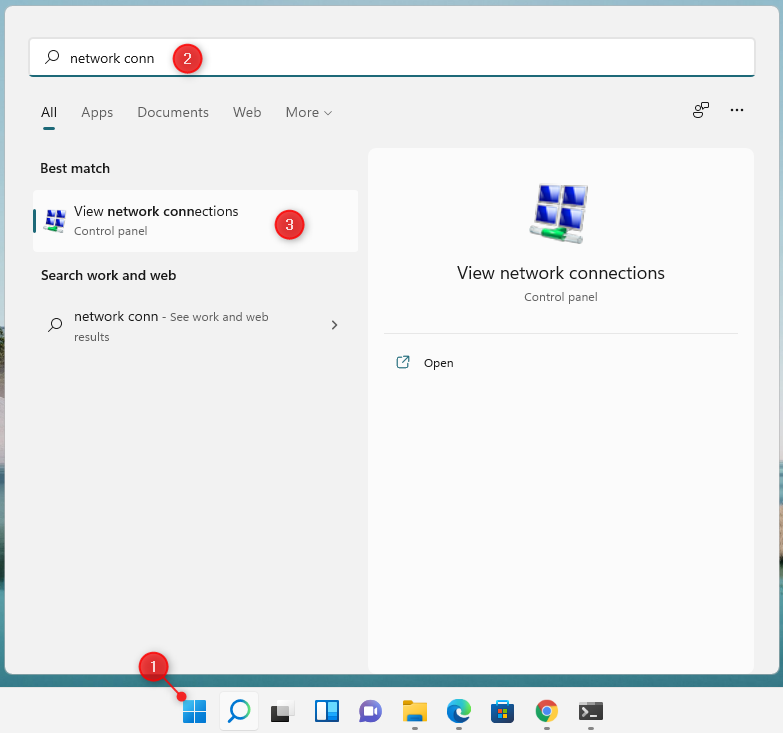
First steps for Windows 11
- Open the start menu
- Search for Network Connections
- Open View network connections
Continue here for both Windows 10 and 11
- Double-click on your (wireless) network adapter
- Click Properties
- Turn off Internet Protocol version 6 (TCP/IPv6)
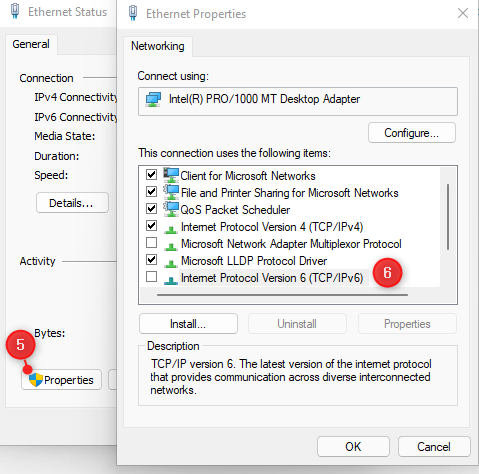
Click Ok to close all the screens and restart your computer. Test the website again to see if the error is resolved.
4. Disable Extensions in Chrome
Browser extensions in Chrome can be de cause of DNS-related issues. Some extensions, like ad blockers, for example, interact with the connection to the website. They block or alter requests send by your browser, resulting in errors like dns_probe_finished_bad_config.
We can simply disable these extensions temporarily to see if they are the cause of the issue.
- Open Chrome and click on Options
- Expand More tools
- Select Extensions
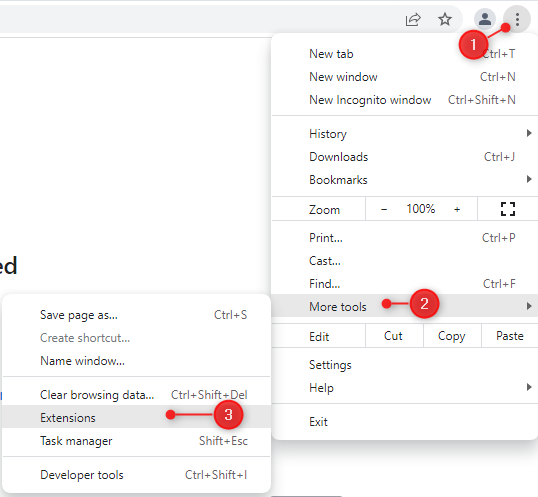
Turn off all extensions and reload the webpage in question. If this solved the problem, then turn the extension on one by one and test between every step if the problem returns. This way you can determine which extension caused the issue.
5. Clear the Chrome DNS Cache
Often not the cause of the issue, but worth a try if all the other steps didn’t help. Chrome also has its own DNS cache. Records in this cache can be outdated or wrong as well. So just to be sure we are going to clear the host cache.
- Open Chrome
- Enter the following address in the addressbar: chrome://net-internals/#dns
- Click on Clear host cache
Reload the webpage to check if the issue is resolved.
6. Turn off internet security software
Keeping your computer secure is important, but some internet security software, like Norton Internet Security, can cause problems with your internet connection. It’s worth a try to turn the software off to see if this resolves the issue “dns probe finished bad config” in Google Chrome
7. Scan your computer for Malware
Some malware is capable of changing your DNS settings, preventing you from accessing the internet (or redirecting your internet traffic). If all the steps above didn’t solve the error dns_probe_finished_bad_config then it is a good idea to run an anti-malware scanner.
A good malware scanner is for example Hitmanpro which you can run with the free trial to see if your computer is infected or not.
Wrapping Up
The Google Chrome error “dns probe finished bad config” is related to an issue with your DNS server. With the steps above you should be able to get back online. Other options that you can try are to restart your router/modem or try a different browser.
If you have any questions, just drop a comment below.


Thanks. Did the trick!
Why if I attached a LAN cable, still it doesn’t t work? However, with just the Wifi it’s okay and works well by following all the given instructions
Thank you so much, the solution worked
Thanks a lot! After surfing and trying for so many unsuccessful solutions, I was able to have it fixed by changing the DNS server with the addresses you specified. Hoping I don’t have to end up changing it on the router as well since that might be a little more tricky.