When you have an environment with a lot of notebooks or other mobile devices that come and go, then stale DNS records are bound to happen. Stale DNS records can cause problems with name resolution, so it’s important to clean up the old DNS records, which we can do automatically with DNS Scavenging.
Stale DNS records are DNS records that still point to the old IP Address of a device. This can cause problems when you want to take over the device or deploy software on it for example. To automatically clean up the old DNS records we need to configure DNS Aging and Scavenging correctly.
In this article
In this article, we are going to prep our DNS records and configure DNS Aging and Scavenging.
How does DNS Scavenging work?
Before we can configure DNS Scavenging correctly, we need to understand how it works. Scavenging removes stale (old) DNS records from your DNS server, but how does it know which records are old? This is where DNS aging comes in. DNS Aging determines when a DNS record is marked as old (stale).
But to configure the DNS aging correctly, we need to know how our DHCP Lease time. A common DHCP lease time is 8 days. This means that a client gets an IP Address assigned for a period of 8 days. It can only renew the lease after 4 days. This means that the client won’t renew the IP Address for at least 4 days.
DNS Aging
With the lease time given, let’s take a look at DNS Aging. Aging is a feature that identifies stale DNS records. It uses the DNS record timestamp to calculate the record age and uses two intervals to determine if a record is stale:
- Non-Refresh interval – A period in which a DNS record cannot be refreshed.
- Refresh interval – A period in which a record could be refreshed.
When we talk about refreshing the record, we don’t mean changing the DNS name or IP Address but refreshing the record timestamp. The timestamp can’t be updated during the non-refresh interval. This reduces the replication traffic on the network because a Windows client will try to update the timestamp every 24 hours.
Given that DHCP records won’t be renewed during the first 50% of the lease time (4 days in our example), we can set the Non-Refresh interval to 4 days. If you have a DHCP lease time of 7 days for example, then set the non-refresh interval to 3 days.
During the renewal period of the DHCP lease time, we can also want to allow the DNS record timestamp to be refreshed, so the Refresh Interval should match the remaining days of the DHCP lease time:
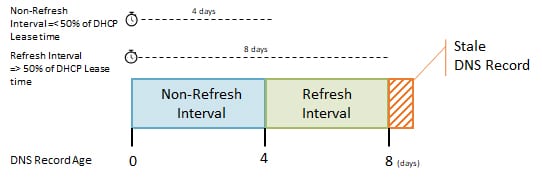
If the record isn’t refreshed after 8 days, then it will be marked stale. This is an indication that the record can be deleted. But if the record is refreshed at day 5 for example, then a new period of 8 days will start again, starting with the Non-Refresh interval.
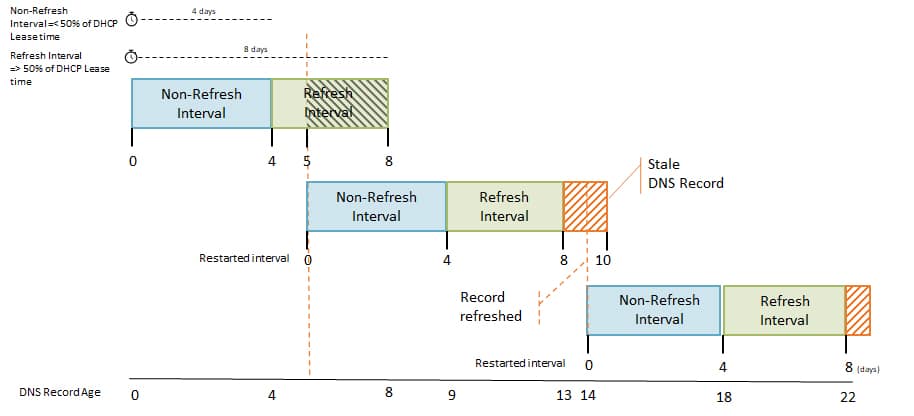
Records can even be refreshed during the stale period. If the record isn’t deleted yet by the scavenging service during the stale period, it can still be renewed.
DNS Scavenging
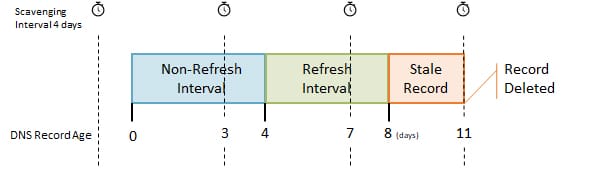
DNS Scavenging is used to actually clean up the stale DNS records. Scavenging is configured for the whole DNS server but also needs to be enabled per DNS zone. The scavenging interval is independent of the Non-refresh and refresh intervals.
This means that if you set the scavenging period to 7 days, then the scavenging service will run every 7 days. It will not delete a stale record after 7 days exactly. To know when the next scavenging cycle will run we can use the PowerShell cmdlet Get-DnsServerScavenging:
Get-DnsServerScavenging

# Result
NoRefreshInterval  : 7.00:00:00
RefreshInterval    : 7.00:00:00
ScavengingInterval : 7.00:00:00
ScavengingState    : True
LastScavengeTime   : 4/11/2023 4:27:43 AM

# Or let PowerShell calculate the next day:
$scavange = Get-DnsServerScavenging
(Get-Date($scavange.LastScavengeTime)).AddDays($scavange.ScavengingInterval.days)

# Result
Tuesday, April 18, 2023 4:27:43 AM
We can see in the results that the interval is set to 7 days, and the Last Scavenge Time was the 11th of April. So on April 18th, it will run again.
In the example below I have set the scavenging interval to 4 days. What we can see here is that a stale record is deleted on day 11, and not exactly after 8 days (Non-Refresh Interval + Refresh Interval).
Step 1 – Preparing your DNS Records
Before we can enable DNS Aging and Scavenging on our server we first need to prepare our DNS records. Because aging and scavenging are done based on the timestamp of DNS records. And especially in older environments you sometimes see DNS records that should be static but have timestamps.
If those records were deleted by the scavenging service, then it’s possible that an application or server won’t be reachable. Besides checking for static records, we also should make a backup/export of the DNS records. This way you can always look up the old records in case they are accidentally deleted.
- Open the DNS Manager
- Navigate to your DNS zone
- Look for any records that should be static, but have timestamps, for example, servers or applications
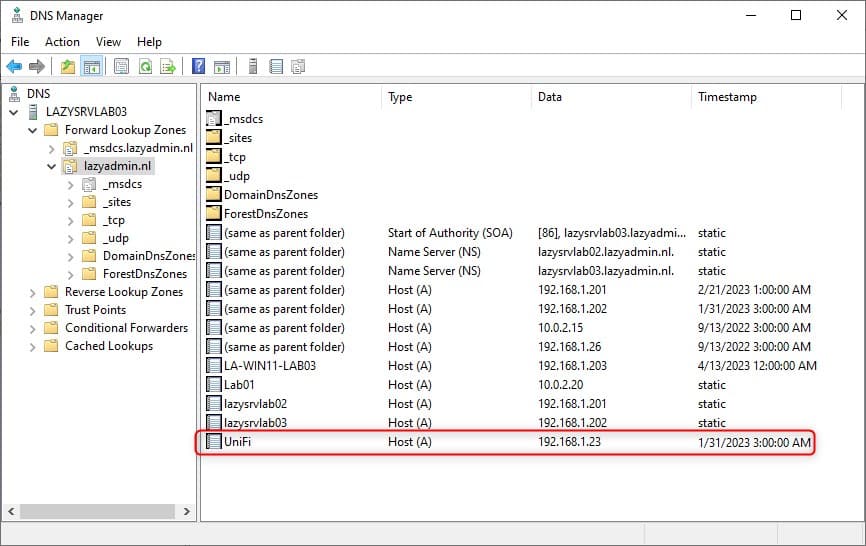
- Right-click on the record and choose Properties
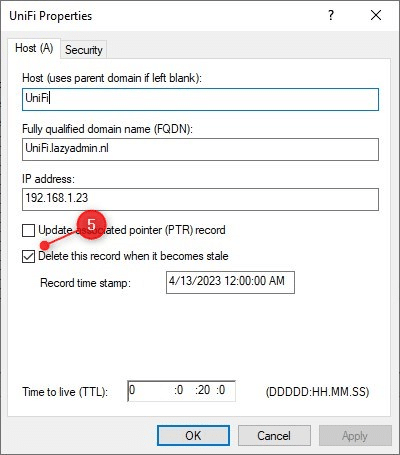
- Remove the checkbox “Delete this record when it becomes stale”
Tip
If you don’t see the option “Delete this record when it becomes stale” then you need to enable Advanced View in the DNS Manager: Click on View > Advanced
Export DNS Records
Next, we are going to export the DNS records to a CSV file. There is an export function in the DNS manager, but that exports the records to a TXT file which is harder to read. So we are going to use PowerShell to export the DNS zone to a CSV file:
Get-DnsServerResourceRecord -ZoneName 'lazyadmin.nl' | ForEach {
    [pscustomobject]@{
        HostName   = $_.hostname
        TimeStamp  = $_.timestamp
        RecordType = $_.recordtype
        RecordData = $_.RecordData.IPv4Address.IPAddressToString}
} | Export-Csv "c:\DNSRecords.csv" -NoTypeInformation
I you have multiple DNS zones, then you will need to run this for each zone.
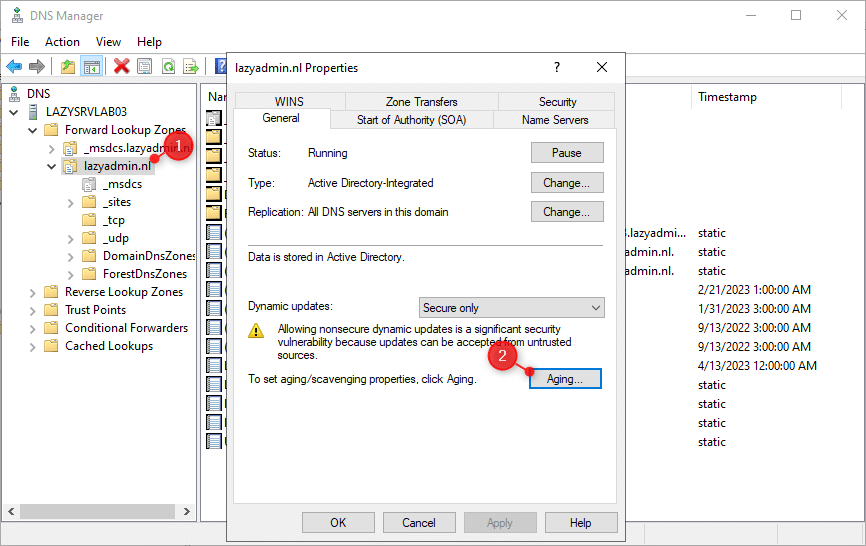
Step 2 – Enable DNS Aging per Zone
With the DNS records checked, we can configure the DNS Aging. We will need to do this per DNS zone. In most environments, you will have only one zone where this is required, and that is your primary domain name under the Forward Lookup Zones.
- Right-Click on your DNS zone and choose properties
- On the general tab, click on Aging
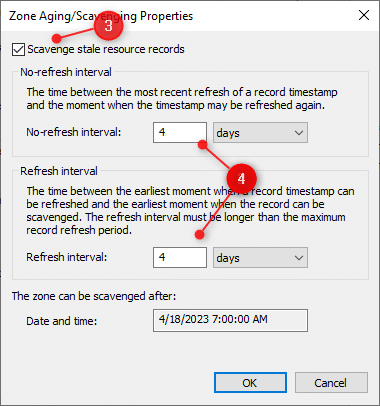
We can now configure the No-refresh interval and refresh interval. I have a DHCP lease time of 8 days, so configured both intervals to 4 days. If you have an uneven number for the DHCP lease time, then make sure that the refresh interval is higher than the no-refresh. So for example, with a DHCP lease time of 7 days, set the No-refresh to 3, and refresh to 4.
Note
The No-Refresh Interval + Refresh interval should be equal or less then your DHCP lease time. Where No-Refresh Interval is equal or smaller then the Refresh interval.
- Enable Scavenge stale resource records
- Set the No-refresh interval and refresh interval
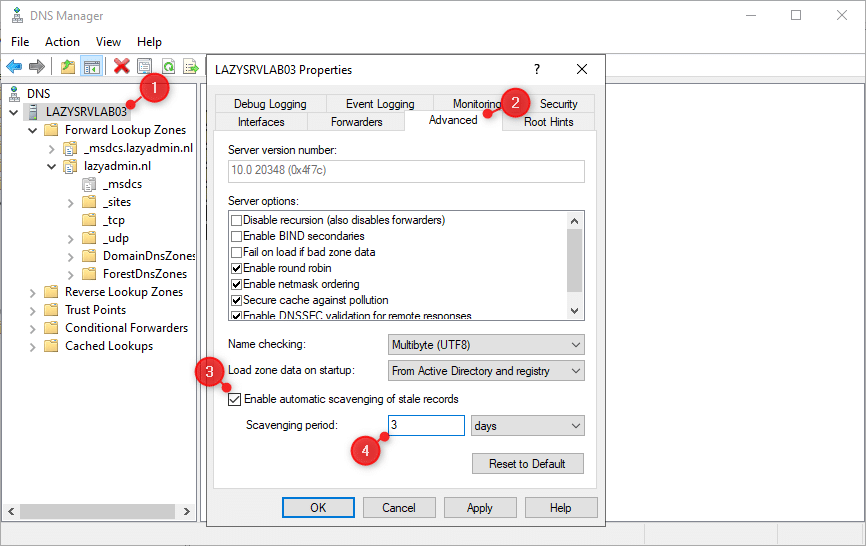
Step 3 – Enable DNS Scavenging
With aging configured for the DNS zone, we can now enable DNS Scavenging on the server. Keep the scavenging period lower than the DHCP Lease time. You could set it even to 1 day, but that could cause a lot of replication traffic depending on your environment.
- Right-Click on your DNS server and choose properties
- Open the Advanced tab
- Enable automatic scavenging of stale records
- Set the scavenging period to 3 days for example
Wrapping Up
Keeping your DNS records cleaned up helps with preventing name resolution errors in your network. Make sure that you thoroughly check your DNS records before you enable DNS aging and scavenging, otherwise, you might run into issues.
I hope you found this article helpful, if you have any questions, just drop a comment below.


H Rudy,
When would be a setup in an environment when I have over 50 DHCP Scopes, and some lease times are at the MS defaults of 8 days. Other scopes are used solely for Wi-Fi and their lease times are 8 hours.
What would be a good setup for DNS scavenging in this scenario.
Thanks,
Eric
You take the shortest leasetime as the starting point. Because that scope will have the most stale records probably.
Great, illustrative article. Thanks.
Hi,
Nice article and I have been using this as the basis for trying to sort out one of our DNS zones that has scavenging set but at the DNS server level, scavenging has not been enabled (as you can image in a large environment there are thousands of records). I would like to be able to test the scavenging first to see what records would be purged, I found one article that talked about using “dnscmd /startscavenging /test” but I cannot find any other reference to this (and not prepared to test in the production environment – yes that’s right….. no pre-prod/test env’s). Any ideas if this is a valid command???
Cheers
/test isn’t a valid parameter indeed. You could try
Start-DnsServerScavenging -whatif. But I am unsure if it would show which records it would remove.