As a sysadmin, I try to automate as much as possible of my daily tasks. One of the biggest time savers for me was when I started using PDQ Deploy back in 2016. Before that we were installing the software manually, using images (which were always outdated), and trying to stay up-to-date with the latest software patches.
PDQ Deploy combined with PDQ Inventory is a powerful patch management system that allows you to fully automate your software installation and patch deployment. One of the biggest advantages is that PDQ is pretty easy to set up and maintain. And the large package library that comes with the Enterprise license really helps a lot with that.
In this article
In this article, we are going to take a look at how to get started with PDQ Deploy and Inventory, creating our first packages, and setting up a baseline deployment.
PDQ Deploy and Inventory
PDQ Deploy and Inventory are two products that are bought together. Deploy is used to automate your patch management, install software and deploy custom scripts on your endpoints. Inventory scans, collects, and organizes your endpoints in collections.
The two products together form a powerful deployment system that allows you to install packages on targeted clients when needed. For example, when there is a new version of Autodesk Revit released. Before you had to install the new version manually on all workstations.
With Inventory, we can automatically create a collection of machines, that already have Revit 2022. In Deploy, we can create a new package for Revit 2023, as explained in this excellent guide. Now we only have to schedule the installation in PDQ Deploy, and all workstations that have Revit 2022, will automatically get the new version.
Creating these packages always takes a bit of time. But once you have your library built up with your custom packages, you will see that it becomes a huge time-saver when installing or updating software on the endpoints.
Free vs Paid version
Good to know, there is also a free version for both Deploy and Inventory available. Now I have to say the paid version, which costs $1500 per sysadmin for both tools, is really great value for money. But if you are on a tight budget then the free version can be a good start.
One of the biggest advantages of the paid version is the full package library in PDQ Deploy. This library contains more than 250 packages with the most popular software that is always up-to-date and managed by PDQ. In the Free version, you will find some packages in the library, but this is mainly the .Net Framework and a handful of other tools.
| PDQ Inventory Feature | Free | Paid |
|---|---|---|
| Add computer by name | X | X |
| Active Directory Sync | X | |
| Network Discovery | X | |
| Standard Scan Information | X | X |
| Full Scan Information | X | |
| Static Collections | X | X |
| Dynamic Collections | X | X |
| Remote Tools (Reboot, shutdown, Wake, VNC, Run Command) | X | X |
| Built-in Reports | X | X |
| Custom Reports | X | |
| Auto Reports | X | |
| Collection Library | X | |
| Additional Tools Library | X |
| PDQ Deploy Feature | Free | Paid |
|---|---|---|
| Package Library | X | X |
| – Full Library | X | |
| Create Custom Package | X | X |
| – Install steps | X | X |
| – Command or PowerShell steps | X | |
| – Nested Packages | X | |
| – File Copy | X | |
| – Message Step | X | |
| – Reboot, Sleep, Logoff | X | |
| – Package and Step Conditions | X | |
| Deploy Once | X | X |
| Scheduled deployments | X | |
| Retry Schedule | X | |
| Pull Copy Mode (Client downloads file from the repository) | X | |
| Notifications | X | |
| Deployment Reports | X | X |
Automatically Installing new Computers
Every company has a couple of default applications that are installed on all computers. We call this a baseline. This is the minimal software that is required, like your company’s anti-virus scanner, PDF reader, browser, Office, etc. We can use PDQ Inventory and Deploy to automatically install this baseline on all new computers.
We do this by watching a specified OU in the Active Directory, any computer placed in the OU will get the baseline installed automatically, and once completed move it to a different OU.
I will explain more about setting up a baseline later in the article.
Getting Started with PDQ Inventory
So the first step is to set up and configure our PDQ Inventory installation. During the installation, you will need to select the license that you want to use and enter domain administrator credentials. I recommend creating a unique service account for this in your Active Directory with the appropriate permission (administrator access on the clients).
Tip
A better solution is to use LAPS (Local Administrator Password Solution), but you can only use it with PDQ Deploy Enterprise and you will need to use the push copy mode.
The next step is to connect PDQ Inventory to the Active Directory and select the containers you want to scan.
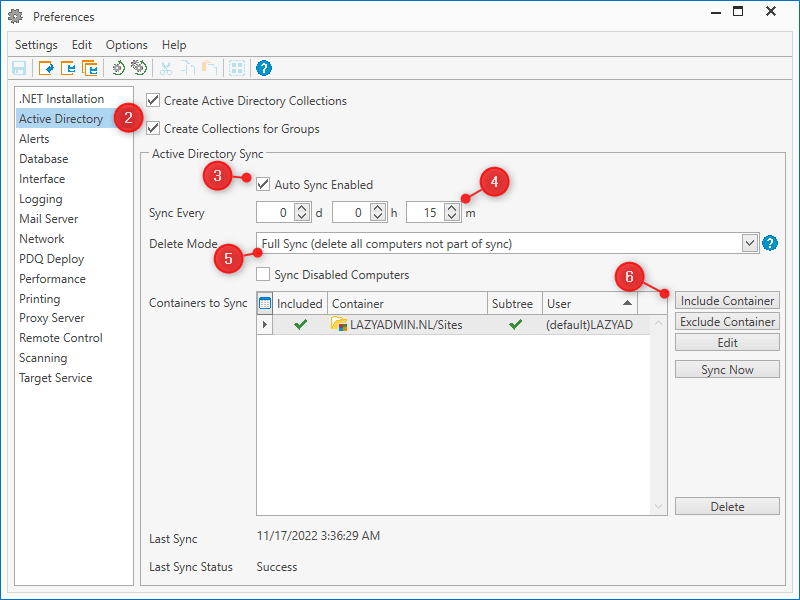
- Select Options > Preferences
- Make sure that Active Directory is selected on the left side
- Enable Auto Sync
- Set the sync to every 15 min
- Delete mode, Full Sync, so inventory also cleans up old deleted computers
- Click Include Container and select the OU with computers (repeat this for every OU needed)
.Net Framework is required by the clients to run the Inventory scans. On most Windows 10 and 11 devices is this installed by default, but to be sure, click on .Net Installation in the preferences and enable Automatically install .Net. Also, make sure that the install file is selected, or otherwise download .Net.
Creating Collections
Collection in PDQ Inventory allows you to organize and group your computers, based on installed applications, application details (version for example), operating system details, or hardware specifications. It comes with a lot of commonly used collections by default, which is great. But we can also create our own collections.
For example, we can create a collection based on the Windows version number. This way we can easily target and update computers that are running behind with the feature updates.
- Expand Workstation
- Right-click on Windows 11 and select New > Dynamic Collection
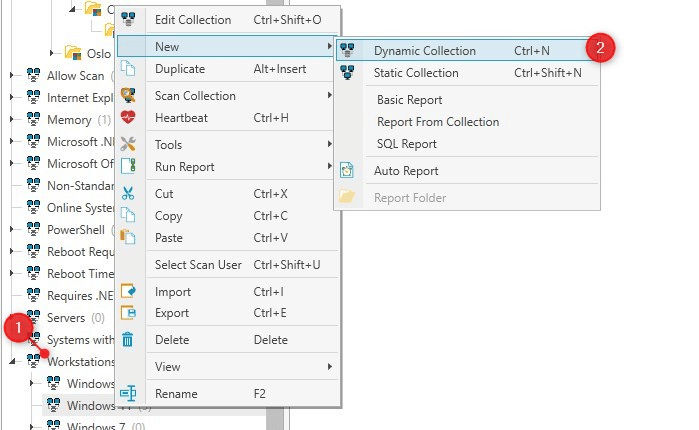
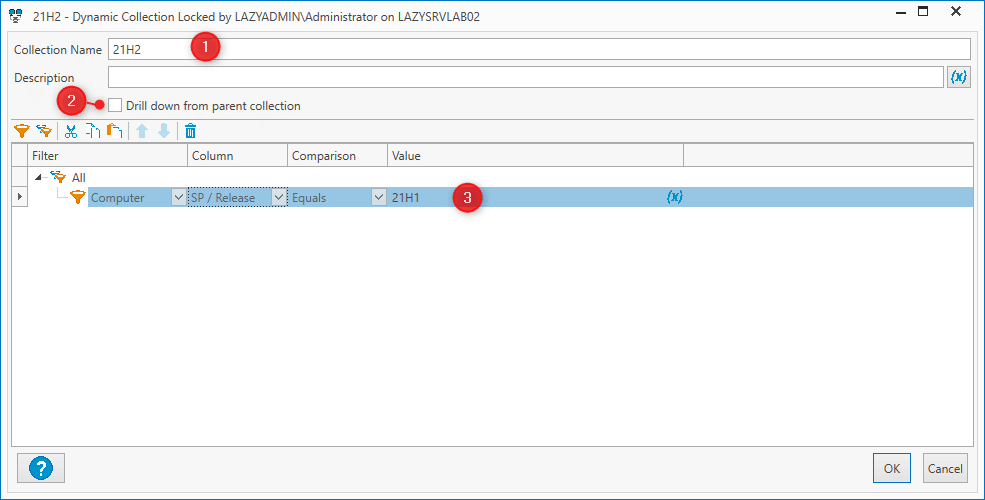
- Give your collection a name
- Enable Drill down from parent collection. This way only Windows 11 machines are selected in this case.
- Create a filter, where the Computer > SP/Release > equals 21H2
You will now get a list of all Windows 11 machines that are running on 21H2. Dynamic lists will automatically update, so machines that you upgrade to 21H2, will automatically be added to the list.
We can do the same for applications. Only what I like to do here is create first a dynamic collection based on the application name. This will give all computers that have, for example, DisplayLink, installed. Then create two nested dynamic collections based on the version numbers of the application. One will contain all clients with the latest version number and the other all clients that have a lower version. This way we can easily update outdated clients.
- First, create a new dynamic collection and set the filter to Application > Name > Contains, and as a value the name of the application
- Create a new dynamic collection under the one that we just created. Name it “latest” and add two filters:
– Application > Name > Contains > and as value the name of the applications
– Application > Version > Version Equals and as value the version number. - The last step is to create a dynamic collection with the name Old. Here we will also add two filters:
– Application > Name > Contains > and as value the name of the applications
– Application > Version > Version Lower Than and as value the version number.
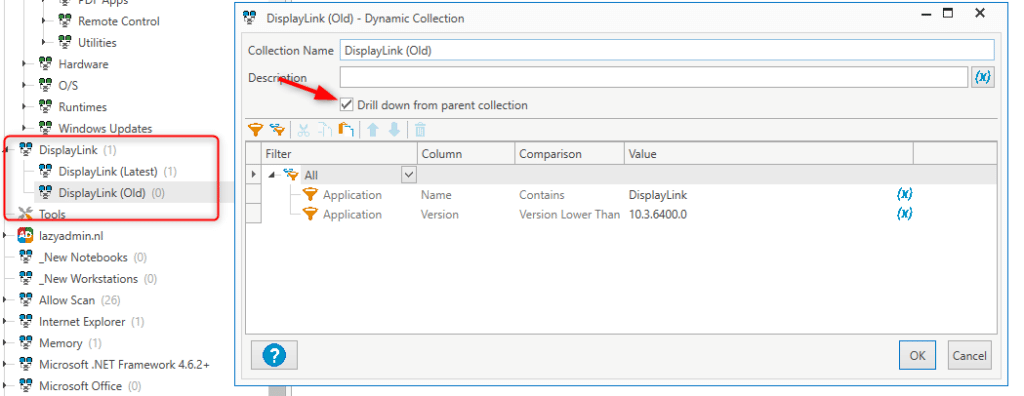
Note that I selected the Drill down from the parent collection option. This way the filters are only run against the computers from the parent collection, so PDQ Inventory doesn’t have to go through all computers again, but only check the computers that have DisplayLink installed.
Read more about the drill-down function, and what it does and doesn’t do in this guide.
Getting Started with PDQ Deploy
The install configuration of PDQ Deploy is similar to Inventory. During the setup, you will need to enter credentials that Deploy can use the install software on the client. You can use the same service account as you have created for Inventory.
After the installation, we might need to make a couple of changes in the preferences depending on your environment. Open the preferences under Options and check the following settings:
- Auto Download – Downloads automatically new versions of packages after 7 days by default. This is in most cases fine, it will download and update Chrome on the clients for example after 7 days automatically.
- Deployments
- Default Timeout for packages is 60 min. You can change this per package or increase it here. This will kill the installation if it hasn’t finished within 60 minutes.
- Scan after deployment – Change it to Applications. No need to do a full scan after installing a package
- Offline Status – Enable Ping before deployment to check if a client is online before attempting to install a package. Optional – Enable Send Wake-on-LAN to wake up computers if your clients support it.
- Performance
- Concurrent Targets Limit – Increase or decrease the concurrent installations depending on your server specifications and available bandwidth.
- Copy Mode – Important one – Set it to Push if the repository is on the same server as PDQ Deploy. If you are using DFS shares or have the repository in a central location, then use Pull mode.
Auto Download Packages
The enterprise version of PDQ Deploy comes with a package library of more than 250 applications. A lot of these applications, like Chrome, and Adobe Reader, are updated regularly and you often want to install these updates also quickly on your clients.
To do this we can download these packages as auto downloads. This way, PDQ will automatically download a new version of the package within 7 days after it’s released. Later we will combine this with a schedule to install the applications.
- Open the package library
- Select the applications that you want to auto download
- Click Download Selected in the top right corner
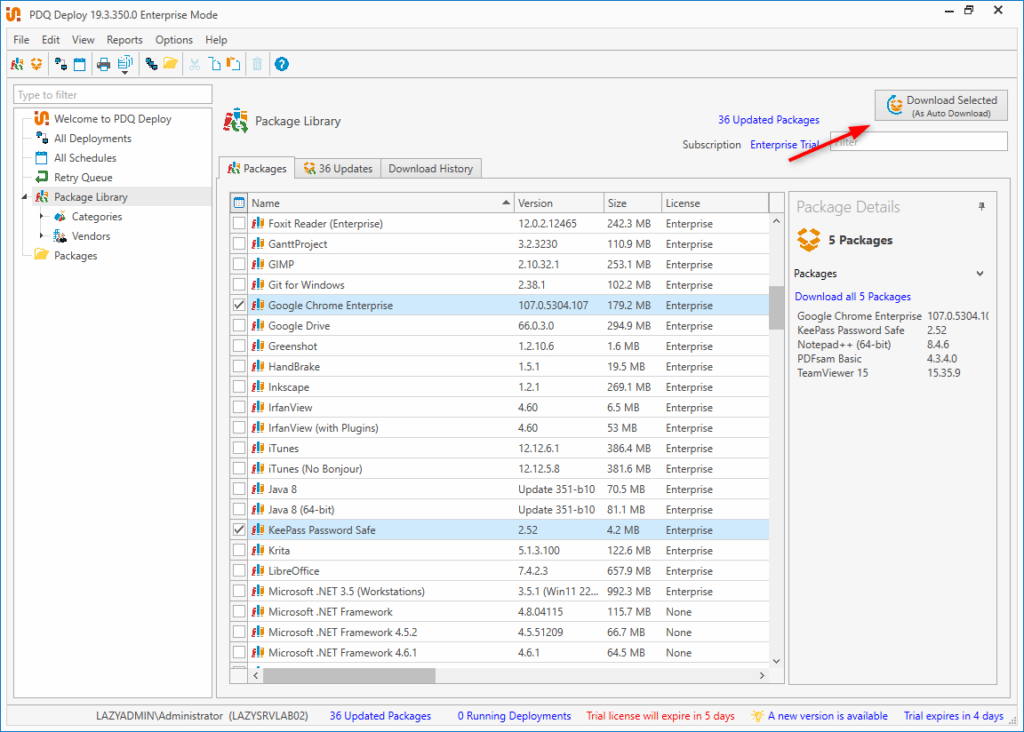
The downloaded packages will appear on the left side, under packages.
Creating your own Packages
In both the free and enterprise version of PDQ, you can create your own packages. Now creating packages isn’t really difficult, but sometimes you will need to search the documentation or do a bit of trial and error to find the correct parameters to use for your installation.
When creating packages you want to run the installation in silent mode. This means that the installation is done in the background without the need for user interaction. If you have an MSI installation file, then this is pretty straightforward. But with .exe files, you sometimes first need to unpack the .exe file or run the .exe locally with the parameter /? behind it.
Tip
Make sure you check the documentation of the software to find the correct parameters to use for a silent install. Sometime you can preconfigure the software, for example, add license keys, or a server connection address, during the installation.
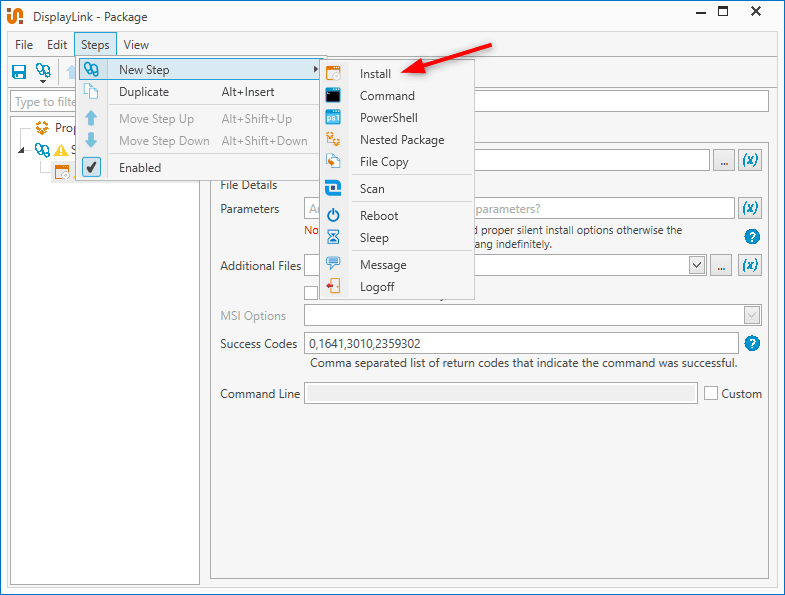
Packages can exist out of one or more steps that need to be performed for the installation. This can be an install step, where you actually install an MSI file for example. But also a message, (PowerShell) command, reboot, file copy, or nested step.
- In PDQ Deploy, Click File > New Package (or right-click in the sidebar)
- Enter the name of the package and optional the version and description
- Click on Steps > New Step and choose Install
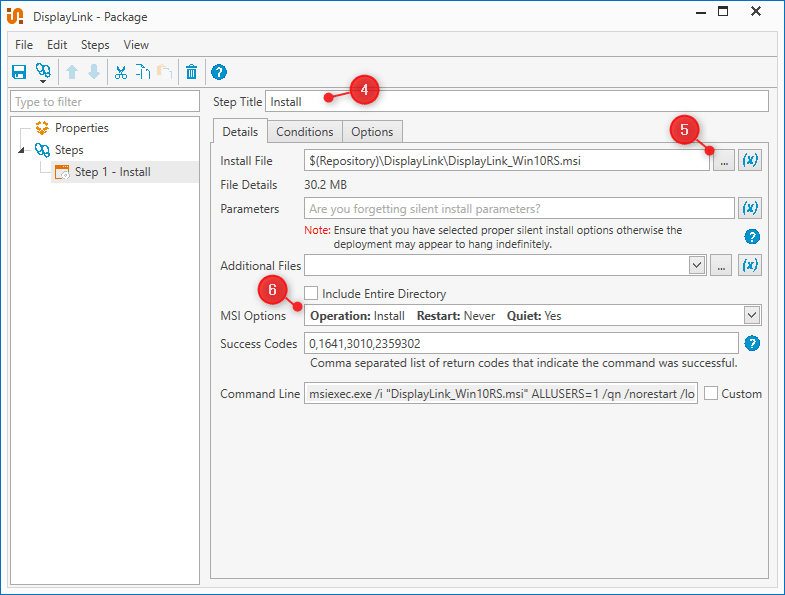
- Enter a step title, which describes what the steps do
- Select the installation file and make sure that the path starts with $(repository)
- When using an MSI file, the MSI options are already set correctly for a silent install. But if you are using a .exe file, you will need to add the silent install parameters in the parameters field.
Note
$(repository) is a shorthand for the default repository location %PUBLIC%\Documents\Admin Arsenal\PDQ Deploy\Repository. Using the variable in your packages isn’t only shorter, but also allows you to change the repository location later easily.
For each step, we can also add conditions. These conditions can be a specific OS Architecture version, for example (32/64bit) or the logged-on state. When we need to restart a computer for example, then we want to make sure that nobody is logged on. So we can add a condition to the step to only run when no user is logged on:
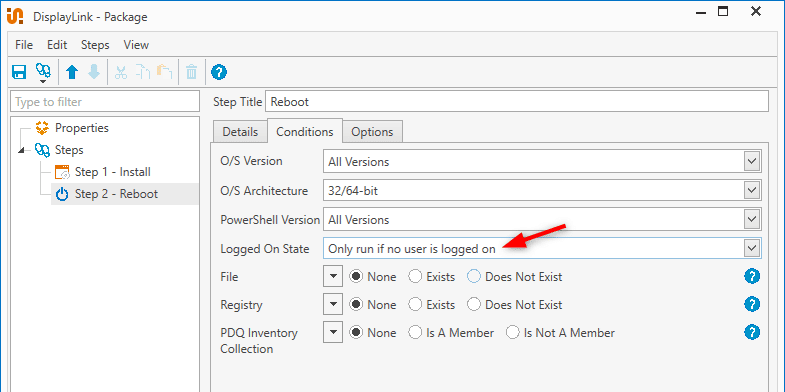
When you have added the necessary steps for your package, click save in the top left corner. Make sure that you test your packages on a test machine before deploying them to production machines.
Deploying Packages
Installing (deploying) packages is where PDQ Deploy really starts to show its power. We have a variety of options when it comes to deploying packages. You can deploy the package to single or multiple computers, to a collection from PDQ Inventory, or to all computers in a specific OU in the Active Directory.
Besides that we also have multiple options for when to install the package:
- Deploy Now
- Schedule deployment
- Once
- Every n days/hours
- Daily / Weekly / Monthly
- Heartbeat (when the endpoint comes online)
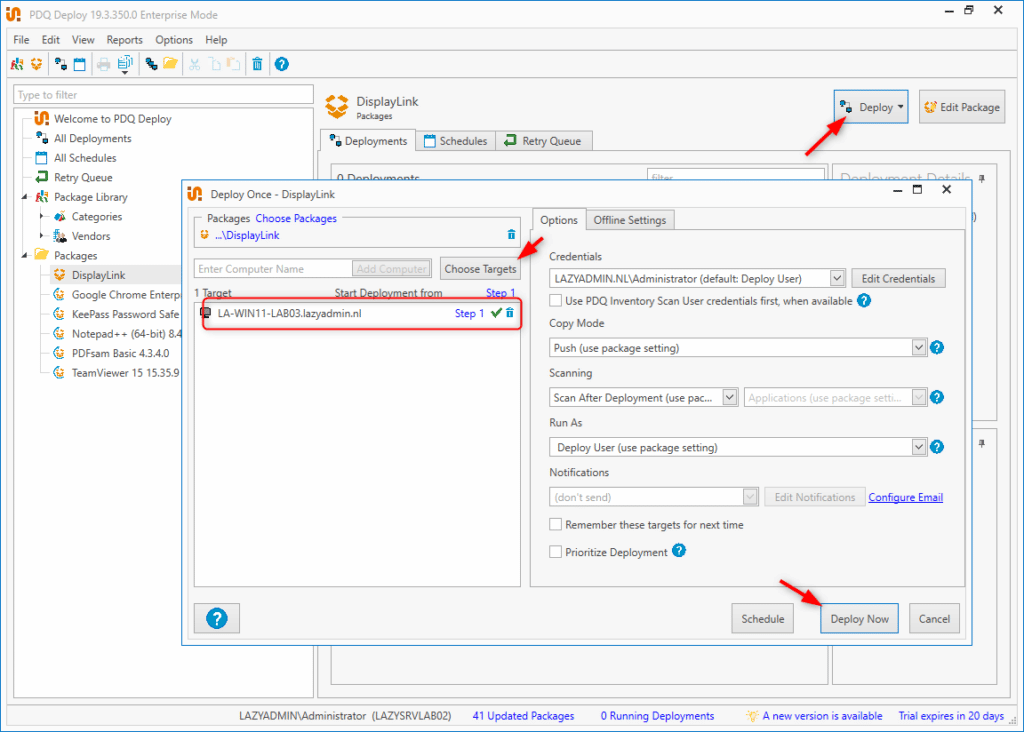
So for example, to install our newly created package to a single computer, we can select the package, and click on Deploy > Deploy Once (or press Ctrl + D). If you know the computer’s name, then you can simply enter it or look it up in Inventory.
All targets that you select or entered will be listed. You will see a green checkmark behind the computer name if the target is online. Click on Deploy Now to install the package immediately.
If you have selected multiple targets (or a collection) then some of the targets might be offline. This isn’t an issue, you can still use the deploy now feature. Under the tab Offline Settings, you can configure what PDQ should do with the offline targets. By default, it will retry to deploy it within the next 3 days.
Automatically install packages with Schedules
We can also install packages automatically with schedules. Schedules are a great way to automate your application installation and make sure that all computers have the latest version of an application.
For example, we want to make sure that our computers have the latest version of DisplayLink installed. We have created the Inventory collection before which tracks the computers that have the latest or an old version of Display Link.
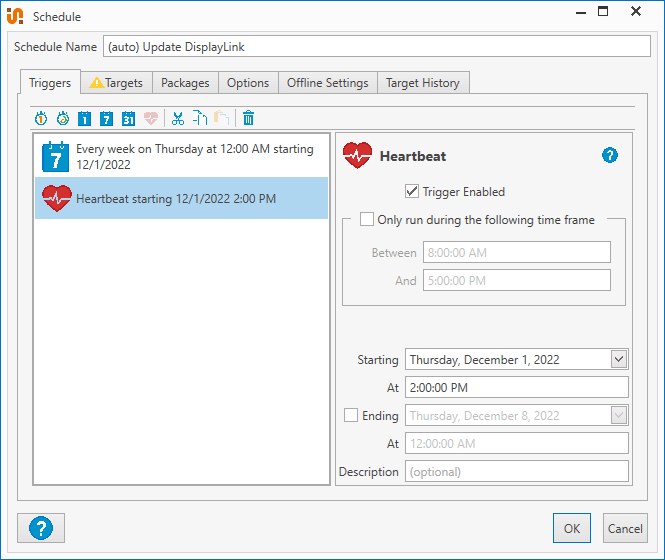
In PDQ Deploy we can create a new schedule, which we will need to give a name. What I like to do is start the name of my update schedules with (auto) and schedules that only run once with (once). This way it’s easier to clean up obsolete schedules later on.
Setting the Triggers
We need to determine the trigger(s) for our schedule. A good setup is to run the updates on a weekly basis around lunchtime for example. This way the majority of the computers are updated when they are not used.
For the computers that are offline, we will also add a heartbeat trigger. This way they will still update when they come online. The retry queue will also partially tackle this, but the problem with the retry queue is that it only runs n amounts of times (by default 72 times, each hour for the next 3 days).
Choosing the Targets
For the targets, we are going to select our Inventory collection DisplayLink (old). This contains all computers that still have an old version of DisplayLink.

Packages and Options
In this case, we only selected one package, because we target computers with an old version of DisplayLink. But it’s also possible to attach multiple packages to one schedule.
We can also configure options like notifications, offline settings stop deployment settings.
Create and Install the Baseline Automatically
A baseline is a collection of software that all computers need. So the first step is to create our baseline package in PDQ Deploy.
Create a new package (ctrl + n) and name it Baseline. Next, we will add all the packages we want to install as a nested package. Click on add step and select nested package. Choose the package and repeat this step for every package that you want to install.
Sometimes you will need to add a Sleep or reboot step after a package before you can install the next one. This is a bit of a trial and error.
A couple of useful steps to add is a PowerShell script to enable BitLocker for example. You can add a PowerShell step for this and use the following code:
Enable-Bitlocker -MountPoint c: -UsedSpaceOnly -SkipHardwareTest -RecoveryPasswordProtector
Another useful PowerShell script that I use is to remove default installed Windows apps:
# Windows 10 Default App Removal Script
# src: https://community.spiceworks.com/topic/1777896-remove-pre-installed-apps-from-the-windows-10-all-apps-menu#entry-6116454
#--------------------------------------------------------------------------------------
$apps=@(
    "9E2F88E3.Twitter" #Twitter
    "ClearChannelRadioDigital.iHeartRadio" #iHeartRadio
    "Flipboard.Flipboard" #Flipboard
    "king.com.CandyCrushSodaSaga" #CandyCrushSodaSaga
    "Microsoft.3DBuilder" #3D Printing Software
    "Microsoft.BingFinance" #Bing Finance
    "Microsoft.BingNews" #Bing News
    "Microsoft.BingSports" #Bing Sports
    "Microsoft.CommsPhone" #Communications - Phone App
    "Microsoft.Getstarted" #Get Started Hub
    "Microsoft.Messaging" #Windows Messenger
    "Microsoft.MicrosoftOfficeHub" #Office 2016 Hub
    "Microsoft.MicrosoftSolitaireCollection" #Solitaire
    "Microsoft.Office.OneNote" #OneNote
    "Microsoft.Office.Sway" #Sway Presentation/Collab Software
    "Microsoft.People" #People Hub
    "Microsoft.SkypeApp" #Skype
    "Microsoft.Windows.Phone" #Windows Phone Connector
    "Microsoft.WindowsPhone" #More Windows Phone
    "Microsoft.WindowsSoundRecorder" #Recorder
    # "Microsoft.WindowsStore" #App Store
    "Microsoft.XboxApp" #Xbox
    "Microsoft.ZuneMusic" #Zune or Groove Music
    "Microsoft.ZuneVideo" #Zune Video or Groove Video
    "Microsoft.windowscommunicationsapps" #Default Mail and Calendar Apps
    "Microsoft.MinecraftUWP" #Minecraft
    "ShazamEntertainmentLtd.Shazam" #Shazam
    "Microsoft.FreshPaint" #FreshPaint
    "TheNewYorkTimes.NYTCrossword" #New York Times Crossword
    "Microsoft.ConnectivityStore" #Microsoft WiFi App
)

foreach ($app in $apps) {
    Write-Output $app
    $appVersion = (Get-AppxPackage -Name $app).Version
    if ($appVersion){
      Get-AppxPackage -Name $app -AllUsers | Remove-AppxPackage
    }
    Get-AppXProvisionedPackage -Online | where DisplayName -EQ $app | Remove-AppxProvisionedPackage -Online

    $appPath="$Env:LOCALAPPDATA\Packages\$app*"
    Remove-Item $appPath -Recurse -Force -ErrorAction 0
}
Creating the OU’s in Active Directory
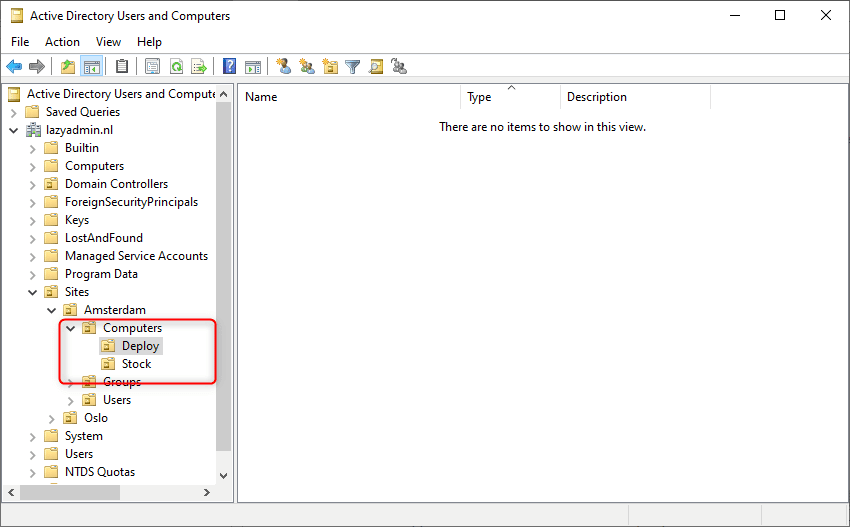
To install the baseline automatically we need to create two OU’s (or at least one of them) in our Active Directory, Deploy, and Stock. We are going to monitor the Deploy OU with PDQ Inventory and create a schedule that will install the baseline on all computers in this OU. When done, we move the computers to the Stock OU.
So in your Active Directory, create the two OU’s in your computers OU:
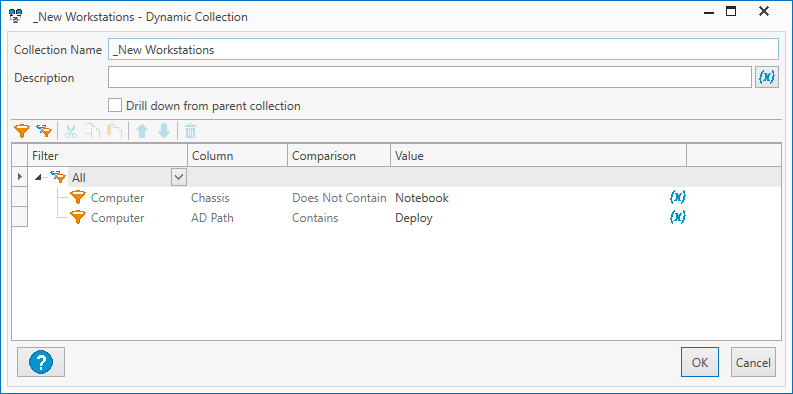
The next step is to create a new dynamic collection in PDQ Inventory. I like to use two collections for this, one to find all new computers and the other for new notebooks. The latter often need additional packages, so I have a Baseline Notebook package, where the first step is the normal Baseline package as a nested step.
For the collection, we can filter the computers based on the Chassis (if you want to split computers and notebooks) and we add another filter for the AD Path, which needs to contain Deploy (the OU name):
Schedule the baseline
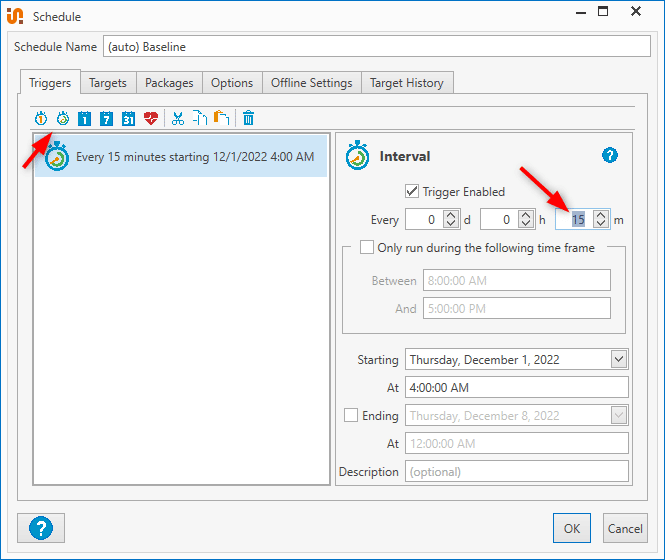
We have set the sync time of PDQ Inventory and AD to 15 minutes. So we can run the schedule every 15 minutes as well. This way, the baseline will automatically start with installing on new computers within this timeframe.
In the schedule, at an Interval Trigger and set it to 15 minutes. For the targets, we select the Dynamic collection that we just created, _New Workstations.
The computer must be moved to a different OU in the Active Directory once the baseline installation is completed. To do this, we can add a PowerShell step in our baseline package:
$path = "OU=Stock,OU=Computers,OU=Oslo,DC=LAZYADMIN,DC=NL"
$session = New-PSSession -computerName LA-SRV-LAB02 # Name of the domain controller
$computer = $env:computername

Invoke-command { import-module activedirectory } -session $session
Invoke-command { Get-ADComputer $Using:computer | Move-ADObject -TargetPath $Using:path } -session $session
So now you only need to place your new computer in the correct OU, and the installation will automatically start. With this setup, you can install multiple computers simultaneously while you are working on other tasks.
Wrapping Up
As mentioned in the beginning, PDQ is really easy to set up and maintain. When you create new packages, make sure that you search the documentation of the software that you want to install for the appropriate silent install options.
If you can’t get it to work, then you can always reach out to the PDQ community where there is a lot of knowledge on deploying software packages silently.
I hope you liked this article, if you have any questions, just drop a comment below.


Your script for removing the windows apps has the -allusers for the get, but not for the remove-appxpackage. When run like that I think the result is it will find the app on any user, but it will still only remove for the logged-on user. Depending on what version of Windows you are deploying on the -allusers may or may not exist for Remove-AppxPackage.
I love the sections about cleaning it out of LocalAppData, I will be adding that to my list for sure.
Hi Jordan,
You are correct that
-allusersis needed to remove the package for all users. Only in this case, I am running the script on a new computer, where only the local administrator account had logged on. And by removing also the provisioned package (Remove-AppxProvisionedPackage), we make sure that the apps won’t be activated/installed for new users.But if you want to use this script on computers that user’s already have logged on to, then the -Allusers is indeed needen.