Azure Automation is one of the most popular tools to run PowerShell scripts in the cloud. You can not only manage your Azure environment with the runbooks but also your Microsoft Office 365 tenant, for example.
Automation is a key part of IT, and as a SysAdmin, you should strive to automate most of your daily/manual tasks. Writing a script may take some time in the beginning, but will save you a lot of time in the long run.
In this article, I am going to explain how to set up your Azure Automation account and how to create your first PowerShell runbook in Azure.
Azure Automation Requirements
There are only a few requirements to get started with running your PowerShell script in Azure:
- Azure subscription (pay-as-you-go)
- Azure Automation Account
You can start with a free trial of the Azure Subscription, but a pay-as-you-subscription isn’t really expensive either.
Tip
Starting from sep 2023, we can’t use the RunAs accounts anymore. Make sure that you migrate your runbooks to use managed identies for authentication before that date. Read all about managed identies in this article.
Azure Automation Pricing
The pricing of Azure Automation is based on the number of minutes that a job runs. With each subscription, you get 500 minutes of job run time and 744 hours for the watchers for free per month.
| Free units per month | Price extra units | |
|---|---|---|
| Job run time | 500 minutes | $0.002 per minute |
| Watchers | 744 hours | $0.002 per hour |
To give you an idea, a simple script that checks the MFA status of all the users in my tenant takes only 1 minute. Creating a SharePoint team site and applying a template to it takes 30 seconds in total.
So with the 500 free minutes, you should be able to automate most of your daily tasks 😉 And every hour more cost only $0.12.
Getting started with Azure Automation
To get started with Azure Automation we will need to create an Azure Automation account and install the correct PowerShell modules.
- Log in to the Azure Portal
Go to https://portal.azure.com/ and log in with your Office 365 credentials.
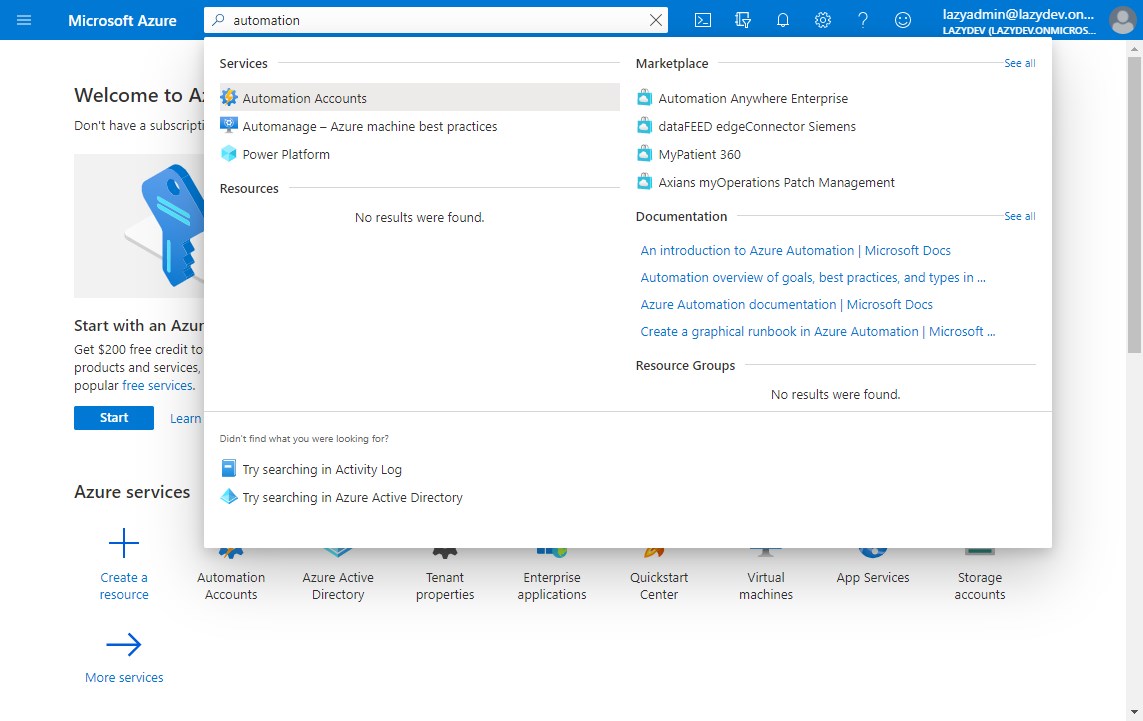
- Go to Automation accounts services
Use the search bar to find the automation accounts services

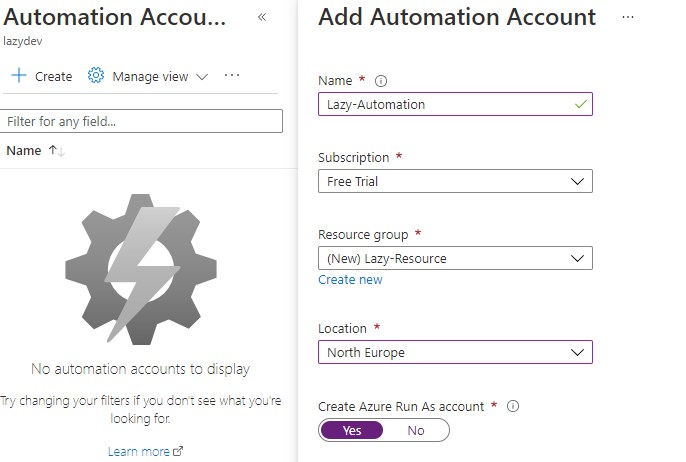
- Create a new automation account
Click on Create to create a new automation account.
– Give your automation account a name
– Select your subscription (free trial or pay-as-you-go)
– Create or select a resource group
It can take a couple of minutes until the resource group is created.
- Open your Azure Automation Account
Select your new automation account after it’s created.
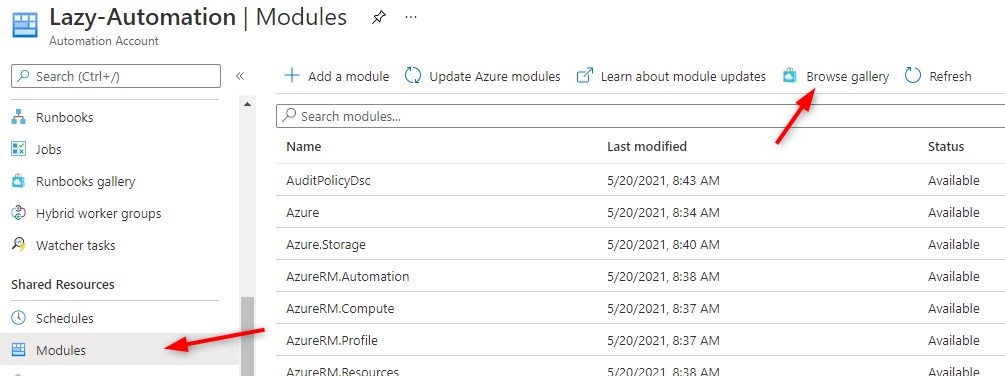
- Install PowerShell modules
Before we can start creating our first runbook, we first need to install the necessary PowerShell modules.
Select modules and click on Browse Gallery
Install the following modules:
– PnP.PowerShell
– AzureAD
– ExchangeOnlineManagement
We have now created our Azure Automation account and can start with creating our first Runbook.
Authentication in Azure Runbook when using MFA
Authentication in Azure Runbooks is always a bit of a challenge. You could exclude the Azure services from MFA with conditional access rules, but that would require you to keep up-to-date with all the IP Addresses.
Another option would be to exclude the service account from MFA, but that is not a best practice. Service accounts maybe have global admin rights, so you want to protect those accounts properly.
So how do you authenticate to AzureAD or Exchange Online in an Azure Runbook? Well, we can use the Azure Run As account.
During the creation of our Azure Automation account we automatically also created a Run as account. The Run As account provides authentication for Azure Runbooks, Automation, and managing resources on the Azure Resource Manager using a self-signed certificate.
Warning
Starting from sep 2023, we can’t use the RunAs accounts anymore. Make sure that you migrate your runbooks to use managed identies for authentication before that date. Read all about managed identies in this article.
Note
The certificate is only valid for one year. You will need to make sure that you renew the certificate before it expires.
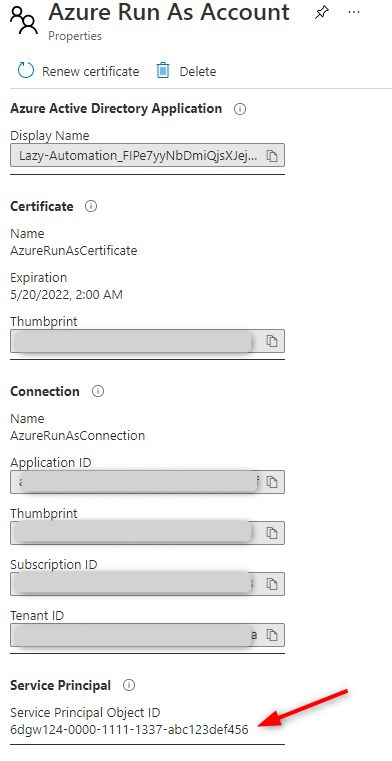
We are going to assign the Run As account the correct permissions to access AzureAD, Exchange Online, and SharePoint. To get started we first need to find the objectId of the account.
- Select Run as accounts in your Azure Automation Account.
- Note the Service Principal Object ID
We are going to add the correct permissions one by one. You can find the complete script here at my Github that will set all permissions in one run.
Connecting to AzureAD from an Azure Runbook
We will first grant our Service Principal account the correct permission to access AzureAD. Make sure you have the AzureAD module installed locally and open PowerShell.
First connect to Azure AD and replace the service principal object id with your own object id.
# Connect to Azure AD
Connect-AzureAD

# Get the Service Principal based on the object Id
$servicePrincipalObjectId = "6dgw124-0000-1111-1337-abc123def456"
If you only need to read data from the AzureAD, then you can give the service principal the Directory Reader role.
Add-AzureADDirectoryRoleMember -ObjectId (Get-AzureADDirectoryRole | where-object {$_.DisplayName -eq "Directory Reader"}).Objectid -RefObjectId $servicePrincipalObjectId
Another option is to make it Global Admin so it can fully manage your Active Directory:
Add-AzureADDirectoryRoleMember -ObjectId (Get-AzureADDirectoryRole | where-object {$_.DisplayName -eq "Company Administrator"}).Objectid -RefObjectId $servicePrincipalObjectId
You can list all available roles in your tenant with the following cmd
Get-AzureADDirectoryRole
You can now connect to AzureAD with the following code in your PowerShell Runbooks.
# Get the service principal connection details
$spConnection = Get-AutomationConnection -Name AzureRunAsConnection

# Connect AzureAd
Connect-AzureAD -TenantId $spConnection.TenantId -ApplicationId $spConnection.ApplicationID -CertificateThumbprint $spConnection.CertificateThumbprint | No-Output

# Test connection:
"User count:"
(Get-AzureADUser).count
Connect to Exchange Online from an Azure Runbook
There is an extra step needed to grant the service principal account access to Exchange Online. We have to give it the Exchange Administrator role and the appropriate API permissions.
# Connect to Azure AD
Connect-AzureAD

# Get the Service Principal based on the object Id
$servicePrincipalObjectId = "6dgw124-0000-1111-1337-abc123def456"

# Assign the Exchange Administrator Role
Add-AzureADDirectoryRoleMember -ObjectId (Get-AzureADDirectoryRole | where-object {$_.DisplayName -eq "Exchange Administrator"}).Objectid -RefObjectId $servicePrincipalObjectId
If you don’t have the Exchange Administrator role in your tenant, then you can enable it with the following code:
if (Get-AzureADDirectoryRole | where-object {$_.DisplayName -eq "Exchange Administrator"} -eq $null) {
	Enable-AzureADDirectoryRole -RoleTemplateId (Get-AzureADDirectoryRoleTemplate | Where-Object {$_.DisplayName -eq "Exchange Administrator"}).Objectid
}
For the Exchange Online API permissions we can use the following code:
# Get the Office 365 Exchange Online App
$EXOApp = (Get-AzureADServicePrincipal -Filter "AppID eq '00000002-0000-0ff1-ce00-000000000000'")
$servicePrincipal = Get-AzureADServicePrincipal -ObjectId $servicePrincipalObjectId

# Get the roles
$permission = $EXOApp.AppRoles | Where-Object { $_.Value -eq 'Exchange.ManageAsApp' }

# Create the permission object
$apiPermission = [Microsoft.Open.AzureAD.Model.RequiredResourceAccess]@{
    ResourceAppId  = $EXOApp.AppId ;
    ResourceAccess = [Microsoft.Open.AzureAD.Model.ResourceAccess]@{
        Id   = $permission.Id ;
        Type = "Role"
    }
}
$Application = Get-AzureADApplication | Where-Object {$_.AppId -eq $servicePrincipal.AppId}
$Application | Set-AzureADApplication -ReplyUrls 'http://localhost'
$Application | Set-AzureADApplication -RequiredResourceAccess $apiPermission
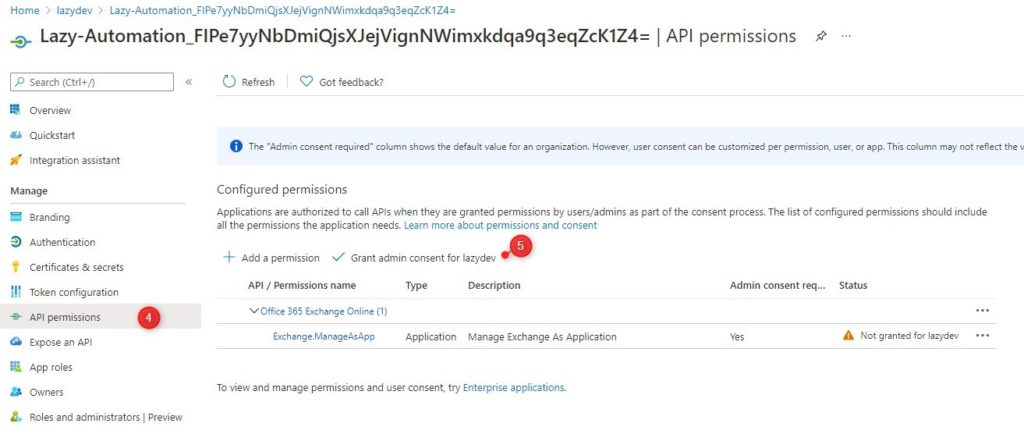
All you need to do now is grant admin consent for the permissions that we have assigned.
- Open your Azure Active Directory
- Choose App registrations
- Click on All applications and select your Automation account
- Go to API Permissions
- Click Grant admin consent
You can now connect to Exchange Online in your Azure Runbook with the following PowerShell code:
# Get the service principal connection details
$spConnection = Get-AutomationConnection -Name AzureRunAsConnection

# Set your tenant name
$tenantName = "contoso.onmicrosoft.com"

# Connect to ExchangeOnline
Connect-ExchangeOnline -CertificateThumbprint $spConnection.CertificateThumbprint -AppId $spConnection.ApplicationID -Organization $tenantName

# Test connection
(Get-ExoMailbox).count
Connect to SharePoint / PnPOnline from Azure Runbook
If you want to use PnPOnline in your Azure Runbook then you will need to grant access to the SharePoint API and maybe even Graph.
I use a couple of permissions to automatically create SharePoint sites and apply templates with default folders. You may not need all the permissions, but this gives you an idea of setting them.
# Get Office 365 SharePoint Online App
$spApp = (Get-AzureADServicePrincipal -Filter "AppID eq '00000003-0000-0ff1-ce00-000000000000'")

# Get the roles
# All sites full control
$spSitesControl = $SPApp.AppRoles | Where-Object { $_.Value -eq 'Sites.FullControl.All' }

# User read write
$spUserControl= $SPApp.AppRoles | Where-Object { $_.Value -eq 'User.ReadWrite.All' }

# TermStore
$spTermControl= $SPApp.AppRoles | Where-Object { $_.Value -eq 'TermStore.ReadWrite.All' }

# NOTE: If you format the code below nicely, and copy-paste it, it will make typeID from the Id attribute :s

$spPermission = [Microsoft.Open.AzureAD.Model.RequiredResourceAccess]@{
    ResourceAppId  = $spApp.AppId ;
    ResourceAccess = [Microsoft.Open.AzureAD.Model.ResourceAccess]@{Id   = $spSitesControl.Id;Type = "Role";},
				[Microsoft.Open.AzureAD.Model.ResourceAccess]@{Id   = $spUserControl.Id;Type = "Role";},
				[Microsoft.Open.AzureAD.Model.ResourceAccess]@{Id   = $spTermControl.Id ;Type = "Role";}
}

$Application = Get-AzureADApplication | Where-Object {$_.AppId -eq $servicePrincipal.AppId}
$Application | Set-AzureADApplication -ReplyUrls 'http://localhost'
$Application | Set-AzureADApplication -RequiredResourceAccess $spPermission
Again you will need to grant admin consent for the permissions:
- Open your Azure Active Directory
- Choose App registrations
- Click on All applications and select your Automation account
- Go to API Permissions
- Click Grant admin consent
To connect to PnPOnline you can use the following code in your Azure Runbook:
# Get the service principal connection details
$spConnection = Get-AutomationConnection -Name AzureRunAsConnection

# Connect to PnPOnline
Connect-PnPOnline -ClientId $spConnection.ApplicationID -Url "https://contoso.sharepoint.com" -Tenant contoso.onmicrosoft.com -Thumbprint $spConnection.CertificateThumbprint

# Test connection
(get-pnptenantsite).count
I also needed access to Graph, so added the API permissions for that as well to:
#
# Get Graph App
#
$graphApp = (Get-AzureADServicePrincipal -Filter "AppID eq '00000003-0000-0000-c000-000000000000'")

# Group read write
$graphGroupControl = $graphApp.AppRoles | Where-Object { $_.Value -eq 'Group.ReadWrite.All' }

# User read write
$graphUserControl = $graphApp.AppRoles | Where-Object { $_.Value -eq 'User.ReadWrite.All' }

# NOTE: If you format the code below nicely, and copy-paste it, it will make typeID from the Id attribute :s
$graphPermission = [Microsoft.Open.AzureAD.Model.RequiredResourceAccess]@{
    ResourceAppId  = $graphApp.AppId ;
    ResourceAccess = [Microsoft.Open.AzureAD.Model.ResourceAccess]@{Id   = $graphGroupControl.Id;Type = "Role";},
				[Microsoft.Open.AzureAD.Model.ResourceAccess]@{Id   = $graphUserControl.Id;Type = "Role";}
}

$Application = Get-AzureADApplication | Where-Object {$_.AppId -eq $servicePrincipal.AppId}
$Application | Set-AzureADApplication -ReplyUrls 'http://localhost'
$Application | Set-AzureADApplication -RequiredResourceAccess $graphPermission
Again, grant the admin consent in the Azure AD.
If you have connected PnPOnline then you can easily get an access token to connect to Graph:
# User Graph
$accessToken = Get-PnPAccessToken

$header = @{
  "Content-Type" = "application/json"
  Authorization = "Bearer $accessToken"
}

# Get users to test Graph
Invoke-RestMethod -Uri "https://graph.microsoft.com/v1.0/users/" -Method Get -Headers $header
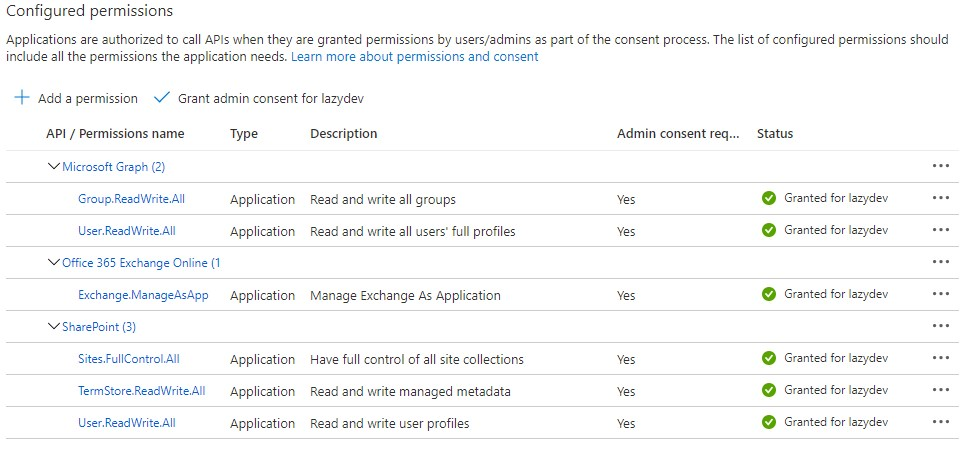
The result with all the permission in the Azure Active Directory should look like this:
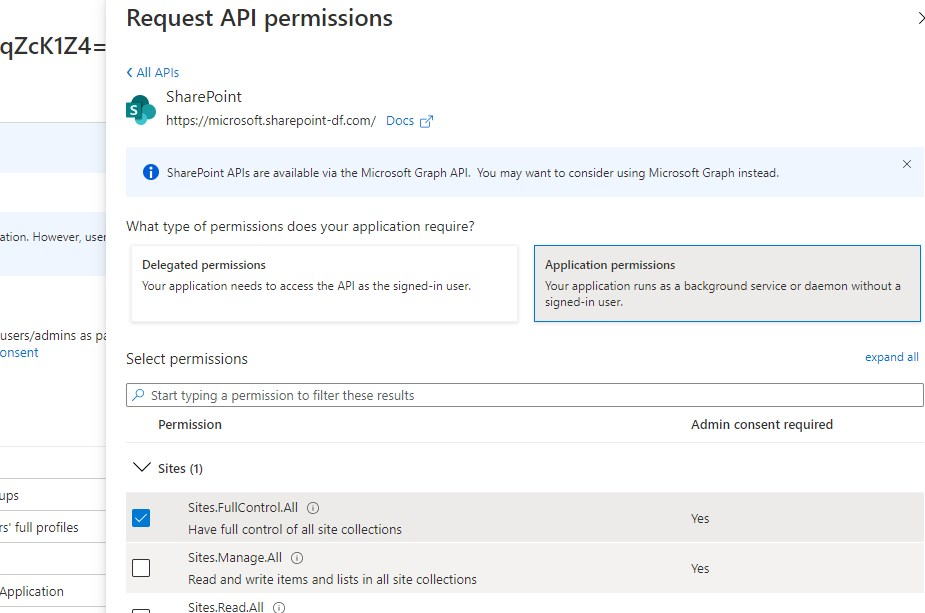
You can also add the permissions in the Azure Portal to your service principal account. This may be more convenient if you don’t know the exact permission name that you are looking for.
In the Azure Active Directory:
- Choose App registrations
- Click on All applications and select your Automation account
- Go to API Permissions
- Click Add a permission
- Choose the API that you need, for example, SharePoint
- Select Application Permissions and select the permissions that you need.
Using variables in Azure Automation Runbooks
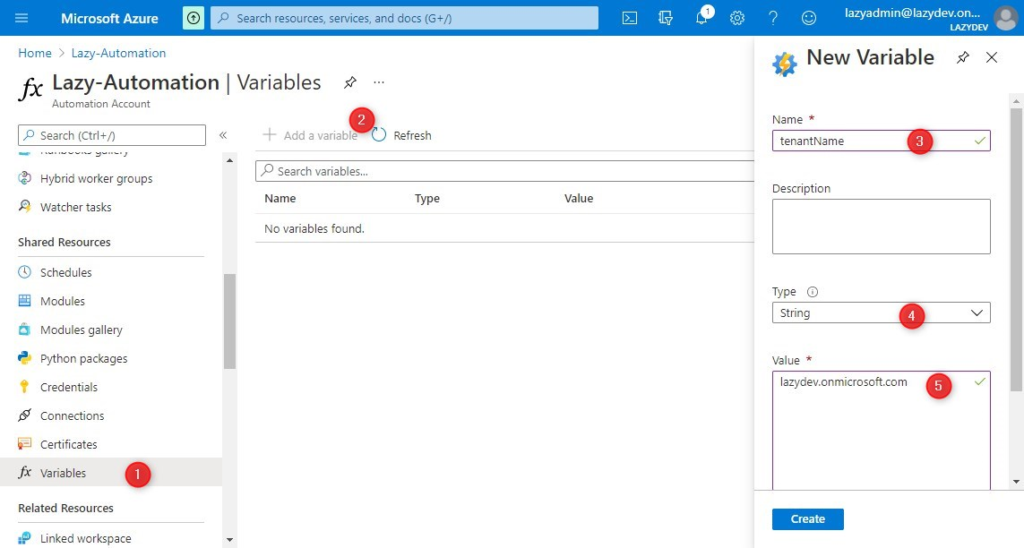
Before we start with creating our first Runbook we are first going to take a look at using variables. You can define global variables in your Automation account that you can use and change in your Runbooks. You can create different types of variables, and they can be encrypted as well.
If you scroll down in your Azure Automation account you will find the variables under Shared Resources.
- Open Variables
- Click on Add a variable
- Give your variable a name
- Choose the type (String, Boolean, DateTime, Integer, Not Specified)
- Enter the value
- Choose Encrypted or not
Creating an Azure Runbook
With the Azure Automation account set up and all the permissions assigned we can start creating our first Runbook.
In your Azure Automation account, you will find Runbooks. There are a couple of Tutorial runbooks already in your account, but we are going to create a new one.
- Click on Create a Runbook
- Give your runbook a meaningful name
- Select PowerShell for Runbook type and maybe a description that describes what the runbook does.
- Click on Create
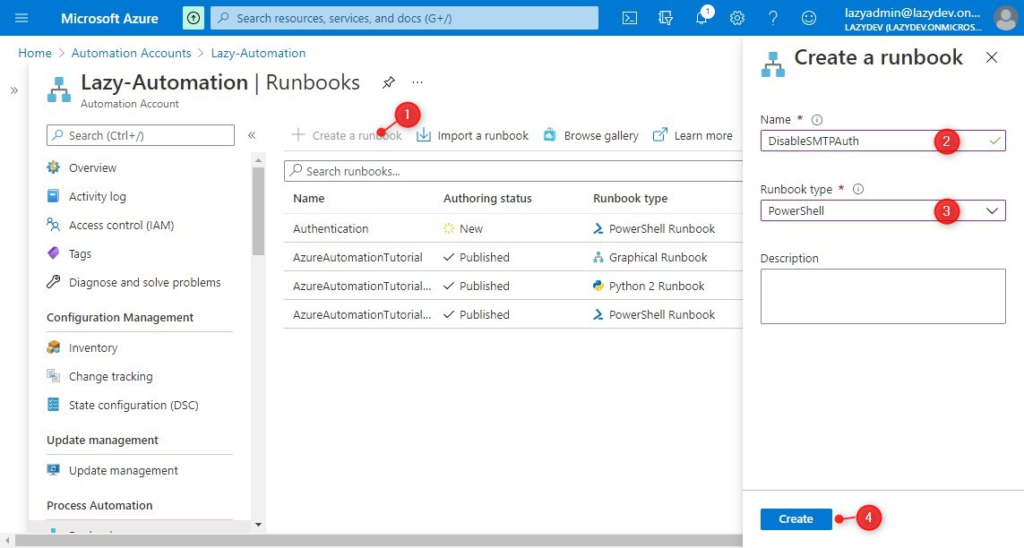
In this example, we are going to create a Runbook that disables SMTP Authentication for all users, except a couple of application accounts. If you want to know more about securing your Office 365 tenant, then make sure you read these tips.
Your new Runbook opens witch is basically a blank PowerShell script. On the left side, you will find an overview of available CMDLets, a list of your Runbooks (you can trigger other runbooks from within your runbook), and assets.
The assets can be variables that you have declared in your automation account, connections, stored credentials, and certificates.
To disable the SMTP Authentication we are going to connect to Exchange Online. To do this we will need the Azure Run As Connection and the tenant name which I added into a variable.
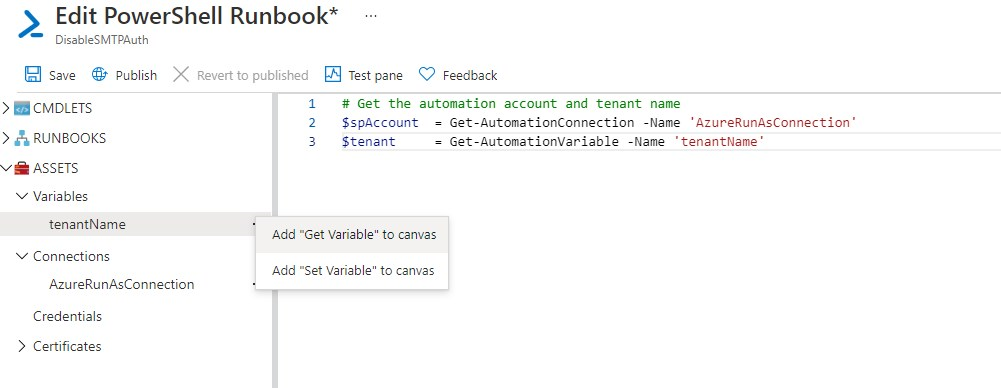
We can now connect to Exchange Online with the following code if you have set the permissions as described in the beginning:
# Get the automation account and tenant name
$spConnection  = Get-AutomationConnection -Name 'AzureRunAsConnection'
$tenantName    = Get-AutomationVariable -Name 'tenantName'

# Connect to ExchangeOnline
Connect-ExchangeOnline -CertificateThumbprint $spConnection.CertificateThumbprint -AppId $spConnection.ApplicationID -Organization $tenantName

$exclusions = @("sa_signatureTool",
                "sa_otherImportantTool"
                )

$mailboxes = Get-CASMailbox | Where-Object {$_.SmtpClientAuthenticationDisabled -ne $true -and $_.Identity -notin $exclusions}

$mailboxes

foreach ($mailbox in $mailboxes) {
    try {
        Set-CASMailbox -Identity $mailbox.Identity -SmtpClientAuthenticationDisabled $true

        [PSCustomObject]@{
            UserPrincipalName  = $mailbox.Identity
            SmtpClientAuthenticationDisabled = $true
        }
    }
    catch {
        [PSCustomObject]@{
            UserPrincipalName = $mailbox.Identity
            SmtpClientAuthenticationDisabled = $false
        }
    }
}

# Close the connection
Disconnect-ExchangeOnline -Confirm:$false
Before you publish the runbook you can test it first in the Test Pane. This is really useful when editing existing Runbooks, you can test your edit before you publish it, keeping the live version working.
Azure Automation Schedule
You can schedule your runbook so it will run automatically on a set interval. After you have published your runbook click on Link to Schedule
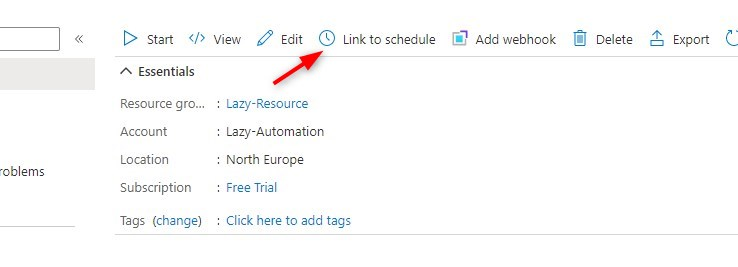
Click on Link a schedule to your runbook to select (or create) a schedule for your Azure Runbook. One schedule can be used for multiple runbooks in your Azure Automation account.
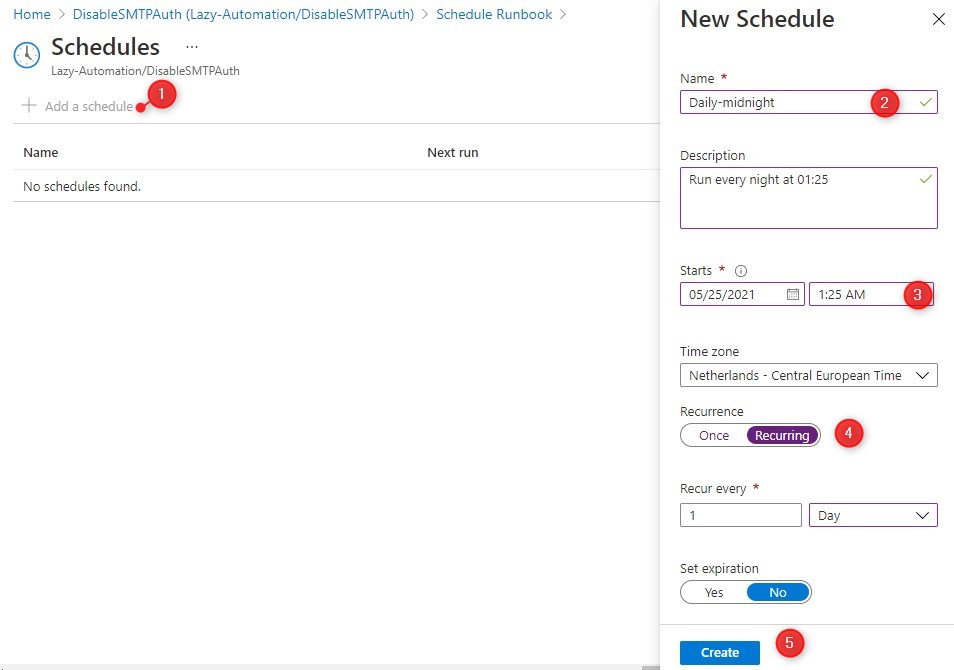
We have to create our first schedule:
- Click on Add a schedule
- Give your schedule a name
- Set the start date and time
- Make it recurring (or run it only once)
- Click on Create
After you have created the schedule click on Ok to apply the schedule to your runbook. You can add multiple schedules to your Runbook if you want.
Your runbook should now automatically run according to the schedule that you have created. You will see an overview of the jobs in the overview screen of the runbook.
Wrapping Up
When you are creating runbooks always make sure that you close the connections when the jobs are finished. Otherwise, you may end up using all connections to Exchange Online for example.
I hope this article helped you to get started with creating your Azure Runbooks and/or setting up authentication to Office 365.
If you have any questions just drop a comment below.


Is it possible to get an update on this guide using a Managed Identity ?
Since MS is removing the Run As account feature.
‘Azure Automation Run As accounts will retire on 30 September 2023 and completely move to Managed Identities. All runbook executions using RunAs accounts, including Classic Run As accounts wouldn’t be supported after this date. Starting 01 April 2023, the creation of new Run As accounts in Azure Automation will not be possible.’
Yes definitely, thanks for the reminder. I already have managed identity running, so I will write an updated guide tomorrow for it.
The article is online about Managed Identies
Wonderful article. I´m just struggling with a weird issue. I´m trying to turn off GAL from the users. However, I get no permissions issue. But the weird part is. It wants to add people to GAL just not turn off, throws permission error. Did anyone encounter this so far or maybe know the solution?
Permission issues are most of the time related to not giving enough permission to the RunAs service principal.
I tried even with Global Administrator. But it still failed with permissions issues. And just for the test purpose i have given the app all of the permissions for API as well.
Can someone please share how to grant the service principal of the run as account access to use Connect-MsolService like how it was done for ExchangeOnlineManagement, PNP.Powershell and AzureAD on this post?
Unfortunately, that is not possible. At the moment I haven’t found a way to automate the Msol connection, and the AzureAD module isn’t able to manage the licenses.
Thank you very much for the article, I have managed to transfer a lot of our automated Exhange taks thanks to your wonderful guide.
I was wondering if you could help me in the direction of utilising your MFA status script using runbooks? Assuming we can’t use connect-msonline I have been unable to get the same level of detail with azuread cmdlets
I got it sorted – had a typo when importing modules and thought it wasn’t there… Duh!
I had MFA running in a runbook, but MSOL is indeed a problem. I can’t get it back to working again, so now I force MFA after I create a user with PowerShell.
Wow that’s a huge and complete article. Love it!
I hope to have time and implement a few automated tasks using this method.
We’re moving to AutoPilot and InTunes in the next months, much to learn and automate!