Azure resources, like Azure Automation or Azure Virtual Machines, often need to have access to other resources. For example, when accessing the Azure AD from within a Runbook. To grant access, you usually need accounts, passwords, or certificates. But you don’t want to store this info inside your code. This is where Azure Managed Identity comes in.
Azure Managed Identity gives Azure Resources a managed identity inside your Azure AD. This way you can easily manage permissions and authenticate in Azure without the need for storing credentials.
In this article
In this article, we will look at what Azure Managed Identities are, how to create them and use them of course. I have also created a PowerShell script that allows you to easily set the permissions of your managed identity.
What are Azure Managed Identities
Azure Managed Identities are an essential tool for securely managing access to Azure resources. These identities provide a way for Azure Applications and Services to authenticate and authorize themselves without the need for storing and managing credentials. This reduces the risk of credential theft or misuse, as there are no credentials to steal or manage.
They work by creating an identity (Enterprise Application) within your Azure Active Directory (AAD). The identity is then associated with a specific Azure resource, like an Azure Automation account. You can give the identity specific permission to the different APIs in Azure, like MsGraph or Exchange Online, just like with regular Enterprise Applications in Azure AD. The identity is then used by the resource to authenticate and authorize access, without the need for credentials.
Managed Identities Types
There are two types of Azure Managed Identities, with the main difference in how they are created and managed:
| Created | Life cycle | Sharing | |
|---|---|---|---|
| System-assigned | Part of an Azure resource | Deleted when parent resource is deleted | Can only be used for one Azure resource |
| User-assigned | Standalone resource | Independent life cycle | Can be shared with more than one Azure Resource |
System-Assigned Managed Identity
System-Assigned Managed Identities are tied to one specific resource. You can enable them for most Azure services, like virtual machines or automation accounts. It creates a unique identity in your Azure AD, allowing you to set specific permissions for the resource.
The advantage of system-assigned identities is that they are automatically deleted when you delete the resource.
User-Assigned Managed Identity
User-Assigned Managed identities, on the other hand, are standalone Azure resources. They can be associated with one or more Azure services. This provides greater flexibility and control over the management of identities, allowing you to create and manage your own identities and use them for multiple resources.
This also means that user-assigned identities are not deleted when you remove a resource, allowing you to reuse the identity.
Creating an Azure Managed Identity
The principle of creating a managed identity and assigning permissions is for each Azure service pretty much the same. For the examples below, we are going to create a managed identity for an Azure Automation Account. We can then use the identity inside the runbooks to access the different APIs, like MsGraph or Exchange online.
I assume that you already have created an Automation account, if not then read this article first to get started.
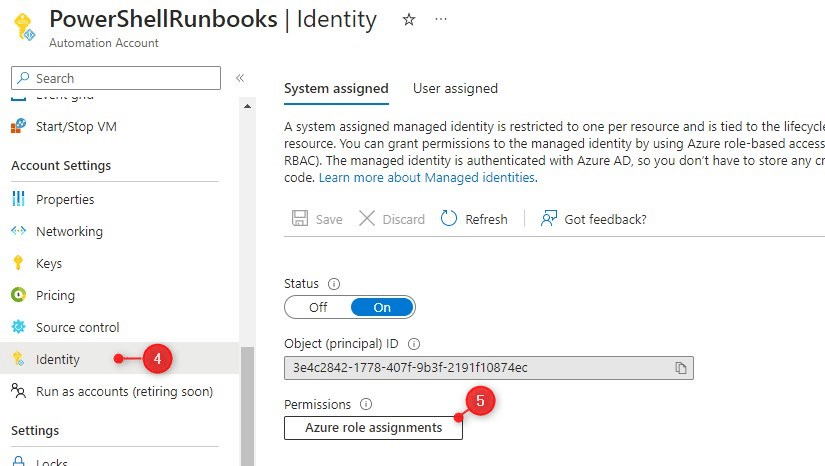
Step 1 – Enabling System-Assigned Managed Identity
The first step is to enable the system assigned managed identity. If you open your Azure service, in this case, the Automation Account, you will find in the left menu the item Identity (might need to scroll a bit down). Select this and enable the system-assigned identity and click on save.

Step 2 – Assigning Roles
After you have clicked Save, you will get a confirmation popup. After you confirmed that you want to create a system-assigned identity you will see the Object ID and the option to assign Azure Roles. Important here is that we add the same roles as our current Run-As account (if you are migrating your runbook).
- In your Azure Automation account, click on Run as accounts
- Open the Run as account
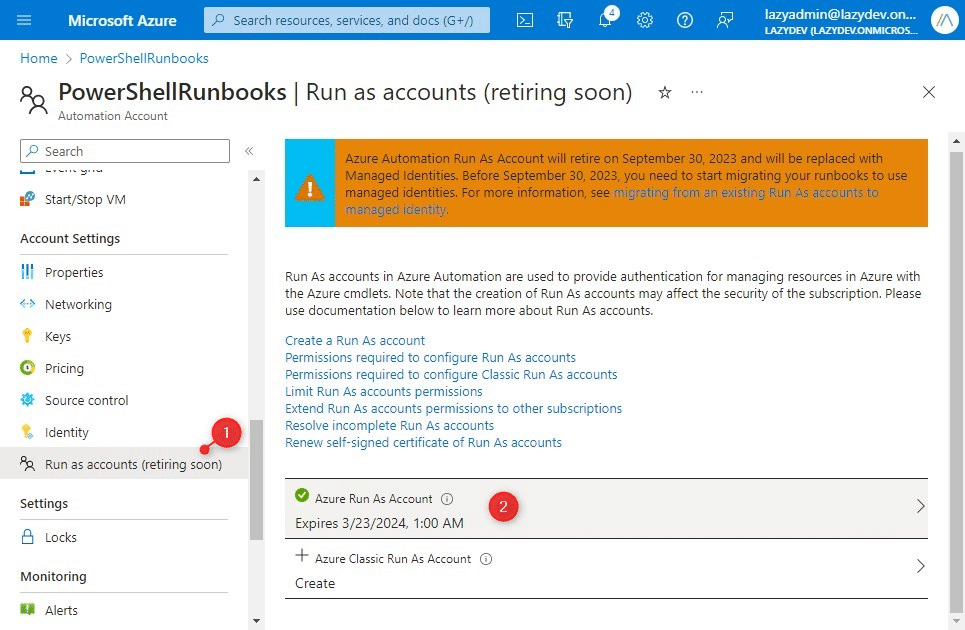
- Note the roles that are currently assigned to the account
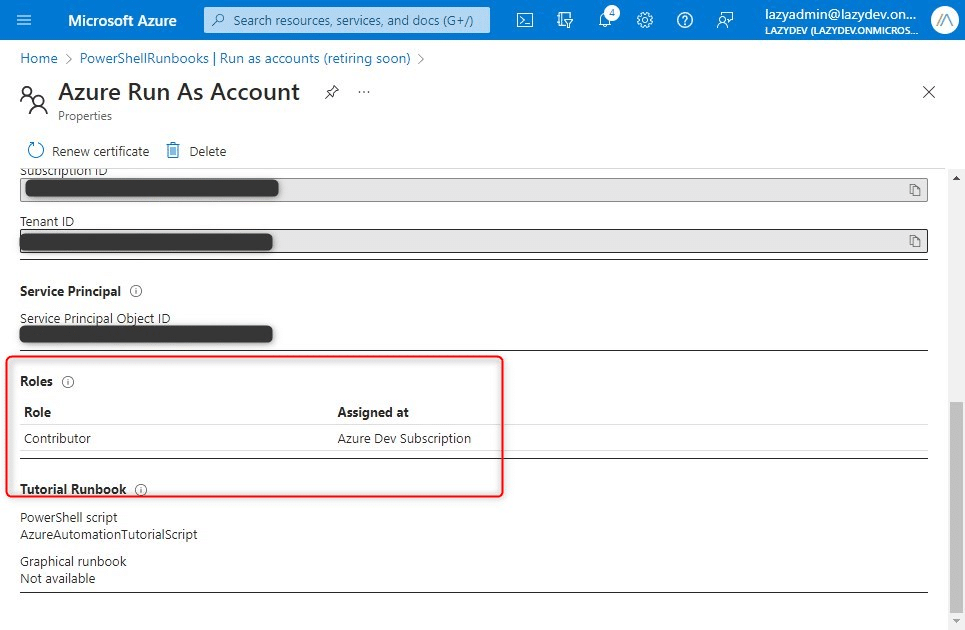
- Go back to Identity
- Click on Azure Role Assignments
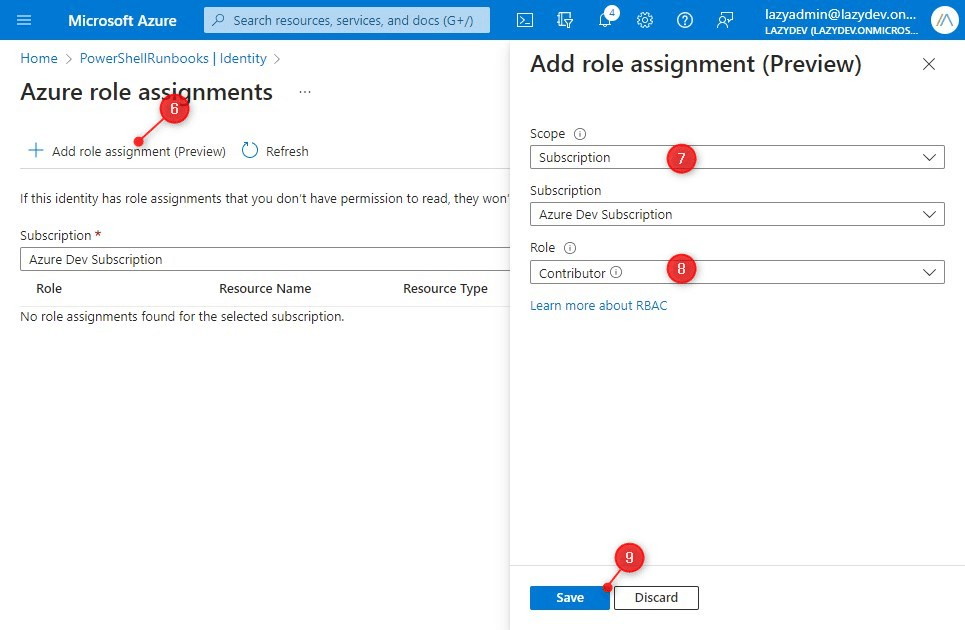
We are going to assign the same role(s) to the system-assigned identity as our RunAs account had.
- Click on Add role assignment
- Set the scope
- Add the required Role
- Click Save
You can now already connect to Azure resources from within the Azure Runbook for example. The required modules for this are already loaded in new Automation Accounts. However, for existing Automation Accounts you will need to load at least the following modules:
- Az.ManagedServiceIdentity
- Az.Accounts
- Az.Automation
Step 3 – Adding Permissions
The Azure Roles only handle the permissions to other Azure resources, but won’t give the managed identity access to MsGraph or Exchange Online for example. For this, we will need to grant permissions to each of the services.
You can view the assigned permissions in the Azure Portal, but we can’t assign permissions. For this, we will need to use PowerShell and we will need to Object ID of the managed identity.
Let’s first lookup the object ID:
- Open the Enterprise Applications in the Azure Portal
- Select All applications
- Click on the filter Application Type
- Choose Managed Identities and click on Apply
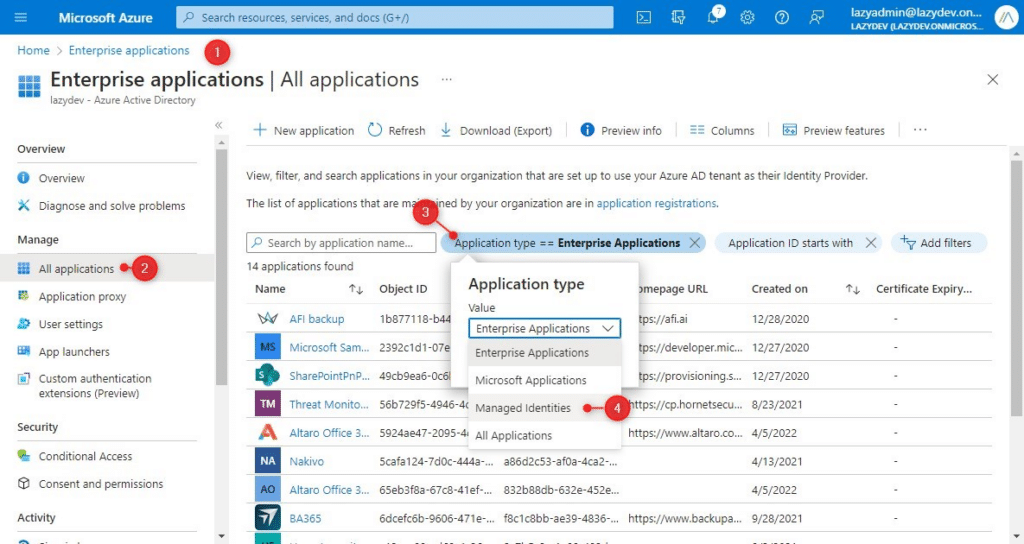
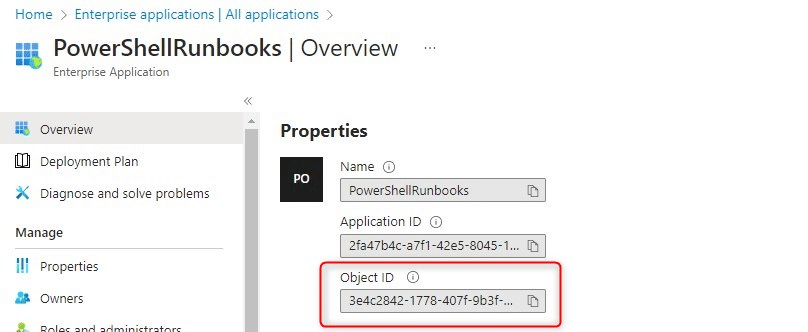
Only the managed identities are now listed. Open the identity that we created earlier and not the object ID:
Open PowerShell on your computer, make sure that you have the Microsoft Graph Module installed, and connect to Graph with the following scopes:
# Connect to Microsoft Graph
Connect-MgGraph -Scopes "Application.Read.All","AppRoleAssignment.ReadWrite.All,RoleManagement.ReadWrite.Directory"

# Select beta profile
Select-MgProfile Beta
We are first going to store the Managed Identity Object ID into a variable because we are going to use it a couple of times in the scripts below:
$managedIdentityId = "3e4c2842-1778-407f-9b3f-2191f10874ec"

# We can also lookup the object id using the name of the managed identity:
$managedIdentityId = (Get-MgServicePrincipal -Filter "displayName eq 'LazyAutomationAccount'").id
MsGraph Permissions
We are first going to get the Service Principal for Graph based on the standard App ID:
$graphApp = Get-MgServicePrincipal -Filter "AppId eq '00000003-0000-0000-c000-000000000000'"
For Graph, we need to define the scopes that we need permission to. We can then grant permissions for each of the scopes by looking up the app role:
$graphScopes = @(
  'UserAuthenticationMethod.Read.All',
  'Group.ReadWrite.All',
  'Directory.Read.All',
  'User.ReadWrite.All'
)

ForEach($scope in $graphScopes){
  $appRole = $graphApp.AppRoles | Where-Object {$_.Value -eq $scope}
  New-MgServicePrincipalAppRoleAssignment -PrincipalId $managedIdentityId -ServicePrincipalId $managedIdentityId -ResourceId $graphApp.Id -AppRoleId $appRole.Id
}
We can now use MgGraph in our Azure Runbook for example. For the runbooks, make sure that you have added at least the following modules to your Azure Automation account:
- Microsoft.Graph.Authentication
- Microsoft.Graph.Users
To connect to Graph we first need to connect to Azure so we can obtain an access token.
Note
Make sure that you have the following modules loaded in your Automation Account:
– Az.ManagedServiceIdentity
– Az.Accounts
– Az.Automation
Otherwise you won’t be able t use the Connect-AzAccount cmdlet
try {
    # Logging in to Azure.
    Connect-AzAccount -Identity

    # Get token and connect to MgGraph
    Connect-MgGraph -AccessToken ((Get-AzAccessToken -ResourceTypeName MSGraph).token)
} catch {
    Write-Error -Message $_.Exception
    throw $_.Exception
}

# Test if we can get users:
Get-MgUser
Connecting to Microsoft Graph will become easier with the new V2 module that is coming out. It’s currently in preview, but once released you can simply connect to Microsoft Graph with a managed identity by using the -identity parameter.
# For System Assigned Managed Identies
Connect-MgGraph -Identity

# For User Assigned Managed Identies
Connect-MgGraph -Identity -ClientId "User_Assigned_Managed_identity_Client_Id"
SharePoint Online Permissions
Also for SharePoint, we first need to get the Service Principal and define the scopes to which we want to give permission. Use the PowerShell commands below to add the SharePoint permission to your managed identity:
$spoApp = Get-MgServicePrincipal -Filter "AppId eq '00000003-0000-0ff1-ce00-000000000000'"

$spoScopes = @(
  'Sites.FullControl.All',
  'TermStore.ReadWrite.All',
  'User.ReadWrite.All'
)

ForEach($scope in $spoScopes){
  $appRole = $spoApp.AppRoles | Where-Object {$_.Value -eq $scope}
  New-MgServicePrincipalAppRoleAssignment -PrincipalId $managedIdentityId -ServicePrincipalId $managedIdentityId -ResourceId $spoApp.Id -AppRoleId $appRole.Id
}
To connect to SharePoint Online inside your runbook you will need to add PnP-Online modules to your Automation Account. Connecting to PnPOnline is done by adding the -ManagedIdentity parameter:
Connect-PnPOnline -Url  lazydev-admin.sharepoint.com -ManagedIdentity

# Test connection
Get-PnPTeamsTeam
Exchange Online
For Exchange, we often only need to ManageAsApp role. So we can simply add the permission with the following commands:
$exoApp = Get-MgServicePrincipal -Filter "AppId eq '00000002-0000-0ff1-ce00-000000000000'"

$appRole = $exoApp.AppRoles | Where-Object {$_.DisplayName -eq "Manage Exchange As Application"}

$AppRoleAssignment = @{
  "PrincipalId" = $managedIdentityId
  "ServicePrincipalId" = $managedIdentityId
  "ResourceId" = $exoApp.Id
  "AppRoleId" = $appRole.Id
}
New-MgServicePrincipalAppRoleAssignment @AppRoleAssignment
Besides the permission, we will also need to give our managed identity the Exchange Adminitrator Role. Otherwise, you will get the following error:
The role assigned to application <id> isn't supported in this scenario. Please check online documentation for assigning correct Directory Roles to Azure AD Application for EXO App-Only Authentication.
We can add the role using MgGraph or using the Azure Portal. For the latter, go to the Azure Active Directory > Roles and administrator. Search for the Exchange Administrator Role and add your managed identity as a member. But we can also use PowerShell of course:
# Make sure that you connected to Graph with the scope RoleManagement.ReadWrite.Directory
$roleId = (Get-MgRoleManagementDirectoryRoleDefinition -Filter "DisplayName eq 'Exchange Administrator'").id

New-MgRoleManagementDirectoryRoleAssignment -PrincipalId $managedIdentityId -RoleDefinitionId $roleId -DirectoryScopeId "/""
To use the Exchange Online connection in your Azure Runbook, you will need to make sure that you have the latest Exchange Online (EXO V3) module loaded in your automation account. Because this will make connecting to Exchange Online a lot simpler with managed identities:
Connect-ExchangeOnline -ManagedIdentity -Organization lazyadmin.onmicrosoft.com
Verify Permissions
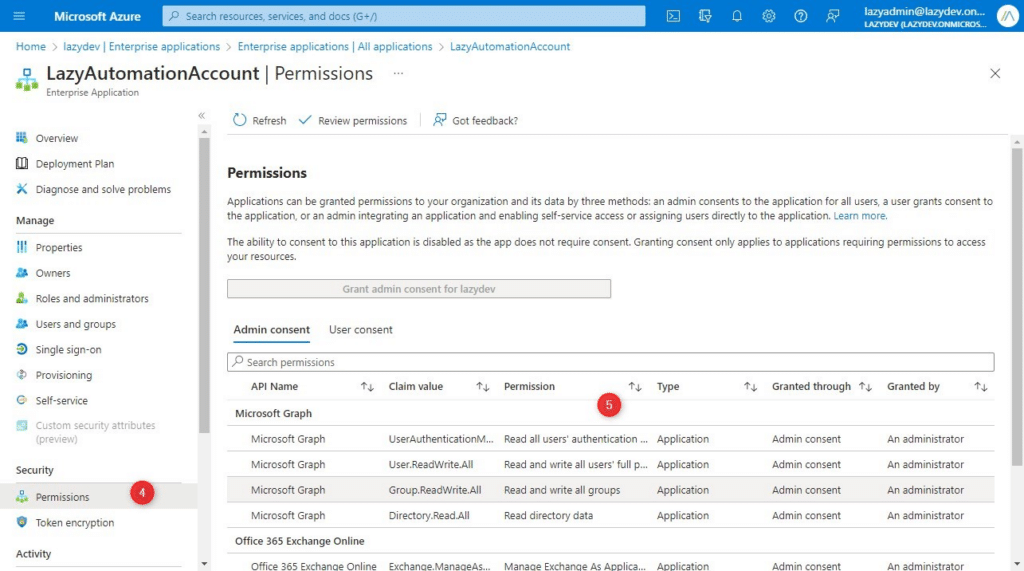
After you added all the permissions it’s always a good idea to verify if they are all added to your managed identity as you expected. We can view the permissions in the Azure Active Directory:
- Open portal.azure.com and navigate to Enterprise Applications in Azure AD
- Click on All Applications
- Change the filter Application type to Managed identies
- Select the managed identity
- Click on permissions to review them
Managed Identity Permissions Script
I have also created a complete script that will set all the permissions for your managed identity. You only need to set the name of your managed identity or you can use the object id of the identity. The script will set all required permissions. You can find the latest version of the script here in my GitHub Repository
# Change this to your Managed Identity app name:
$managedIdentityName = "LazyAutomationAccount"

# Connect to Microsoft Graph
Connect-MgGraph -Scopes "Application.Read.All","AppRoleAssignment.ReadWrite.All,RoleManagement.ReadWrite.Directory"
Select-MgProfile Beta

# Get the Managed Identity Object id
# You can find the name or object id in Azure > Automation Account > Identity
# $managedIdentityId = "<id-number-goes-here>"
$managedIdentityId = (Get-MgServicePrincipal -Filter "displayName eq $managedIdentityName").id

#
# Adding Microsoft Graph permissions
#
Write-host "Adding Microsoft Graph Permissions" -ForegroundColor Cyan

$graphApp = Get-MgServicePrincipal -Filter "AppId eq '00000003-0000-0000-c000-000000000000'"

# Add the required Graph scopes
$graphScopes = @(
  'UserAuthenticationMethod.Read.All',
  'Group.ReadWrite.All',
  'Directory.Read.All',
  'User.ReadWrite.All'
)
ForEach($scope in $graphScopes){
  $appRole = $graphApp.AppRoles | Where-Object {$_.Value -eq $scope}

  if ($null -eq $appRole) { Write-Warning "Unable to find App Role for scope $scope"; continue; }

  # Check if permissions isn't already assigned
  $assignedAppRole = Get-MgServicePrincipalAppRoleAssignment -ServicePrincipalId $managedIdentityId | Where-Object { $_.AppRoleId -eq $appRole.Id -and $_.ResourceDisplayName -eq "Microsoft Graph" }

  if ($null -eq $assignedAppRole) {
    New-MgServicePrincipalAppRoleAssignment -PrincipalId $managedIdentityId -ServicePrincipalId $managedIdentityId -ResourceId $graphApp.Id -AppRoleId $appRole.Id
  }else{
    write-host "Scope $scope already assigned"
  }
}

#
# SharePoint Online Permissions
#
Write-host "Adding SharePoint Online Permissions" -ForegroundColor Cyan

$spoApp = Get-MgServicePrincipal -Filter "AppId eq '00000003-0000-0ff1-ce00-000000000000'"

# Add the required SPO scopes
$spoScopes = @(
  'Sites.FullControl.All',
  'TermStore.ReadWrite.All',
  'User.ReadWrite.All'
)
ForEach($scope in $spoScopes){
  $appRole = $spoApp.AppRoles | Where-Object {$_.Value -eq $scope}

  if ($null -eq $appRole) { Write-Warning "Unable to find App Role for scope $scope"; continue; }

  # Check if permissions isn't already assigned
  $assignedAppRole = Get-MgServicePrincipalAppRoleAssignment -ServicePrincipalId $managedIdentityId | Where-Object { $_.AppRoleId -eq $appRole.Id -and $_.ResourceDisplayName -eq "Office 365 SharePoint Online"}

  if ($null -eq $assignedAppRole) {
    New-MgServicePrincipalAppRoleAssignment -PrincipalId $managedIdentityId -ServicePrincipalId $managedIdentityId -ResourceId $spoApp.Id -AppRoleId $appRole.Id
  }else{
    write-host "Scope $scope already assigned"
  }
}


#
# Adding Exchange Online permissions
#
Write-host "Adding Exchange Online Permissions" -ForegroundColor Cyan

$exoApp = Get-MgServicePrincipal -Filter "AppId eq '00000002-0000-0ff1-ce00-000000000000'"
$appRole = $exoApp.AppRoles | Where-Object {$_.DisplayName -eq "Manage Exchange As Application"}

$AppRoleAssignment = @{
  "PrincipalId" = $managedIdentityId
  "ServicePrincipalId" = $managedIdentityId
  "ResourceId" = $exoApp.Id
  "AppRoleId" = $appRole.Id
}
New-MgServicePrincipalAppRoleAssignment @AppRoleAssignment

# Add Exchange Administrator Role
$roleId = (Get-MgRoleManagementDirectoryRoleDefinition -Filter "DisplayName eq 'Exchange Administrator'").id
New-MgRoleManagementDirectoryRoleAssignment -PrincipalId $managedIdentityId -RoleDefinitionId $roleId -DirectoryScopeId "/"
Wrapping Up
Managed Identities are great too securely managing access to Azure resources. It provides a secure and easy way to manage access to resources without the need for credentials or complex security policies, which reduces the risk of credential theft or misuse.
While updating your scripts, make sure that you also switch to the latest version of the Exchange Online module, and replace the Azure AD module with the new Microsoft Graph module.
I hope you liked this article, if you have any questions, just drop a comment below.


Nice article. I have been trying to get MIs working for a while but haven’t been able to – until I found this! Thank you.
I have created a manged identity and can verify the Microsoft Graph permissions on the MI but still get errors (Object reference not set) wen trying to perform MgGraph cmdlets.
Hi Rudy,
Great article!
I want to send emails in my runbook, but I’m not sure how to do it with Managed Identities. Do you have an example?
Currently, I’m already sending emails through the Graph API, but I’m using an App ID and secret.
Best regards,
Stefan
Try the following:
– Import the Microsoft.Graph.Users.Actions module in your PowerShell Runbooks
– Add the following permission to the Managed Identity Mail.Send (follow step 3 from this article)
You should then be able to send and email as an user using the following method:
$params = @{ Message = @{ Subject = "Meet for lunch?" Body = @{ ContentType = "Text" Content = "The new cafeteria is open." } ToRecipients = @( @{ EmailAddress = @{ Address = "lazyadmin@lazydev.onmicrosoft.com" } } ) } SaveToSentItems = "true" } Send-MgUserMail -UserId 'meganb@lazydev.onmicrosoft.com' -BodyParameter $paramsYes! Thanks!
What a great article and script. Thank you Rudy!
Microsoft does not offer much guidance for using the Managed Identity for SharePoint or Exchange Online.
Been searching for a while now for a solution to assigning SharePoint PnP permissions to a Managed identity for use in an Automation account, and this was just what I was looking for.
BTW, I had to encase the $managedIdentityName variable on line 11 in single quotes.
I was getting a (Invalid filter clause: Syntax error).
Keep up the great work!
You SAVED me. I’ve been working on this problem for over a month, multiple tickets to Microsoft, to get my managed identity permissions. I found your article this morning, and coincidentally, a Senior Escalation Engineer from Azure called me back when I was in the middle of trying it. He said it could be done in the portal.
We ended up doing it your way. The problem was that the identity should be under AD App Registrations and it wasn’t. His fix was to set up a Run As account to start the process but turns out that feature has been depreciated.
After your script, the identity shows up under Enterprise Apps and has all the correct permissions. I just cannot thank you enough.
Not sure why but I am getting following error:
New-MgServicePrincipalAppRoleAssignment : Insufficient privileges to complete the operation.
I connect to graph with following permissions:
“Application.Read.All”,”AppRoleAssignment.ReadWrite.All”,”RoleManagement.ReadWrite.Directory”
Any ideas?
Did you select the beta profile?
Yes. This is my whole script:
# Connect to Microsoft Graph
Connect-MgGraph -Scopes “Application.Read.All”,”AppRoleAssignment.ReadWrite.All,RoleManagement.ReadWrite.Directory”
# Select beta profile
Select-MgProfile Beta
$managedIdentityId = (Get-MgServicePrincipal -Filter “displayName eq ‘xxx'”).id
$graphApp = Get-MgServicePrincipal -Filter “AppId eq ‘00000003-0000-0000-c000-000000000000′”
$graphScopes = @(
‘UserAuthenticationMethod.Read.All’#,
‘Group.ReadWrite.All’,
‘Directory.Read.All’,
‘User.ReadWrite.All’
)
ForEach($scope in $graphScopes){
$appRole = $graphApp.AppRoles | Where-Object {$_.Value -eq $scope}
New-MgServicePrincipalAppRoleAssignment -PrincipalId $managedIdentityId -ServicePrincipalId $managedIdentityId -ResourceId $graphApp.Id -AppRoleId $appRole.Id
}
Do I actually need a Global Administrator role for this? I have activated Application and Cloud Application Administrator roles.
That is a good one, I tested it with Global admin permissions..
Just confirmed that Privileged Role Administrator role will do the trick.
Very nice!
Question: Is there any way to run Connect-MsolService using Azure Managed Identities?
Msol module is being deprecated around June this year, at least that is the plan right now (it has already changed a couple of times)