PowerShell scripts are a great way to automate daily tasks or generate weekly reports. But how do you make a scheduled task for your PowerShell scripts? We can do this with either the task scheduler to run a PowerShell script or create the task in PowerShell.
The advantage of scheduled tasks is that you can set and forget them. They will run in the background, and update your systems, or generate the reports that you otherwise will have to do manually.
In this article
In this article, we will look at how to run a PowerShell script with task scheduler and how to create a scheduled task in PowerShell.
Use Task Scheduler to Run a PowerShell Script
The first option that we are going to look at is using the task scheduler in Windows to run a PowerShell Script. The Windows Task Scheduler originates from Windows 95! and is a great way to schedule tasks in Windows.
To run PowerShell scripts with the task scheduler, we can’t simply select the PowerShell file that we want to schedule. What we are going to do is run the “program” PowerShell and use the arguments to select the file that we want to run.
Time needed: 2 minutes
- Open Task Scheduler
Click on Start and type “Task scheduler” to open it. Or select it in the Start Menu under Windows Administrative Tools (or Windows Tools when using Win 11)
- Create a new basic task
Click on Create Basic Tasks… in the action bar on the right side and give your task a name.
(I recommend organizing your tasks in folders, create them on the left side first)
- Schedule the task
The trigger determines when the task should be executed. Choose a trigger, for example, Weekly, and click Next to configure when exactly the tasks need to be executed.
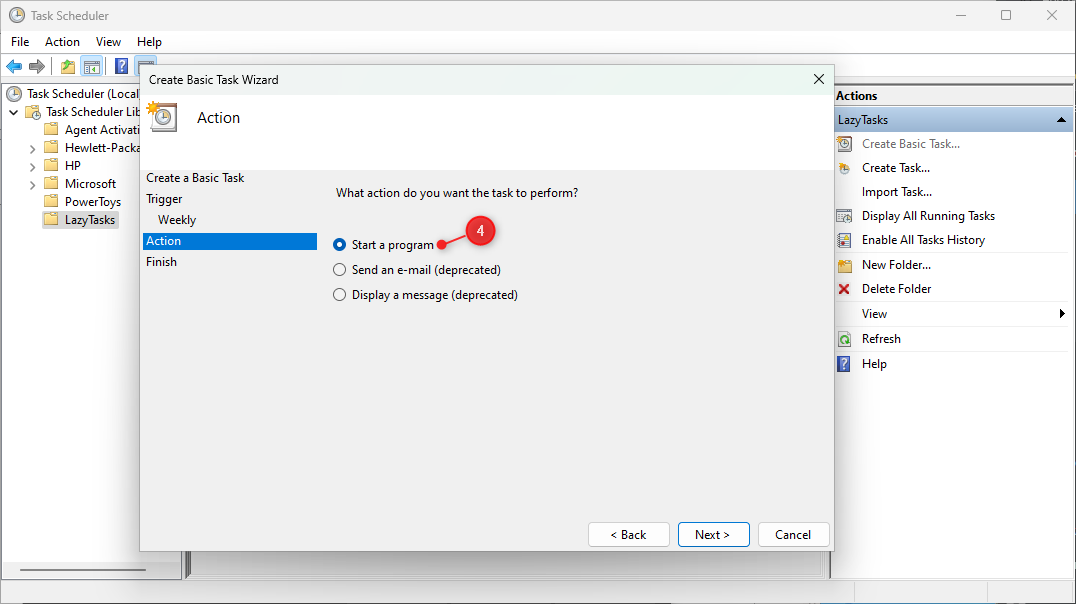
- Set the Action
Here comes the important part, for the action, we are going to Start a Program
- Start a Program – PowerShell
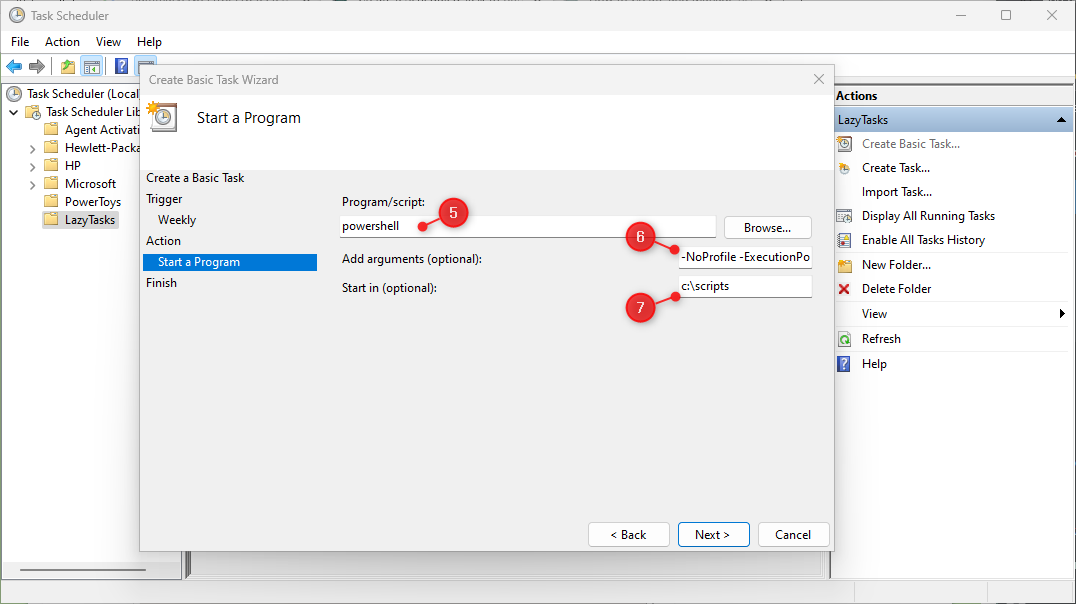
The program that we want to run is PowerShell. Just enter PowerShell in the Program/Script field (see screenshot in step 6), you don’t need to find the exact path to the executable.
- Add Arguments
In the arguments field, we are going to add the argument
-Fileand path to the PowerShell script. It’s also a good idea to add the PowerShell switch-NoProfileand set the-ExecutionPolicyto ByPass.
If your scripts require any parameters then you can add them after the path (for example the -Output parameter):-NoProfile -ExecutionPolicy Bypass -File "C:\scripts\ADHealth.ps1" -Output "HTML" - Start in
Always set the Start in location to the same path as where your script is located. This way any exports that your script generates will be stored in the same location as your script. Otherwise, the output will be saved in C:\Windows\System32
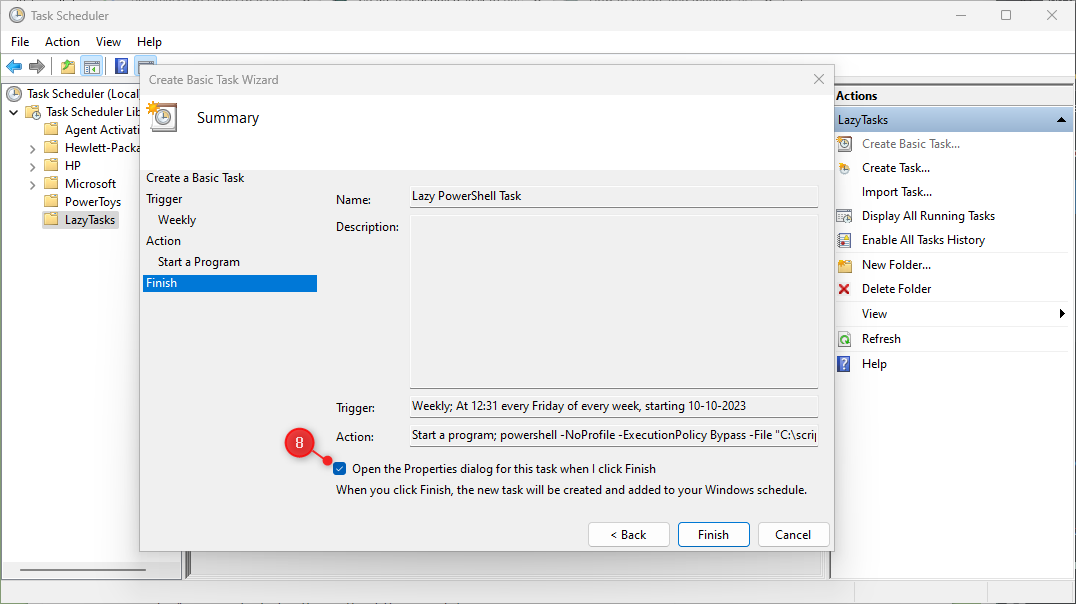
- Finish
Click on Next and review your settings on the finish screen. Make sure that you select Open the properties dialog … so we configure some more settings.
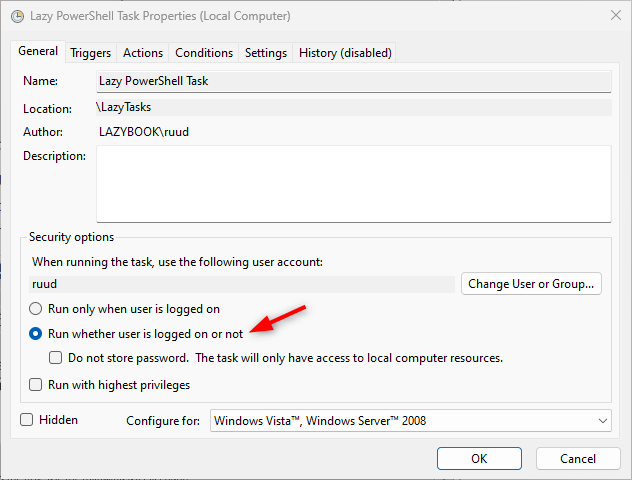
- Advanced Settings
There are two settings that we need to change for our scheduled PowerShell task. We will need to make sure that the script runs even when we are not logged on, which you do on the General tab.
And we want to make sure that the script stops if it’s running for more than a day. Change this setting under Settings and set Stop the task if it runs longer than to 1 day or less.
- Save the task
Click Ok and enter your password, so the task can run when you are not logged on. It is always a good idea to test your task, right-click on it, and choose Run to run the task now.

Use PowerShell to Create Scheduled Task
We can of course also use PowerShell to create and manage scheduled tasks. Creating a scheduled task in PowerShell requires a couple of steps. For each step, there is a different cmdlet that we are going to use.
To create the scheduled task we are going to use the following cmdlets:
| Cmdlet | Description |
|---|---|
| New-ScheduledTaskTrigger | Creates a trigger object for a scheduled task |
| New-ScheduledTaskAction | Creates the action for a scheduled task |
| Register-ScheduledTask | Registers a scheduled task |
| Get-ScheduledTask | Show the scheduled tasks |
To create a scheduled task in PowerShell we will need to define the Trigger and Action for the task at least. So to create a simple task that runs every Friday and executes a PowerShell script we can do the following:
$taskTrigger = New-ScheduledTaskTrigger -Weekly -DaysOfWeek Friday -At 3am
$taskAction = New-ScheduledTaskAction -Execute "PowerShell" -Argument "-NoProfile -ExecutionPolicy Bypass -File 'C:\scripts\ADHealth.ps1' -Output 'HTML'" -WorkingDirectory 'c:\scripts'

Register-ScheduledTask 'Lazy PS Tasks' -Action $taskAction -Trigger $taskTrigger
This will create the exact same task that we have created with the task scheduler. But let’s explain each of the cmdlets to see what options we have.
Creating the Trigger – New-ScheduledTaskTrigger
The first step is to define the trigger. This determines when we want to run the task. Just like with the task scheduler, we can define multiple triggers for our task.
The New-ScheduledTaskTrigger cmdlet comes with a couple of parameters that allow you to define when you want to task to run:
- AtLogOn – Runs the task when a user logs on
- AtStartup – When the system is started
- At – Used with Once, Daily, or Weekly. Defines the specific time to run the task
- Daily – Runs every day. Define the days with DaysOfWeek
- DaysInterval – Run every x days
- DaysOfWeek – This can be used with Daily or Weekly. Defines which days to run the task
- Weekly – Runs the tasks every week
- WeeklyInterval – Determines the interval between the weeks.
So to run the task every week on Tuesday and Thursday at 08:30 AM we can create the following trigger:
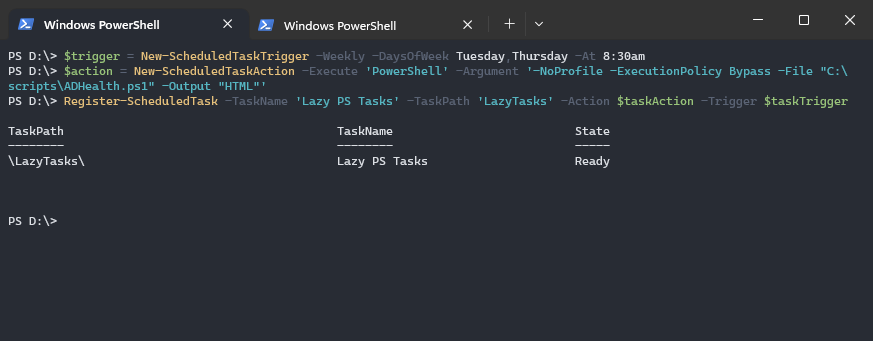
$trigger = New-ScheduledTaskTrigger -Weekly -DaysOfWeek Tuesday,Thursday -At 8:30am
Defining the Action – New-ScheduledTaskAction
To create the scheduled task action in PowerShell we will need to define which program we want it to run, any arguments (the path to the PowerShell scripts for example), and optionally the working directory.
So to run our PowerShell script we will set the -Execute parameter to PowerShell and define the file path and other parameters in the -Argument parameter. If your scripts require it, you can set the –WorkingDirectory parameter to the path of your script
$action = New-ScheduledTaskAction -Execute 'PowerShell' -Argument '-NoProfile -ExecutionPolicy Bypass -File "C:\scripts\ADHealth.ps1" -Output "HTML"'
Creating the Task – Register-ScheduledTask
With the trigger and action defined, we can create and register the scheduled task. We will need to give our task a name and I recommend adding a TaskPath (folder) as well. This will make it easier to retrieve your tasks later on.
Register-ScheduledTask -TaskName 'Lazy PS Tasks' -TaskPath 'LazyTasks' -Action $taskAction -Trigger $taskTrigger
As mentioned you can define multiple triggers and actions for your task. To do this you will need to add the trigger or actions in an array. For example, to run the task every Tuesday and Thursday and on the first day of the month we can do:
# Define the triggers for Tuesday and Thursday at 08:30 AM and when a user logs on
$taskTriggers = @(
    New-ScheduledTaskTrigger -Weekly -DaysOfWeek Tuesday,Thursday -At 08:30,
    New-ScheduledTaskTrigger -AtLogon
)

Register-ScheduledTask -TaskName 'Lazy PS Tasks' -TaskPath 'LazyTasks' -Action $taskAction -Trigger $taskTriggers
Running the Task with Different Privileges
When we created the PowerShell task with the Task Scheduled, we enabled to option to run the task whether a user is logged on or not. For this, we also needed to supply the username and password to run the task. Also, we will need to set the parameter -RunLevel of the task to highest:
Register-ScheduledTask -TaskName "Lazy PowerShell Tasks" -taskPath 'LazyTasks' -Action $taskAction -Trigger $taskTrigger -User "lazyadmin\Administrator" -Password 'yourPass123' -RunLevel Highest
View the Scheduled Task
You can view your created tasks in the task scheduler. But you can also retrieve the scheduled task with PowerShell. For this, we will need to use the cmdlet Get-ScheduledTask. If you run the cmdlet without any parameters, then it will retrieve all scheduled tasks on your computer.
And as you can see, that is quite a lot. That’s why it’s important to organize your tasks in folders by using the taskPath parameter. This way you can use the TaskPath parameter to view only our tasks:
Get-ScheduledTask -TaskPath \LazyTasks\
The task path always starts and ends with a backslash \. To view your tasks you will need to supply the TaskName. If the name is unique, then the name alone will be enough. Otherwise, you will need to supply the path as well:
Get-ScheduledTask -TaskName 'Lazy PS Tasks' -TaskPath \LazyTasks\ | Select *
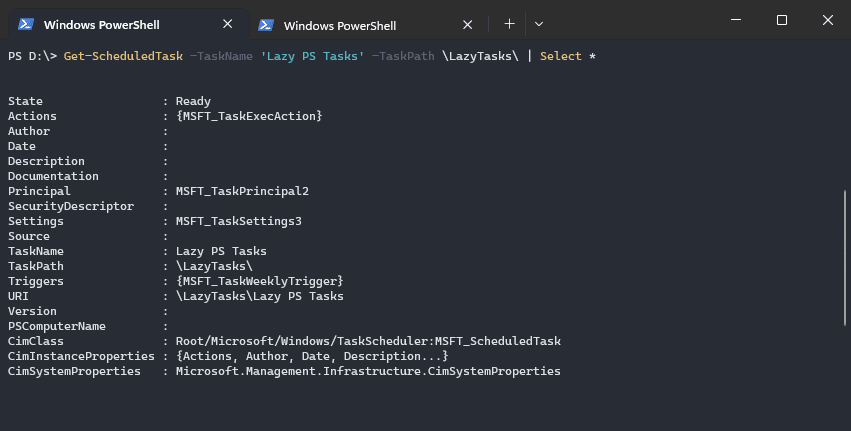
As you can see in the screenshot above, we can’t see all the details of the task. To view the Actions or Triggers we will need to expand the properties. We can do this by using the ExpandProperty method or by saving the results in a variable:
Get-ScheduledTask -TaskName 'Lazy PS Tasks' -TaskPath \LazyTasks\ | Select -ExpandProperty Triggers

# Or
$task = Get-ScheduledTask -TaskName 'Lazy PS Tasks' -TaskPath \LazyTasks\
$task.Triggers
Updating Tasks
To update scheduled tasks with PowerShell you can use the Set-ScheduledTask cmdlet. It works similar to the Register-ScheduledTask cmdlet. Just create a new trigger or action first and then add it just like when you would create it.
# Define new trigger
$newTrigger= New-ScheduledTaskTrigger -Weekly -DaysOfWeek Monday -At 08:30

# Update the task
Set-ScheduledTask -TaskName "Lazy PowerShell Tasks" -taskPath 'LazyTasks'-Trigger $newTrigger
Wrapping Up
Scheduling PowerShell Tasks can be done with both Task Scheduler and in PowerShell with the Register-ScheduledTask cmdlet. Personally, I find it easier to create the task using PowerShell, but to modify it, I find the task scheduler more convenient.
Nevertheless, you can use both options to schedule your PowerShell scripts. I hope you found this article helpful, if you have any questions, just drop a comment below.


Love your content! Having an issue with our Server 2016 tasks. I created a new PS1 file that emails my team the disk storage information of a mapped drive. The ps1 file runs fine through PowerShell and also runs through the cmd prompt. The minute I assign it to the task scheduler to run daily, it fails with no errors. Log files report that the task has been run successfully, but we dont get email notifications about the disk. It only works when someone is logged on to the server….
Mapped drives are only available in the user profile, so when somebody is logged in. You can try to first map the drive with PS Drive in your script, and then check the storage space.
can you change the task´s name with powershell? The only workaround i found is to export the task an then import it,
Have you tried
A great guide. Sincere thanks.
The one wrinkle I ran into is that in the Scheduled Tasks UI on the Server 2012 R2 machine I was working on this weekend, Start In does not allow double quotes.
Thanks for articles like this that cover functionality useful to those of us not in the system administrator universe. I’ve been programming for decades and only discovered PowerShell w/in the last year and continue to be blown away by the power it has – not to mention it’s free, and kept updated automatically.
Thanks again for taking the time to compose these informative, useful and clearly written articles.